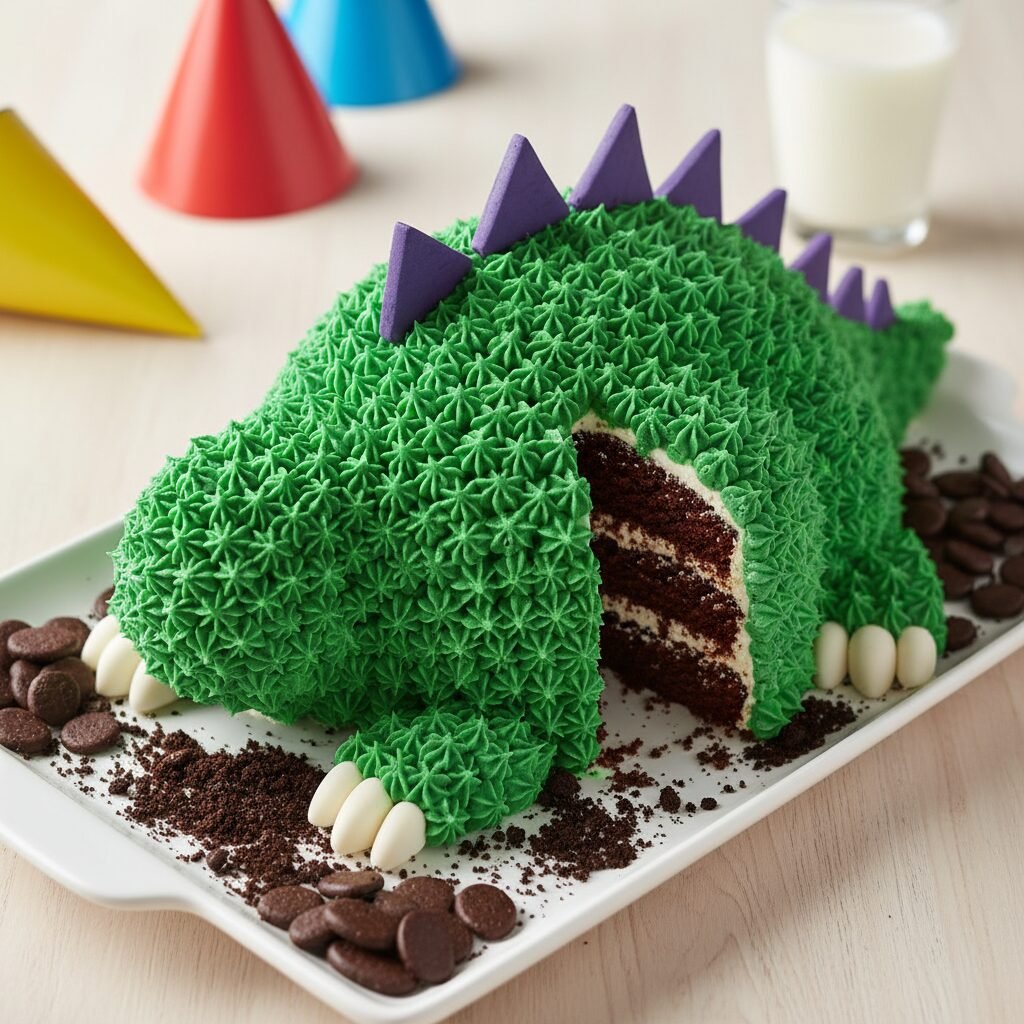
The Ultimate Chocolate Dinosaur Birthday Cake: Easy 8-Inch Round Recipe
Fun Chocolate Dinosaur Birthday Cake For 8 Inch Round Pans Recipe
Make your little paleontologist roar with delight! This rich, fudgy chocolate cake transforms into a prehistoric masterpiece using simple 8-inch round pans and clever cutting techniques—no fancy molds required. It is the perfect centerpiece for a Jurassic-themed party.
45 minutes
35 minutes
2 hours 30 minutes
12-14 servings
Dessert
Baking
American
Vegetarian
There is something universally magical about dinosaurs that captures the imagination of children and adults alike. Whether it is the towering T-Rex or the gentle Brontosaurus, these prehistoric giants are a perennial favorite for birthday themes. But let’s be honest: custom bakery cakes can cost a fortune, and specialty shaped cake pans often end up gathering dust in the back of the pantry after a single use. That is why this Fun Chocolate Dinosaur Birthday Cake is a total game-changer for home bakers. By using standard 8-inch round cake pans—staples in almost every kitchen—you can construct a whimsical, professional-looking dinosaur without needing an engineering degree or expensive equipment.
At the heart of this creation is a deeply chocolatey, moist cake base that is sturdy enough to withstand carving and frosting yet tender enough to melt in your mouth. We pair it with a silky, vibrant vanilla buttercream that can be dyed any color your birthday child desires. The beauty of this recipe lies in its versatility; with just a few strategic cuts, two simple circles of cake evolve into a roaring reptile. This guide will walk you through every step, from baking the perfect crumb to the final piping of ‘scales,’ ensuring your creation is Pinterest-ready and tasted delicious. Get ready to be the hero of the birthday party with a dessert that looks impressive but is secretly incredibly easy to assemble.
History & Origins
The tradition of the birthday cake dates back to the 18th century, originally derived from the German ‘Kinderfest,’ a celebration for children. However, the concept of the ‘cut-up cake’—where round or square cakes are cut and reassembled into novelty shapes—saw a massive boom in the mid-20th century. In the 1950s and 60s, as suburban culture in America and the UK flourished, home baking became a symbol of domestic love and creativity. Magazines and cookbooks began publishing diagrams showing how to turn a simple 9×13 or round cake into everything from butterflies to rocket ships.
The dinosaur motif, specifically, surged in popularity during the late 80s and early 90s, largely fueled by the release of ‘The Land Before Time’ and subsequently the ‘Jurassic Park’ franchise. Suddenly, every child wanted a prehistoric party. The classic ‘Australian Women’s Weekly Children’s Birthday Cake Book,’ a bible for parents in the 80s, featured an iconic dinosaur cake that inspired a generation of home bakers. This recipe pays homage to those nostalgic, cut-up cake traditions. It moves away from the hyper-realistic, fondant-heavy sculptures seen on modern TV competitions and returns to the charming, delicious, and accessible style of buttercream-covered cakes that actually taste as good as they look. It represents a return to homemade warmth, where the effort put into the cutting and frosting is a direct expression of love.
Why This Recipe Works
This recipe succeeds where others fail because it prioritizes both structural integrity and flavor. Often, novelty cakes are dry because a denser crumb is required to hold a complex shape. However, this recipe uses a reverse-creaming method modified with oil and buttermilk. The oil ensures the cake stays moist for days, while the buttermilk breaks down the gluten just enough to make it tender without becoming crumbly. This balance is crucial when you are cutting the cake into shapes like the tail and head; a crumbly cake would fall apart under the knife, but this sponge holds a clean edge.
Furthermore, the assembly method is geometrically optimized for 8-inch pans to minimize waste. Many dinosaur cake tutorials require you to bake a large sheet cake and cut away (and waste) 30% of it. Our method utilizes nearly 100% of the two round cakes, rearranging the arcs and curves of the circles to naturally mimic the spine and neck of a dinosaur. Finally, the buttercream recipe is designed to crust slightly. This is essential for piping ‘scales’ or stars, as it holds its shape perfectly in room temperature conditions, ensuring your dinosaur doesn’t melt before the candles are blown out.
Why You’ll Love This Recipe
- ✓Uses standard 8-inch round pans—no specialty molds needed.
- ✓Zero-waste cutting guide utilizes the entire cake.
- ✓Sturdy chocolate crumb that is easy to carve but moist to eat.
- ✓Highly customizable colors for any party theme.
- ✓Step-by-step assembly makes you look like a pro baker.
- ✓Kid-friendly flavor profile that pleases picky eaters.
Equipment You’ll Need
- ✓Two 8-inch round cake pans
- ✓Stand mixer or electric hand mixer
- ✓Large serrated knife
- ✓Offset spatula
- ✓Large rectangular cake board (at least 13×19 inches)
- ✓Piping bags
- ✓Star piping tip (e.g., Wilton 1M or 21)
- ✓Parchment paper
- ✓Cooling racks
Ingredients
- ✓2 cups all-purpose flour
- ✓2 cups granulated sugar
- ✓3/4 cup unsweetened cocoa powder
- ✓2 tsp baking powder
- ✓1.5 tsp baking soda
- ✓1 tsp salt
- ✓1 cup buttermilk, room temperature
- ✓1/2 cup vegetable oil
- ✓2 large eggs, room temperature
- ✓2 tsp vanilla extract
- ✓1 cup boiling hot coffee (enhances chocolate flavor)
- ✓1.5 cups unsalted butter, softened (for frosting)
- ✓5-6 cups powdered sugar (for frosting)
- ✓1/4 cup heavy cream (for frosting)
- ✓Gel food coloring (Green, Purple, or Blue)
- ✓White fondant or marshmallows (for eyes/claws)
- ✓Chocolate chips or candy rocks (for decoration)
Instructions
- Preheat your oven to 350°F (175°C). Grease two 8-inch round cake pans and line the bottoms with parchment paper.
- In the bowl of a stand mixer, whisk together flour, sugar, cocoa, baking powder, baking soda, and salt.
- Add buttermilk, vegetable oil, eggs, and vanilla extract. Beat on medium speed for about 2 minutes until well combined.
- Reduce speed to low and carefully pour in the boiling hot coffee. The batter will be very thin and liquid; this is normal.
- Divide batter evenly between the two prepared pans. Bake for 30-35 minutes, or until a toothpick inserted into the center comes out clean.
- Cool in pans for 10 minutes, then turn out onto wire racks to cool completely. Chill the cakes in the fridge for 1 hour to make carving easier.
- The Cut: Take the first round cake. Cut it exactly in half to create two semi-circles. Sandwich them together with a layer of frosting to create the main body hump (standing up) OR lay one semi-circle flat for a 2D dino body.
- Take the second round cake. Cut a crescent moon shape from one side (this will be the tail). Use the remaining center piece to carve a head/neck shape and rectangular legs.
- Assembly: On your large cake board, arrange the pieces. Place the body (the halved cake) in the center. Attach the head piece to the top left and the tail piece to the bottom right using frosting as glue. Position legs underneath.
- Frosting: Whip the butter until pale. Gradually add powdered sugar and cream/vanilla until fluffy. Tint with your chosen gel food coloring.
- Apply a thin ‘crumb coat’ of frosting over the entire dinosaur to seal in crumbs. Chill for 20 minutes.
- Fill a piping bag fitted with a star tip. Pipe stars all over the cake to create a textured, scale-like appearance.
- Use fondant or candies to create eyes, toes, and spikes down the back. Arrange candy rocks around the base for effect.
Expert Cooking Tips
- ✓Chill Before Carving: Never try to cut a warm cake. Freezing the layers for 30 minutes makes the crumb tight and easy to cut without tearing.
- ✓Hot Coffee is Key: Don’t skip the hot coffee. You won’t taste the coffee, but it blooms the cocoa powder, resulting in a much richer chocolate flavor.
- ✓Gel Colors: Use gel paste food coloring rather than liquid drops. Liquid drops can water down your frosting and ruin the piping consistency.
- ✓Sketch it First: Before cutting your actual cake, draw an 8-inch circle on paper and practice your cutting lines to ensure you understand the shapes.
- ✓Crumb Coat: The crumb coat is essential. Without it, brown cake crumbs will mix with your green or blue frosting, ruining the clean look.
- ✓Room Temp Ingredients: Ensure butter, eggs, and buttermilk are at room temperature to prevent the batter from curdling.
Substitutions and Variations
This recipe is quite resilient and allows for several dietary adjustments. For a **Gluten-Free** version, swap the all-purpose flour for a high-quality 1:1 gluten-free baking flour blend (one that contains xanthan gum). The texture will remain largely the same. If you need to be **Dairy-Free**, replace the buttermilk with almond milk mixed with a tablespoon of vinegar (let it sit for 5 minutes to curdle), use oil instead of butter in the cake (which is already included), and use plant-based butter sticks and coconut cream for the frosting. For **Egg-Free** baking, a commercial egg replacer or 1/2 cup of unsweetened applesauce works well in this chocolate recipe, though the cake may be slightly denser. If you want to avoid **Caffeine**, simply use boiling water or decaf coffee instead of regular coffee; the liquid heat is what matters for the cocoa bloom.
Common Mistakes to Avoid
The most frequent mistake with this cake is **over-baking**. Because chocolate cake is dark, you can’t see it browning. Rely on the toothpick test; if you bake it until it looks dry, it will be tough. Another common issue is **weak frosting**. If your kitchen is hot, the buttercream may melt or slide off the curved edges of the dinosaur. If the frosting feels too soft, put the bowl in the fridge for 10 minutes before piping. Finally, **poor board planning** is a classic error. This cake ends up being wider than you think once assembled. Always measure your layout on the counter before committing to the final cake board to ensure the tail or head doesn’t hang off the edge.
Serving Suggestions
This cake is a showstopper, so present it with flair! Serve it on a board decorated with ‘edible dirt’ made from crushed Oreos and chocolate rocks. For a party, it pairs beautifully with ‘Swamp Water’ punch (lemon-lime soda with lime sherbet) and vanilla bean ice cream to cut through the rich chocolate. If you are serving adults as well, a side of fresh raspberries or a raspberry coulis adds a sophisticated tartness that complements the sweet buttercream. You can also create a ‘prehistoric landscape’ on the serving table using large tropical leaves (real or paper) as placemats.
Storage and Reheating Tips
Once frosted, the buttercream acts as a seal, keeping the cake moist. It can stay at cool room temperature for up to 2 days. If you are making it in advance or if the weather is hot, store it in the refrigerator for up to 5 days; however, let it come to room temperature for an hour before serving for the best flavor and texture. If you have leftovers, press a piece of plastic wrap directly against the cut section of the cake to prevent drying. Individual slices can be frozen in airtight containers for up to 3 months. Thaw frozen slices on the counter for 30 minutes before eating.
Nutrition Facts (Estimated)
| Serving Size | 1 slice |
| Calories | 480 |
| Fat | 24g |
| Saturated Fat | 10g |
| Unsaturated Fat | 12g |
| Trans Fat | 0g |
| Cholesterol | 65mg |
| Sodium | 310mg |
| Carbohydrates | 62g |
| Fiber | 3g |
| Sugar | 35g |
| Protein | 6g |
Frequently Asked Questions
Can I use 9-inch pans instead of 8-inch?
Yes, you can. The layers will be slightly thinner and will bake faster (check them at 25 minutes). You will end up with a larger, flatter dinosaur.
Can I make the cake layers ahead of time?
Absolutely. Bake the rounds, let them cool completely, wrap them tightly in double layers of plastic wrap, and freeze for up to a month. Thaw slightly before carving.
I don’t have a piping bag. Can I still decorate it?
Yes! You can use a spatula to slather the frosting on and use the back of a spoon to create swirls that look like rough skin. It gives a rustic, textured look.
How do I transport this cake?
Because of its irregular shape, standard cake boxes won’t fit. Use a large moving box cut down to size, or transport it in the trunk of a car on a non-slip mat on a large flat baking sheet.
Is the coffee flavor strong?
No. The coffee enhances the chocolate, making it taste more like chocolate. It does not impart a mocha flavor.
Can I use store-bought frosting?
You can, but you will need about 3-4 tubs. Whip the store-bought frosting with a little extra powdered sugar to stiffen it up for piping, as it tends to be too soft.
What if my cake breaks while cutting?
Don’t panic! Buttercream is edible glue. simply stick the pieces back together with frosting and cover the crack. No one will know once it’s decorated.
Can I make this a vanilla cake?
Yes, simply swap the chocolate cake batter for your favorite sturdy vanilla or yellow cake recipe. The cutting and assembly instructions remain exactly the same.
Conclusion
Creating a Fun Chocolate Dinosaur Birthday Cake doesn’t require professional skills, just a little bit of patience and creativity. This recipe transforms humble ingredients into a memory that your child will cherish for years to come. The look of wonder on their face when they see a dinosaur made of cake—and the silence that falls when everyone takes their first delicious bite—is worth every minute of prep time. So grab your 8-inch pans, preheat that oven, and get ready to bring the Jurassic era to your kitchen table. Don’t forget to snap a photo before the herd devours it!