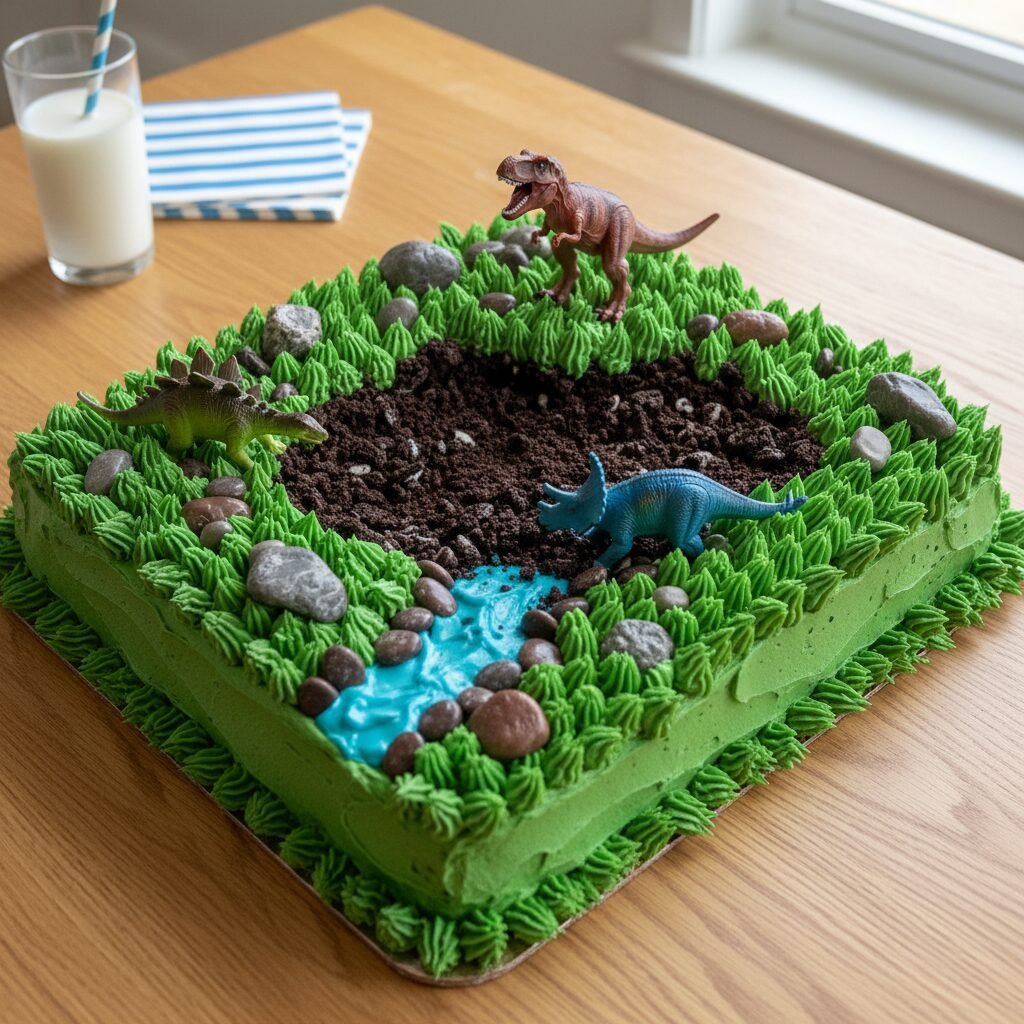
The Ultimate Chocolate Dinosaur Excavation Cake (9×13 Sheet Pan)
Fun Chocolate Dinosaur Birthday Cake For 9×13 Pan Recipe
Transform a simple 9×13 chocolate sheet cake into a prehistoric masterpiece with this fun, easy-to-follow dinosaur excavation recipe. Featuring a moist, fudgy devil’s food base and a creative ‘dino dig’ decoration style using crushed cookies and chocolate rocks, this cake is guaranteed to be the roar of the party without requiring professional decorating skills.
45 minutes
35 minutes
2 hours 30 minutes (includes cooling)
15-18 servings
Dessert
Baking
American
Vegetarian
There is something undeniably magical about a childhood birthday party, and the centerpiece of that magic is almost always the cake. For parents, however, the pressure to produce a confectionery masterpiece that rivals the glossy images on social media can be overwhelming. Enter the Dinosaur Excavation Cake—a brilliant solution that combines the ease of a standard 9×13 sheet cake with the high-impact visual appeal of a professional bakery creation. This isn’t just a cake; it is an edible landscape, a prehistoric terrain of chocolate crumble ‘dirt,’ lush buttercream ‘grass,’ and candy ‘boulders’ that invites children to explore before they devour. The base is a deeply rich, fiercely moist chocolate cake that relies on the classic combination of hot coffee and buttermilk to achieve a texture that is both sturdy enough to hold decorations and tender enough to melt in your mouth. Unlike complex tiered cakes or precarious cut-up shapes that risk falling apart, this sheet pan method offers a stress-free canvas. You don’t need to be a sculptor to make this work; you just need to be willing to play with your food. The beauty of this recipe lies in its forgiveness—crumbled cake and messy frosting only add to the rugged, adventurous aesthetic of a dinosaur dig site. Whether you are celebrating a budding paleontologist or just a kid who loves T-Rex, this cake delivers on flavor, fun, and nostalgia in equal measure.
History & Origins
The concept of the ‘sheet cake’ or ‘tray bake’ became a staple of American households in the mid-20th century, coinciding with the mass production of standard 9×13 metal baking pans. Before this, cakes were primarily round layers, requiring more skill to stack and frost. The 9×13 pan democratized baking, allowing home cooks to feed a crowd at church potlucks, school functions, and backyard birthdays with a single vessel. Simultaneously, the fascination with dinosaurs has been a recurring theme in American pop culture, spiking significantly in the late 1980s and early 1990s with the release of ‘The Land Before Time’ and subsequently ‘Jurassic Park.’ This cultural obsession migrated into the kitchen, where creative mothers began crafting ‘cut-up cakes’—rearranging shapes to look like animals. However, the ‘Dino Dig’ or ‘Prehistoric Landscape’ style of cake emerged later as a more modern, sensory-focused trend. It moved away from the abstraction of cut-up sponges and towards realism, utilizing the growing availability of novelty candies like chocolate rocks and the ubiquity of chocolate sandwich cookies to mimic soil. This specific recipe honors that evolution, blending the mid-century convenience of the sheet cake with the modern, textured aesthetic of a themed dessert table.
Why This Recipe Works
This recipe succeeds where many novelty cakes fail because it prioritizes the eating experience alongside the visual presentation. First, the cake base itself is scientifically formulated for moisture. The use of oil instead of butter in the batter ensures the cake stays soft even when refrigerated, which is often necessary for detailed decorating. The addition of hot coffee blooms the cocoa powder, intensifying the chocolate flavor without making the cake taste like espresso. Structurally, the 9×13 format provides a stable, broad surface area that acts as a literal landscape for your dinosaur scene. There is no worrying about layers sliding or dowels failing. The decoration method—using crushed Oreos for dirt and green buttercream for grass—is incredibly forgiving. If you make a mistake with the spatula, you can simply cover it with ‘dirt’ or a plastic dinosaur toy. This approach removes the anxiety of smooth frosting, which is the hardest skill for home bakers to master. Furthermore, the ratio of frosting to cake in a sheet pan is ideal for kids, providing a sweet bite without the overwhelming heaviness of a fondant-covered multi-tier cake.
Why You’ll Love This Recipe
- ✓No special shaped pans required—uses a standard 9×13 inch pan.
- ✓Forgiving decoration style hides any frosting imperfections.
- ✓Deeply chocolatey, moist cake base that stays fresh for days.
- ✓Highly customizable with different dinosaur toys and candies.
- ✓Perfect for beginners or parents short on time.
- ✓Feeds a large crowd easily with simple slicing.
Equipment You’ll Need
- ✓9×13 inch metal baking pan
- ✓Large mixing bowl
- ✓Whisk
- ✓Electric hand mixer or stand mixer
- ✓Rubber spatula
- ✓Offset spatula for frosting
- ✓Piping bag with grass tip (optional)
- ✓Wire cooling rack
Ingredients
- ✓2 cups all-purpose flour
- ✓2 cups granulated sugar
- ✓3/4 cup unsweetened cocoa powder (Dutch-process preferred)
- ✓2 teaspoons baking powder
- ✓1 1/2 teaspoons baking soda
- ✓1 teaspoon salt
- ✓1 cup whole milk or buttermilk
- ✓1/2 cup vegetable oil or canola oil
- ✓2 large eggs, room temperature
- ✓2 teaspoons vanilla extract
- ✓1 cup boiling hot coffee (or boiling water)
- ✓1 cup unsalted butter, softened (for frosting)
- ✓3-4 cups powdered sugar (for frosting)
- ✓1/4 cup heavy cream (for frosting)
- ✓Green gel food coloring
- ✓1 package chocolate sandwich cookies (like Oreos), crushed
- ✓1/2 cup chocolate rocks or pebble candy
- ✓Clean, new plastic dinosaur toys for decoration
Instructions
- 1. Preheat your oven to 350°F (175°C). Grease a 9×13 inch baking pan liberally with butter or cooking spray and dust with flour or cocoa powder to prevent sticking.
- 2. In a large mixing bowl or the bowl of a stand mixer, whisk together the flour, sugar, cocoa powder, baking powder, baking soda, and salt until well combined and no lumps remain.
- 3. Add the milk (or buttermilk), vegetable oil, eggs, and vanilla extract to the dry ingredients. Mix on medium speed until well combined. Reduce speed to low and carefully pour in the boiling hot coffee. Beat on high speed for about 1 minute to add air to the batter. The batter will be very thin and liquid; this is normal.
- 4. Pour the batter into the prepared baking pan. Bake for 30-35 minutes, or until a wooden toothpick inserted into the center comes out clean or with just a few moist crumbs attached.
- 5. Remove the cake from the oven and let it cool completely in the pan on a wire rack. Do not attempt to frost until the cake is fully cool to the touch, usually about 90 minutes.
- 6. While the cake cools, prepare the buttercream. Beat the softened butter in a large bowl until creamy. Gradually add powdered sugar and cocoa powder (if making chocolate frosting) or just sugar (for vanilla). Add heavy cream and vanilla extract. Beat on high for 3 minutes until fluffy.
- 7. To create the landscape: Tint about 2/3 of your frosting green. Leave the rest chocolate or white depending on your design. Frost the entire cake with a thin ‘crumb coat’ if desired, or just go straight for the decorative layer.
- 8. Create the ‘Excavation Site’: Use a spoon to scoop out a shallow trench or hole in one corner of the cake (eat the scraps!). Frost the inside of the hole with chocolate frosting.
- 9. Fill the hole and scatter areas of the cake with crushed chocolate cookies to resemble dirt. Use the green frosting to pipe grass or swirl it to look like vegetation around the dirt patches.
- 10. Place the chocolate rock candies strategically to look like boulders. Arrange the plastic dinosaurs on the cake, placing some inside the ‘dig site’ and others roaming the grassy areas. Serve immediately or store at room temperature.
Expert Cooking Tips
- ✓Ensure your baking powder and baking soda are fresh; expired leaveners are the number one cause of flat cakes.
- ✓Do not skip the boiling water/coffee step; the heat blooms the cocoa powder, releasing a more intense chocolate flavor.
- ✓If using plastic dinosaurs, wash them thoroughly with soap and water before placing them on the cake.
- ✓For ultra-realistic ‘dirt’, remove the cream filling from the Oreos before crushing them.
- ✓If you don’t have a piping bag for the grass, you can poke holes in a Ziploc bag or use a fork to fluff up the green frosting for texture.
- ✓Room temperature eggs incorporate better into the batter, creating a more uniform crumb structure.
Substitutions and Variations
This recipe is quite versatile regarding dietary needs. To make this cake gluten-free, substitute the all-purpose flour with a high-quality 1:1 gluten-free baking flour blend that contains xanthan gum. For a dairy-free version, swap the buttermilk for almond or soy milk mixed with a teaspoon of vinegar, and use a plant-based butter stick for the frosting. If you are avoiding caffeine, boiling water works perfectly fine instead of coffee, though the chocolate flavor may be slightly milder. You can also substitute the vegetable oil with melted coconut oil or even applesauce for a lower-fat option, though applesauce will make the cake denser. For the dye, natural food colorings derived from spinach or matcha powder can be used instead of artificial green gel, giving a more earthy tone to the ‘grass’.
Common Mistakes to Avoid
The most common mistake with this recipe is frosting the cake before it is completely cool. Because this is a sheet cake, it retains heat in the center longer than you might expect. If you apply buttercream to a warm cake, the butter will melt, the decorations will slide, and the ‘dirt’ will turn into a muddy sludge. Another mistake is over-mixing the batter after adding the flour but before adding the hot liquid; this develops gluten and leads to a tough, rubbery cake. Finally, be careful not to over-bake. Start checking the cake at the 30-minute mark. If the edges are pulling away from the pan, it is likely done, even if the center looks slightly soft.
Serving Suggestions
Serve this dinosaur cake right from the pan to maintain the ‘landscape’ effect. It pairs beautifully with cold milk or a scoop of vanilla bean ice cream to cut through the richness of the chocolate. For a birthday party, consider serving ‘dino egg’ grapes or ‘herbivore’ veggie cups alongside the cake to balance the sugar. You can also crumble the scooped-out cake pieces over ice cream for a ‘dino debris’ sundae station.
Storage and Reheating Tips
This cake can be stored at room temperature, covered tightly with plastic wrap or a fitted lid, for up to 3 days. The oil-based batter ensures it stays moist. If you live in a very hot or humid climate, you may want to refrigerate it to prevent the buttercream from melting. If refrigerating, let the slices come to room temperature for about 20 minutes before serving for the best texture. The cake can also be baked and frozen (unfrosted) for up to a month; wrap it in plastic wrap and foil. Thaw in the fridge overnight before decorating.
Nutrition Facts (Estimated)
| Serving Size | 1 slice (1/15th of cake) |
| Calories | 420 |
| Fat | 22g |
| Saturated Fat | 8g |
| Unsaturated Fat | 12g |
| Trans Fat | 0g |
| Cholesterol | 45mg |
| Sodium | 310mg |
| Carbohydrates | 58g |
| Fiber | 3g |
| Sugar | 35g |
| Protein | 5g |
Frequently Asked Questions
Can I use a glass pan instead of metal?
Yes, but glass conducts heat differently. You will likely need to lower the oven temperature to 325°F and bake for an additional 5-10 minutes. Watch the edges to ensure they don’t burn.
Can I make this cake ahead of time?
Absolutely. You can bake the cake one day in advance and keep it covered at room temperature. Decorate it the morning of the party for the freshest look, especially with the cookie crumbs which can soften over time.
How do I get the vibrant green color for the grass?
Use gel food coloring rather than liquid drops. Gel is more concentrated and won’t water down your frosting. ‘Leaf Green’ or ‘Moss Green’ are great shades for a realistic look.
What if I don’t drink coffee?
You won’t taste the coffee in the final product; it simply enhances the chocolate. However, you can substitute it with plain boiling water with no issues.
Can I use a boxed cake mix instead?
Yes, you can use a Devil’s Food box mix. To make it taste homemade, swap the water for milk, double the butter, and add an extra egg. Follow the baking instructions on the box.
How do I make the river look like water?
Use a blue piping gel or tint a small amount of vanilla frosting blue. You can creates waves with a small spoon or offset spatula.
Where can I find chocolate rocks?
Chocolate rocks are usually available in the bulk candy section of grocery stores, at party supply stores, or easily found online. They look exactly like river stones but are made of chocolate.
Is this cake suitable for carving into a dinosaur shape?
Yes, this cake is sturdy enough to be frozen slightly and then carved if you prefer to cut the 9×13 rectangle into a specific dinosaur silhouette rather than doing the landscape style.
Conclusion
Creating a memorable birthday cake doesn’t require a culinary degree or days of stress. This Chocolate Dinosaur Excavation Cake proves that with a simple 9×13 pan, some creative toppings, and a little imagination, you can transport your party guests back to the Jurassic period. The rich, fudgy flavor ensures that the adults will enjoy it just as much as the kids, while the playful design provides the perfect backdrop for blowing out candles and making wishes. So grab your plastic dinos, crush some cookies, and get ready to make some prehistoric memories right in your own kitchen.