Ultimate Fun Candy Explosion Birthday Cake For 8 Inch Round Pans
Fun Candy Explosion Birthday Cake For 8 Inch Round Pans Recipe
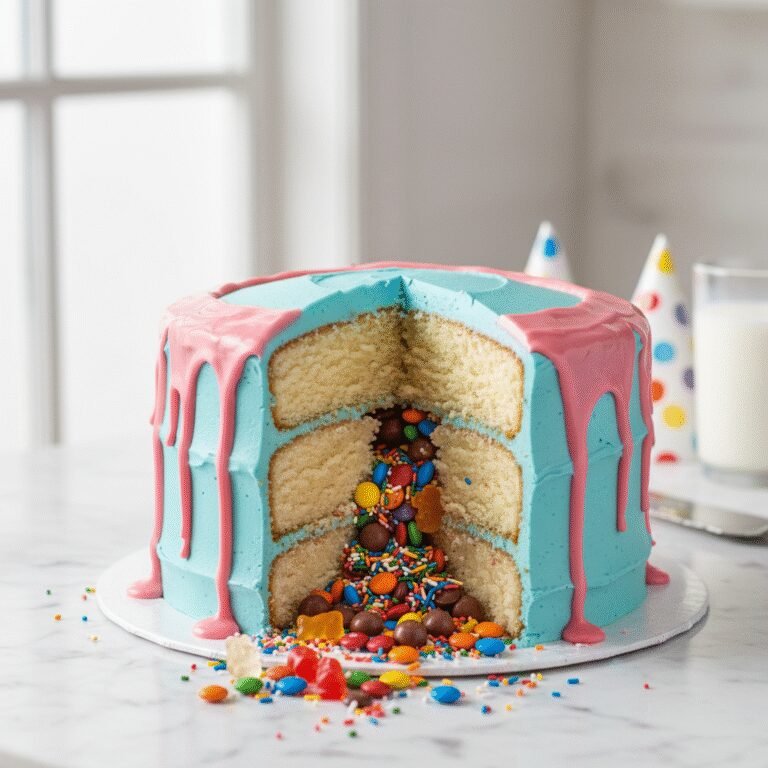
Surprise your guests with this show-stopping Candy Explosion Cake, also known as a Piñata Cake! Hidden inside layers of moist vanilla sponge is a secret avalanche of colorful candies that spills out when you cut the first slice. It is the perfect centerpiece for an unforgettable birthday celebration.
60 minutes
35 minutes
3 hours
12-16 Servings
Dessert
Baking
American
Vegetarian
There is something universally magical about a birthday cake, but when you slice into a cake and a cascade of colorful candies tumbles out, the moment transforms from a simple tradition into an unforgettable event. This Fun Candy Explosion Birthday Cake, often referred to as a Piñata Cake or Surprise-Inside Cake, is designed specifically for 8-inch round pans to maximize the structural integrity while providing a generous cavity for the sweet treasure hidden within. Unlike standard layer cakes, this recipe focuses heavily on the density and crumb of the sponge; it needs to be sturdy enough to support the hollowed-out center without collapsing, yet moist and tender enough to melt in your mouth. The vanilla base is rich and buttery, acting as the perfect neutral canvas for the explosion of sweetness from the chocolate candies, sprinkles, and gummy treats hidden inside. Whether you are baking for a child’s fifth birthday or a fun-loving adult’s thirtieth, the sheer joy on everyone’s faces when the ‘secret’ is revealed makes every minute of preparation worth it. In this comprehensive guide, we will walk you through not just the baking, but the structural engineering required to stack, fill, and decorate this masterpiece so that it looks professional and tastes divine. We are moving beyond basic baking here; we are creating an edible experience that will be the talk of the party and the star of your social media feed. Get ready to create a dessert that is as fun to eat as it is to behold.
History & Origins
The concept of hiding surprises inside food dates back centuries, long before the modern ‘Instagrammable’ food trends took over our feeds. In Medieval Europe, it was not uncommon for banquet hosts to serve ‘animated pies’ containing live birds or frogs that would escape when the crust was cut, a spectacle designed to entertain royalty and nobility. Fortunately, culinary hygiene and animal welfare standards have evolved, and the surprises we hide today are far sweeter. The modern birthday cake itself has roots in Germany’s ‘Kinderfest’ from the 15th century, but the specific ‘Piñata Cake’ trend is a relatively recent phenomenon, gaining massive popularity in the early 2010s alongside the rise of visual-centric social media platforms like Pinterest and Instagram. Bakers began experimenting with hollowing out the centers of stacked cakes to mimic the Mexican piñata tradition, where a container is broken to release candy. The engineering challenge of keeping the cake standing while missing its center led to the development of denser sponge recipes and specific stacking techniques. Over the last decade, this style has evolved from a novelty internet trend into a staple of home baking repertoires, symbolizing the idea that it is what is on the inside that counts—especially if what is on the inside is chocolate. This specific recipe honors that modern tradition, optimizing the classic technique for the standard American 8-inch cake pan found in most kitchens.
Why This Recipe Works
This recipe is meticulously calibrated for success because it addresses the two biggest failures of piñata cakes: structural collapse and dry sponge. Many recipes simply use a standard light chiffon or boxed mix, which lacks the crumb density to hold up once the center is removed. Our recipe utilizes the ‘reverse creaming’ method (mixing fat into dry ingredients first) or a high-ratio butter cake approach, which produces a velvety, flat-topped cake that stacks perfectly without needing excessive leveling. Furthermore, the buttercream ratio is calculated to act as a strong ‘cement’ or mortar. We use a crusting American Buttercream that hardens slightly on the outside but stays soft inside, ensuring the layers do not slide around when the center is filled with heavy candy. The 8-inch size is crucial; a 6-inch cake often becomes too tall and wobbly when stacked four layers high, while a 9-inch or 10-inch cake requires an immense amount of batter and candy to look impressive. The 8-inch round offers the perfect center-of-gravity balance. Additionally, we incorporate sour cream into the batter, which guarantees moisture retention even if the cake sits out for display, ensuring that the ‘wow’ factor of the visual is matched by a delicious eating experience.
Why You’ll Love This Recipe
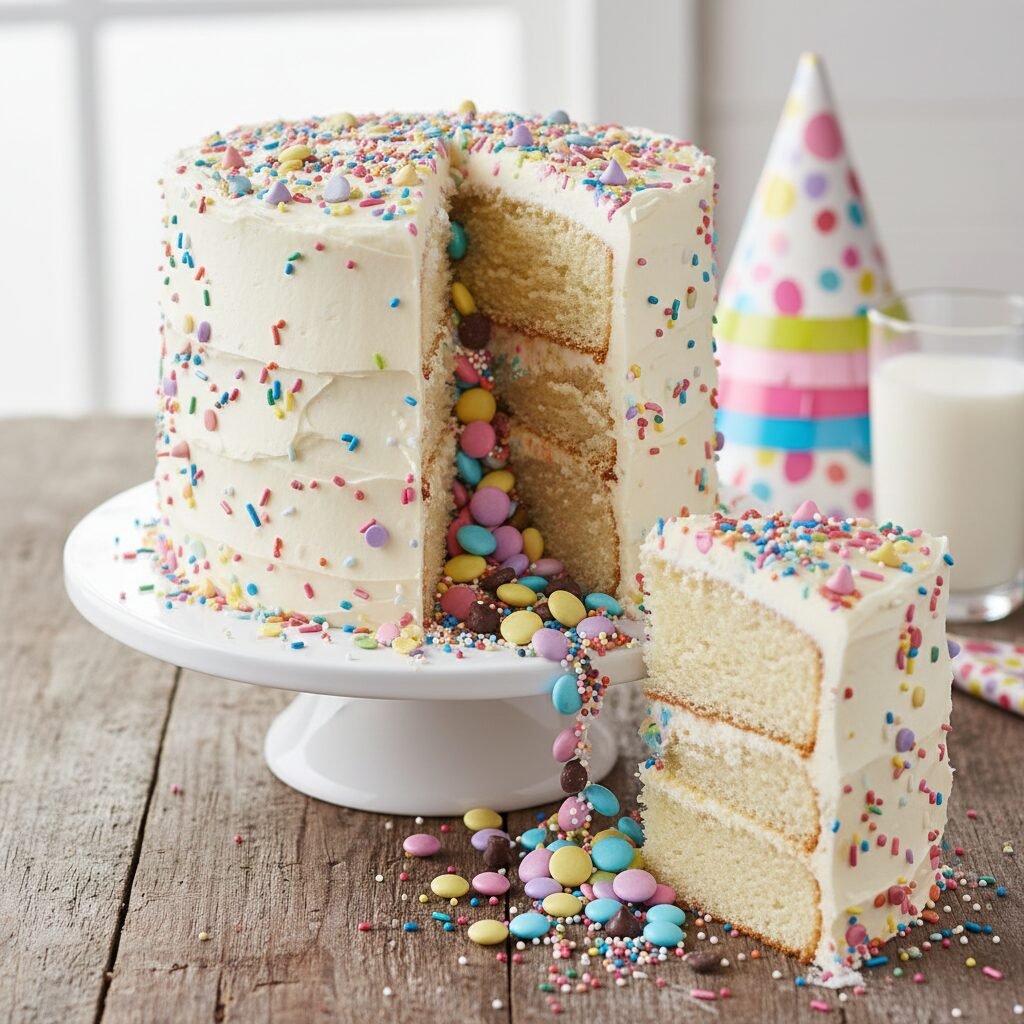
- ✓Creates a dramatic ‘avalanche’ effect when sliced.
- ✓Sturdy vanilla sponge designed specifically for stacking.
- ✓Highly customizable with any small candies or sprinkles.
- ✓Perfect size for standard 8-inch round cake pans.
- ✓Includes a stable buttercream recipe that acts as structural glue.
- ✓Guaranteed to be the highlight of any birthday party.
Equipment You’ll Need
- ✓Four 8-inch round cake pans
- ✓Stand mixer or electric hand mixer
- ✓Large mixing bowls
- ✓3-inch or 4-inch round cookie cutter
- ✓Offset spatula
- ✓Piping bags and tips
- ✓Cake turntable (optional but recommended)
- ✓Serrated bread knife
- ✓Cake board
Ingredients
- ✓3 cups All-purpose flour (spooned and leveled)
- ✓2 ½ tsp Baking powder
- ✓½ tsp Baking soda
- ✓1 tsp Salt
- ✓1 cup Unsalted butter, room temperature
- ✓2 cups Granulated sugar
- ✓4 large Eggs, room temperature
- ✓1 tbsp Pure vanilla extract
- ✓1 cup Sour cream, full fat
- ✓½ cup Whole milk, room temperature
- ✓2 cups Assorted small candies (M&Ms, sprinkles, mini chocolate chips, gummy bears)
- ✓2 cups Unsalted butter (for frosting), softened
- ✓7-8 cups Powdered sugar (confectioners’ sugar)
- ✓¼ cup Heavy cream
- ✓2 tsp Vanilla extract (for frosting)
- ✓Gel food coloring (optional)
Instructions
- 1. Preheat your oven to 350°F (175°C). Grease four 8-inch round cake pans with butter and dust with flour, or line the bottoms with parchment paper for easy release.
- 2. In a medium bowl, whisk together the flour, baking powder, baking soda, and salt. Set aside.
- 3. In the bowl of a stand mixer fitted with the paddle attachment, beat the 1 cup of butter and granulated sugar together on medium-high speed for 3-4 minutes until light and fluffy.
- 4. Add the eggs one at a time, beating well after each addition. Scrape down the sides of the bowl. Stir in the vanilla extract.
- 5. Reduce mixer speed to low. Add the dry ingredients in three parts, alternating with the sour cream and milk, beginning and ending with the dry ingredients. Mix only until just combined to avoid a tough cake.
- 6. Divide the batter evenly among the four prepared pans. Bake for 30-35 minutes, or until a toothpick inserted into the center comes out clean.
- 7. Allow the cakes to cool in the pans for 10 minutes, then transfer them to a wire rack to cool completely. Do not attempt to cut warm cakes.
- 8. Once cool, level off the domed tops of all four cake layers using a serrated knife so they are perfectly flat.
- 9. Take two of the cake layers and use the 3-inch or 4-inch round cutter to remove the exact center of the sponge, creating thick rings. Leave the other two layers whole (one for the bottom, one for the top).
- 10. Prepare the frosting: Beat the 2 cups of butter until creamy. Gradually add powdered sugar, heavy cream, and vanilla. Whip on high for 3-5 minutes until fluffy.
- 11. Assemble the cake: Place one whole layer on your cake board. Spread a layer of frosting on top.
- 12. Place one of the ‘ring’ layers on top. Frost the top of the ring. Stack the second ‘ring’ layer on top of that. You now have a deep well in the center.
- 13. Frost the inside of the well lightly to seal crumbs (optional). Fill the center cavity to the brim with your chosen candy assortment.
- 14. Apply frosting to the top of the second ring layer and place the final whole cake layer on top to seal the candy inside.
- 15. Apply a thin ‘crumb coat’ of frosting over the entire cake and refrigerate for 20 minutes to set.
- 16. Apply the final thick layer of frosting and decorate as desired with sprinkles, swirls, or a drip glaze. Slice and enjoy the explosion!
Expert Cooking Tips
- ✓Ensure all cold ingredients (eggs, milk, sour cream, butter) are at room temperature before mixing to ensure a smooth emulsion.
- ✓Do not overmix the batter once the flour is added; overmixing develops gluten and makes the cake tough.
- ✓Chill the cake layers in the fridge for 30 minutes before carving the holes; cold cake produces fewer crumbs and is easier to handle.
- ✓Use a mixture of small candies; large candies can make slicing difficult, while tiny sprinkles alone might pour out too fast.
- ✓Apply a ‘dam’ of frosting around the edge of the filling layers to prevent the filling from leaking out.
- ✓If you only have two pans, bake in batches, cleaning and re-greasing the pans in between.
- ✓Use a serrated knife and a sawing motion when cutting the final cake to prevent squishing the layers.
Substitutions and Variations
This recipe is quite versatile regarding dietary adjustments, though structural integrity is key. For a gluten-free version, substitute the all-purpose flour with a high-quality 1:1 gluten-free baking flour blend that contains xanthan gum; be aware the crumb may be slightly more fragile. If you need to make this dairy-free, use plant-based butter sticks (not tub margarine) and a full-fat dairy-free milk like oat or soy milk; replace sour cream with a dairy-free yogurt. For the filling, the possibilities are endless. While we suggest M&Ms and sprinkles, you can use chocolate chips, crushed cookies, chopped nuts, or even fresh berries (though berries must be served immediately to prevent sogginess). If you do not have a round cutter, you can trace a circle with a glass and cut it out carefully with a paring knife. For the frosting, a Swiss Meringue Buttercream can be used for a less sweet option, but ensure it is stiff enough to hold the layers.
Common Mistakes to Avoid
The most common mistake with explosion cakes is cutting the hole in the center too wide. If the walls of the cake rings are too thin, the cake will be unstable and may bulge or collapse under the weight of the top layer and frosting. Keep the hole to about 3-4 inches in diameter for an 8-inch cake. Another frequent error is filling the cake with perishable or moisture-heavy items like fruit or jams without creating a proper barrier; this will cause the cake to get soggy from the inside out. Avoid using large, hard candies like jawbreakers, which can be a choking hazard or break a tooth when someone unknowingly bites into a slice. Finally, rushing the cooling process is a recipe for disaster; if the cakes are even slightly warm, the butter in the frosting will melt, causing the layers to slide and the structure to fail.
Serving Suggestions
Serve this cake on a sturdy pedestal cake stand to elevate the presentation. Because the cake is rich and filled with candy, slices should be cut slightly thinner than usual. It pairs beautifully with a cold glass of milk to balance the sweetness or a scoop of vanilla bean ice cream. For a birthday party, wait until everyone is gathering around to make the first cut—the sound of the candy hitting the plate is part of the experience! If you are serving adults, a dark roast coffee or an espresso martini makes a sophisticated contrast to the sugary, nostalgic flavors of the cake.
Storage and Reheating Tips
This cake is best stored at room temperature if you have used standard American Buttercream and non-perishable fillings like hard candy or chocolate. It can be kept in an airtight cake carrier on the counter for up to 3 days. If you live in a very hot or humid climate, or if you used a cream cheese frosting or fruit filling, the cake must be refrigerated. However, refrigeration can dry out the sponge, so ensure any cut edges are covered with plastic wrap or extra frosting. If refrigerating, allow the cake to come to room temperature for at least 1-2 hours before serving to soften the butter and candy. You can freeze the baked, unfilled cake layers wrapped in plastic for up to a month, but do not freeze the fully assembled cake, as the condensation upon thawing will cause the candy dye to bleed into the sponge.
Nutrition Facts (Estimated)
| Serving Size | 1 Slice |
| Calories | 680 |
| Fat | 34g |
| Saturated Fat | 20g |
| Unsaturated Fat | 12g |
| Trans Fat | 0.5g |
| Cholesterol | 95mg |
| Sodium | 320mg |
| Carbohydrates | 88g |
| Fiber | 1g |
| Sugar | 55g |
| Protein | 6g |
Frequently Asked Questions
Can I use a boxed cake mix instead of scratch?
Yes, you can use a boxed mix to save time. However, boxed mixes are often very light and airy. To make them sturdy enough for this structure, add an extra egg and replace the water with milk. You will likely need two boxes to get four full 8-inch layers.
How far in advance can I assemble this cake?
You can bake the layers a day or two in advance. Assembly is best done the day of or the night before serving. If the candy sits inside the cake for more than 24 hours, moisture from the cake might make the candy shells sticky or soft.
What size cutter should I use for the center?
For an 8-inch cake, a 3-inch to 4-inch cutter is ideal. This leaves about 2 to 2.5 inches of cake ring on all sides, which provides enough stability to hold the top layer.
Why did my candy stick together inside the cake?
This usually happens if the cake was stored in the fridge or if the environment is humid. Condensation makes sugar coatings sticky. Try to store the cake at cool room temperature and avoid refrigerating once filled.
Can I make this a 2-layer cake?
It is difficult to make a proper explosion cake with only two layers because you need a bottom, a hole, and a top. You need at least three layers: bottom base, middle with hole, and top lid. Four layers (two middle rings) give the best volume of candy.
Do I need dowels for support?
For a standard 4-layer 8-inch cake using this sturdy recipe, dowels are usually not necessary. However, if you are traveling with the cake or if it will be sitting out in a warm room for a long time, adding 3-4 bubble tea straws or wooden dowels can add peace of mind.
Can I put fresh fruit inside?
Technically yes, but it is risky. Fresh fruit releases moisture which can turn the cake mushy. If you use fruit, ensure it is thoroughly dried and serve the cake immediately after assembly.
How do I slice it without making a mess?
Making a mess is part of the fun! However, use a sharp, warm knife. Cut a large wedge and pull it out slowly. The candy will spill everywhere—have a camera ready!
Conclusion
The Fun Candy Explosion Birthday Cake is more than just a dessert; it is an interactive centerpiece that brings out the inner child in everyone. While it looks like a feat of architectural engineering, breaking it down into simple steps—baking, cutting, stacking, and filling—makes it completely achievable for the home baker. The combination of the buttery vanilla sponge, the creamy sweetness of the frosting, and the satisfying crunch of the hidden candy creates a textural delight that is unmatched by standard cakes. So, for the next birthday on your calendar, skip the bakery order and try your hand at this magical creation. The gasp of surprise when the first slice is pulled away is a gift in itself.