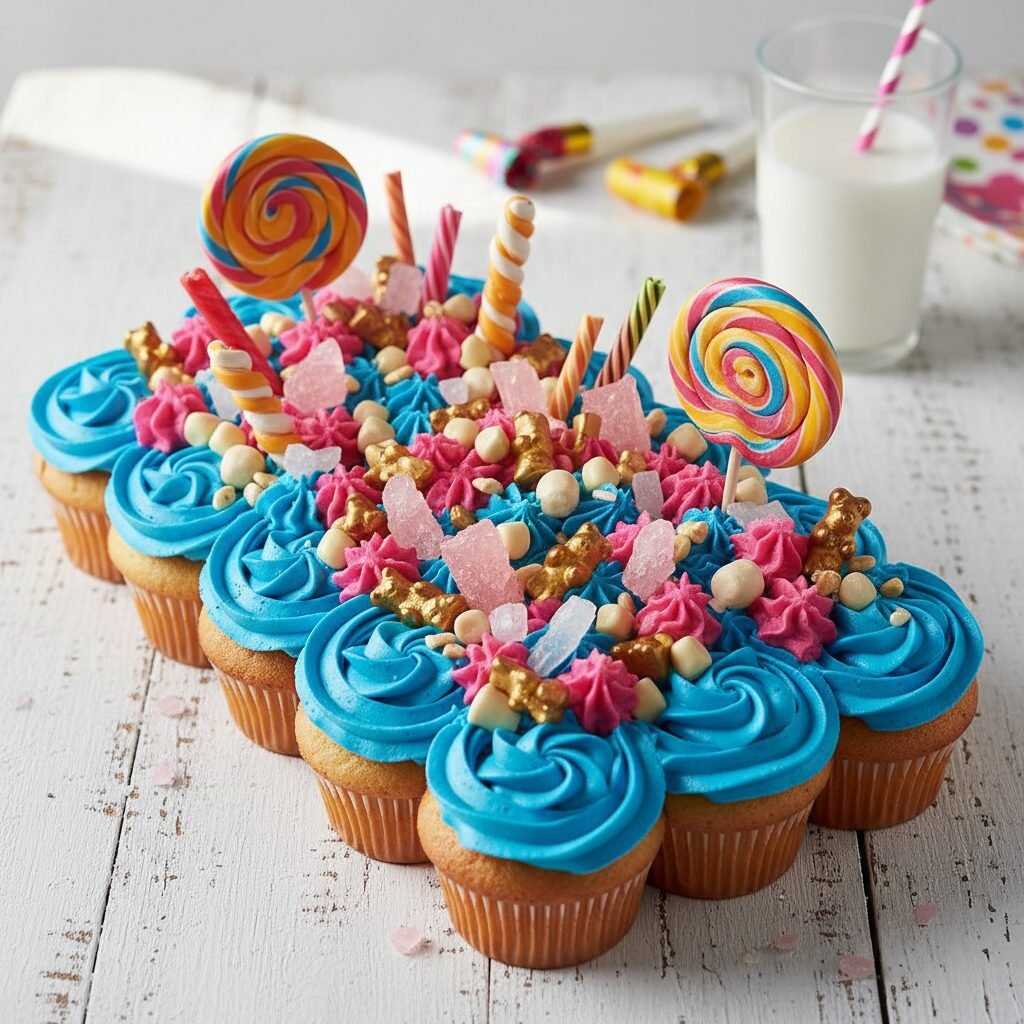
Ultimate Candy Explosion Cupcake Pull-Apart Cake: The Best Birthday Treat
Fun Candy Explosion Birthday Cake For Cupcake Pull Apart Cake Recipe
Ditch the knife and spark joy with this vibrant Candy Explosion Cupcake Pull-Apart Cake! It combines the convenience of grab-and-go cupcakes with the stunning visual appeal of a decorated sheet cake, loaded with a mountain of your favorite sweets.
45 minutes
20 minutes
1 hour 30 minutes
24 Servings
Dessert
Baking
American
Vegetarian
If you have ever hosted a children’s birthday party, you know the specific panic that sets in when it is time to cut the cake. The crumbs fly everywhere, the slices are uneven, and there is always one child crying because their piece has slightly less frosting than their neighbor’s. Enter the genius solution that has taken the baking world and Pinterest boards by storm: the Cupcake Pull-Apart Cake. Specifically, this Fun Candy Explosion edition is designed to be the absolute showstopper of any celebration. Imagine the fluffy, moist texture of a bakery-style vanilla bean cupcake, topped with a cloud of whipped buttercream, and then literally buried under a treasure trove of colorful confectioneries. From gummy bears and chocolate gems to sour worms and crushed candy bars, this cake is a feast for the eyes and the palate.
What makes this recipe truly special is the ‘explosion’ aspect. We aren’t just sprinkling a few nonpareils on top; we are creating a landscape of sugar that mimics a fireworks display. It creates an interactive dessert experience where guests can choose their cupcake based on the specific candies clustered on top. Whether you are a novice baker looking for a forgiving decorating project or a seasoned pro wanting to create a viral-worthy dessert table centerpiece, this recipe delivers on all fronts. The flavor profile balances the rich, buttery vanilla cake with the sharp sweetness of the candy, ensuring that every bite offers a delightful crunch and a soft, tender crumb. Get ready to become the hero of the party with a dessert that is as fun to eat as it is to look at.
History & Origins
The history of the cupcake is surprisingly deeply rooted in American culinary tradition, dating back to 1796 when a recipe for ‘a cake to be baked in small cups’ appeared in Amelia Simmons’ ‘American Cookery’. However, the concept of the pull-apart cupcake cake—often called a ‘cupcake cake’—is a much more modern innovation, gaining significant traction in the early 2000s with the rise of supermarket bakeries and the eventual explosion of food blogging and Pinterest. Bakers realized that by arranging cupcakes close together and frosting them as a single unit, they could achieve the canvas size of a sheet cake without the need for serving utensils. This hybrid dessert solved the logistical nightmare of serving large crowds while maintaining the artistic freedom of a large cake surface.
The ‘Candy Explosion’ or ‘Overload’ aesthetic traces its roots to the ‘Freakshake’ trend of the mid-2010s, which originated in Australia. This trend involved piling milkshakes high with donuts, pretzels, candies, and sauces, defying gravity and caloric caution. This maximalist approach to dessert decoration quickly migrated to cakes. ‘Piñata cakes’ (cakes filled with candy centers) and ‘Drip Cakes’ loaded with chocolate shards and lollipops became the gold standard for birthday extravaganzas. This recipe marries the utilitarian genius of the pull-apart method with the whimsical, chaotic joy of the candy overload trend. It represents a cultural shift in home baking from formal, rigid fondant decorations to fun, accessible, and abundant styles that emphasize joy and indulgence over perfection.
Why This Recipe Works
This recipe works exceptionally well because it addresses the three main pillars of a successful party dessert: taste, texture, and logistics. First, the cupcake base is engineered to be sturdy enough to hold a heavy load of frosting and candy without collapsing, yet it remains incredibly moist thanks to the inclusion of sour cream and oil in the batter. Unlike standard sponge cakes that can dry out when exposed to air, the individual cupcake liners protect the sides of each portion, keeping the crumb tender for longer.
Secondly, the buttercream used here is a high-ratio American buttercream. This means it creates a stable ‘crust’ on the outside while remaining soft inside. This stability is crucial for acting as the ‘glue’ that holds the cupcakes together in the pull-apart formation and anchoring the heavy candy toppings so they don’t slide off.
Finally, the ‘Candy Explosion’ concept works because it allows for infinite customization. You can tailor the color palette and candy selection to match any theme—superheroes, unicorns, or neon raves—without changing the core recipe. The contrasting textures of the soft cake, creamy frosting, and crunchy or chewy candies create a sensory experience that keeps people coming back for ‘just one more’ cupcake. It eliminates the need for plates and forks, making cleanup a breeze, which is perhaps the most convincing reason of all for busy hosts.
Why You’ll Love This Recipe
- ✓No cutting required—guests simply grab and go!
- ✓Highly customizable with any candy or color theme.
- ✓Moist, bakery-style vanilla bean cupcake base.
- ✓Stable buttercream that holds heavy toppings easily.
- ✓Perfect for large crowds and kids’ birthday parties.
- ✓Visually stunning centerpiece with minimal decorating skills needed.
Equipment You’ll Need
- ✓2 standard 12-cup muffin tins
- ✓Cupcake liners
- ✓Large mixing bowls
- ✓Electric hand mixer or stand mixer
- ✓Large rectangular cake board or serving platter
- ✓Offset spatula
- ✓Piping bag with large round tip (optional)
- ✓Wire cooling rack
Ingredients
- ✓2 1/2 cups all-purpose flour
- ✓2 cups granulated sugar
- ✓3 tsp baking powder
- ✓1 tsp salt
- ✓1 cup whole milk, room temperature
- ✓1/2 cup vegetable oil
- ✓1 tbsp vanilla bean paste or pure vanilla extract
- ✓2 large eggs, room temperature
- ✓1 cup sour cream, room temperature
- ✓1 cup water, boiling
- ✓4 sticks (2 cups) unsalted butter, softened
- ✓6-7 cups powdered sugar, sifted
- ✓1/4 cup heavy cream
- ✓Gel food coloring (bright pink, blue, yellow, etc.)
- ✓2 cups assorted candies (Gummy bears, M&Ms, crushed Oreos, sour worms, lollipops, rock candy)
Instructions
- Preheat your oven to 350°F (175°C) and line two muffin tins with cupcake liners.
- In a large bowl or stand mixer, combine flour, sugar, baking powder, and salt. Mix on low speed until blended.
- Add the milk, vegetable oil, vanilla, eggs, and sour cream. Beat on medium speed for roughly 2 minutes until the batter is smooth and creamy.
- Reduce the mixer speed to low and carefully pour in the boiling water. Mix until just combined. The batter will be very thin; this is normal and ensures a moist cake.
- Fill the cupcake liners about 2/3 full. Do not overfill, or they will spill over and lose their shape.
- Bake for 18-22 minutes, or until a toothpick inserted into the center comes out clean. Remove from the oven and let cool in the pans for 5 minutes before transferring to a wire rack to cool completely.
- While cupcakes cool, make the frosting. Beat the softened butter until pale and fluffy (about 5 minutes). Gradually add powdered sugar, one cup at a time, alternating with tablespoons of heavy cream.
- Add vanilla and a pinch of salt. Whip on high speed for another 3-4 minutes until airy. Divide frosting into bowls and tint with gel food coloring as desired.
- Arrange the cooled cupcakes on your large cake board. You can form a rectangle (4×6) or a number shape. Dab a tiny bit of frosting on the bottom of each liner to ‘glue’ them to the board so they don’t slide.
- Using a piping bag or a large scoop, place a mound of frosting on each cupcake. Use an offset spatula to spread the frosting across the entire surface, bridging the gaps between cupcakes to create a unified ‘cake’ look.
- Now for the explosion: While the frosting is still soft, aggressively decorate with your assorted candies. Create clusters of gummies, scatter the chocolate gems, and stick lollipops or rock candy sticks upright for height.
- Finish with a dusting of sprinkles or edible glitter. Let the cake set for 20 minutes before serving to allow the frosting to crust slightly.
Expert Cooking Tips
- ✓Ensure all cold ingredients (eggs, milk, sour cream) are at room temperature to prevent the batter from curdling.
- ✓Don’t skip the boiling water step; it blooms the cocoa (if making chocolate) or simply ensures the flour hydrates fully for a tender crumb.
- ✓When frosting, push the buttercream into the gaps between cupcakes first to create a solid foundation.
- ✓Use gel food coloring instead of liquid drops to keep your frosting consistency stable.
- ✓Arrange the cupcakes as close together as possible on the board to minimize gaps.
- ✓Wait until the very last moment to add heavy candies like lollipops to ensure they stay upright.
Substitutions and Variations
If you need to make this gluten-free, simply swap the all-purpose flour for a high-quality 1:1 gluten-free baking flour blend; the rest of the recipe remains the same. For a dairy-free version, use plant-based milk (almond or oat work best), swap the butter for vegan butter sticks, and use a dairy-free yogurt instead of sour cream. If you don’t have sour cream, full-fat Greek yogurt is an excellent 1:1 substitute that provides the same moisture and tang. You can also use buttermilk instead of regular milk for a richer flavor. regarding the candy, the sky is the limit. If you want a ‘healthier’ version, you can top the cake with fresh berries, edible flowers, and yogurt-covered pretzels instead of sugary candies.
Common Mistakes to Avoid
The most common mistake with pull-apart cakes is allowing the cupcakes to shift while frosting. This is why ‘gluing’ them down with a dab of buttercream is essential. Another error is overfilling the cupcake liners; if they have ‘muffin tops,’ they won’t fit snugly together, leaving large gaps that are hard to cover with frosting. Additionally, avoid frosting the cupcakes while they are even slightly warm. This will cause the butter in the frosting to melt, leading to a greasy, sliding disaster that won’t hold the candy weight. Finally, don’t use liquid food coloring if you want vibrant colors; liquid adds too much moisture and can make the frosting runny.
Serving Suggestions
Serve this masterpiece on a large, sturdy board or a clean wooden cutting board. Since no knives are needed, you can simply place a stack of colorful napkins nearby. This cake pairs beautifully with cold milk for the kids and a strong coffee or prosecco for the adults. To make the presentation even more dramatic, you can place sparklers on the cake (safely away from flammable wrappers) instead of traditional candles. If it is a summer party, serve alongside scoops of vanilla ice cream to balance the sweetness of the candy.
Storage and Reheating Tips
This cake is best enjoyed the day it is assembled, especially if you are using candies that might get soggy (like cotton candy or certain cookies). However, leftovers can be stored in an airtight container at room temperature for up to 2 days. If you have used perishable fillings or toppings (like fresh fruit or cream cheese frosting), store it in the refrigerator for up to 3 days. Note that hard candies might become sticky in the fridge due to humidity. If you need to prep ahead, bake the cupcakes and make the frosting 1-2 days in advance, storing the cupcakes in a sealed box and the frosting in the fridge (bring to room temp and re-whip before using).
Nutrition Facts (Estimated)
| Serving Size | 1 Cupcake |
| Calories | 350 |
| Fat | 16g |
| Saturated Fat | 8g |
| Unsaturated Fat | 7g |
| Trans Fat | 0g |
| Cholesterol | 45mg |
| Sodium | 180mg |
| Carbohydrates | 52g |
| Fiber | 1g |
| Sugar | 35g |
| Protein | 3g |
Frequently Asked Questions
Can I use a box mix instead of scratch?
Absolutely! To make a box mix taste homemade, swap the water for milk, use melted butter instead of oil, and add an extra egg.
How do I transport a pull-apart cake?
Transport is tricky. Use a cake box that fits your board exactly so it doesn’t slide. Place the box on the floor of your car, not the seat, to keep it flat.
Can I freeze the cupcakes beforehand?
Yes, unfrosted cupcakes freeze beautifully for up to 3 months. Wrap them tightly in plastic wrap and thaw at room temperature before decorating.
Why is my frosting too soft?
Your kitchen might be too warm, or you added too much liquid. Add more sifted powdered sugar or chill the frosting for 10 minutes to firm it up.
How many cupcakes do I need for a number shape?
It depends on the number, but usually, you need between 18 and 24 cupcakes to create a standard double-digit number shape.
Can I use whipped cream instead of buttercream?
It is not recommended. Whipped cream is not stable enough to bridge the gaps between cupcakes or hold heavy candy toppings.
What are the best candies to use?
Use a mix of textures! Soft gummies, crunchy chocolates (like KitKats or M&Ms), and sour hard candies create the best variety.
How do I prevent the cupcakes from drying out?
The frosting acts as a seal, keeping moisture in. As long as they are fully frosted, they will stay moist for days.
Conclusion
The Fun Candy Explosion Cupcake Pull-Apart Cake is more than just a dessert; it is an edible event. It brings out the inner child in everyone and turns a standard birthday celebration into a memorable, colorful fiesta. By following these steps, you preserve the moisture of the cake, ensure the stability of the design, and deliver a flavor punch that store-bought cakes just can’t match. So gather your sprinkles, unwrap those candies, and get ready to pull apart some happiness!