The Ultimate Fun Candy Explosion Birthday Cake For 9×13 Pan Recipe
Fun Candy Explosion Birthday Cake For 9×13 Pan Recipe
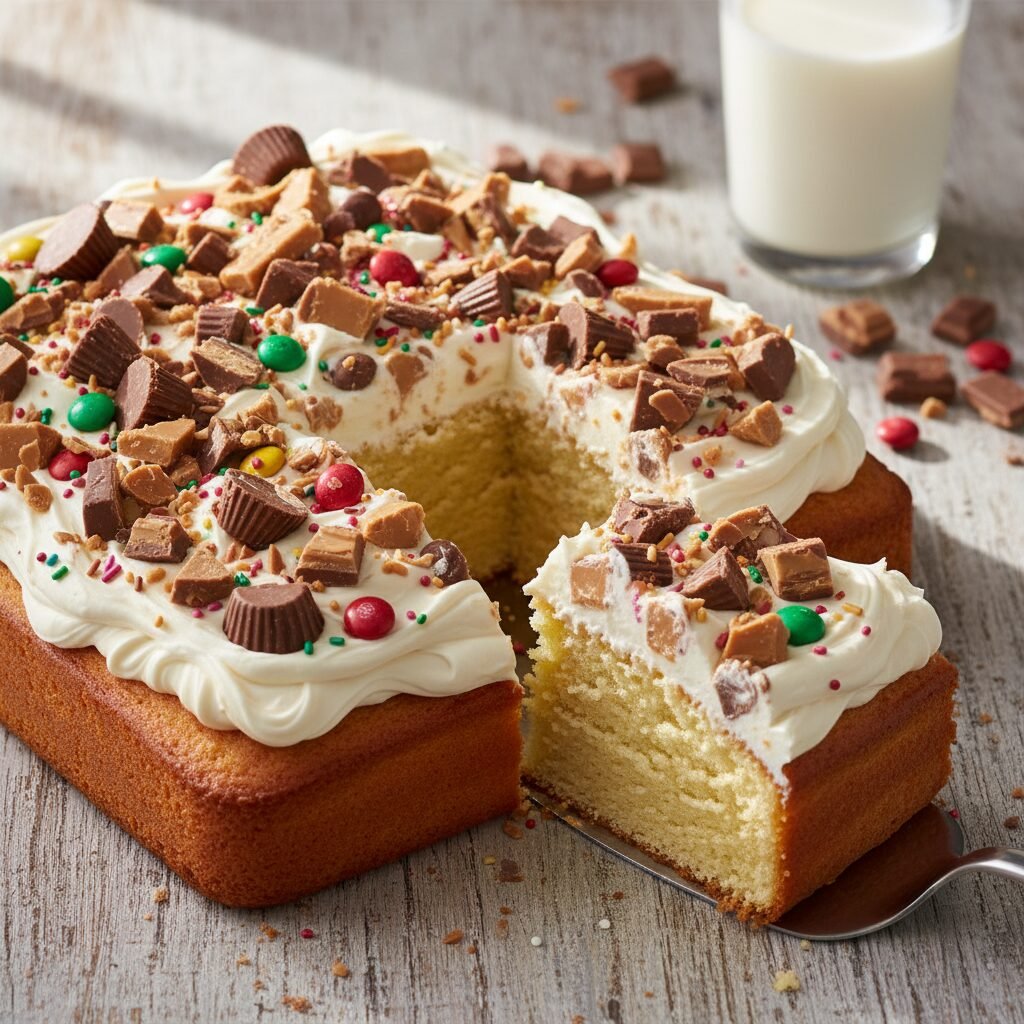
Get ready to party with this vibrant, crowd-pleasing 9×13 sheet cake loaded with a chaotic and delicious assortment of your favorite chopped candies! It is the perfect low-stress, high-impact birthday treat that guarantees smiles, sugar rushes, and zero leftovers.
25 minutes
35 minutes
1 hour 30 minutes (includes cooling)
15 servings
Dessert
Baking
American
Vegetarian
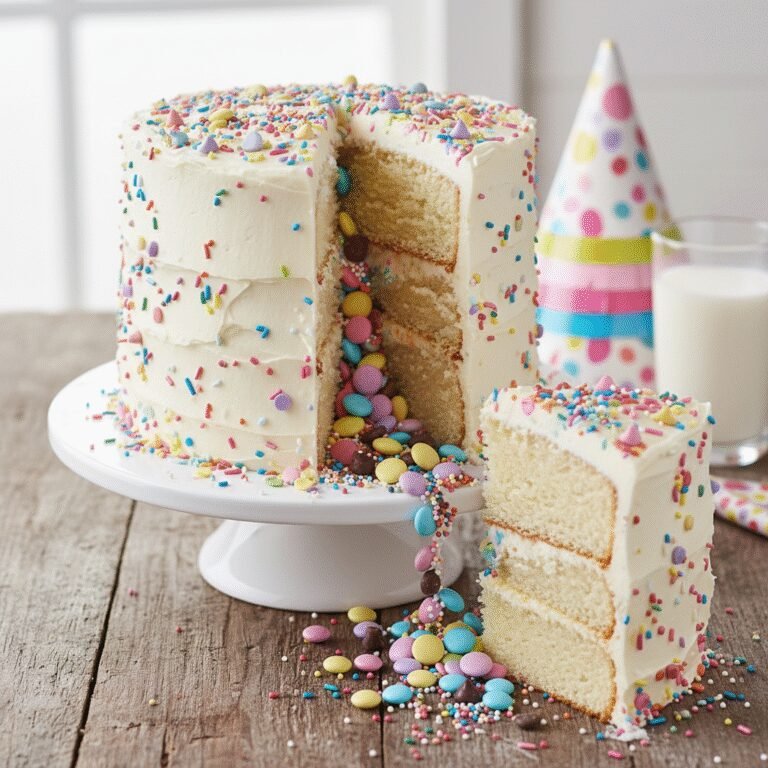
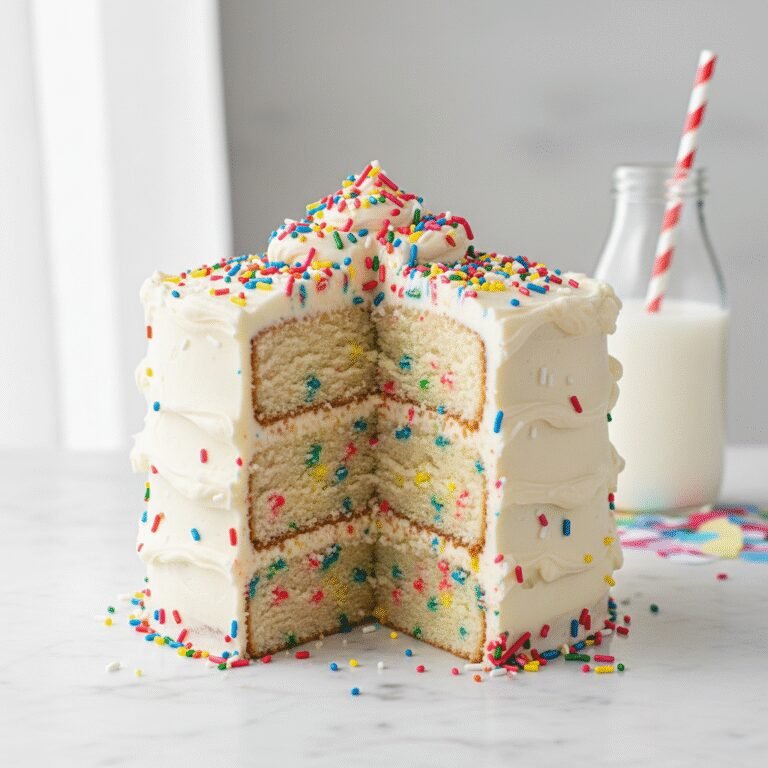
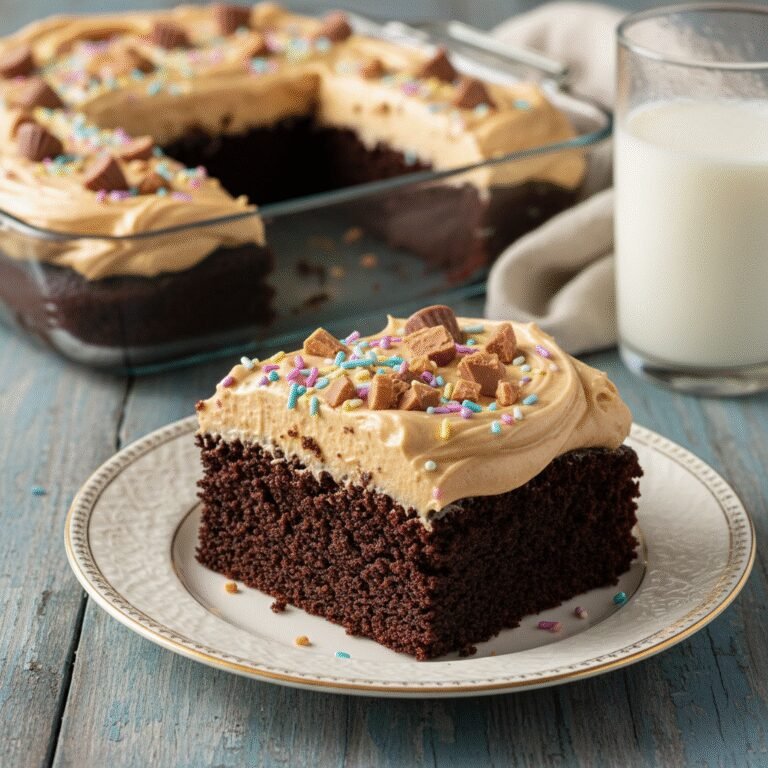
There is something undeniably nostalgic and joy-inducing about a classic 9×13 sheet cake. While towering layer cakes often steal the show on Instagram, the humble rectangular pan is the true workhorse of American birthday parties, potlucks, and celebrations. This ‘Fun Candy Explosion’ cake takes that reliable format and turns the volume up to eleven. Imagine a tender, moist vanilla bean cake base—dense enough to hold its shape but light enough to melt in your mouth—slathered in a fluffy, whipped buttercream. But the real magic lies in the toppings. This isn’t just a garnish; it is a full-blown textural experience. We are talking about chopped peanut butter cups, crushed toffee bars, colorful coated chocolates, and gummy bears all vying for attention on a landscape of frosting.
The beauty of this recipe lies in its adaptability and its sheer sense of fun. It captures the unbridled excitement of childhood birthdays where more was always better. Unlike sophisticated desserts that rely on subtle flavor profiles, this cake creates a carnival in your mouth. The contrast between the creamy frosting, the soft crumb of the cake, and the crunch, chew, and snap of the various candies creates a sensory delight that appeals to both kids and adults who are young at heart. It is a centerpiece that doesn’t take itself too seriously, inviting everyone to grab a fork and dive right in. Whether you are celebrating a milestone birthday or just need a pick-me-up on a Friday night, this Candy Explosion Cake delivers pure, unadulterated happiness.
History & Origins
The history of the 9×13 cake, often referred to as a ‘sheet cake’ or ‘tray bake,’ is deeply intertwined with the evolution of the American kitchen in the mid-20th century. Following World War II, the rise of suburban living and the manufacturing boom led to the standardization of kitchen equipment. The 9×13 inch baking pan became a staple in nearly every household, championed by cookware manufacturers like Pyrex and popularized by community cookbooks and magazines like Better Homes & Gardens. It was the perfect vessel for feeding a crowd, efficiently utilizing oven space, and allowing for easy transport to church suppers and neighborhood block parties.
The concept of the ‘Candy Explosion’ or ‘Garbage Pail’ cake emerged later, likely in the late 1980s and 90s, paralleling the explosion of variety in the candy aisle. As candy bars became more diverse and ‘fun size’ options became readily available for Halloween, creative home bakers began incorporating these treats directly into their baking. Initially, chopped candy bars were folded into batters, but the trend of using them as an abundant, chaotic topping gained traction with the rise of visual food culture. It moved the birthday cake away from the formal, piped roses of the bakery window and toward a DIY, exuberant aesthetic that celebrated abundance and variety. Today, this style of cake represents a rejection of minimalism, embracing a ‘more is more’ philosophy that honors the simple joy of sugary treats.
Why This Recipe Works
This recipe is meticulously designed to solve the common problems associated with loaded sheet cakes. First, the cake base itself is engineered for structural integrity without sacrificing moisture. Many standard sponge recipes are too airy and collapse under the weight of heavy frosting and candy toppings. We utilize a ‘reverse creaming’ method (or a modified high-ratio method) and include sour cream in the batter. The acidity of the sour cream tenderizes the gluten strands, ensuring a soft crumb, while the fat content provides the density needed to support the ‘explosion’ on top.
Secondly, the frosting is a stabilized American Buttercream. Standard buttercream can sometimes become too soft at room temperature, causing heavy candy pieces to slide off or sink unappealingly. By using a specific ratio of butter to shortening and high-quality confectioners’ sugar, we create a frosting that crusts slightly on the outside—locking the candy in place—while remaining creamy underneath. Finally, the flavor profile is balanced. Because the toppings are intensely sweet, the cake base uses a high quality vanilla bean paste and a pinch more salt than usual. This slight salinity cuts through the sugar, preventing the dessert from becoming cloying and ensuring that the chocolate and fruity notes of the candy shine through distinctively.
Why You’ll Love This Recipe
- ✓Feeds a Crowd: The 9×13 format easily yields 12-15 generous slices.
- ✓Structural Integrity: The dense yet moist crumb holds up heavy candy toppings without collapsing.
- ✓Customizable: Use whatever leftover Halloween or piñata candy you have on hand.
- ✓Travel Friendly: No precarious layers to slide around during transport.
- ✓Visual Impact: The colorful, chaotic topping makes for stunning photos.
Equipment You’ll Need
- ✓9×13 inch baking pan (metal preferred)
- ✓Electric hand mixer or stand mixer
- ✓Large mixing bowl
- ✓Medium mixing bowl
- ✓Whisk
- ✓Rubber spatula
- ✓Offset spatula
- ✓Cooling rack
- ✓Measuring cups and spoons
Ingredients
- ✓2 1/2 cups All-purpose flour
- ✓2 1/2 tsp Baking powder
- ✓1/2 tsp Baking soda
- ✓1 tsp Fine sea salt
- ✓3/4 cup Unsalted butter, softened
- ✓1 3/4 cups Granulated sugar
- ✓3 large Eggs, room temperature
- ✓2 tsp Vanilla bean paste or pure vanilla extract
- ✓1 cup Full-fat sour cream
- ✓1/2 cup Whole milk
- ✓FOR THE FROSTING:
- ✓1 cup Unsalted butter, softened
- ✓4 cups Confectioners’ sugar, sifted
- ✓1/4 cup Heavy cream
- ✓1 tsp Vanilla extract
- ✓Pinch of salt
- ✓FOR THE EXPLOSION:
- ✓2 cups Assorted chopped candy bars (Snickers, Reese’s, KitKat, etc.)
- ✓1/2 cup M&Ms or similar coated chocolates
- ✓1/4 cup Rainbow sprinkles
Instructions
- 1. Preheat your oven to 350°F (175°C). Grease a 9×13 inch baking pan with butter or non-stick spray and line the bottom with parchment paper for easy removal.
- 2. In a medium bowl, whisk together the flour, baking powder, baking soda, and salt until well combined. Set aside.
- 3. In a large bowl (or stand mixer fitted with the paddle attachment), cream the softened butter and granulated sugar together on medium-high speed for about 3-4 minutes, until the mixture is pale and fluffy.
- 4. Add the eggs one at a time, beating well after each addition. Scrape down the sides of the bowl. Mix in the vanilla bean paste.
- 5. In a small jug, whisk together the sour cream and whole milk.
- 6. Reduce the mixer speed to low. Add the flour mixture in three parts, alternating with the sour cream mixture in two parts, starting and ending with the flour. Mix only until just combined; do not overmix.
- 7. Pour the batter into the prepared pan and smooth the top with a spatula. Tap the pan gently on the counter to release any large air bubbles.
- 8. Bake for 30-35 minutes, or until a toothpick inserted into the center comes out clean or with just a few moist crumbs. The top should be golden brown.
- 9. Remove from the oven and place on a wire rack. Let the cake cool completely in the pan. This is crucial; frosting a warm cake will melt the butter.
- 10. While the cake cools, make the frosting. Beat the butter on high speed for 5 minutes until it is nearly white. Gradually add the confectioners’ sugar, one cup at a time, mixing on low.
- 11. Add the heavy cream, vanilla, and salt. Increase speed to high and whip for another 3 minutes until airy and creamy.
- 12. Spread the frosting generously over the cooled cake using an offset spatula. Create swirls and divots to hold the candy.
- 13. Immediately scatter the chopped candy bars, M&Ms, and sprinkles over the wet frosting. Press them down gently to adhere.
- 14. Slice into squares and serve immediately.
Expert Cooking Tips
- ✓Room Temperature Ingredients: Ensure your butter, eggs, and sour cream are at room temperature to create a smooth, emulsified batter.
- ✓Don’t Overmix: Once the flour is added, mix gently. Overmixing develops gluten which leads to a tough, chewy cake rather than a tender one.
- ✓The Candy Chop: Chop your candy bars into varying sizes—some chunks, some crumbs—to create better texture and visual appeal.
- ✓Cooling is Key: If you frost before the cake is 100% cool, your frosting will slide off. Be patient.
- ✓Metal vs. Glass: If using a glass pan, reduce oven temperature by 25°F as glass retains heat longer and can overcook the edges.
- ✓Salt the Frosting: A tiny pinch of salt in the buttercream cuts the sweetness and highlights the vanilla flavor.
Substitutions and Variations
This recipe is highly versatile. If you don’t have sour cream, full-fat Greek yogurt is an excellent 1:1 substitute that provides the same tang and moisture. For a dairy-free version, use a high-quality plant-based butter and replace the sour cream with a dairy-free yogurt alternative or coconut cream, and use almond or oat milk. If you prefer a chocolate base, replace 1/2 cup of the flour with high-quality Dutch-processed cocoa powder and add an extra tablespoon of milk. As for the candy toppings, the sky is the limit. You can use chopped cookies (like Oreos), pretzels for a salty twist, or even dried fruit and nuts if you want a slightly more ‘grown-up’ version. Just ensure the toppings aren’t too heavy or wet (like fresh fruit) which might dissolve the frosting.
Common Mistakes to Avoid
The most common mistake with sheet cakes is overbaking. Because the surface area is large, the edges can dry out before the center is done. Start checking the cake at the 30-minute mark. Another frequent error is using cold ingredients. Cold eggs hitting creamed butter can cause the batter to curdle, leading to an uneven rise. Regarding the decoration, a common pitfall is chopping the candy too finely; you want recognizable chunks, not dust. Conversely, leaving pieces too large makes the cake difficult to slice neatly. Finally, do not skimp on the creaming process for the frosting. If you don’t beat the butter long enough before adding sugar, the frosting will be yellow and heavy instead of white and fluffy.
Serving Suggestions
This cake is a showstopper on its own, but it pairs beautifully with a scoop of simple vanilla bean ice cream or a glass of cold milk to wash down the sweetness. For a birthday party spread, serve it alongside salty snacks like popcorn or pretzels to balance the sugar rush. If you are serving this at an adult gathering, a dark roast coffee or a stout beer pairs surprisingly well with the chocolate and caramel notes of the candy toppings. Serve the cake directly from the pan for a casual vibe, or lift it out using the parchment paper and place it on a large platter for a more dramatic presentation.
Storage and Reheating Tips
Because of the dairy in the frosting and the perishable nature of some cake ingredients, this cake is best stored in an airtight container. It can sit at room temperature for up to 2 days if the kitchen isn’t too hot. For longer storage, cover the pan tightly with plastic wrap or transfer slices to a sealed container and refrigerate for up to 5 days. Note that refrigeration may cause some candies (like gummy bears or hard caramel) to become hard or ‘sweat.’ To freeze, place uncoated cake slices on a baking sheet to freeze the frosting solid, then wrap individually in plastic wrap and foil. Thaw in the fridge overnight before eating.
Nutrition Facts (Estimated)
| Serving Size | 1 slice (approx 1/15 of cake) |
| Calories | 480 |
| Fat | 22g |
| Saturated Fat | 10g |
| Unsaturated Fat | 12g |
| Trans Fat | 0g |
| Cholesterol | 65mg |
| Sodium | 320mg |
| Carbohydrates | 68g |
| Fiber | 1g |
| Sugar | 45g |
| Protein | 5g |
Frequently Asked Questions
Can I make this cake ahead of time?
Yes! You can bake the cake base up to 2 days in advance. Wrap it tightly in plastic wrap and store at room temperature. Frost and decorate on the day of serving for the freshest candy crunch.
Why did my cake sink in the middle?
This usually happens if the oven door was opened too early during baking, releasing heat, or if the cake was underbaked. It can also result from too much leavening (baking powder/soda).
Can I use a boxed cake mix instead?
Absolutely. While homemade tastes better, you can use a high-quality yellow or vanilla cake mix. To elevate it, swap the water for milk and add an extra egg.
How do I cut neat slices with all the candy on top?
Use a large, sharp chef’s knife. Dip the knife in hot water and wipe it dry between cuts. Use a gentle sawing motion to get through the candy chunks without squishing the cake.
What candies should I avoid?
Avoid extremely hard candies like jawbreakers (choking hazard and hard to cut) or candies that bleed color easily when in contact with moisture, like certain cheap sprinkles or cotton candy.
Can I use whipped cream instead of buttercream?
You can, but stabilized whipped cream is necessary. Regular whipped cream is too soft to hold heavy candy pieces and will weep over time.
Is this recipe gluten-free friendly?
Yes, if you use a high-quality 1-to-1 gluten-free baking flour blend instead of all-purpose flour. Ensure all your candy toppings are certified gluten-free as well.
Why do I need both baking powder and baking soda?
Baking soda reacts with the acid in the sour cream to neutralize it and provide lift, while baking powder provides a secondary lift during the baking process for a perfect texture.
Conclusion
The Fun Candy Explosion Birthday Cake is more than just a dessert; it is a celebration on a plate. It breaks the rules of formal baking and invites you to play with your food, resulting in a treat that is as fun to make as it is to eat. Whether you are six or sixty, the sight of a cake loaded with all your favorite treats is guaranteed to bring a smile to your face. So, raid the candy aisle, preheat that oven, and get ready to be the hero of the next birthday party. This is one recipe that proves you really can have your cake and eat it too—along with a mountain of candy!