The Ultimate Fun Vanilla Unicorn Birthday Cake Recipe
Fun Vanilla Unicorn Birthday Cake Recipe
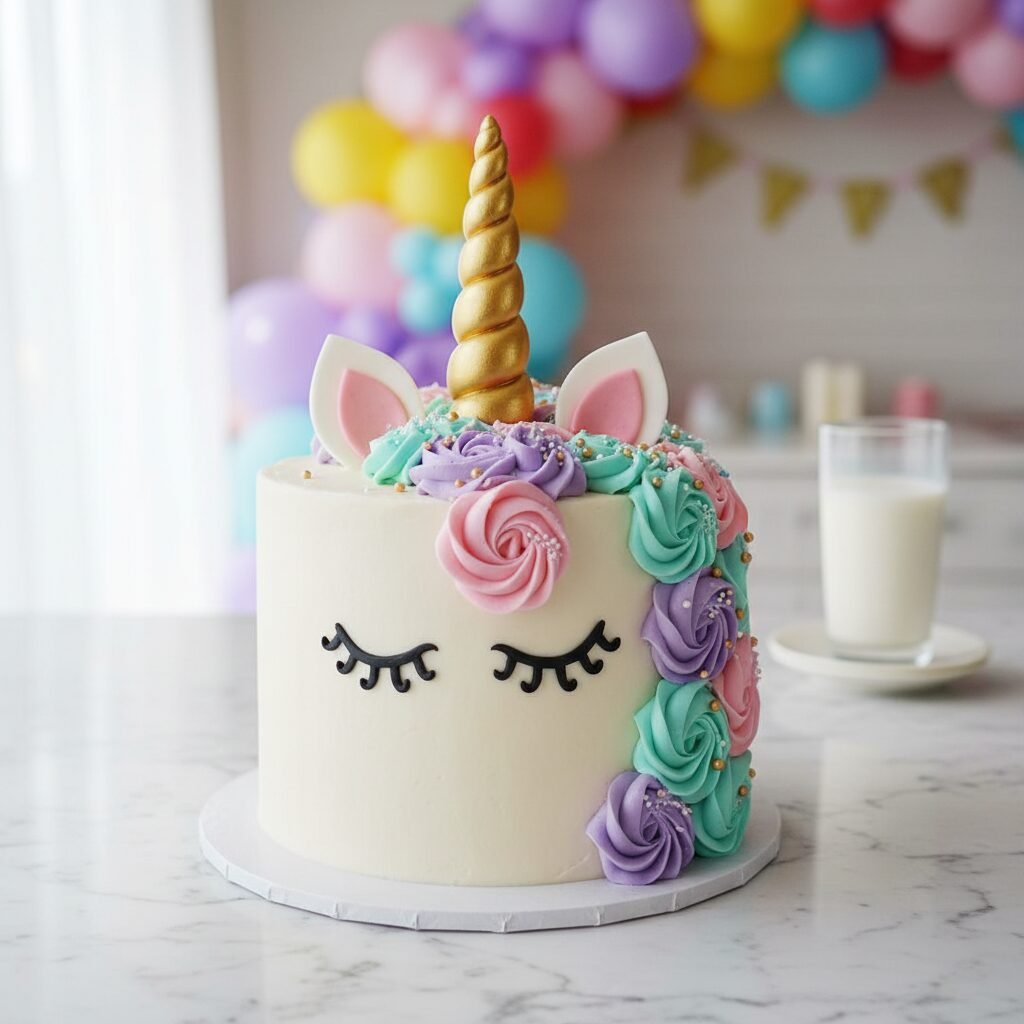
Bring a touch of magic to your next celebration with this whimsical Fun Vanilla Unicorn Birthday Cake! Featuring tender layers of vanilla bean cake, a silky pastel buttercream mane, and a shimmering gold horn, this dessert is as delicious as it is enchanting.
1 hour
35 minutes
3 hours
12-14 servings
Dessert
Baking
American
Vegetarian
There is something undeniably magical about a unicorn cake. It is not just a dessert; it is a centerpiece that sparks joy, wonder, and a fair amount of ‘oohs’ and ‘aahs’ from guests of all ages. If you have spent any time scrolling through Pinterest or Instagram in the last few years, you have likely seen these adorable creations with their sleepy eyes and swirling pastel manes. But here is the secret: underneath all that glitter and gold fondant, you need a cake that actually tastes incredible. This recipe delivers exactly that—a classic, high-quality vanilla foundation that stands up to the hype of its decoration.
We start with a ‘white velvet’ vanilla cake base. Unlike standard yellow cakes that use whole eggs, this recipe utilizes egg whites and buttermilk to create a crumb that is exceptionally tender, moist, and pale enough to let colorful sprinkles or dyes pop if you choose to add them inside. The flavor is infused with pure vanilla bean paste, offering a depth of aroma that artificial extracts simply cannot match.
The exterior is where the real fun begins. We use a sturdy yet fluffy American Buttercream that crusts perfectly, making it the ideal medium for piping those intricate rosettes and stars that form the unicorn’s mane. Whether you are a seasoned baker or a parent trying to pull off a birthday miracle, this guide breaks down the intimidating decoration process into manageable steps. Prepare to create a masterpiece that tastes just as dreamy as it looks.
History & Origins
The concept of the birthday cake has roots stretching back centuries, but the specific ‘Unicorn Cake’ trend is a strictly modern phenomenon born of the social media age. Historically, the tradition of birthday cakes can be traced to Germany in the Middle Ages with ‘Kinderfest,’ a celebration for children where a cake was topped with candles. However, the cakes were more bread-like and far less sugary than what we enjoy today. The ancient Greeks also offered round cakes to Artemis, the goddess of the moon, lit with candles to glow like moonlight, which is perhaps the spiritual ancestor to our glowing birthday traditions.
Fast forward to the 2010s, specifically around 2016, when the ‘Unicorn Food’ trend exploded globally. This aesthetic movement was characterized by pastel rainbows, edible glitter, and fantastical imagery. While the exact origin of the first unicorn cake design is often debated, it is widely attributed to cake designers who began simplifying the unicorn face into ‘sleepy eyes’ painted on the side of a round cake, topped with a fondant horn and a flowing buttercream mane. This specific design became a viral sensation because it was achievable for home bakers—you didn’t need to carve a complex 3D horse shape; you just needed a round cake and some piping skills. It democratized professional-looking cake decorating, turning a standard vanilla round cake into a symbol of whimsy and internet culture.
Why This Recipe Works
This recipe succeeds because it prioritizes structural integrity without sacrificing texture. When creating a tall, decorated cake like a unicorn, you need a sponge that isn’t too flimsy. Many box mixes are too airy and can collapse under the weight of heavy buttercream piping and fondant toppers. This scratch-made recipe uses the ‘reverse creaming’ method (mixing fat into dry ingredients first) or a high-ratio method which coats the flour proteins in fat, limiting gluten development. The result is a plush, velvety crumb that is dense enough to stack but melts in your mouth.
Furthermore, the buttercream ratio in this recipe is calculated to withstand the heat of a party. We use a high-fat American buttercream with a touch of heavy cream. This allows for sharp definition in the piping tips—essential for the definition of the unicorn’s mane. If the frosting is too soft, the rosettes will droop; too stiff, and it is impossible to pipe. This balance ensures your unicorn looks fresh and perky from the first photo to the last slice. Finally, the use of clear vanilla extract in the frosting ensures the colors of the mane stay true to their pastel hues, avoiding the ivory tint that regular vanilla can impart.
Why You’ll Love This Recipe
- ✓Stunning visual presentation perfect for social media.
- ✓Tender ‘white velvet’ crumb texture.
- ✓Stable buttercream ideal for intricate piping.
- ✓Customizable color palette for the mane.
- ✓Step-by-step guide to crafting the fondant horn.
Equipment You’ll Need
- ✓Three 6-inch round cake pans
- ✓Stand mixer with paddle attachment
- ✓Piping bags
- ✓Piping tips (1M, 2D, 4B open star tips)
- ✓Offset spatula
- ✓Bench scraper
- ✓Turntable
- ✓Wooden skewer (for the horn)
Ingredients
- ✓3 cups cake flour, sifted
- ✓2 cups granulated sugar
- ✓1 tablespoon baking powder
- ✓1/2 teaspoon salt
- ✓1 cup unsalted butter, room temperature, cubed
- ✓1 cup egg whites (approx 7-8 eggs)
- ✓1 cup buttermilk, room temperature
- ✓2 tablespoons vanilla bean paste
- ✓1/2 cup rainbow sprinkles (optional for funfetti effect)
- ✓2 cups unsalted butter (for frosting)
- ✓7-8 cups confectioners’ sugar
- ✓1/4 cup heavy cream
- ✓Gel food coloring (pink, purple, teal)
- ✓White fondant (approx 4 oz)
- ✓Gold luster dust and vodka (for painting horn)
Instructions
- Preheat your oven to 350°F (175°C). Grease three 6-inch round cake pans and line the bottoms with parchment paper.
- In the bowl of a stand mixer, whisk together the cake flour, sugar, baking powder, and salt.
- Add the cubed butter to the dry ingredients and mix on low speed until the mixture resembles coarse sand (this is the reverse creaming method).
- In a separate jug, whisk together the egg whites, buttermilk, and vanilla bean paste.
- With the mixer on low, slowly pour in half of the wet ingredients. Increase speed to medium and beat for 2 minutes to build structure.
- Scrape down the sides of the bowl, then add the remaining wet ingredients in two batches, mixing just until incorporated. Fold in sprinkles if using.
- Divide the batter evenly among the three prepared pans. Bake for 30-35 minutes, or until a toothpick inserted into the center comes out clean.
- Allow cakes to cool in pans for 10 minutes, then turn out onto a wire rack to cool completely.
- While cakes cool, prepare the horn and ears. Roll a snake of fondant tapered at both ends, fold in half, and twist to create a spiral horn. Insert a skewer for stability. Cut two triangles for ears. Paint with gold luster dust mixed with a drop of vodka. Let dry.
- Make the buttercream: Beat the butter until pale and creamy (5-7 minutes). Gradually add confectioners’ sugar and heavy cream. Beat on high for 3-5 minutes until fluffy.
- Stack the cake layers with a layer of buttercream between each. Crumb coat the entire cake and chill for 20 minutes.
- Apply a final smooth coat of white buttercream. Use a bench scraper to get smooth sides.
- Divide remaining buttercream into three bowls and tint with gel colors (pink, purple, teal). Transfer to piping bags fitted with various star tips.
- Place the horn and ears on top of the cake. Pipe rosettes and stars around the horn and cascading down one side of the cake to create the ‘mane’.
- Using black gel food coloring or a small roll of black fondant, create the ‘sleepy eyes’ on the front of the cake.
Expert Cooking Tips
- ✓Ensure all dairy ingredients (butter, buttermilk, eggs) are at true room temperature to prevent the batter from curdling.
- ✓Do not overmix the batter once the final liquid is added; this ensures the cake remains tender.
- ✓Chill the cake layers before stacking; cold cake is easier to handle and less likely to crumble.
- ✓Use gel food coloring instead of liquid drops to maintain the consistency of your buttercream.
- ✓If your kitchen is hot, chill the piping bags for 5 minutes if the frosting starts to get too soft while decorating.
- ✓Make the fondant horn and ears at least 24 hours in advance so they have time to harden and stand upright.
Substitutions and Variations
If you do not have cake flour, you can make a DIY version by removing 2 tablespoons of all-purpose flour per cup and replacing it with cornstarch, though store-bought cake flour yields the best texture. For a dairy-free version, use high-quality plant-based butter sticks and a dairy-free milk alternative mixed with a teaspoon of vinegar to simulate buttermilk. If you prefer a less sweet frosting, a Swiss Meringue Buttercream can be used, though it takes color differently than American buttercream. Whole eggs can be used instead of egg whites, but the cake will have a yellow tint rather than white.
Common Mistakes to Avoid
The most common mistake is rushing the cooling process. Piping buttercream onto a warm cake will cause the frosting to melt and slide off instantly. Another issue is adding too much liquid food coloring, which can break the buttercream emulsion; always stick to concentrated gels. Finally, failing to level the cake layers can lead to a leaning ‘Tower of Pisa’ unicorn. Always trim the domed tops of your cakes with a serrated knife before stacking.
Serving Suggestions
Serve this magical cake on a pedestal stand to heighten the drama. It pairs beautifully with cold milk for the kids and a glass of sparkling rosé or champagne for the adults. To keep the theme going, serve alongside ‘unicorn poop’ meringues or rainbow fruit skewers. Slice the cake using a knife dipped in hot water and wiped dry for clean, professional-looking cuts that show off the layers.
Storage and Reheating Tips
Store the frosted cake in the refrigerator if you are not serving it immediately, especially in warm weather. However, buttercream tastes best at room temperature, so remove the cake from the fridge 1-2 hours before serving. Leftovers can be stored in an airtight container in the fridge for up to 4 days. You can also freeze individual slices wrapped tightly in plastic wrap and foil for up to 3 months. The fondant decorations should not be refrigerated for long periods as humidity can cause them to wilt or ‘sweat’.
Nutrition Facts (Estimated)
| Serving Size | 1 slice |
| Calories | 650 |
| Fat | 30g |
| Saturated Fat | 18g |
| Unsaturated Fat | 10g |
| Trans Fat | 1g |
| Cholesterol | 85mg |
| Sodium | 320mg |
| Carbohydrates | 85g |
| Fiber | 1g |
| Sugar | 55g |
| Protein | 6g |
Frequently Asked Questions
Can I make the cake layers ahead of time?
Yes! You can bake the layers up to 2 days in advance. Wrap them tightly in plastic wrap and store at room temperature, or freeze them for up to a month for easier handling.
How do I get the gold color on the horn?
Mix edible gold luster dust with a few drops of clear alcohol (like vodka or lemon extract) to create a paint. Brush this onto the white fondant horn.
Do I need a stand mixer?
While a stand mixer makes the process much easier, especially for the buttercream, a hand mixer can work. Just be prepared to mix for longer periods to achieve the right fluffiness.
Why did my buttercream curdle?
Buttercream usually curdles if the butter was too cold or if liquids were added too quickly. Keep whipping on high speed; it often comes back together after a few minutes.
Can I use store-bought frosting?
Technically yes, but store-bought frosting is often too soft for piping the defined mane. Homemade buttercream is strongly recommended for structural stability.
How do I transport this cake?
Transport the cake in a tall cake box. Place the box on the floor of the car (the flattest surface), not the seat. Keep the car cool with air conditioning.
What size piping tips should I use?
For the best mane texture, use large open star tips like Wilton 1M, 2D, and 4B. Varying the tips creates a more dynamic and interesting look.
Can I make this gluten-free?
Yes, simply swap the cake flour for a high-quality 1:1 gluten-free baking flour blend. Ensure your baking powder and sprinkles are also certified gluten-free.
Conclusion
Creating a Fun Vanilla Unicorn Birthday Cake is a labor of love that pays off tenfold in smiles and memories. While it may look like a professional bakery creation, breaking it down into baking, stacking, and decorating makes it an achievable weekend project for any home baker. The combination of the moist, vanilla-flecked cake and the creamy, sweet frosting is a timeless classic that grounds the whimsical decorations in serious flavor. So grab your piping bags, unleash your inner artist, and get ready to bake a little bit of magic!