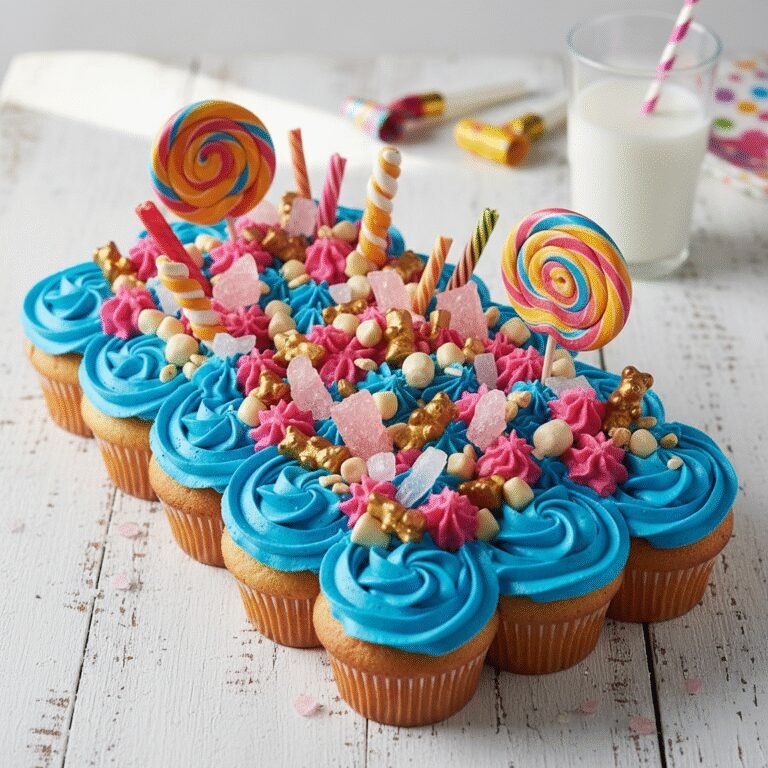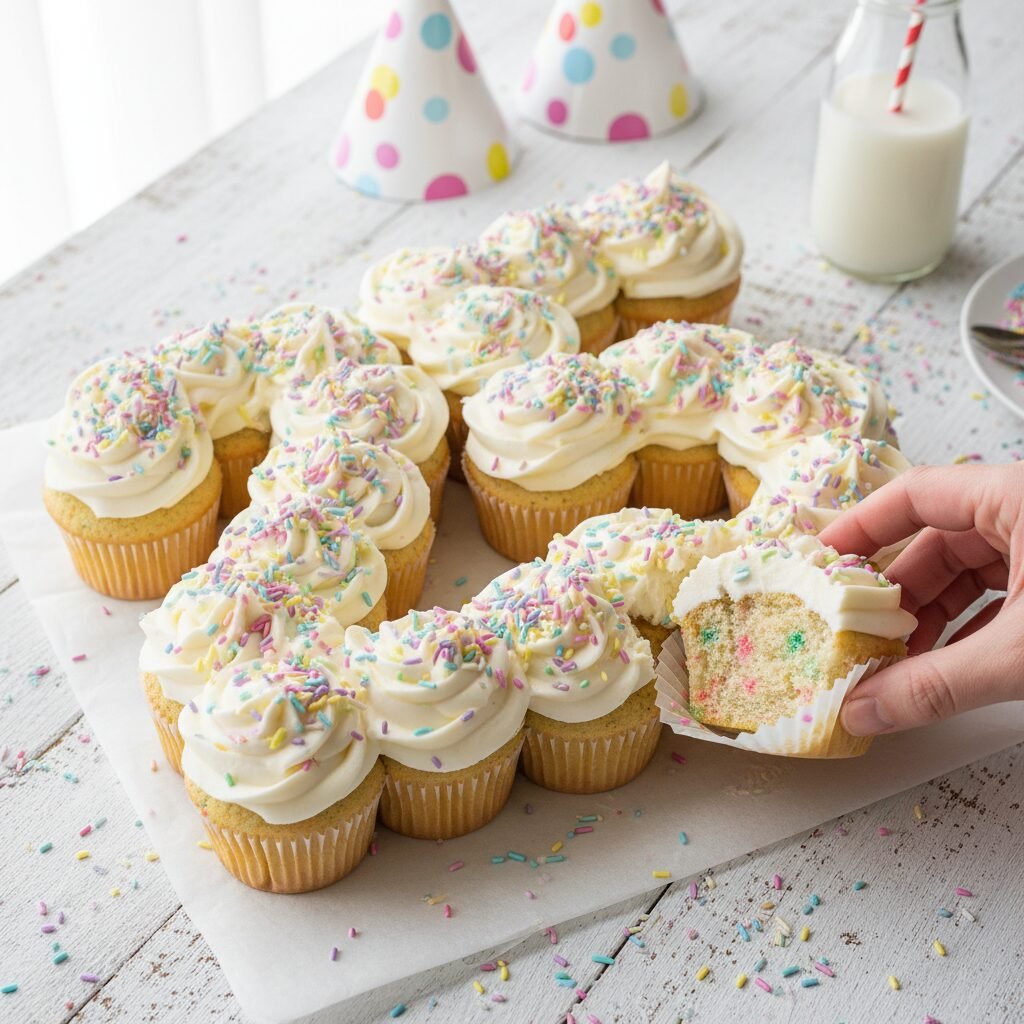
Ultimate Rainbow Sprinkle Pull-Apart Cupcake Cake: The Perfect Birthday Centerpiece
Fun Rainbow Sprinkle Birthday Cake For Cupcake Pull Apart Cake Recipe
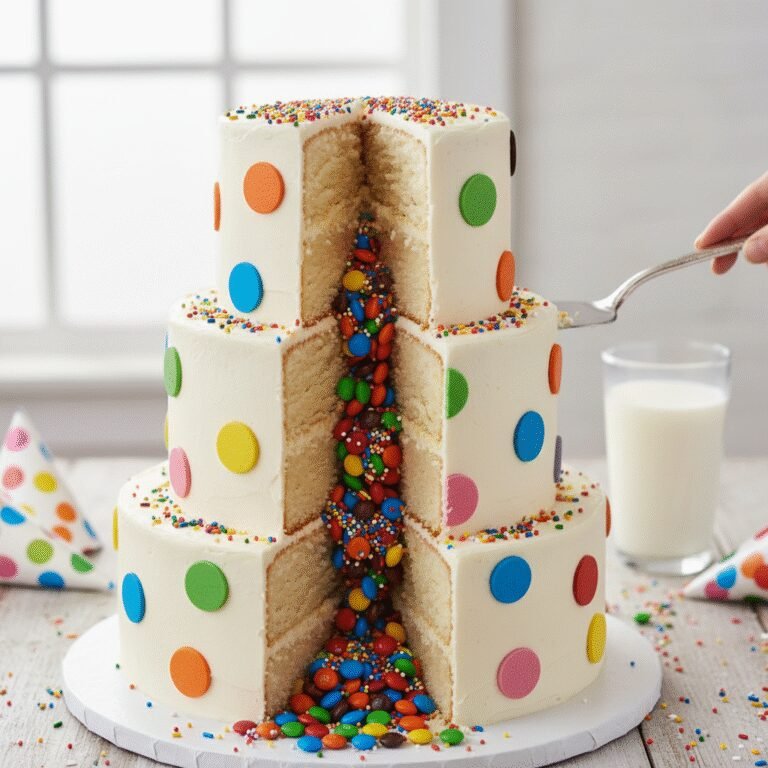
Ditch the knife and plates with this festive, crowd-pleasing Rainbow Sprinkle Pull-Apart Cupcake Cake! Combining the convenience of individual cupcakes with the stunning presentation of a sheet cake, this recipe features tender funfetti sponges and a unified layer of creamy vanilla buttercream.
30 minutes
20 minutes
1 hour 30 minutes
24 Cupcakes
Dessert
Baking
American
Vegetarian
There is something undeniably magical about a birthday cake covered in rainbow sprinkles. It evokes a sense of nostalgia, childhood joy, and pure celebration. However, anyone who has hosted a large children’s birthday party or a crowded family gathering knows the logistical nightmare that often accompanies the ‘cake cutting’ ceremony. You have to find a sharp knife, hunt down enough dessert plates, and awkwardly slice pieces while trying to ensure everyone gets an equal share of the frosting flowers. Enter the genius solution: the Pull-Apart Cupcake Cake.
This recipe is the ultimate hybrid, offering the best of both worlds. Visually, it presents as a cohesive, stunning cake that can be decorated with elaborate messages, swirls, and, of course, an explosion of rainbow sprinkles. Functionally, however, it is a platter of pre-portioned cupcakes. When it is time to serve, guests simply reach out and ‘pull apart’ a cupcake. No knives, no mess, and no crumbling slices.
Beyond the mechanics, the flavor profile here is a elevated take on the classic ‘birthday cake’ taste. We are moving away from waxy store-bought boxes to a homemade vanilla bean batter that is enriched with sour cream for moisture and studded with high-quality rainbow jimmies that melt into colorful bursts of sweetness. The frosting is a classic American Buttercream, whipped to a cloud-like consistency that is sturdy enough to bridge the gaps between cupcakes but soft enough to melt in your mouth. Whether you shape it into a number for a milestone birthday, a simple rectangle, or a fun shape like a flower or balloon, this Pull-Apart Cupcake Cake is guaranteed to be the star of your next party.
History & Origins
The concept of the cupcake dates back to 1796, when a recipe for ‘a light cake to bake in small cups’ was written in ‘American Cookery’ by Amelia Simmons. However, the specific innovation of the ‘Pull-Apart Cake’ (sometimes called a cupcake cake) is a much more modern invention, gaining significant traction in the early 2000s with the rise of mommy blogs and later, Pinterest.
The trend emerged from a desire for convenience without sacrificing the aesthetic appeal of a traditional birthday cake. Professional bakeries began offering them as a practical alternative for school classroom parties where knives were often not allowed. The design mimics the ‘sheet cake’ look, utilizing the tops of the cupcakes as a canvas.
Culturally, this dessert taps into the American love affair with ‘Funfetti.’ Introduced by Pillsbury in 1989, the inclusion of rainbow sprinkles directly into the batter transformed plain white cake into a confetti-filled celebration. This recipe honors that relatively recent culinary history while applying the techniques of traditional baking—creaming butter and sugar, alternating dry and wet ingredients—to create a scratch-made version that far surpasses the boxed mixes of the late 20th century.
Why This Recipe Works
This recipe succeeds where many pull-apart cakes fail because of three critical factors: structural integrity, moisture retention, and frosting consistency. First, the cupcake base is designed to be sturdy enough to hold the weight of a unified frosting layer without collapsing, yet tender enough to remain fluffy. We achieve this by using a combination of butter and oil; butter provides the flavor, while oil ensures the crumb stays soft even if refrigerated.
Secondly, we use ‘jimmies’ (the rod-shaped sprinkles) rather than ‘nonpareils’ (the tiny balls). Jimmies dissolve slightly during baking to create distinct pops of color without bleeding into a muddy gray mess, which is a common pitfall in rainbow cakes.
Finally, the frosting technique is key. A standard buttercream can be too soft, causing the ‘bridge’ between cupcakes to sag. This recipe uses a high-ratio American Buttercream that crusts slightly on the outside. This ‘crusting’ quality allows you to smooth the surface across multiple cupcakes to create the illusion of a single sheet cake. Once the frosting sets, it holds the shape perfectly until a guest pulls a cupcake away.
Why You’ll Love This Recipe
- ✓No cutting required—guests just grab and go!
- ✓Nostalgic vanilla flavor with colorful confetti inside and out.
- ✓Highly customizable shape (numbers, letters, or geometric patterns).
- ✓Sturdy buttercream that bridges gaps perfectly.
- ✓Stays moist for days thanks to the sour cream and oil blend.
Equipment You’ll Need
- ✓2 standard 12-cup muffin tins
- ✓Cupcake liners
- ✓Stand mixer or electric hand mixer
- ✓Large mixing bowls
- ✓Large serving platter or cake board
- ✓Offset spatula
- ✓Piping bag with large round tip (optional)
Ingredients
- ✓2 1/2 cups cake flour, sifted
- ✓2 tsp baking powder
- ✓1/2 tsp baking soda
- ✓1/2 tsp salt
- ✓3/4 cup unsalted butter, softened
- ✓1/4 cup vegetable oil
- ✓1 1/2 cups granulated sugar
- ✓3 large eggs, room temperature
- ✓2 tsp pure vanilla extract
- ✓1/2 cup sour cream, room temperature
- ✓3/4 cup whole milk, room temperature
- ✓1/2 cup rainbow sprinkles (jimmies, not nonpareils)
- ✓1 1/2 cups unsalted butter (for frosting), softened
- ✓5-6 cups powdered sugar, sifted
- ✓1/4 cup heavy cream
- ✓Pinch of salt
- ✓Additional sprinkles for decoration
Instructions
- Preheat your oven to 350°F (175°C) and line two 12-cup muffin tins with paper liners.
- In a medium bowl, whisk together the cake flour, baking powder, baking soda, and salt. Set aside.
- In the bowl of a stand mixer fitted with the paddle attachment, beat the softened butter, vegetable oil, and granulated sugar on medium-high speed for 3-4 minutes until light and fluffy.
- Add the eggs one at a time, beating well after each addition. Scrape down the sides of the bowl. Mix in the vanilla extract and sour cream.
- Reduce mixer speed to low. Add the dry ingredients in three parts, alternating with the milk, starting and ending with the flour mixture. Mix only until just combined to avoid dense cupcakes.
- Gently fold in the 1/2 cup of rainbow sprinkles by hand using a rubber spatula. Do not overmix.
- Divide the batter evenly among the cupcake liners, filling them about 2/3 full.
- Bake for 18-20 minutes, or until a toothpick inserted into the center comes out clean. Allow cupcakes to cool in the pan for 5 minutes, then transfer to a wire rack to cool completely.
- While cupcakes cool, make the frosting. Beat the 1 1/2 cups butter on medium-high speed for 5 minutes until pale and creamy.
- Gradually add the powdered sugar, one cup at a time, mixing on low. Add the heavy cream, vanilla, and salt. Increase speed to high and whip for 3-4 minutes until fluffy.
- To assemble, arrange the cooled cupcakes on your cake board in your desired shape (rectangle, circle, or number). Place them as close together as possible so the liners touch.
- Put a small dab of frosting on the bottom of each cupcake wrapper to ‘glue’ it to the board so they don’t slide while frosting.
- Pipe a thick layer of frosting over the tops of the cupcakes, filling in the gaps between them. Use an offset spatula to smooth the frosting into one continuous surface, treating the cupcake tops like a single sheet cake.
- Immediately top with generous amounts of additional rainbow sprinkles before the frosting crusts over.
- Let the cake set for 30 minutes before serving to allow the frosting bridge to stabilize.
Expert Cooking Tips
- ✓Use ‘Jimmies’ sprinkles inside the batter. Nonpareils (the little balls) will bleed color and turn your batter gray.
- ✓Ensure all cold ingredients (eggs, milk, sour cream) are at room temperature to create a smooth, emulsified batter.
- ✓Do not overfill the liners. You want flat tops for a pull-apart cake to ensure an even frosting surface.
- ✓Glue the cupcakes down! A tiny dot of buttercream or corn syrup under each liner prevents them from sliding around while you try to spread the frosting.
- ✓If you have large gaps between cupcakes, you can plug them with mini marshmallows or small pieces of cookie before frosting to support the buttercream bridge.
- ✓Sift your powdered sugar to ensure a lump-free frosting, which is crucial for a smooth finish.
- ✓Use an offset spatula dipped in warm water to get a perfectly smooth bakery-style finish on the frosting.
Substitutions and Variations
If you do not have cake flour, you can make a substitute by measuring 1 cup of all-purpose flour, removing 2 tablespoons, and replacing them with 2 tablespoons of cornstarch. Sift this mixture twice. For a dairy-free version, substitute the butter with high-quality vegan butter sticks and use almond or oat milk in place of cow’s milk; note that the frosting may be slightly softer. You can replace sour cream with full-fat Greek yogurt for a similar tang and moisture content. If you prefer a different flavor base, this method works excellently with chocolate cupcakes, though the rainbow sprinkles inside won’t be as visible. For the oil, canola oil, grapeseed oil, or melted coconut oil are all acceptable substitutes.
Common Mistakes to Avoid
The most common mistake with pull-apart cakes is spacing the cupcakes too far apart. They must be touching; otherwise, the frosting will fall into the crevices, breaking the illusion of a single cake. Another error is frosting the cupcakes while they are still slightly warm. This will melt the butter in the frosting, causing it to slide off and lose its shape. Overmixing the batter after adding the flour is a frequent baking error that leads to tough, chewy cupcakes instead of light, fluffy ones. Finally, using cheap, waxy sprinkles can result in a gritty texture; opt for high-quality confectionery sprinkles for the best mouthfeel.
Serving Suggestions
Serve this pull-apart cake as the centerpiece of a birthday party table. Because it is already pre-portioned, you don’t need a knife. Place a stack of colorful napkins nearby and let guests grab their own cupcake. This cake pairs beautifully with cold milk or vanilla ice cream. If you are doing a specific theme, you can pipe a border around the edge of the ‘cake’ or write a message across the center just like you would on a traditional sheet cake.
Storage and Reheating Tips
This cake is best enjoyed the day it is assembled. However, leftovers can be stored in an airtight container at room temperature for up to 2 days. If you need to keep them longer, refrigerate them for up to 4 days, but allow them to come to room temperature before serving to soften the buttercream. If you are making this in advance, you can bake the cupcakes a day ahead and store them in an airtight container, then assemble and frost the cake on the day of the event. Freezing the fully assembled pull-apart cake is difficult due to its size, but individual unfrosted cupcakes freeze perfectly for up to 3 months.
Nutrition Facts (Estimated)
| Serving Size | 1 Cupcake |
| Calories | 320 |
| Fat | 16g |
| Saturated Fat | 9g |
| Unsaturated Fat | 6g |
| Trans Fat | 0g |
| Cholesterol | 45mg |
| Sodium | 180mg |
| Carbohydrates | 42g |
| Fiber | 0.5g |
| Sugar | 28g |
| Protein | 3g |
Frequently Asked Questions
Can I bake the cupcakes in advance?
Yes! You can bake the cupcakes 1-2 days in advance. Store them in an airtight container at room temperature. Do not frost them until the day you plan to serve to ensure the structure holds up best.
How do I transport a pull-apart cake?
Transporting can be tricky. It is best to assemble the cake on the final serving board or a strong cake drum. Place the board inside a large cake box. If you don’t have a box that fits, place the board in the trunk of your car (on a non-slip mat) where it is flat, rather than on a slanted car seat.
Why did my sprinkles sink to the bottom?
Sprinkles can sink if the batter is too thin or if you use heavy sprinkles. Toss your sprinkles in a teaspoon of flour before folding them into the batter to give them some grip.
Can I use store-bought frosting?
You can, but store-bought frosting is often thinner than homemade buttercream. If you use it, you might need to whip in some extra powdered sugar to stiffen it up so it can bridge the gaps between cupcakes without sagging.
How many cupcakes does this recipe make?
This recipe yields approximately 24 standard-sized cupcakes. If you need fewer, you can halve the recipe, or if you need more for a large number shape (like ’50’), you may need to make a double batch.
How do I make the frosting smooth like a sheet cake?
The key is using a large offset spatula and plenty of frosting. Don’t be afraid to pile it on thick. Once spread, let it sit for about 5-10 minutes until it slightly crusts, then use a Viva paper towel or parchment paper to gently smooth out any spatula lines.
Can I make this gluten-free?
Yes, simply swap the cake flour for a high-quality 1:1 Gluten-Free Baking Flour blend. Ensure your sprinkles are also certified gluten-free, as some brands use wheat starch as a binder.
What if my cupcakes have high domes?
If your cupcakes bake up with high peaks, you should trim them with a serrated knife to make them flat. Flat tops are essential for creating a smooth, unified surface for the pull-apart cake illusion.
Conclusion
The Rainbow Sprinkle Pull-Apart Cupcake Cake is truly the ultimate party hack. It delivers all the joy and flavor of a scratch-made birthday cake with zero stress when it comes to serving. The tender crumb, the crunch of the sprinkles, and the creamy, sweet frosting come together to create a dessert that is as delicious as it is beautiful. Whether you are a seasoned baker or a novice in the kitchen, this forgiving and fun recipe is sure to become your go-to for celebrations. So grab your sprinkles, preheat your oven, and get ready to be the hero of the birthday party!