The Ultimate Fun Rainbow Sprinkle Birthday Cake for 8-Inch Pans
Fun Rainbow Sprinkle Birthday Cake For 8 Inch Round Pans Recipe
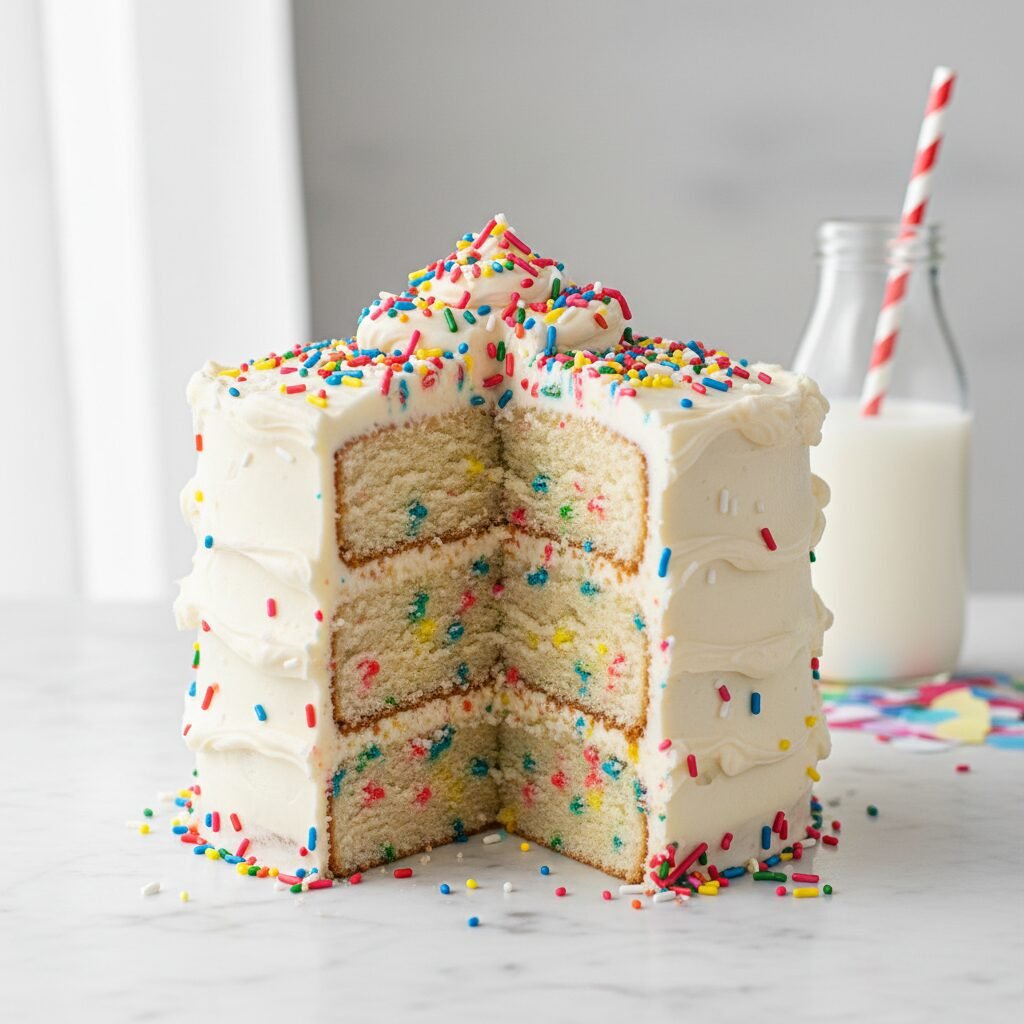
Ditch the box mix for this incredibly moist and tender homemade rainbow sprinkle cake! Perfectly scaled for two 8-inch round pans, this nostalgic ‘Funfetti’ style dessert features a plush vanilla crumb packed with colorful jimmies and topped with a velvety buttercream frosting.
30 minutes
35 minutes
1 hour 30 minutes
12-14 servings
Dessert
Baking
American
Vegetarian
There is something undeniably magical about cutting into a cake and discovering a confetti explosion of color hidden within the tender white crumb. This Fun Rainbow Sprinkle Birthday Cake is more than just a dessert; it is a time machine that transports you straight back to the happiest moments of childhood. While the convenience of a box mix has its place, there is absolutely no comparison to the flavor and texture of a scratch-made version. This recipe has been meticulously tested to ensure that it delivers that classic, nostalgic ‘birthday cake’ flavor—heavy on the vanilla, buttery sweet, and impossibly soft—without the chemical aftertaste often associated with commercial mixes.
The secret to this cake’s allure lies in its texture. It strikes the perfect balance between dense and fluffy, sturdy enough to stack but meltingly tender on the tongue. We achieve this by using a combination of butter for flavor and oil for lasting moisture, along with sour cream to tenderize the gluten strands. But the real stars of the show are the sprinkles. Not just any sprinkles, but specifically rainbow jimmies, which hold their shape and color during the baking process, creating distinct pockets of joy rather than a muddy, gray swirl. Whether you are celebrating a milestone birthday, a promotion, or just the fact that it’s Friday, this cake is the ultimate centerpiece. It screams celebration, demands a smile, and tastes like pure happiness on a fork. Prepare to become the designated cake baker for every family event moving forward, because once you serve this, nothing else will do.
History & Origins
The concept of the birthday cake has a surprisingly long and storied lineage, evolving significantly over centuries to become the sprinkle-laden confection we know today. The tradition can be traced back to the Ancient Romans, who baked cakes using flour, nuts, yeast, and honey to celebrate weddings and occasional 50th birthdays. However, the modern birthday cake finds its truest roots in the German ‘Kinderfest’ of the 15th century. These celebrations for children featured cakes that were more bread-like and far less sweet than our contemporary versions. It wasn’t until the Industrial Revolution in the 19th century that baking ingredients like refined sugar, flour, and baking powder became accessible and affordable, allowing for the creation of the lighter, sweeter cakes that resemble what we eat today.
The specific phenomenon of the ‘Funfetti’ or rainbow sprinkle cake is a much more recent innovation, cementing itself in American pop culture in 1989 when Pillsbury introduced their now-iconic cake mix. It was a marketing masterstroke that combined the convenience of a mix with the visual excitement of colorful confectionery bits. The product tapped into a desire for whimsy and visual flair, quickly becoming a staple at children’s parties across the United States. While ‘Funfetti’ is a trademarked term, the concept of embedding sprinkles into batter has been embraced by bakers worldwide. Culturally, the addition of sprinkles—or ‘jimmies’ as they are regionally known in parts of the Northeast US—signifies festivity. They transform a standard white cake into an event, bridging the gap between culinary art and playful expression.
Why This Recipe Works
This recipe succeeds where many others fail because it addresses the three most common complaints about homemade vanilla cakes: dryness, lack of flavor, and sinking sprinkles. First, regarding moisture: many recipes rely solely on butter. While butter provides excellent flavor, it contains water which evaporates, potentially leading to a dry crumb. By using a 50/50 split of high-quality unsalted butter and neutral vegetable oil, we get the best of both worlds—the rich, creamy taste of butter and the moisture-retaining properties of oil, which keeps the cake soft for days.
Secondly, the structure is fortified with sour cream and egg whites. The acidity in the sour cream breaks down gluten strands, ensuring a tender crumb, while the egg whites (rather than whole eggs) keep the batter pale and white, allowing the colors of the sprinkles to pop vibrantly without a yellow tint.
Finally, the sprinkle suspension mechanics are crucial. This batter is thick enough to suspend the sprinkles so they don’t sink to the bottom, thanks to the reverse creaming method or a sturdy traditional cream depending on your preference (we use a modified creaming method here). We specifically call for ‘jimmies’ (the rod-shaped sprinkles) rather than ‘nonpareils’ (the tiny balls). Jimmies are coated in a way that prevents them from melting instantly into the batter, preserving distinct dots of color rather than bleeding into a tie-dye mess. This combination of chemical leavening precision and ingredient selection creates a foolproof, bakery-quality result.
Why You’ll Love This Recipe
- ✓Uses both butter and oil for maximum moisture and flavor.
- ✓Egg whites ensure a bright white crumb to make colors pop.
- ✓Specifically designed for 8-inch pans for tall, impressive layers.
- ✓Sour cream addition guarantees a tender, melt-in-your-mouth texture.
- ✓Uses rainbow jimmies that won’t bleed or streak the batter.
Equipment You’ll Need
- ✓Two 8-inch round cake pans
- ✓Stand mixer or electric hand mixer
- ✓Large mixing bowls
- ✓Whisk
- ✓Rubber spatula
- ✓Parchment paper
- ✓Wire cooling rack
- ✓Offset spatula
- ✓Cake turntable (optional)
Ingredients
- ✓2 1/2 cups (300g) cake flour, sifted
- ✓2 teaspoons baking powder
- ✓1/2 teaspoon baking soda
- ✓1 teaspoon salt
- ✓3/4 cup (170g) unsalted butter, softened to room temperature
- ✓1/4 cup (60ml) vegetable oil or canola oil
- ✓1 1/2 cups (300g) granulated sugar
- ✓1 tablespoon clear vanilla extract (for white color) or pure vanilla extract
- ✓4 large egg whites, room temperature
- ✓1/2 cup (120g) full-fat sour cream, room temperature
- ✓1 cup (240ml) whole milk, room temperature
- ✓2/3 cup (100g) rainbow sprinkles (jimmies, not nonpareils)
Instructions
- Preheat your oven to 350°F (175°C). Grease two 8-inch round cake pans heavily with butter or baking spray and line the bottoms with parchment paper rounds for easy release.
- In a medium bowl, whisk together the cake flour, baking powder, baking soda, and salt until well combined. Set aside.
- In the bowl of a stand mixer fitted with the paddle attachment (or a large bowl using a hand mixer), beat the softened butter, oil, and granulated sugar on medium-high speed for about 3-4 minutes. The mixture should look light, fluffy, and pale.
- Add the vanilla extract and mix until combined. Scrape down the sides and bottom of the bowl.
- Reduce the mixer speed to medium-low. Add the egg whites one at a time, mixing well after each addition. Stop to scrape the bowl again to ensure everything is incorporated.
- In a small bowl or measuring cup, whisk together the sour cream and whole milk until smooth.
- With the mixer on low speed, add the dry ingredients in three additions and the wet ingredients (milk/sour cream mixture) in two additions, alternating between them. Start and end with the dry ingredients. Mix only until just combined and no large streaks of flour remain. Do not overmix.
- Remove the bowl from the mixer. Gently fold in the rainbow sprinkles using a rubber spatula. Be careful not to overwork the batter, or the sprinkles may begin to bleed.
- Divide the batter evenly between the two prepared cake pans. Use a kitchen scale for precision if available.
- Bake for 30-35 minutes, or until a toothpick inserted into the center comes out clean or with just a few moist crumbs attached. The tops should be lightly golden and spring back when gently pressed.
- Allow the cakes to cool in the pans for 15 minutes. Then, carefully run a knife around the edges and invert them onto a wire rack to cool completely before frosting.
Expert Cooking Tips
- ✓Room Temperature Ingredients: Ensure butter, eggs, milk, and sour cream are at room temperature. This creates an emulsion that traps air, resulting in a fluffier cake.
- ✓Weigh Your Flour: Using a kitchen scale is far more accurate than cups. Too much flour creates a dry, dense cake.
- ✓Don’t Overmix: Once the flour is added, mix gently. Overmixing develops gluten, which leads to a tough, rubbery texture.
- ✓Use Jimmies: Always use the rod-shaped sprinkles (jimmies). Nonpareils (tiny balls) will bleed instantly and turn your batter a muddy gray.
- ✓Clear Vanilla: If you want that stark white, nostalgic bakery look, use clear imitation vanilla. For better flavor, use pure vanilla extract.
- ✓Parchment Paper: Never skip lining your pans with parchment paper. It guarantees your layers come out perfect without sticking.
Substitutions and Variations
This recipe is versatile, but substitutions should be made with care to preserve the chemistry. If you don’t have cake flour, you can make a DIY version by measuring 1 cup of all-purpose flour, removing 2 tablespoons, and replacing them with 2 tablespoons of cornstarch. Sift this mixture twice before using. For the sour cream, full-fat plain Greek yogurt is an excellent 1:1 substitute that provides similar acidity and moisture. If you need to make this dairy-free, you can substitute the butter with high-quality vegan butter sticks (not tub margarine), the milk with unsweetened almond or soy milk, and the sour cream with a dairy-free yogurt alternative, though the texture may vary slightly. While we recommend egg whites for the color, you can use 3 whole large eggs instead, though the cake will have a yellower crumb.
Common Mistakes to Avoid
The most frequent mistake with this cake is over-creaming or under-creaming the butter and sugar. You want it light and fluffy, but if the butter gets too warm, it loses its ability to hold air bubbles. Another common pitfall is using the wrong type of sprinkles; avoid ‘nonpareils’ or natural-dyed sprinkles that might brown in the oven. Additionally, opening the oven door too early can cause the cakes to collapse in the center due to a sudden drop in temperature. Wait until at least 25 minutes have passed before checking. Finally, frosting the cake before it is completely cool is a recipe for disaster; the buttercream will slide right off the layers. Patience is key!
Serving Suggestions
This cake is a showstopper on its own, but presentation is everything. Serve it on a pedestal cake stand to give it height and elegance. A classic American Buttercream or Swiss Meringue Buttercream flavored with vanilla bean paste pairs perfectly. For an extra festive touch, press additional sprinkles into the bottom third of the frosted cake’s exterior. Serve slices with a scoop of vanilla bean ice cream or a glass of cold milk. If it’s an adult birthday, a glass of champagne or a cake-batter martini complements the sweetness beautifully.
Storage and Reheating Tips
To store this cake, keep it in an airtight cake carrier at room temperature for up to 3 days. The sugar and fat content act as preservatives, keeping it moist. If you live in a very hot or humid climate, you may need to refrigerate it. If refrigerating, let the slices come to room temperature before eating for the best texture and flavor, as cold butter makes the cake feel dense. For long-term storage, you can freeze the unfrosted cake layers. Wrap each layer tightly in plastic wrap, then in aluminum foil, and freeze for up to 3 months. Thaw overnight in the refrigerator before assembling.
Nutrition Facts (Estimated)
| Serving Size | 1 slice |
| Calories | 580 |
| Fat | 28g |
| Saturated Fat | 14g |
| Unsaturated Fat | 12g |
| Trans Fat | 0g |
| Cholesterol | 65mg |
| Sodium | 320mg |
| Carbohydrates | 78g |
| Fiber | 1g |
| Sugar | 45g |
| Protein | 6g |
Frequently Asked Questions
Can I use all-purpose flour instead of cake flour?
Yes, but the texture will be slightly denser and more bread-like. Cake flour has less protein, which ensures a tender, velvety crumb.
Why did my sprinkles sink to the bottom?
This usually happens if the batter is too thin or if the cake was overmixed. This recipe uses a thick batter specifically to suspend the sprinkles.
Can I make this into cupcakes?
Absolutely! This recipe will yield approximately 24 standard cupcakes. Bake them at 350°F for 18-22 minutes.
Can I use natural sprinkles?
Natural sprinkles often use vegetable dyes that can turn brown or fade significantly during baking. For the best visual result, traditional artificial jimmies work best.
Why do I need room temperature ingredients?
Room temperature ingredients emulsify (mix together) much better than cold ones, trapping air which expands in the oven for a lighter, fluffier cake.
Can I use salted butter?
You can, but reduce the added salt in the recipe to 1/2 teaspoon. Unsalted butter is preferred so you can control the sodium level.
How do I get flat cake layers?
You can use ‘cake strips’ wrapped around the outside of the pan, which insulate the edges and promote even baking. Alternatively, simply trim the domes off with a serrated knife after cooling.
Is this recipe suitable for carving?
Yes, this cake is sturdy enough to be stacked and carved, making it a great choice for novelty sculpted cakes.
Can I double this recipe?
Yes, you can double the ingredients to make a 3-layer 9-inch cake or a 4-layer 8-inch cake. Just ensure your mixer bowl is large enough.
Conclusion
Making a Fun Rainbow Sprinkle Birthday Cake from scratch is a labor of love that pays off in every single bite. The joy on your family’s or friends’ faces when they see the vibrant speckles of color and taste the rich, homemade vanilla flavor is worth every minute of prep time. This recipe moves beyond the artificial taste of box mixes and offers a sophisticated yet deeply nostalgic treat that is perfect for any celebration. Whether you are a seasoned baker or a novice in the kitchen, following these steps will guarantee a centerpiece that is as delicious as it is beautiful. So grab your sprinkles, preheat that oven, and get ready to bake some happiness!