Ultimate Fun Candy Explosion Birthday Cake: The Best Class Party Surprise Recipe
Fun Candy Explosion Birthday Cake For Class Party Recipe
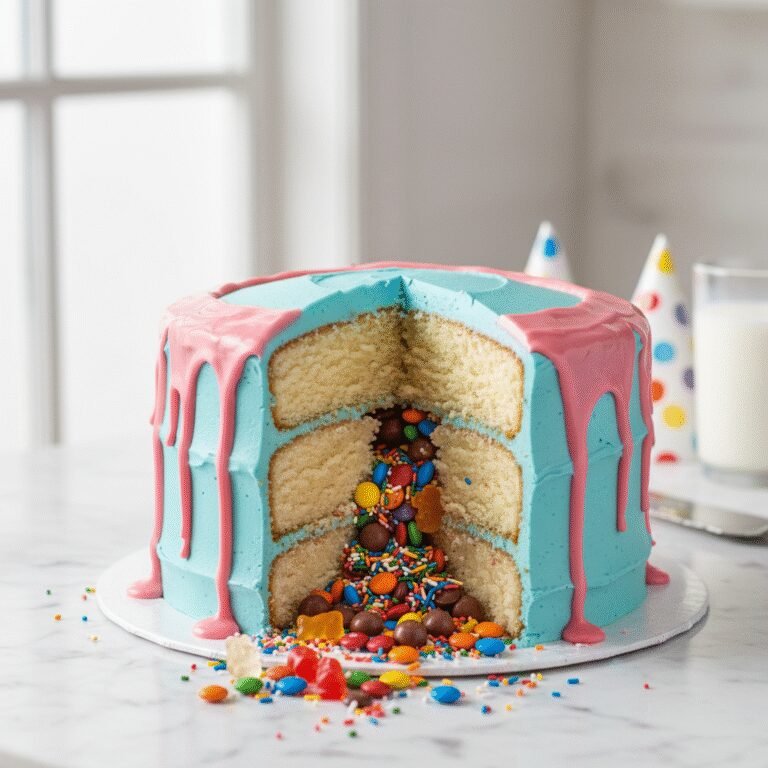
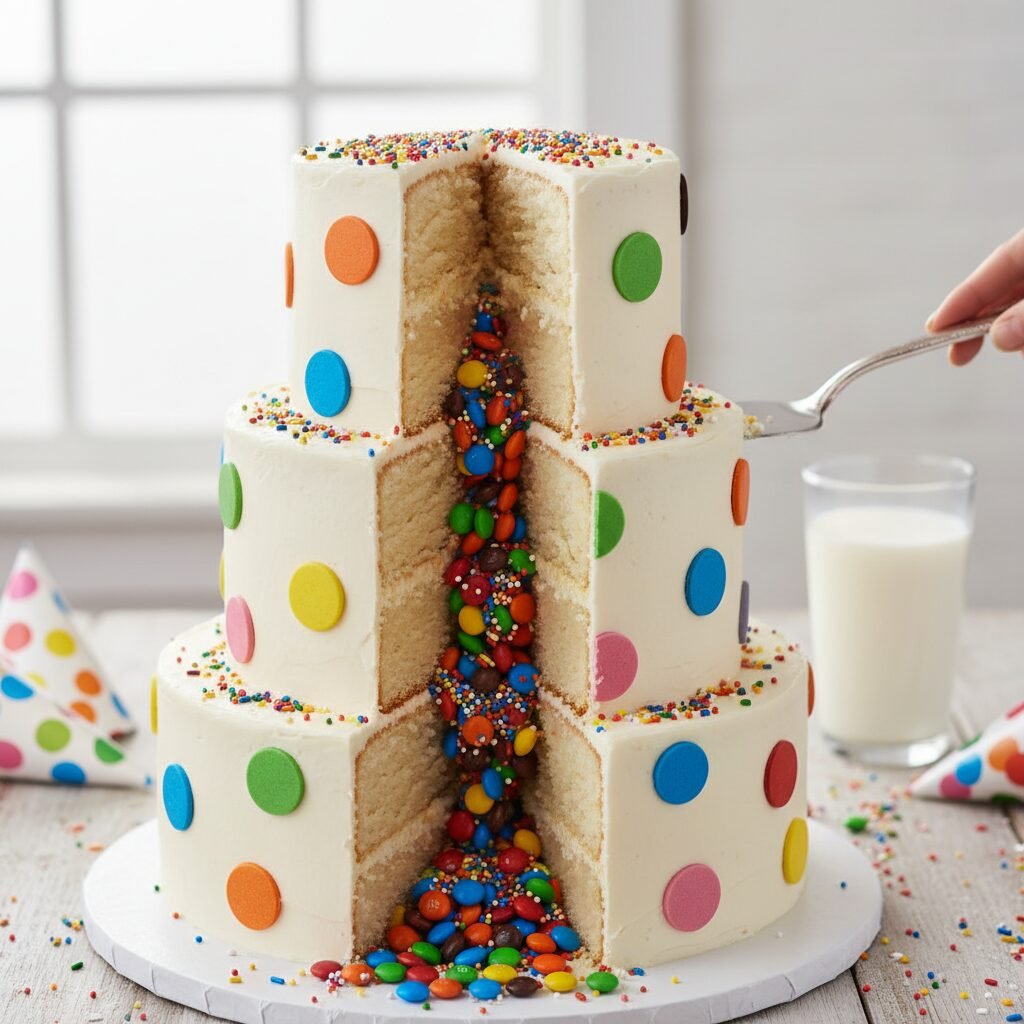
Get ready to be the hero of the classroom with this show-stopping Candy Explosion Birthday Cake! A seemingly innocent vanilla buttercream cake that spills out a cascade of colorful candies when sliced, creating an unforgettable moment of joy for kids and adults alike.
45 minutes
35 minutes
2 hours 30 minutes
12-16 servings
Dessert
Baking
American
Vegetarian
There is a specific kind of magic that happens at a child’s birthday party when the cake is brought out. The lights dim, the candles flicker, and a room full of energetic kids suddenly goes quiet in anticipation. But imagine the eruption of cheers when that first slice is pulled away, not to reveal just sponge and frosting, but a literal avalanche of colorful candies tumbling out from the center! This Fun Candy Explosion Birthday Cake, often known as a Piñata Cake or Surprise-Inside Cake, is the ultimate party trick that tastes as good as it looks.
Designed specifically for class parties and large gatherings, this recipe balances structural integrity with moist, tender crumb. While many novelty cakes prioritize looks over taste, we believe you shouldn’t have to choose. The base is a sturdy yet fluffy vanilla bean butter cake that holds up to the carving and stacking process without crumbling. It is coated in a velvety, kid-friendly American buttercream that acts as the perfect glue and canvas for your sprinkles.
The beauty of this recipe lies in its versatility. You can tailor the hidden candy center to match school colors, holiday themes, or the birthday child’s absolute favorites. Whether it’s M&Ms, sprinkles, jelly beans, or chocolate rocks, the hidden treasure turns a standard dessert into an interactive event. In this comprehensive guide, we will walk you through every step of baking, stacking, filling, and frosting to ensure your cake makes it to the classroom safely and delivers that perfect ‘explosion’ moment.
History & Origins
The concept of the ‘Surprise-Inside’ cake has roots that go back much further than the Pinterest era, though its modern, candy-filled iteration is a relatively recent phenomenon. Historically, the idea of hiding objects inside food dates back to Medieval Europe. In those times, ‘entremets’ were elaborate entertainment dishes served between courses at banquets. The most famous, and somewhat bizarre, examples involved hiding live birds or other animals inside large pies, which would fly out when the crust was cut—a literal interpretation of ‘four and twenty blackbirds baked in a pie.’
Moving into more appetizing territory, the tradition of hiding distinct items in cakes is seen in the King Cake (Galette des Rois) of France and New Orleans, where a bean or small figurine is baked inside to designate the ‘king’ for the day. Similarly, the Victorian era saw the popularity of cakes containing coins or charms, meant to predict the future of the guest who found them.
The modern ‘Piñata Cake,’ which mimics the Mexican tradition of breaking open a papier-mâché container to release candy, gained massive popularity in the early 2010s alongside the rise of visual social media platforms like Instagram and Pinterest. Bakers began experimenting with cutting centers out of layer cakes to create hidden chambers. This technique transformed the cake from a mere dessert into an experience, capitalizing on the element of surprise. Today, it has become a staple for gender reveal parties and milestone birthdays, representing the evolution of baking as a form of interactive entertainment.
Why This Recipe Works
This recipe is engineered for success because it addresses the three main challenges of a piñata cake: structural stability, moisture retention, and the ‘spill’ factor. First, a standard box mix is often too light and airy to support the weight of the upper layers once the center has been hollowed out. Our recipe uses a ‘reverse creaming’ method (mixing butter into dry ingredients first) which yields a tighter, sturdier crumb that cuts cleanly without falling apart, yet remains melt-in-your-mouth tender.
Secondly, we use a high-ratio American Buttercream. This frosting crusts slightly on the outside, which is essential for transporting the cake to a classroom without it melting or sliding. It also acts as a powerful adhesive for the layers.
Finally, the ‘why’ behind the explosion works because of the specific dimensions we recommend for the hollowed center. Many recipes suggest cutting too wide of a hole, which destabilizes the cake, or too narrow, which results in the candy getting stuck. Our method creates a chamber that maximizes volume while leaving a thick enough wall of cake to ensure the slice holds its shape when served. We also recommend specific types of candy that won’t absorb moisture from the cake and get soggy, ensuring a crisp, loud rattle and a perfect tumble when sliced.
Why You’ll Love This Recipe
- ✓Creates a massive ‘wow’ factor with a hidden candy avalanche.
- ✓Sturdy vanilla sponge designed specifically for carving and stacking.
- ✓Highly customizable filling for any theme or allergy requirement.
- ✓Uses a crusting buttercream perfect for transport to schools.
- ✓Feeds a large crowd, making it ideal for class parties.
- ✓Includes a step-by-step guide to structural safety.
Equipment You’ll Need
- ✓Four 8-inch round cake pans
- ✓Stand mixer or electric hand mixer
- ✓3.5-inch round cookie cutter (for coring)
- ✓Offset spatula
- ✓Bench scraper
- ✓Serrated bread knife
- ✓Cake turntable (optional but recommended)
- ✓Piping bags and tips
Ingredients
- ✓3 cups all-purpose flour, sifted
- ✓2 1/2 cups granulated sugar
- ✓1 tbsp baking powder
- ✓1 tsp salt
- ✓1 cup unsalted butter, room temperature, cubed
- ✓1 cup whole milk, room temperature
- ✓1/2 cup sour cream, room temperature
- ✓5 large eggs, room temperature
- ✓1 tbsp pure vanilla extract
- ✓2 cups M&Ms, sprinkles, or small coated candies (for the filling)
- ✓2 cups unsalted butter (for frosting)
- ✓7-8 cups powdered sugar, sifted
- ✓1/4 cup heavy cream
- ✓Rainbow sprinkles (for decoration)
Instructions
- Preheat your oven to 350°F (175°C). Grease four 8-inch round cake pans, line the bottoms with parchment paper, and grease the paper. Dust with flour and tap out excess.
- In the bowl of a stand mixer fitted with the paddle attachment, combine the flour, sugar, baking powder, and salt. Mix on low speed for 30 seconds to combine.
- Add the cubed butter one piece at a time while the mixer is running on low. Continue mixing until the mixture resembles damp sand and no large chunks of butter remain.
- In a separate jug, whisk together the milk, sour cream, eggs, and vanilla extract.
- With the mixer on low, slowly pour in half of the wet ingredients. Increase speed to medium and beat for 2 minutes to build structure. Scrape down the sides of the bowl.
- Add the remaining wet ingredients in two batches, beating for 30 seconds after each addition. Do not overmix.
- Divide the batter evenly among the four prepared pans. Bake for 30-35 minutes, or until a toothpick inserted into the center comes out clean.
- Allow cakes to cool in pans for 10 minutes, then turn out onto a wire rack to cool completely. Wrap in plastic wrap and chill in the fridge for 1 hour (this makes carving easier).
- Level the tops of all four cake layers using a serrated knife so they are perfectly flat.
- Take two of the cake layers and use the 3.5-inch round cookie cutter to remove the exact center, creating thick rings of cake. Leave the other two layers whole (one for the bottom, one for the top).
- Make the frosting: Beat the 2 cups of butter on medium-high speed for 5 minutes until pale and creamy. Gradually add powdered sugar, alternating with heavy cream and vanilla. Whip for another 3-5 minutes until fluffy.
- Assembly: Place one whole layer on your cake board or serving platter. Spread a thin layer of frosting on top.
- Place one ‘ring’ layer on top of the base. Frost the top of the ring. Place the second ‘ring’ layer on top of that. You now have a deep well in the center of the cake.
- Frost the inside walls of the well lightly to seal crumbs, then fill the cavity to the brim with your M&Ms and candy mix.
- Apply frosting to the top of the second ring, then place the final whole cake layer on top to seal the chamber.
- Crumb coat the entire cake with a thin layer of frosting and chill for 20 minutes.
- Apply the final thick layer of frosting, smooth with a bench scraper, and cover the exterior with festive sprinkles.
- Slice gently to reveal the surprise!
Expert Cooking Tips
- ✓Chill your cake layers before cutting the centers; warm cake will crumble and compromise the structure.
- ✓Use ‘hard’ candies for the filling (like M&Ms or sprinkles). Gummies or fresh fruit can release moisture and make the inside of the cake soggy.
- ✓Measure your flour by weight (grams) or use the spoon-and-level method to avoid a dense, dry cake.
- ✓Apply a ‘crumb coat’ (a thin layer of frosting) to seal in crumbs before doing the final decoration.
- ✓When cutting the hole, save the center scraps! They make perfect cake pops or a snack for the baker.
- ✓Ensure the bottom layer is completely level, or the entire tower may lean.
- ✓If transporting to school, bring the cake in a tall box and keep the vehicle cool to prevent the buttercream from sliding.
Substitutions and Variations
This recipe is highly adaptable to dietary needs and pantry limitations. For a gluten-free version, substitute the all-purpose flour with a high-quality 1:1 gluten-free baking flour blend that contains xanthan gum. If you need to make this dairy-free, use plant-based butter blocks (not tub margarine) for both the cake and frosting, and swap the milk/sour cream for oat milk and a dairy-free yogurt alternative. For the filling, ensure your candies are certified gluten-free or vegan depending on the requirement. If you don’t have sour cream, full-fat Greek yogurt or buttermilk are excellent substitutes that provide the necessary acidity and moisture. You can also swap the vanilla extract for almond or lemon extract to change the flavor profile.
Common Mistakes to Avoid
The most common mistake is cutting the hole in the center layers too wide. If the walls of the cake ring are too thin, they will buckle under the weight of the top layer and frosting. Aim for a hole that is about 3 to 4 inches in diameter for an 8-inch cake. Another error is overfilling the center. If you pile the candy higher than the rim of the ring layers, the top layer won’t sit flat, causing a gap where filling can leak out or the cake to wobble. Lastly, do not cut the cake while it is still warm. The structural integrity required for a piñata cake relies on the fats in the butter and eggs being set and cool.
Serving Suggestions
Serve this cake on a large, flat platter to catch the spilling candy. It pairs beautifully with cold milk or vanilla ice cream. Since this is a ‘tall’ cake (four layers), you may want to cut thinner slices than usual. For a class party, bring small paper cups or napkins to help distribute the extra candy that spills out onto the board, ensuring every child gets a fair share of the ‘treasure.’ To heighten the drama, use a sharp, warm knife to make the first cut, and pull the slice out slowly for the best photo opportunity.
Storage and Reheating Tips
This cake is best stored at room temperature in an airtight cake carrier for up to 3 days. Refrigeration can dry out the sponge and make the candy inside hard or ‘sweaty’ due to condensation. However, if your kitchen is very hot (above 75°F), you may need to refrigerate it to keep the buttercream stable. If you do refrigerate it, let it come to room temperature for at least 2 hours before serving. Leftover slices (where the candy has already spilled) can be wrapped individually in plastic wrap. Note that once cut, the candy inside will begin to soften from exposure to the air and cake moisture, so it is best consumed within 24 hours of slicing.
Nutrition Facts (Estimated)
| Serving Size | 1 slice |
| Calories | 650 |
| Fat | 30g |
| Saturated Fat | 18g |
| Unsaturated Fat | 10g |
| Trans Fat | 0.5g |
| Cholesterol | 85mg |
| Sodium | 320mg |
| Carbohydrates | 88g |
| Fiber | 1g |
| Sugar | 55g |
| Protein | 6g |
Frequently Asked Questions
Can I bake the cake layers a day in advance?
Absolutely! In fact, baking the layers a day ahead makes the assembly easier. Wrap the cooled layers tightly in plastic wrap and store them at room temperature or in the fridge. Cold layers are easier to carve and stack.
What is the best candy to use for the filling?
Coated candies like M&Ms, Reese’s Pieces, or Sixlets work best because the candy shell protects the chocolate from melting. Sprinkles and nonpareils are also excellent. Avoid gummies, marshmallows, or chopped chocolate bars, as they tend to stick together or get soggy.
How do I transport this to a school party safely?
Use a sturdy cake box that fits the height of the cake. Place a non-slip mat (or a dab of buttercream) under the cake board inside the box. Keep the car cool and drive carefully. If it’s a hot day, transport the cake chilled.
Can I use store-bought frosting?
You can, but you will need about 3-4 tubs. Note that store-bought frosting is often softer than homemade buttercream, so your cake might be less stable. You can stiffen store-bought frosting by whipping in some extra powdered sugar.
Why did my cake collapse?
This usually happens if the cake walls were cut too thin, the cake was too warm when stacked, or the frosting between layers was too slippery. Ensure your cake rings have at least 2 inches of width.
How many layers do I really need?
You need a minimum of three layers: a bottom base, a middle ring (with the hole), and a top lid. However, four layers (two middle rings) create a more impressive explosion effect.
Can I freeze this cake?
You can freeze the cake layers before assembly. We do not recommend freezing the fully assembled cake, as the candy inside may crack or bleed color when thawing.
Is this recipe nut-free?
The cake batter is nut-free, but you must check the labels on your candy filling. Many chocolate candies are processed in facilities with nuts. For a strictly nut-free school, stick to safe sprinkles or verified nut-free chocolates.
Conclusion
The Fun Candy Explosion Birthday Cake is more than just a dessert; it is an edible event that brings genuine wonder to any celebration. While it requires a bit more architectural planning than a standard sheet cake, the payoff is worth every second of effort. The look of pure delight on the children’s faces when the colorful avalanche tumbles out is a memory that lasts a lifetime. Whether you are a seasoned baker or a parent looking to try something special for the class party, this recipe provides a reliable, delicious foundation for your creativity. So grab your sprinkles, preheat your oven, and get ready to bake the most talked-about cake of the school year!