The Ultimate Tall Oreo Drip Cake With Sprinkles
Tall Oreo Drip Cake With Sprinkles Recipe
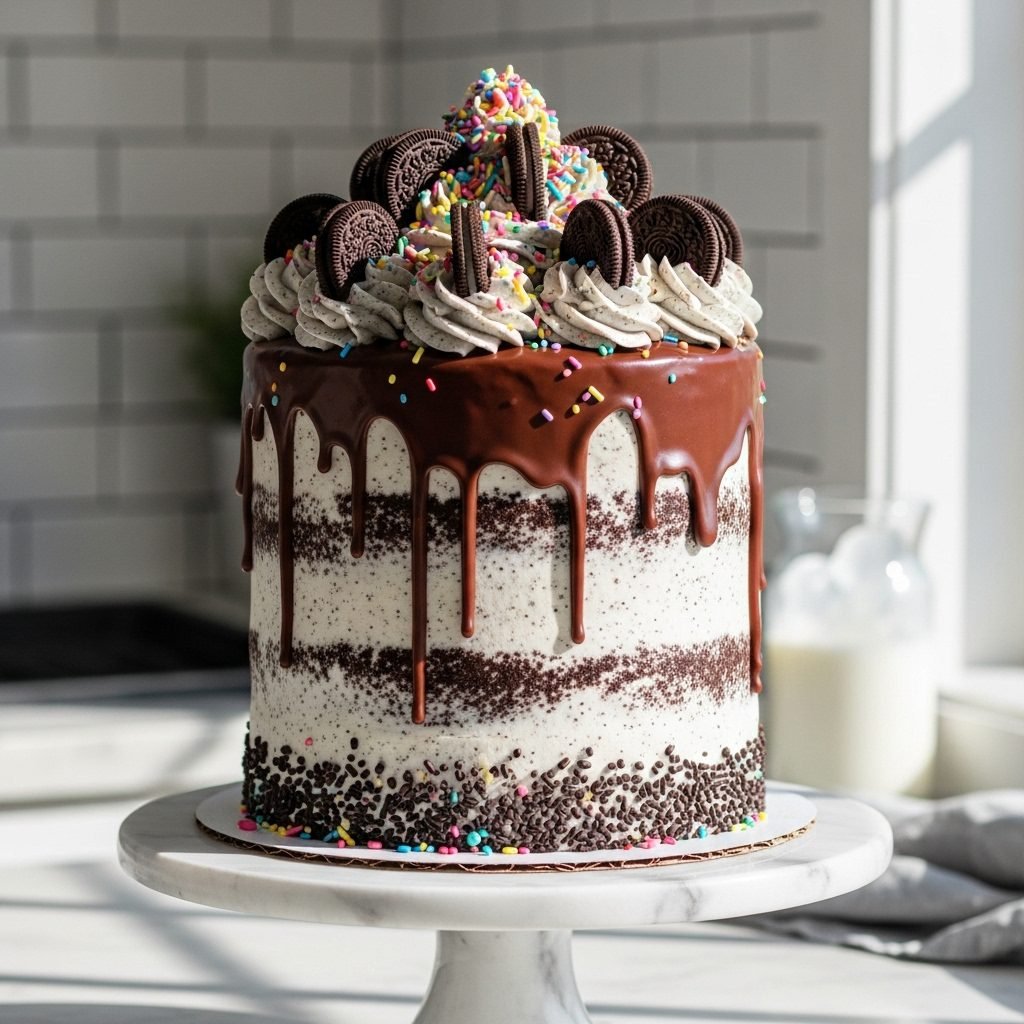
This showstopping Tall Oreo Drip Cake is a chocolate lover’s dream, featuring four layers of moist dark chocolate sponge sandwiched between creamy crushed Oreo buttercream. Finished with a glossy chocolate ganache drip and a festive explosion of sprinkles, it is the perfect centerpiece for any celebration.
1 hour
35 minutes
2 hours 30 minutes
12-14 servings
Dessert
Baking
American
Vegetarian
There is something undeniably magical about a tall, architectural cake that demands attention the moment it enters a room. This Tall Oreo Drip Cake with Sprinkles is not just a dessert; it is a statement piece designed to bring joy, nostalgia, and a serious sugar rush to your table. At its heart lies a deeply rich, dark chocolate sponge that manages to be incredibly moist yet sturdy enough to support the towering structure. We use a combination of Dutch-processed cocoa and hot coffee to bloom the chocolate flavor, ensuring every bite is intense and satisfying without being overly heavy.
But the real star of the show is the cookies-and-cream buttercream. By folding finely crushed Oreo crumbs into a silky vanilla American buttercream, we create a frosting that is speckled with deliciousness and offers a delightful textural contrast to the soft cake layers. The saltiness of the cookie crumbs cuts through the sweetness of the sugar, creating a perfectly balanced bite. To elevate the aesthetics, we employ the popular ‘drip’ technique using a simple chocolate ganache. The glossy dark drips cascading down the speckled white sides create a dramatic visual effect that looks professionally made but is surprisingly achievable at home.
Finally, we crown this masterpiece with a generous scattering of vibrant sprinkles and whole cookies, adding a pop of color and whimsy that makes this cake ideal for birthdays, anniversaries, or any day that calls for a celebration. Whether you are a seasoned baker looking for your next project or a novice ready to try your hand at cake stacking, this recipe guides you through every step to ensure structural integrity and flavor perfection. Get ready to slice into a skyscraper of cookies and cream heaven!
History & Origins
The history of this cake is a delicious convergence of two major culinary icons: the Oreo cookie and the modern drip cake trend. The Oreo itself dates back to 1912, when it was introduced by the National Biscuit Company (today known as Nabisco) in New York City. Originally sold as the ‘Oreo Biscuit,’ it was an imitation of the Hydrox cookie but quickly surpassed its competitor to become the best-selling cookie in the United States. Over the last century, the Oreo has become a cultural phenomenon, evolving from a simple snack into a versatile ingredient used in milkshakes, ice creams, and, of course, cakes. Its distinct bitter chocolate wafer and sweet crème filling provide a flavor profile that is instantly recognizable and universally loved.
The ‘drip cake’ aesthetic, on the other hand, is a much more recent innovation in the world of pastry arts. While glazing cakes is an ancient technique, the specific style of a tall, straight-sided cake with a controlled, viscous drip cascading down the sides was popularized in the mid-2010s. This trend is largely credited to Australian baker Katherine Sabbath, whose neon-colored, playful creations broke the mold of traditional fondant-covered wedding cakes. The drip cake movement embraced buttercream finishes, sharp edges, and whimsical toppings, democratizing cake decorating by making it more about fun and flavor than rigid perfection. The ‘tall’ aspect of this cake also reflects a modern shift away from wide, single-layer sheet cakes toward smaller diameter tins (often 6-inch) stacked high to create an impressive vertical profile. This recipe marries the centenarian legacy of America’s favorite cookie with the contemporary artistic flair of the drip cake revolution.
Why This Recipe Works
This recipe succeeds because it meticulously addresses the structural challenges of tall cakes while maximizing flavor and texture. When building a cake with four or more layers, stability is paramount. The chocolate cake base in this recipe uses a specific balance of oil and buttermilk; the oil ensures the cake remains moist for days (as butter-based cakes can dry out when refrigerated), while the buttermilk tenderizes the gluten, preventing the tall stack from becoming tough or rubbery. We also use a ‘reverse creaming’ or simple wet-dry mix method that minimizes air incorporation, resulting in a flat, dense crumb that stacks beautifully without bulging.
The buttercream is another triumph of engineering and taste. By pulverizing the Oreos into a fine dust before adding them to the frosting, we ensure the buttercream remains pipeable and smooth enough to spread, while larger chunks are reserved for the filling between layers to add crunch. The ganache drip is formulated with a precise 1:1 ratio of heavy cream to chocolate, which creates the perfect viscosity—fluid enough to run down the side, but thick enough to set midway without pooling messily at the bottom. Finally, the contrasting colors—black cake, speckled white frosting, dark drip, and bright sprinkles—create a visual allure that triggers the ‘appetite appeal’ centers of the brain, making the cake look as good as it tastes.
Why You’ll Love This Recipe
- ✓Deeply rich and moist dark chocolate sponge layers.
- ✓Silky buttercream infused with real crushed Oreo cookies.
- ✓Beginner-friendly chocolate ganache drip technique.
- ✓Impressive tall structure perfect for parties and photos.
- ✓Customizable with your favorite colorful sprinkles.
- ✓Stays moist for days thanks to the oil-based batter.
Equipment You’ll Need
- ✓Three or four 6-inch round cake pans
- ✓Stand mixer or electric hand mixer
- ✓Cake turntable
- ✓Offset spatula
- ✓Bench scraper (icing smoother)
- ✓Piping bags and tips (1M or 2D)
- ✓Squeeze bottle or spoon for dripping
- ✓Wire cooling rack
- ✓Parchment paper
Ingredients
- ✓2 cups granulated sugar
- ✓1 3/4 cups all-purpose flour
- ✓3/4 cup dark unsweetened cocoa powder
- ✓1 1/2 teaspoons baking powder
- ✓1 1/2 teaspoons baking soda
- ✓1 teaspoon salt
- ✓2 large eggs, room temperature
- ✓1 cup whole milk
- ✓1/2 cup vegetable oil
- ✓2 teaspoons vanilla extract
- ✓1 cup boiling water
- ✓1.5 cups unsalted butter, softened (for buttercream)
- ✓5 cups powdered sugar (for buttercream)
- ✓15-20 Oreo cookies, finely crushed (for buttercream)
- ✓1/2 cup heavy cream (for buttercream)
- ✓1/2 cup semi-sweet chocolate chips (for ganache)
- ✓1/2 cup heavy cream (for ganache)
- ✓Rainbow sprinkles (for decoration)
- ✓Whole Oreos (for decoration)
Instructions
- Preheat your oven to 350°F (175°C). Grease three or four 6-inch cake pans and line the bottoms with parchment paper. Dust the sides with cocoa powder.
- In a large mixing bowl, whisk together the sugar, flour, cocoa, baking powder, baking soda, and salt.
- Add the eggs, milk, oil, and vanilla extract to the dry ingredients. Beat on medium speed for about 2 minutes.
- Stir in the boiling water by hand. The batter will be very thin and watery; this is normal.
- Divide the batter evenly between the prepared pans. Bake for 30-35 minutes, or until a wooden toothpick inserted into the center comes out clean.
- Cool the cakes in the pans for 10 minutes, then remove them from the pans to wire racks to cool completely.
- To make the buttercream: Beat the softened butter until creamy. Gradually add powdered sugar and heavy cream alternately, beating until fluffy. Fold in the finely crushed Oreo crumbs.
- To assemble: Level the tops of the cooled cakes if they are domed. Place the first layer on a cake board. Pipe a layer of buttercream on top. Repeat with remaining layers.
- Apply a thin ‘crumb coat’ of frosting all over the cake to trap any crumbs. Chill in the fridge for 20 minutes.
- Apply the final thick layer of buttercream and smooth the sides using a bench scraper. Chill the cake again for at least 30 minutes before adding the drip.
- Make the ganache: Heat 1/2 cup heavy cream until simmering. Pour over chocolate chips. Let sit for 5 minutes, then stir until glossy and smooth. Let it cool slightly until it thickens to a drip consistency.
- Using a spoon or squeeze bottle, carefully drip the ganache down the edges of the chilled cake, then fill in the top center.
- Immediately pipe swirls of buttercream on top before the ganache sets completely.
- Decorate with whole Oreos and a generous amount of rainbow sprinkles. Serve at room temperature.
Expert Cooking Tips
- ✓Ensure all refrigerated ingredients (eggs, milk, butter) are at room temperature before starting to ensure a smooth emulsion.
- ✓Do not skip the chilling steps. A cold cake is essential for the drip to stop midway down the side rather than pooling at the bottom.
- ✓Test your ganache consistency on the side of a glass before applying it to the cake. If it runs too fast, let it cool longer.
- ✓Use a kitchen scale to divide the batter evenly between pans for perfectly equal layers.
- ✓Bloom the cocoa powder with the boiling water to unlock a deeper, more intense chocolate flavor.
- ✓Crush the Oreos for the buttercream very finely (use a food processor) so they don’t clog your piping tip.
Substitutions and Variations
This recipe is quite versatile if you need to make dietary adjustments. For the flour, a high-quality 1:1 gluten-free baking flour blend works excellently; just ensure it contains xanthan gum. If you need to go dairy-free, you can substitute the milk in the cake with almond or soy milk, and use a plant-based butter sticks and coconut cream for the frosting and ganache. Note that regular Oreos are accidentally vegan, but always check the packaging to be sure. You can substitute the vegetable oil with melted coconut oil or canola oil. If you don’t have buttermilk (or the recipe calls for milk + vinegar which creates a similar effect), you can use sour cream or plain Greek yogurt thinned with a little milk. For the drip, white chocolate chips can be used for a colored drip effect, though the ratio of cream may need to be adjusted (usually less cream for white chocolate).
Common Mistakes to Avoid
The most common mistake with tall cakes is rushing the assembly. If the cake layers are even slightly warm, the buttercream will melt, causing the layers to slide and the cake to lean or collapse. Always freeze your layers for 20 minutes before stacking to make them easier to handle. Another frequent issue is the ganache temperature. If the ganache is too hot, it will melt the buttercream and run straight to the bottom of the plate. If it’s too cold, it will look chunky and won’t drip naturally. Aim for a consistency similar to warm honey. Lastly, avoid over-mixing the cake batter once the flour is added; over-mixing develops gluten and leads to a tough, dense cake with tunneling holes.
Serving Suggestions
This rich cake is best served in thin slices due to its height and decadence. A tall 6-inch cake can easily yield more servings than a standard flat cake. Use a sharp, hot knife (dipped in hot water and wiped dry) to get clean cuts through the ganache and buttercream. Serve this with a tall glass of cold milk to cut through the sweetness, or a hot espresso to complement the chocolate notes. If you are hosting a party, serve the cake on a pedestal stand to heighten the drama. For a plated dessert, add a dollop of unsweetened whipped cream and a few fresh raspberries on the side to balance the sugar with some tartness.
Storage and Reheating Tips
Because this cake contains dairy in the buttercream and ganache, it should ideally be stored in the refrigerator, especially in warm weather. However, buttercream cakes are best eaten at room temperature. Store the cake in an airtight cake carrier or cover the cut section with plastic wrap to prevent it from drying out. It will keep in the fridge for up to 5 days. When ready to eat, remove the slice or the whole cake from the fridge and let it sit on the counter for 1-2 hours until the frosting is soft again. The cake layers can be baked ahead and frozen (wrapped tightly in plastic) for up to a month. You can also freeze individual slices of the finished cake for a quick treat later.
Nutrition Facts (Estimated)
| Serving Size | 1 slice |
| Calories | 750 |
| Fat | 38g |
| Saturated Fat | 18g |
| Unsaturated Fat | 18g |
| Trans Fat | 0.5g |
| Cholesterol | 85mg |
| Sodium | 420mg |
| Carbohydrates | 95g |
| Fiber | 4g |
| Sugar | 65g |
| Protein | 8g |
Frequently Asked Questions
Can I make this cake in 8-inch pans instead of 6-inch?
Yes, you can. This recipe will make two thick 8-inch layers or three thinner 8-inch layers. The baking time may need to be adjusted slightly; check around the 25-minute mark.
Why is my ganache drip too runny?
The ganache was likely too hot or the ratio of cream to chocolate was too high. Let it cool longer to thicken. If it’s still too thin, melt a bit more chocolate and stir it in.
Do I need to use dowels for this cake?
For a 6-inch cake with 3-4 layers, dowels usually aren’t strictly necessary if the cake is kept cool and stable. However, if you plan to transport it or if it’s a very hot day, inserting a central wooden dowel or a few bubble tea straws is a great safety precaution.
How do I get the sides perfectly smooth?
The secret is a metal bench scraper and a turntable. Hold the scraper steady against the cake while rotating the table. Run the scraper under hot water and dry it off for the final pass to slightly melt and smooth the butter.
Can I use store-bought frosting?
You can, but homemade buttercream is much more stable for stacking tall cakes. Store-bought frosting is often too soft and may cause the layers to slide.
What if I don’t have a piping bag?
You can use a heavy-duty Ziploc bag and snip off one corner. It won’t give you the textured swirls of a star tip, but it works perfectly for filling and applying the drip.
Why did my cake sink in the middle?
This usually happens if the oven door was opened too early, causing a temperature drop, or if the leavening agents (baking soda/powder) were expired. It can also happen if the batter was over-mixed.
Can I use Golden Oreos instead?
Absolutely! Golden Oreos work perfectly and will give you a vanilla-forward flavor profile. The method remains exactly the same.
Conclusion
Creating this Tall Oreo Drip Cake is a labor of love that rewards you with arguably one of the most impressive and delicious desserts you can make at home. It combines the nostalgic comfort of cookies and cream with the sophisticated look of a boutique bakery creation. While the steps may seem numerous, breaking them down makes the process manageable and fun. The moment you slice into that towering stack and see the beautiful layers, all the effort pays off. Whether for a loved one’s birthday or just a weekend baking project, this cake is guaranteed to create smiles and sticky fingers. Happy baking!