Ultimate Tall Oreo Drip Cake with Glossy Dark Chocolate Ganache
Tall Oreo Drip Cake With Drip Ganache Recipe
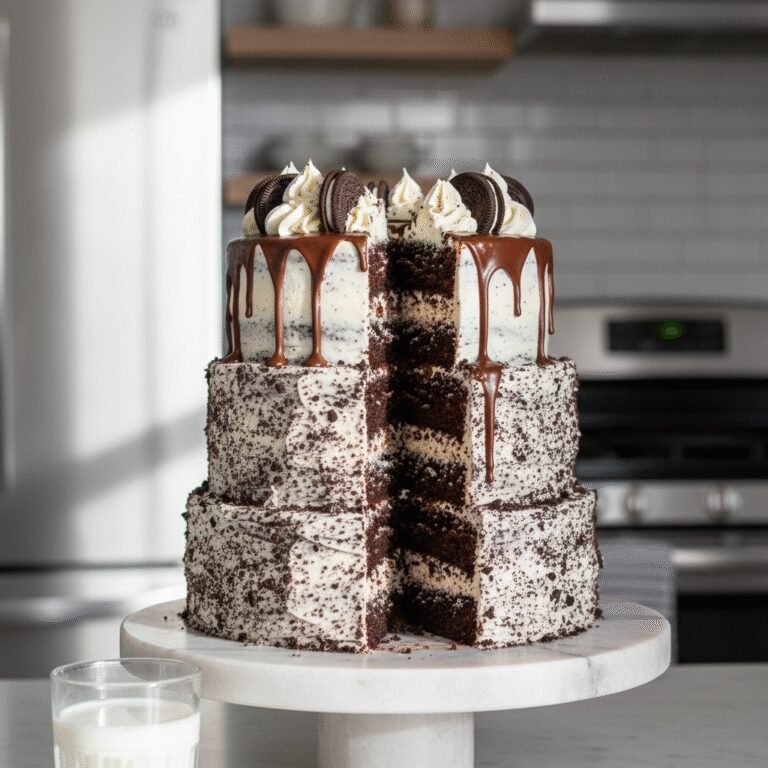
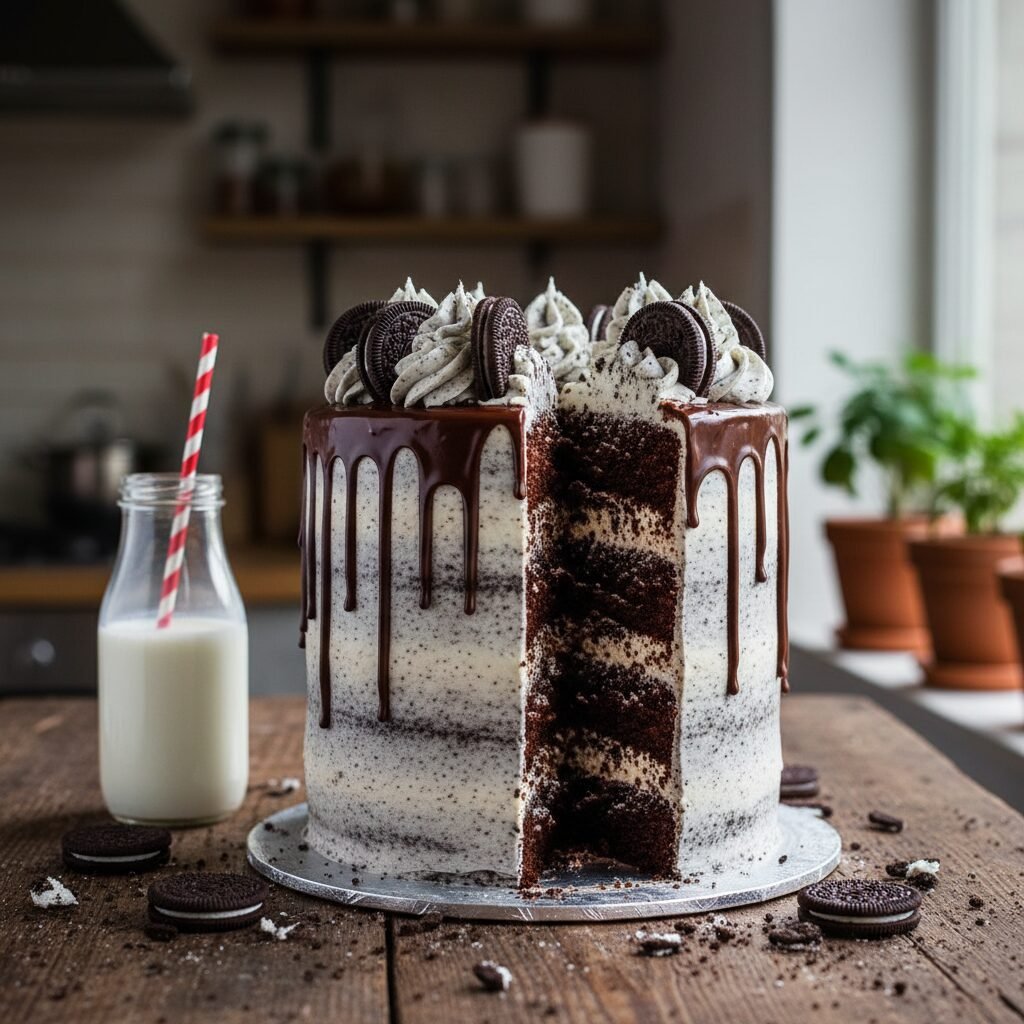
This show-stopping Tall Oreo Drip Cake features towering layers of moist chocolate sponge, stuffed with crushed cookies and cream filling. Finished with a silky chocolate ganache drip and crowned with extra Oreos, it is the ultimate celebration centerpiece for cookie lovers.
1 hour 30 minutes
35 minutes
4 hours (includes cooling and chilling)
12-16 servings
Dessert
Baking
American
Vegetarian
If there is one dessert that screams celebration, it is the tall, architectural marvel known as the drip cake. But not just any drip cake—we are talking about the Ultimate Tall Oreo Drip Cake. This recipe is a love letter to the classic cookies and cream flavor profile, elevated to a professional bakery standard right in your own kitchen. Imagine slicing into four distinct, towering layers of deeply dark, moist chocolate cake, each separated by a generous slathering of fluffy, vanilla bean buttercream speckled with crunchy Oreo crumbs. The contrast between the tender crumb of the cake and the slight crunch of the cookie filling is texture heaven.
But the real magic happens on the outside. The cake is coated in a smooth, sharp-edged layer of cookies and cream buttercream, creating a monochromatic canvas that hints at the flavors inside. Then comes the drama: a luxurious, glossy dark chocolate ganache drip that cascades down the sides, frozen in time just before it hits the bottom. Topped with swirls of frosting and whole cookies standing at attention, this cake is as much a feast for the eyes as it is for the palate.
I have designed this recipe to be robust enough to stand tall without sliding, yet tender enough to melt in your mouth. It is perfect for birthdays, anniversaries, or those days when you just need a serious chocolate fix. While it looks intimidatingly professional, the step-by-step guide below breaks down the architecture of a tall cake into manageable stages. From baking flat layers to mastering the temperature of your ganache for that perfect drip, I will walk you through every detail to ensure your creation is Instagram-ready and utterly delicious.
History & Origins
The history of this dessert is a fascinating convergence of three distinct culinary timelines: the chocolate cake, the Oreo cookie, and the modern drip cake aesthetic. Chocolate cake itself dates back to the 18th century, but it wasn’t until the mid-19th century that it resembled the cake we know today, thanks to the discovery of how to extract cocoa butter. The introduction of baking powder and baking soda later allowed for the fluffy, aerated textures we adore.
Then enters the Oreo. Introduced by the National Biscuit Company (Nabisco) on March 6, 1912, in New York City, the ‘Oreo Biscuit’ was originally sold in clear glass jars. It quickly became the best-selling cookie in the United States, beloved for its simple yet addictive combination of two chocolate wafers and a sweet creme filling. Over the last century, it has transcended being just a snack to becoming a staple ingredient in desserts worldwide, defining the ‘cookies and cream’ flavor category.
The ‘drip cake’ phenomenon, however, is a much more recent innovation in the world of pastry arts. Gaining massive popularity in the mid-2010s, the style is often attributed to Australian cake designer Katherine Sabbath. She moved away from the rigid, fondant-covered wedding cakes of the 90s and 2000s, embracing a more playful, colorful, and appetizing aesthetic using buttercream and ganache. The drip technique adds movement and a sense of indulgence to the cake, making it look like it is overflowing with goodness. Combining the nostalgic, century-old flavor of Oreos with the contemporary, avant-garde aesthetic of the tall drip cake creates a dessert that honors the past while firmly planting itself in the modern culinary zeitgeist.
Why This Recipe Works
This recipe succeeds because it meticulously balances structural integrity with moisture, two factors that are often at odds in tall cakes. A tall cake requires a sponge that is sturdy enough to support the weight of upper layers without compressing into a dense puck, yet it must remain moist. We achieve this by using a chocolate cake base that utilizes both oil and buttermilk. The oil ensures the cake stays soft even when refrigerated (which is necessary for stacking), while the acidity of the buttermilk tenderizes the gluten and reacts with the baking soda for a superior rise.
Furthermore, the buttercream in this recipe is an American Buttercream hybrid. It has the crusting capability needed to get sharp edges and a stable dam for the filling, but we whip it for an extended period to incorporate air, mimicking the lightness of a Swiss Meringue Buttercream without the hassle of heating egg whites. The Oreo crumbs in the frosting also act as a stabilizer, absorbing excess moisture.
Finally, the ganache drip is scientifically calibrated. A 1:1 ratio of chocolate to heavy cream is standard for truffles, but for a drip, we adjust this slightly depending on the chocolate percentage to ensure fluidity. The key ‘why it works’ factor here is temperature control: applying the ganache when it is near body temperature onto a thoroughly chilled cake shocks the chocolate, causing it to set midway down the side, creating that signature suspended drip look rather than a messy pool at the bottom.
Why You’ll Love This Recipe
- ✓Towering four-layer presentation for maximum visual impact.
- ✓Moist, oil-based chocolate sponge that stays soft in the fridge.
- ✓Crunchy cookies and cream buttercream filling.
- ✓Foolproof ganache recipe for the perfect drip consistency.
- ✓Rich dark chocolate flavor balanced by sweet vanilla creme.
- ✓Detailed instructions suitable for intermediate home bakers.
Equipment You’ll Need
- ✓Three 6-inch or 7-inch round cake pans
- ✓Stand mixer with paddle attachment
- ✓Large mixing bowls
- ✓Digital kitchen scale
- ✓Offset spatula
- ✓Bench scraper (for smoothing frosting)
- ✓Cake turntable
- ✓Piping bags and tips (Wilton 1M or similar)
- ✓Squeeze bottle (for the drip)
- ✓Wire cooling rack
Ingredients
- ✓2 ½ cups All-purpose flour
- ✓2 cups Granulated sugar
- ✓¾ cup Dark unsweetened cocoa powder (Dutch-processed preferred)
- ✓2 tsp Baking soda
- ✓1 tsp Baking powder
- ✓1 tsp Salt
- ✓1 cup Buttermilk, room temperature
- ✓½ cup Vegetable oil
- ✓2 Large eggs, room temperature
- ✓2 tsp Vanilla extract
- ✓1 cup Hot brewed coffee
- ✓2 cups Unsalted butter, softened (for frosting)
- ✓6 cups Powdered sugar, sifted (for frosting)
- ✓¼ cup Heavy cream (for frosting)
- ✓1 package (approx. 25) Oreo cookies, finely crushed
- ✓½ cup Semi-sweet chocolate chips (for ganache)
- ✓½ cup Heavy cream (for ganache)
- ✓Additional Oreos for decoration
Instructions
- Preheat your oven to 350°F (175°C). Grease three 6-inch cake pans with butter, line the bottoms with parchment paper, and dust the sides with cocoa powder.
- In the bowl of a stand mixer, whisk together the flour, sugar, cocoa powder, baking soda, baking powder, and salt until well combined.
- Add the buttermilk, vegetable oil, eggs, and vanilla extract to the dry ingredients. Mix on medium speed for about 2 minutes until the batter is smooth and well-incorporated.
- Reduce the mixer speed to low and carefully pour in the hot coffee. The batter will be very thin; this is normal. Mix just until combined.
- Distribute the batter evenly among the three prepared cake pans. Use a digital scale for precision if available.
- Bake for 30-35 minutes, or until a toothpick inserted into the center comes out clean or with just a few moist crumbs.
- Remove cakes from the oven and let them cool in the pans for 10 minutes. Then, turn them out onto a wire rack to cool completely.
- While cakes cool, prepare the buttercream. Beat the softened butter on high speed for 5-7 minutes until pale and fluffy.
- Gradually add the powdered sugar, one cup at a time, mixing on low speed until incorporated. Add the vanilla and heavy cream, then whip on high for another 3-5 minutes.
- Fold in the finely crushed Oreo crumbs by hand or on the lowest mixer setting until evenly distributed.
- To assemble, level the tops of the cooled cakes with a serrated knife. Place the first layer on a cake board.
- Spread a generous layer of Oreo buttercream over the cake. Repeat with the remaining layers. Apply a thin ‘crumb coat’ of frosting over the entire cake and refrigerate for 20 minutes.
- Apply the final thick layer of buttercream. Use a bench scraper to smooth the sides and top for a sharp finish. Chill the cake for at least 30 minutes before dripping.
- Make the ganache: Place chocolate chips in a heatproof bowl. Heat the ½ cup heavy cream until it just begins to simmer, then pour over the chocolate. Let sit for 5 minutes, then whisk until smooth.
- Let the ganache cool until it is slightly thickened but still pourable (around 90°F/32°C). Pour into a squeeze bottle.
- Test a drip on the back of the cake. If it runs too fast, cool longer. If perfect, drip around the edges, then fill in the center top of the cake.
- Use remaining buttercream to pipe swirls on top of the cake and garnish with whole or halved Oreos.
- Chill for 15 minutes to set the drip, then serve at room temperature.
Expert Cooking Tips
- ✓Room temperature ingredients are non-negotiable for the batter; they emulsify better and create a uniform crumb.
- ✓Don’t skip the hot coffee; it blooms the cocoa powder, intensifying the chocolate flavor without making the cake taste like coffee.
- ✓Chill your cake thoroughly before applying the final coat of frosting and the drip. A cold cake helps the buttercream smooth out and stops the drip in its tracks.
- ✓Use a squeeze bottle for the drip to have maximum control over the length and spacing of each drip.
- ✓If your ganache seizes or looks grainy, add a teaspoon of warm milk and whisk vigorously to bring it back together.
- ✓Weigh your cake pans with batter to ensure even layers, which makes stacking and frosting much easier.
Substitutions and Variations
For the flour, you can use a 1:1 gluten-free baking flour blend if you are catering to gluten sensitivities, though the texture may be slightly denser. If you don’t have buttermilk, make a substitute by adding 1 tablespoon of white vinegar or lemon juice to a cup of whole milk and letting it sit for 5 minutes. The vegetable oil can be replaced with melted coconut oil or canola oil. For the cocoa powder, natural cocoa works, but Dutch-process provides a darker color and smoother flavor closer to an Oreo cookie. In the frosting, you can swap heavy cream for whole milk, but the texture will be slightly less creamy. If you prefer a white chocolate drip, swap the semi-sweet chips for white chocolate chips, but note that you will need to reduce the cream slightly (3:1 ratio of chocolate to cream) as white chocolate is softer.
Common Mistakes to Avoid
The most common mistake is rushing the cooling process. Frosting a warm cake will cause the butter to melt, the layers to slide, and the structure to collapse. Another frequent error is applying the drip when the ganache is too hot. This will melt the buttercream, creating a muddy mess rather than clean lines. Conversely, if the ganache is too cold, it will look chunky and won’t drip naturally. Always do a ‘test drip’ on the back of the cake. Over-mixing the batter after adding the flour is another pitfall; it develops gluten and leads to a tough, rubbery cake rather than a tender sponge. Finally, failing to level the cake layers will result in a leaning tower of Pisa—always cut the domes off your cakes before stacking.
Serving Suggestions
This cake is extremely rich, so thin slices are recommended. Use a sharp chef’s knife dipped in hot water and wiped dry between cuts for the cleanest slices that show off the beautiful layers. Serve this cake at room temperature; if it has been in the fridge, let it sit out for an hour before serving to allow the buttercream to soften and the flavors to open up. A glass of cold milk is the classic pairing, but it also goes beautifully with a shot of espresso or a dark roast coffee to cut through the sweetness. For an adult twist, serve with a glass of port wine or a stout beer.
Storage and Reheating Tips
Store the fully assembled cake in the refrigerator, preferably in a cake box to prevent it from absorbing fridge odors. It will keep for up to 4 days. The cut face of the cake should be covered with plastic wrap or a piece of parchment to keep the inside moist. You can also freeze individual slices: wrap them tightly in plastic wrap and then aluminum foil. They will last for up to 3 months. To eat, thaw in the fridge overnight and bring to room temperature. Unfrosted cake layers can be wrapped and frozen for up to a month before assembly.
Nutrition Facts (Estimated)
| Serving Size | 1 slice |
| Calories | 750 |
| Fat | 42g |
| Saturated Fat | 18g |
| Unsaturated Fat | 20g |
| Trans Fat | 0g |
| Cholesterol | 85mg |
| Sodium | 320mg |
| Carbohydrates | 88g |
| Fiber | 4g |
| Sugar | 55g |
| Protein | 8g |
Frequently Asked Questions
Can I make this cake ahead of time?
Absolutely. The cake layers can be baked, cooled, wrapped, and frozen up to a week in advance. You can assemble and frost the cake the day before serving; just keep it refrigerated and add the fresh Oreo garnishes on the day of serving to ensure they stay crisp.
Why did my ganache drip run all the way to the bottom?
This usually happens because the ganache was too hot or too thin, or the cake wasn’t cold enough. Ensure your cake has been chilled for at least 30 minutes and let your ganache cool to about 90°F before dripping.
Can I use store-bought frosting?
Technically yes, but I strongly advise against it for a tall cake. Store-bought frosting is often too soft to support the weight of four layers and won’t crust, making it difficult to get smooth sides and sharp edges.
Do I need dowels for this cake?
For a 6-inch cake with 3-4 layers, you generally do not need dowels if your buttercream is stable and the cake is kept cool. However, if you are transporting the cake or it will sit in a warm room, adding a central wooden dowel is a good safety measure.
My cake layers domed significantly. How do I prevent this?
Doming is normal, but you can minimize it by using ‘cake strips’ (damp fabric strips wrapped around the pan) which cool the sides of the pan, allowing the cake to bake more evenly. Regardless, you should always trim the domes off before stacking.
Can I make this into cupcakes instead?
Yes! This batter works perfectly for cupcakes. Fill liners 2/3 full and bake for 18-22 minutes. The yield will be approximately 24-30 cupcakes.
How do I get the buttercream so white?
Butter has a natural yellow tint. To get a whiter base before adding Oreos, whip the butter for a long time (5+ minutes) until it becomes very pale. You can also add a tiny drop of purple food coloring to neutralize the yellow tones.
Can I use different cookies?
Yes, this recipe works well with any sandwich cookie, such as Golden Oreos, mint chocolate cookies, or even peanut butter sandwich cookies. Just ensure you crush them finely for the frosting.
Conclusion
Creating this Tall Oreo Drip Cake is a journey that rewards you with a masterpiece of texture and flavor. It is more than just a dessert; it is a centerpiece that commands attention and brings out the inner child in everyone who sees it. The combination of the deep, dark chocolate sponge, the creamy and crunchy filling, and the luxurious ganache drip is a timeless trio that never fails to impress. Whether you are a seasoned baker looking to refine your drip technique or a novice ready to tackle your first tall cake, this recipe provides the roadmap to success. So, grab your spatula, turn up your favorite baking playlist, and get ready to create a cake that tastes even better than it looks. Happy baking!