Ultimate Tall Oreo Drip Cake: The Best Cookies & Cream Layer Cake Recipe
Tall Oreo Drip Cake Three Layer Cake Recipe
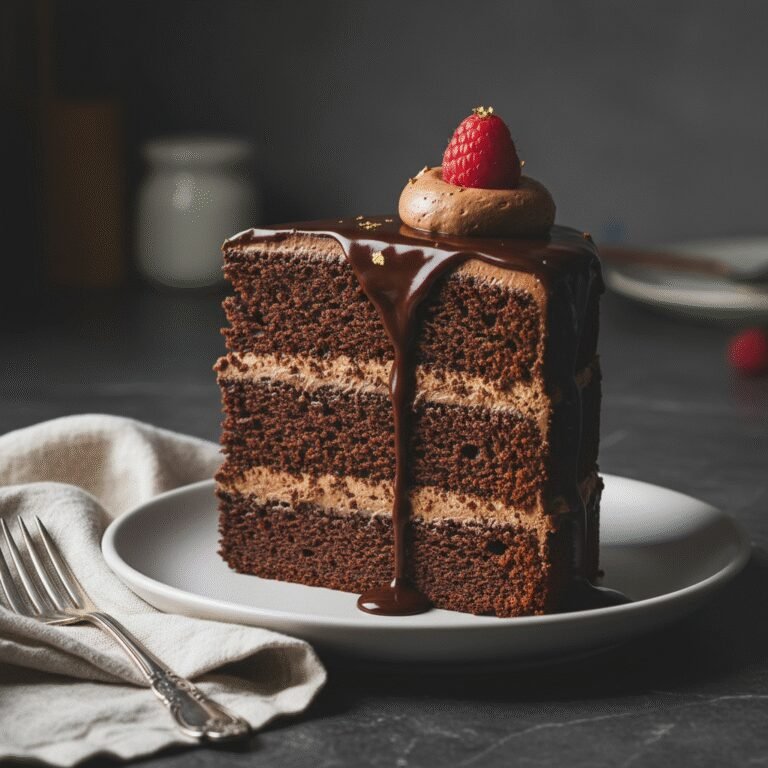
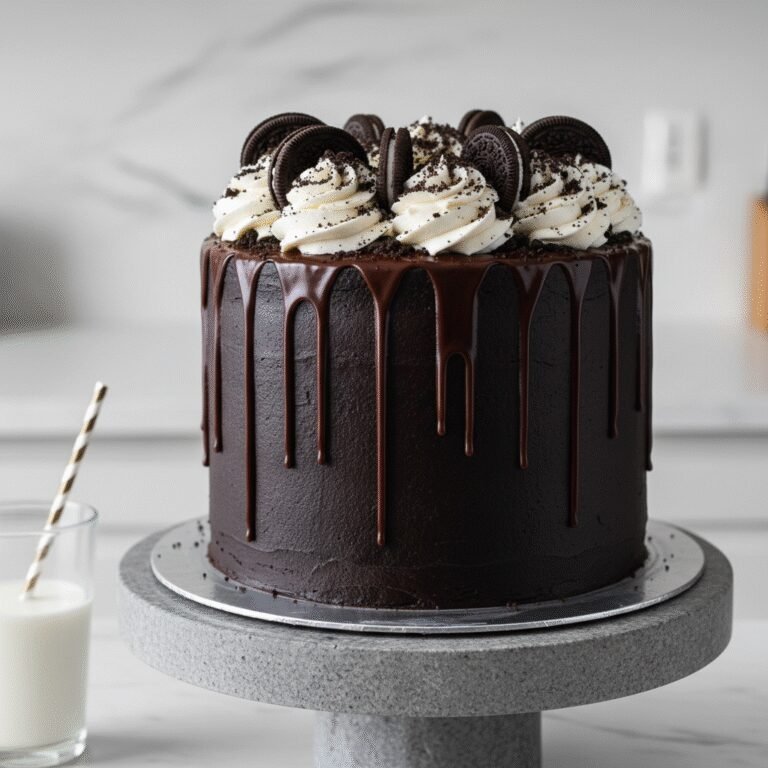
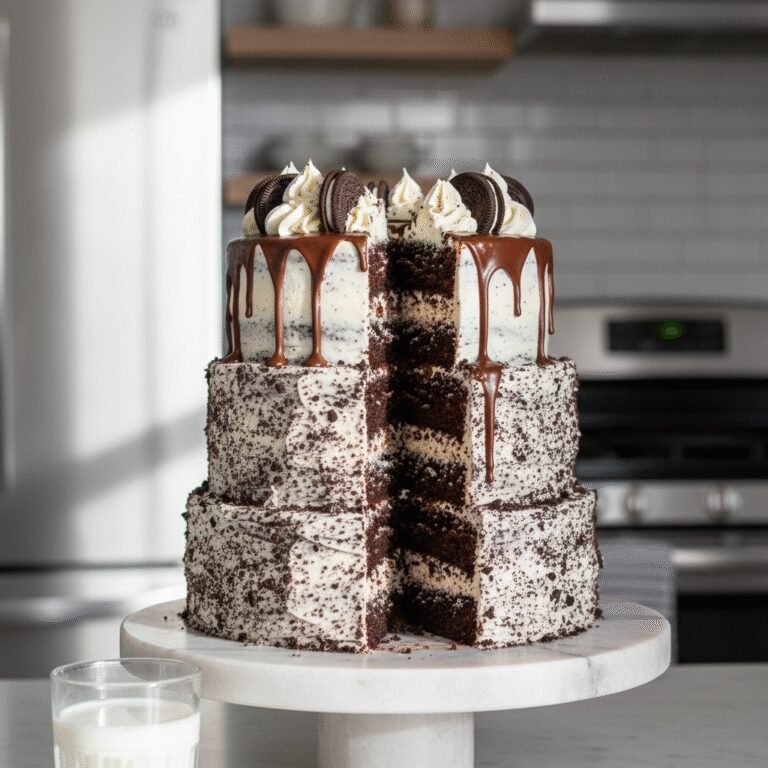
This show-stopping Tall Oreo Drip Cake features three moist dark chocolate sponge layers, velvety Oreo buttercream, and a dramatic chocolate ganache drip. It is the ultimate Cookies & Cream celebration cake that tastes even better than it looks!
1 hour
35 minutes
4 hours
12-16 servings
Dessert
Baking
American
Vegetarian
If there is one dessert that universally screams celebration, it is the tall, dramatic drip cake. But when you combine that architectural beauty with the nostalgic, beloved flavor of Cookies and Cream, you get a masterpiece that is impossible to resist. This Tall Oreo Drip Cake is not just a feast for the eyes; it is a textural wonderland. We start with the foundation: three layers of incredibly moist, deep dark chocolate cake. We use black cocoa powder to achieve that signature Oreo color and a rich, slightly bitter chocolate profile that perfectly balances the sweetness of the frosting. Speaking of frosting, this is not your average buttercream. It is a speckled, fluffy cloud of vanilla bean cream loaded with crushed Oreo cookies, ensuring that every single bite delivers that classic sandwich cookie crunch. The height of the cake—achieved by stacking three thick layers—gives it a modern, bakery-style elegance that makes it perfect for birthdays, anniversaries, or any event where you want to impress. The crowning glory is the semi-sweet chocolate ganache drip, cascading down the sides in glossy ribbons, topped with swirls of buttercream and whole cookies. While it looks like it came straight from a high-end patisserie, this recipe is designed for the home baker. We break down the intimidation factor of the ‘drip’ technique and the stacking process, guiding you toward a sturdy, straight, and stunning dessert. Whether you are a die-hard chocolate lover or a dunking enthusiast, this cake brings your childhood dreams to life in a sophisticated, sliceable format. Get ready to be the star of the party with a cake that is as fun to make as it is to eat.
History & Origins
The history of this cake is a delicious convergence of three distinct culinary evolutions: the invention of the Oreo, the rise of Cookies and Cream as a flavor profile, and the modern trend of the Drip Cake. The Oreo biscuit itself was first developed and produced by the National Biscuit Company (today known as Nabisco) in 1912 at their Chelsea, New York City factory. Interestingly, it was created as an imitation of the Hydrox cookie, which had been introduced in 1908, but the Oreo quickly surpassed its competitor in popularity to become the best-selling cookie in the United States. The classic design and the ‘twist, lick, dunk’ ritual became a cultural phenomenon. However, the concept of ‘Cookies and Cream’ as a dessert flavor outside of the cookie itself did not truly take off until the late 1970s and early 1980s. It is widely disputed who invented Cookies and Cream ice cream—South Dakota State University and Blue Bell Creameries both claim the title—but once it hit the market, it became an instant classic, proving that crushed chocolate sandwich cookies could elevate any creamy base. Fast forward to the 2010s, and the cake decorating world saw a massive shift away from fondant-covered cakes toward buttercream-finished cakes with a rustic yet polished aesthetic. Australian baker Katherine Sabbath is often credited with popularizing the neon-colored, candy-loaded ‘Drip Cake’ around 2015. Her style inspired a global movement of home bakers. This recipe marries the 1912 classic cookie with the modern 21st-century drip aesthetic, creating a dessert that honors over a century of sweet history.
Why This Recipe Works
This recipe succeeds because it meticulously balances structural integrity with moisture and flavor intensity, three variables that often fight against each other in tall cakes. First, the cake sponge uses a combination of oil and buttermilk. Butter-based cakes can sometimes dry out when refrigerated, but oil remains liquid at cool temperatures, ensuring the cake stays moist for days. The buttermilk provides acidity, which reacts with the baking soda to create a tender crumb, breaking down long gluten strands. We specifically call for ‘Black Cocoa’ in the batter. This is the same type of cocoa used in actual Oreos; it has been heavily alkalized to remove acidity, resulting in a charcoal-black color and a savory, non-bitter chocolate flavor that mimics the cookie perfectly. For the frosting, we use a crusting American Buttercream base. Meringue-based buttercreams can sometimes be too soft to hold up the weight of crushed cookies and heavy cake layers in a tall stack. American buttercream offers the stiffness required for stability while remaining creamy. Finally, the drip works because of the specific ratio of heavy cream to chocolate (1:1 by weight for semi-sweet chocolate). This creates a ganache that is fluid enough to run down the side of the chilled cake but thick enough to set midway, preventing it from pooling messily at the bottom. The contrast of the chilled cake against the slightly warm ganache ensures the drips freeze in their tracks for that picture-perfect look.
Why You’ll Love This Recipe
- ✓Achieves a stunning, professional bakery-style height using three 6-inch pans.
- ✓Uses black cocoa for an authentic Oreo flavor and color profile.
- ✓The buttercream is stable enough to stack but melts in your mouth.
- ✓Includes a foolproof ganache ratio for the perfect drip every time.
- ✓Can be made ahead of time, as the flavors meld and improve after sitting.
Equipment You’ll Need
- ✓Three 6-inch round cake pans
- ✓Stand mixer with paddle attachment
- ✓Kitchen scale
- ✓Offset spatula
- ✓Bench scraper or cake smoother
- ✓Piping bags and large star tip (e.g., Wilton 1M)
- ✓Turntable (lazy Susan)
- ✓Squeeze bottle or spoon for the drip
- ✓Wire cooling rack
Ingredients
- ✓2 cups All-purpose flour
- ✓2 cups Granulated sugar
- ✓3/4 cup Black cocoa powder (or Dutch-process)
- ✓2 tsp Baking powder
- ✓1.5 tsp Baking soda
- ✓1 tsp Salt
- ✓1 cup Buttermilk, room temperature
- ✓1/2 cup Vegetable oil
- ✓2 large Eggs, room temperature
- ✓2 tsp Vanilla extract
- ✓1 cup Hot coffee (freshly brewed)
- ✓1.5 cups Unsalted butter, softened (for buttercream)
- ✓5-6 cups Powdered sugar
- ✓1/4 cup Heavy cream (for buttercream)
- ✓15 Oreos, finely crushed (for buttercream)
- ✓1/2 cup Semi-sweet chocolate chips (for drip)
- ✓1/2 cup Heavy cream (for drip)
- ✓10-12 Whole Oreos (for garnish)
Instructions
- 1. Preheat your oven to 350°F (175°C). Grease three 6-inch cake pans with butter and dust with cocoa powder, or line the bottoms with parchment paper rounds for easy release.
- 2. In the bowl of a stand mixer, whisk together the flour, sugar, black cocoa powder, baking powder, baking soda, and salt until well combined.
- 3. In a separate medium bowl, whisk together the buttermilk, vegetable oil, eggs, and vanilla extract.
- 4. With the mixer on low speed, slowly pour the wet ingredients into the dry ingredients. Mix until just combined. Do not overmix.
- 5. Carefully pour the hot coffee into the batter while the mixer is running on low. The batter will be very thin and liquid; this is normal.
- 6. Divide the batter evenly among the three prepared pans. Use a kitchen scale to ensure even layers.
- 7. Bake for 30-35 minutes, or until a toothpick inserted into the center comes out clean or with just a few moist crumbs.
- 8. Remove cakes from the oven and let them cool in the pans for 10 minutes, then turn them out onto a wire rack to cool completely.
- 9. While cakes cool, make the buttercream. Beat the softened butter on medium-high speed for 5-7 minutes until pale and creamy.
- 10. Gradually add the powdered sugar, one cup at a time, mixing on low. Add the vanilla and heavy cream. Increase speed to high and whip for 3 minutes until fluffy.
- 11. Fold in the finely crushed Oreos by hand or on the lowest mixer setting. Ensure the crumbs are fine enough to pass through a piping tip later.
- 12. If the cake layers have domed tops, use a serrated knife to level them flat.
- 13. Place the first cake layer on a board. Pipe a layer of buttercream on top and spread evenly. Repeat with the second and third layers.
- 14. Apply a thin ‘crumb coat’ of frosting all over the cake to trap loose crumbs. Chill in the fridge for 20 minutes.
- 15. Apply the final thick layer of buttercream. Use a bench scraper to smooth the sides and top. Chill the cake again for at least 30 minutes before adding the drip.
- 16. Make the drip: Heat 1/2 cup heavy cream until it just begins to simmer. Pour over the chocolate chips in a heatproof bowl. Let sit for 5 minutes, then stir gently until smooth. Let it cool until it is slightly thick but still pourable (around 90°F/32°C).
- 17. Using a spoon or squeeze bottle, apply the drip to the edges of the chilled cake, letting it run down. Fill in the top center with the remaining ganache.
- 18. Pipe swirls of remaining buttercream on top and garnish with whole Oreos.
- 19. Slice and serve!
Expert Cooking Tips
- ✓Ensure all refrigerated ingredients (eggs, buttermilk, butter) are at room temperature before starting to ensure a smooth emulsion.
- ✓Do not skip the hot coffee step; it blooms the cocoa powder, intensifying the chocolate flavor without making the cake taste like coffee.
- ✓When making the drip, test the consistency on the side of a glass first. If it runs too fast, let it cool longer. If it’s too thick, warm it slightly.
- ✓Sift your powdered sugar to avoid gritty buttercream.
- ✓Crush your Oreos for the frosting very finely (use a food processor) so they don’t clog your piping tip.
- ✓Chill the cake thoroughly before applying the drip; a cold cake helps control how far the ganache runs.
- ✓Weigh your batter into the pans to ensure perfectly even layers.
Substitutions and Variations
If you cannot find black cocoa powder, standard Dutch-process cocoa powder works well, though the cake will be dark brown rather than black. In a pinch, natural cocoa powder can be used, but the baking soda reaction will be stronger, potentially altering the texture slightly. If you don’t have buttermilk, you can make a sour milk substitute by adding 1 tablespoon of white vinegar or lemon juice to a cup of regular milk and letting it sit for 5 minutes. For the oil, canola, vegetable, or melted coconut oil are all suitable options. If you prefer a Swiss Meringue Buttercream, you can use that as a base and fold in the cookie crumbs, but be aware it is softer than American buttercream. To make this gluten-free, substitute the all-purpose flour with a high-quality 1:1 gluten-free flour blend that contains xanthan gum. For the coffee, you can substitute hot water, but the chocolate flavor will be slightly less intense.
Common Mistakes to Avoid
The most common mistake with drip cakes is applying the ganache when it is too hot. If the ganache is hot, it will melt the buttercream, causing the frosting to slide off and the drip to pool at the bottom of the plate in a messy puddle. Always let the ganache cool to slightly above room temperature. Another mistake is overmixing the cake batter after adding the flour; this develops too much gluten and results in a tough, rubbery cake rather than a tender one. Stop mixing as soon as the ingredients are combined. Failing to level the cake tops is another issue; if your layers are domed, the stack will be unstable and may lean or topple. Always cut the domes off to create a flat surface. Finally, using large chunks of Oreo in the buttercream will make it impossible to smooth the sides of the cake cleanly; ensure the crumbs are practically dust.
Serving Suggestions
This cake is extremely rich, so thin slices are often sufficient. Serve it at room temperature; while it needs to be stored in the fridge, the butter-based frosting and chocolate cake taste best when they have had time to soften on the counter for about 1-2 hours before serving. Cold cake can taste dry and the frosting will be waxy. Pair this decadent dessert with a cold glass of milk to echo the ‘cookies and cream’ theme, or a hot cup of black coffee to cut through the sweetness. For a party, serve it alongside vanilla bean ice cream. Because of its height, it looks spectacular when served on a pedestal cake stand.
Storage and Reheating Tips
Store the fully assembled cake in the refrigerator. Due to the dairy in the buttercream and ganache, it should not be left out overnight. It will keep in the fridge for up to 4-5 days, preferably in a cake keeper or lightly covered with plastic wrap to prevent it from absorbing fridge odors. To freeze, you can freeze individual cake layers wrapped tightly in plastic wrap for up to 3 months. You can also freeze individual slices of the finished cake; place them on a baking sheet to freeze the frosting hard, then wrap them individually in plastic wrap and foil. Thaw slices in the fridge overnight or on the counter for an hour before eating.
Nutrition Facts (Estimated)
| Serving Size | 1 slice |
| Calories | 680 |
| Fat | 38g |
| Saturated Fat | 18g |
| Unsaturated Fat | 18g |
| Trans Fat | 0g |
| Cholesterol | 85mg |
| Sodium | 320mg |
| Carbohydrates | 82g |
| Fiber | 4g |
| Sugar | 55g |
| Protein | 8g |
Frequently Asked Questions
Can I make this cake in 8-inch pans instead of 6-inch?
Yes, you can. However, the layers will be thinner, and the cake will not be as tall. You will likely only need to bake them for 25-30 minutes. The 6-inch pans are recommended specifically for that trendy ‘tall’ look.
Why did my cake sink in the middle?
Cakes usually sink because the oven door was opened too early, causing a temperature drop, or because the cake was underbaked. Ensure you don’t open the oven until at least 3/4 of the baking time has passed.
Do I have to use coffee in the batter?
You don’t strictly have to, but it is highly recommended. The coffee enhances the chocolate flavor significantly. If you cannot use coffee, hot water is the best substitute.
How do I get my buttercream sides perfectly smooth?
The secret is using a metal bench scraper and a turntable. Hold the scraper stationary against the side of the cake while rotating the table. Also, run your scraper under hot water and dry it off; the heat helps smooth the butter.
Can I make this cake ahead of time?
Absolutely. In fact, the cake layers are easier to handle when they have been baked a day in advance and chilled. You can bake the layers, wrap them, and assemble the next day.
Why is my drip too runny?
This usually happens if the ratio of cream to chocolate is off (too much cream) or if the ganache was too hot when poured. Ensure you use a 1:1 ratio by weight and let it cool.
Can I use white chocolate for the drip?
Yes, but white chocolate requires a different ratio. Use 3 parts white chocolate to 1 part heavy cream, as white chocolate is softer and melts differently than semi-sweet.
How do I transport a tall cake like this?
Transport the cake while it is cold and the butter is hard. Use a box that is specifically designed for tall cakes. Place the box on the flat floor of the car, not on a slanted seat.
Conclusion
There you have it—the blueprint for creating a bakery-quality Tall Oreo Drip Cake right in your own kitchen. While the process involves several steps, from the dark chocolate sponge to the delicate drip, the result is a masterpiece that is worth every minute of effort. This cake captures the essence of childhood nostalgia wrapped in a sophisticated, modern package. It is bold, beautiful, and undeniably delicious. So, grab your stand mixer, turn on your favorite playlist, and get ready to bake a cake that will have your friends and family asking, ‘Where did you buy this?’ Don’t forget to snap a photo of that perfect slice before it disappears!