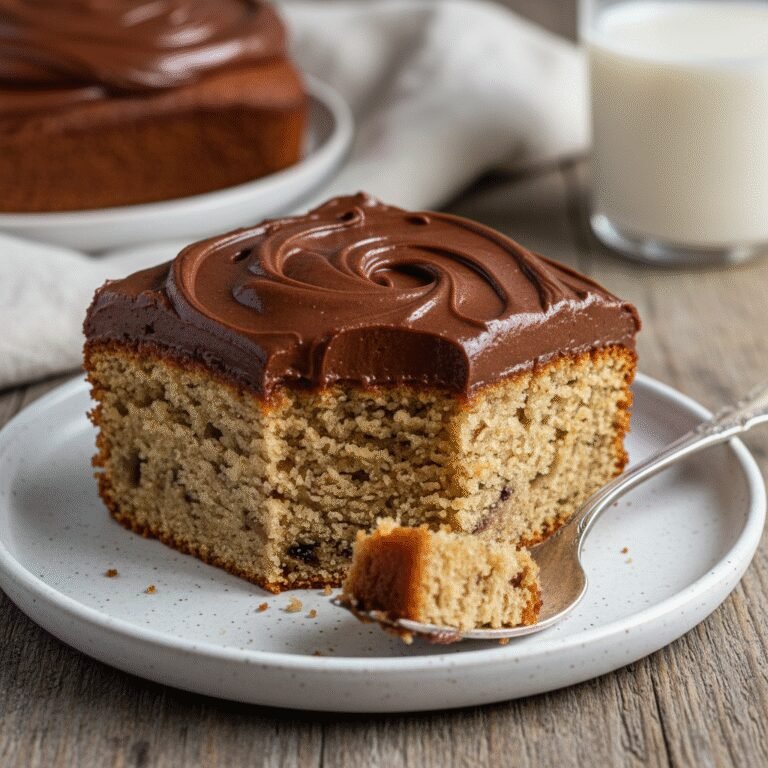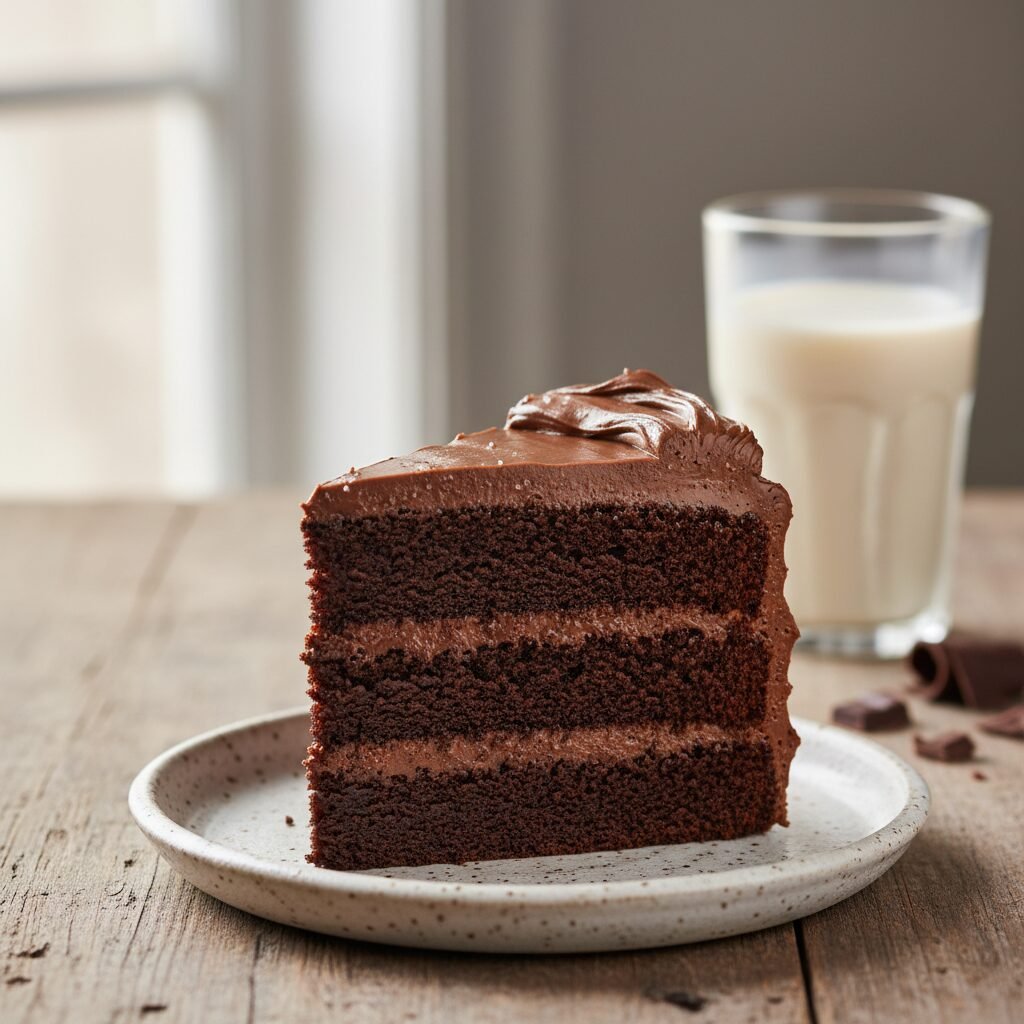
The Ultimate Moist Vegan Chocolate Cake With Creamy Fudge Frosting
Moist Vegan Chocolate Cake With Vegan Chocolate Frosting Recipe
This is hands down the best vegan chocolate cake you will ever taste—impossibly moist, rich, and covered in a velvety dairy-free chocolate buttercream. It requires just one bowl to mix up and delivers a deep cocoa flavor that rivals any traditional bakery cake, making it the perfect centerpiece for birthdays and celebrations.
20 minutes
35 minutes
55 minutes
12 servings (2-layer 8-inch cake)
Dessert
Baking
American
Vegan
If you have ever been skeptical about vegan baking, let this recipe be the one that changes your mind forever. For years, dairy-free desserts suffered from a reputation of being dry, dense, or lacking that crave-worthy richness that butter and eggs provide. However, this Moist Vegan Chocolate Cake shatters those misconceptions completely. It is, without exaggeration, one of the most decadent, tender, and deeply chocolatey cakes you will ever bake, regardless of dietary preferences.
The magic lies in the simplicity of the ingredients and the reaction between them. We aren’t using obscure egg replacers or hard-to-find gums here; we are relying on pantry staples that come together to create a crumb that is soft, plush, and stays moist for days. The flavor profile is sophisticated yet nostalgic—think of the best diner-style chocolate cake you had as a child, but with a cleaner, more intense cocoa punch.
What truly elevates this dessert is the vegan chocolate frosting. It is whipped to airy perfection, using a balance of high-quality cocoa powder and vegan butter to create a frosting that melts in your mouth without being gritty or overly greasy. Whether you are baking for a vegan friend, a child with an egg allergy, or simply want to make a killer chocolate cake with ingredients you likely already have in your cupboard, this recipe is a guaranteed winner. It is the kind of cake that makes people ask, ‘Are you sure this is vegan?’ after they have licked their plates clean. Get ready to add this to your permanent rotation, because once you try it, you won’t go back to the traditional version.
History & Origins
The history of vegan chocolate cake is deeply intertwined with the history of ‘Wacky Cake’ or ‘Depression Cake,’ which rose to prominence during the Great Depression and World War II. During these eras, ingredients like milk, butter, and eggs were either scarce, rationed, or too expensive for the average family. Resourceful home bakers had to find a way to keep spirits high and celebrations sweet without relying on these luxury staples.
They discovered that a chemical reaction between vinegar and baking soda could provide the necessary leavening lift that eggs usually provided. By using oil instead of butter and water or coffee instead of milk, they created a cake that was surprisingly light and moist. This ‘accident of history’ laid the groundwork for modern vegan baking.
In the decades that followed, as the vegan movement began to gain traction for ethical, health, and environmental reasons, bakers revisited these wartime recipes. However, early commercial vegan attempts in the 1980s and 90s often relied on heavy whole wheat flours or carob, which alienated many dessert lovers. It wasn’t until the culinary boom of the 2010s, with the availability of better plant-based milks and high-quality vegan butters, that the humble Depression Cake was elevated into the gourmet tier. Today’s recipe honors that history of ingenuity while utilizing modern techniques—like blooming cocoa in hot coffee and using almond or soy milk curds—to create a dessert that stands toe-to-toe with classic French patisserie styles.
Why This Recipe Works
This recipe succeeds where others fail due to a few key scientific principles that maximize moisture and flavor. First and foremost is the use of oil rather than vegan butter in the cake batter itself. While butter adds flavor, it is solid at room temperature. Oil remains liquid, which means the cake stays incredibly soft and moist on the counter and doesn’t dry out even after a few days.
Secondly, we utilize the ‘blooming’ technique. By pouring boiling hot water (or hot coffee) over the cocoa powder and sugar, we dissolve the cocoa solids effectively. This releases the flavor compounds trapped in the cocoa, resulting in a much more intense chocolate experience than if you were to simply whisk the powder into cold ingredients.
The leavening agent is another crucial factor. We create a homemade ‘buttermilk’ by combining plant-based milk with apple cider vinegar. This acid reacts vigorously with the baking soda, creating carbon dioxide bubbles that aerate the batter. This ensures the cake is fluffy and light, counteracting the weight of the sugar and flour. Because there are no eggs to provide structure, this chemical lift is vital. The result is a crumb structure that is tender and velvety, not gummy or dense.
Why You’ll Love This Recipe
- ✓Requires only one bowl for the batter, minimizing cleanup.
- ✓Completely egg-free and dairy-free, suitable for most allergy sufferers.
- ✓Uses boiling water/coffee to bloom the cocoa for intense flavor.
- ✓Stays moist for 4-5 days at room temperature.
- ✓The frosting is stable enough to pipe beautiful designs.
- ✓Can be made with standard pantry staples—no weird egg replacers needed.
Equipment You’ll Need
- ✓Two 8-inch round cake pans
- ✓Parchment paper
- ✓Large mixing bowl
- ✓Whisk
- ✓Electric hand mixer or stand mixer (for frosting)
- ✓Wire cooling rack
- ✓Offset spatula
- ✓Measuring cups and spoons
Ingredients
- ✓2 cups all-purpose flour
- ✓2 cups granulated sugar
- ✓3/4 cup unsweetened cocoa powder (high quality)
- ✓2 teaspoons baking soda
- ✓1 teaspoon baking powder
- ✓1 teaspoon salt
- ✓1 cup unsweetened almond milk (or soy milk)
- ✓1 tablespoon apple cider vinegar
- ✓1/2 cup vegetable oil (or melted coconut oil)
- ✓1 cup boiling water (or boiling hot strong coffee)
- ✓2 teaspoons vanilla extract
- ✓1 cup vegan butter sticks, slightly softened (for frosting)
- ✓3 cups powdered sugar (for frosting)
- ✓2/3 cup cocoa powder (for frosting)
- ✓2-3 tablespoons non-dairy milk (for frosting)
- ✓1 teaspoon vanilla extract (for frosting)
Instructions
- Preheat your oven to 350°F (175°C). Grease two 8-inch round cake pans with a little oil and line the bottoms with parchment paper circles. This ensures the cakes release perfectly.
- In a measuring cup, combine the 1 cup of almond milk with the 1 tablespoon of apple cider vinegar. Stir and let it sit for about 5-10 minutes to curdle into vegan buttermilk.
- In a large mixing bowl, sift together the flour, sugar, 3/4 cup cocoa powder, baking soda, baking powder, and salt. Whisk well to ensure there are no lumps and the leavening agents are evenly distributed.
- Add the prepared vegan buttermilk, vegetable oil, and vanilla extract to the dry ingredients. Mix briefly with a whisk until just combined—do not overmix yet.
- Carefully pour in the boiling water (or boiling coffee). Using the whisk, mix strictly until the batter is combined and smooth. The batter will be very thin and liquid; this is normal, do not add more flour.
- Divide the batter evenly between the two prepared cake pans. Tap the pans gently on the counter to release any large air bubbles.
- Bake in the center of the oven for 30-35 minutes, or until a toothpick inserted into the center comes out clean or with just a few moist crumbs attached.
- Remove from the oven and let the cakes cool in the pans for 15 minutes. Then, carefully run a knife around the edges and invert them onto a wire rack to cool completely. They must be 100% cool before frosting.
- While cakes cool, make the frosting. In a large bowl (or stand mixer), beat the softened vegan butter until creamy and pale (about 2-3 minutes).
- Sift in the powdered sugar and 2/3 cup cocoa powder. Add the vanilla and 1 tablespoon of non-dairy milk.
- Start mixing on low speed until incorporated, then switch to high speed and whip for 2-3 minutes until fluffy. Add more non-dairy milk, a teaspoon at a time, if the frosting is too stiff.
- Once the cakes are cool, place one layer on your serving plate. Spread a generous layer of frosting over the top. Place the second cake layer on top. Cover the top and sides with the remaining frosting.
Expert Cooking Tips
- ✓Measure flour correctly: Use a kitchen scale for accuracy, or the spoon-and-level method. Scooping directly with the cup packs the flour and leads to a dry cake.
- ✓Don’t skip the boiling liquid: The heat blooms the cocoa powder, releasing flavor, and helps dissolve the sugar for a smoother texture.
- ✓Use room temperature ingredients: Ensure your vegan milk is not ice cold when mixing, though the boiling water helps regulate the temp.
- ✓Cool completely: Vegan cakes can be slightly more fragile when warm. If you try to frost a warm cake, the frosting will melt and slide off.
- ✓Coffee enhances chocolate: Using hot coffee instead of water won’t make the cake taste like coffee; it simply makes the chocolate taste more like chocolate.
- ✓Quality matters: Since cocoa is the main flavor, use a high-quality Dutch-processed or natural cocoa powder for the best results.
- ✓Parchment paper is key: Always line the bottom of your pans. It guarantees your cake won’t stick, preventing heartbreak when flipping them out.
Substitutions and Variations
This recipe is quite versatile, but baking is chemistry, so proceed with care. For the flour, you can use a high-quality 1:1 Gluten-Free Baking Flour blend (like Bob’s Red Mill or King Arthur) to make this cake gluten-free; the texture will be slightly different but still delicious. If you don’t have apple cider vinegar, white vinegar or lemon juice works perfectly as a substitute to create the buttermilk. For the oil, melted coconut oil works, but if your kitchen is cold, it might solidify the batter slightly; canola, vegetable, or grapeseed oil are the most neutral options. For the sugar, we recommend standard white granulated sugar for the best structure. Coconut sugar can be used, but it will result in a darker, denser cake with a caramel undertone. In the frosting, if you cannot find vegan butter sticks, you can use a high-quality vegetable shortening, though the flavor won’t be as buttery—add a pinch of salt and extra vanilla to compensate.
Common Mistakes to Avoid
The most common mistake is over-baking. Because dark chocolate cakes don’t show ‘browning’ like vanilla cakes, it’s hard to tell visually when they are done. Rely on the toothpick test and check at the 30-minute mark. If you bake it too long, it will lose its signature moisture. Another mistake is over-mixing the batter after adding the flour. Once the wet and dry ingredients meet, gluten begins to form. If you whisk too vigorously, you’ll end up with a rubbery, tough cake rather than a tender one. Finally, using expired baking soda is a culprit for flat cakes. Since there are no eggs for lift, fresh baking soda is non-negotiable.
Serving Suggestions
This cake is rich, so it pairs beautifully with things that cut through the sweetness. Serve a slice with a side of fresh raspberries or strawberries to add a tart contrast. A scoop of vegan vanilla bean ice cream or a dollop of coconut whipped cream is classic. For an elegant touch, shave a bar of dark chocolate over the top of the frosting or dust it with a little extra cocoa powder. If you are a coffee lover, an espresso or a tall glass of cold oat milk is the perfect beverage companion.
Storage and Reheating Tips
This cake stores incredibly well thanks to the oil content. It can be kept at room temperature in an airtight cake carrier or container for up to 4 days. In fact, many find it tastes even better on the second day as the flavors meld. If you live in a very hot or humid climate, store it in the refrigerator to keep the frosting from melting, but bring it to room temperature before serving for the best texture. The cake layers can also be frozen (unfrosted) for up to 3 months. Wrap them tightly in plastic wrap, then foil. Thaw on the counter before frosting.
Nutrition Facts (Estimated)
| Serving Size | 1 slice |
| Calories | 480 |
| Fat | 24g |
| Saturated Fat | 6g |
| Unsaturated Fat | 16g |
| Trans Fat | 0g |
| Cholesterol | 0mg |
| Sodium | 310mg |
| Carbohydrates | 68g |
| Fiber | 4g |
| Sugar | 42g |
| Protein | 5g |
Frequently Asked Questions
Can I make this recipe into cupcakes?
Yes! This recipe makes about 24 standard cupcakes. Fill liners 2/3 full and bake at 350°F for 18-22 minutes.
Why do I need to use vinegar?
Vinegar is an acid that reacts with the baking soda. This reaction creates bubbles (carbon dioxide) which causes the cake to rise. Since there are no eggs, this is essential for a fluffy texture.
Can I reduce the sugar?
You can reduce the sugar by about 1/4 cup without ruining the structure, but reducing it significantly will affect the moisture and tenderness of the cake, as sugar is a liquid ingredient when melted.
My cake sank in the middle, why?
This usually happens if the oven door was opened too early during baking, causing the temperature to drop, or if the leavening agents (baking soda) were expired.
Can I use olive oil?
Yes, you can use olive oil, but keep in mind that strong extra virgin olive oil will impart a savory flavor. Use a ‘light’ or ‘pure’ olive oil for a neutral taste.
What is Dutch-processed cocoa?
Dutch-processed cocoa has been treated with an alkalizing agent to reduce acidity. It is darker and smoother. This recipe works with both natural and Dutch-processed, but Dutch will give a darker, fudgier result.
Is the frosting stable for piping?
Yes, as long as you use vegan butter sticks (not tub margarine) and beat it well with powdered sugar, it holds its shape perfectly for piping roses or borders.
Can I use a bundt pan?
Yes, but grease the pan very heavily. Bake for 45-55 minutes, checking for doneness, as the batter is deep and takes longer to cook through.
Conclusion
There is something incredibly satisfying about pulling a perfect chocolate cake out of the oven, knowing it was made entirely from plants yet sacrifices nothing in terms of flavor or texture. This Moist Vegan Chocolate Cake is a testament to how delicious vegan baking can be. It’s foolproof, crowd-pleasing, and undeniably decadent. Whether you are celebrating a special occasion or just need a chocolate fix on a Tuesday night, this recipe is ready to deliver. So grab your whisk, boil that water, and get ready to enjoy the best slice of chocolate cake you’ve arguably ever had.