The Ultimate Fun Oreo Cookie Pull-Apart Cupcake Cake For Birthdays
Fun Oreo Cookie Birthday Cake For Cupcake Pull Apart Cake Recipe
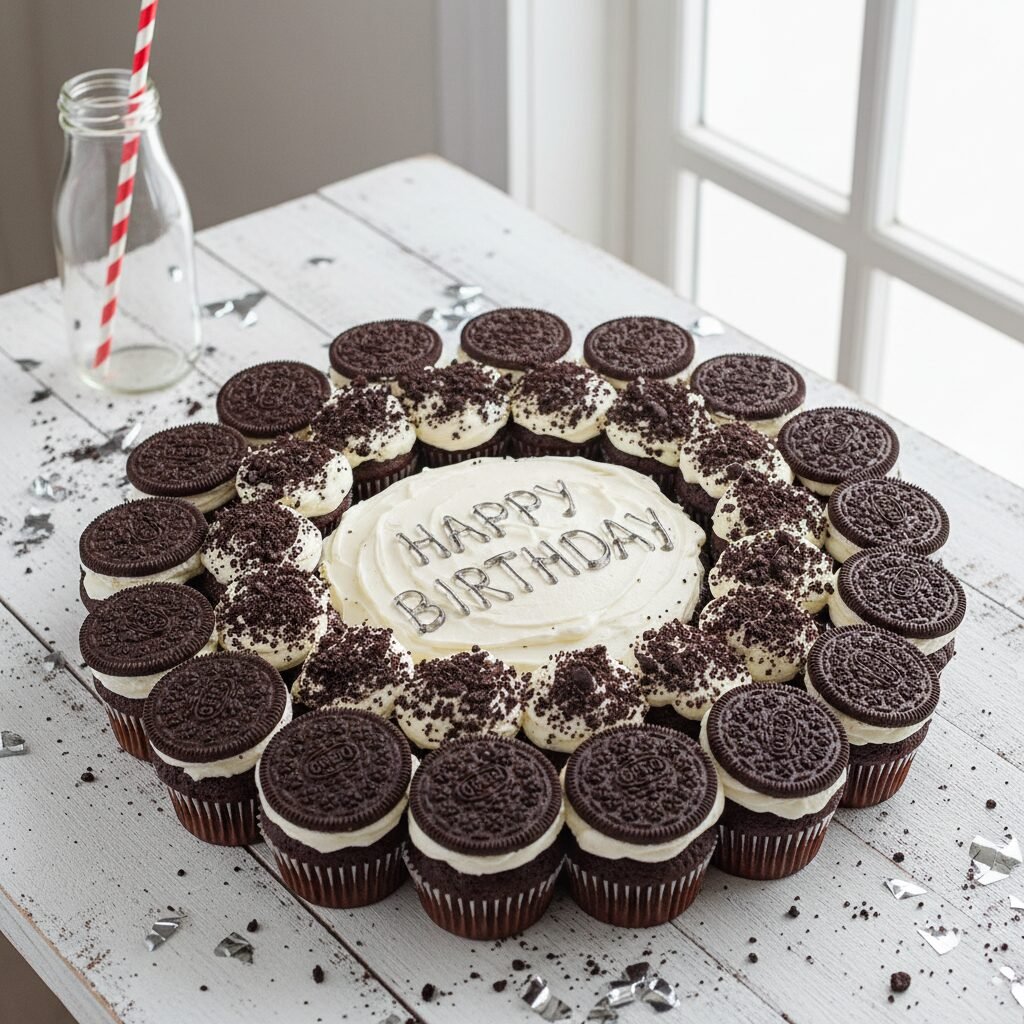
Transform a classic childhood favorite into a show-stopping birthday centerpiece with this Oreo Pull-Apart Cupcake Cake! It combines the grab-and-go convenience of cupcakes with the stunning visual of a sheet cake, all loaded with rich chocolate and crunchy cookie crumbles.
30 minutes
20 minutes
1 hour 15 minutes (includes cooling)
24 Servings
Dessert
Baking
American
Vegetarian
If there is one flavor that universally screams ‘celebration’ to both kids and adults alike, it is the classic cookies and cream. There is something undeniably nostalgic about the combination of dark, bitter cocoa and sweet, creamy vanilla filling that takes us right back to school lunchboxes and midnight snacks. This Fun Oreo Cookie Birthday Cake For Cupcake Pull Apart Cake Recipe takes that beloved flavor profile and elevates it into a party masterpiece that is as fun to eat as it is to look at. A pull-apart cake, or ‘cupcake cake,’ is the ultimate hack for hosting large gatherings. Gone are the days of frantically searching for a cake knife or worrying about cutting even slices while twenty eager children wait with plates in hand. With a pull-apart cake, the serving utensil is your hand, and the portion control is built right in!
This specific recipe features incredibly moist, dark chocolate cupcakes that serve as the base. We arrange them in a specific pattern—often a large circle to mimic a giant cookie or a rectangular sheet for maximum surface area—and frost them continuously as if they were a single cake. The result is a stunning canvas of fluffy vanilla buttercream infused with crushed Oreo bits, topped with even more whole cookies and crumbs. The contrast between the tender cake crumb and the crunchy cookie topping creates a textural symphony in every bite. Whether you are planning a milestone birthday, a casual backyard BBQ, or just want to surprise an Oreo lover, this recipe delivers high-impact visuals with low-stress serving. It is the perfect intersection of Pinterest-worthy aesthetics and practical party planning.
History & Origins
The history of this dessert is a fascinating blend of corporate confectionery innovation and the modern evolution of home baking trends. The Oreo cookie itself was first developed and produced by the National Biscuit Company (today known as Nabisco) in 1912 at their Chelsea Market factory in New York City. Originally sold as the ‘Oreo Biscuit,’ it quickly surpassed its competitors to become the best-selling cookie in the United States. Over the last century, the Oreo has become a cultural icon, sparking debates over the proper way to eat it (twist, lick, or dunk?) and inspiring countless dessert variations, from milkshakes to deep-fried state fair treats.
On the other hand, the concept of the ‘pull-apart cake’ or ‘cupcake cake’ is a more recent phenomenon, gaining significant traction in the early to mid-2000s with the rise of mommy blogs and social media platforms like Pinterest. As home bakers sought ways to create professional-looking cakes without advanced fondant skills, the cupcake cake emerged as a brilliant solution. It allowed bakers to create shapes, numbers, and characters easily by arranging cupcakes and frosting over the gaps. Merging the century-old legacy of the Oreo with the modern convenience of the pull-apart cake was an inevitable and delicious evolution. It represents the democratization of cake decorating, proving that you don’t need a culinary degree to create a birthday cake that looks like it came from a high-end bakery.
Why This Recipe Works
This recipe works exceptionally well because it addresses the three main pillars of a successful party dessert: flavor, texture, and logistics. Flavor-wise, we use ‘bloomed’ cocoa powder in the cupcake base, which involves mixing the cocoa with hot coffee or water to release the deep, dark chocolate notes that mimic the Oreo wafer. This ensures the cake isn’t just a vehicle for frosting but a rich experience on its own. The frosting is a stabilized whipped buttercream that holds its shape over the gaps between cupcakes, preventing that dreaded ‘sinking’ look that often plagues amateur pull-apart cakes.
Texturally, the inclusion of both fine cookie crumbs in the frosting and large chunks on top provides a necessary crunch to offset the soft sponge and creamy icing. Logistically, this format eliminates the need for plates and forks if you’re in a casual setting, making cleanup a breeze. Furthermore, the ‘glue’ technique we use—applying a small dab of frosting to the bottom of each cupcake liner—anchors the cakes to the board, ensuring your masterpiece survives the car ride to the venue. It is a foolproof system designed to make you look like a pro baker with minimal stress.
Why You’ll Love This Recipe
- ✓No knife needed: Guests simply pull a cupcake and enjoy.
- ✓Rich dark chocolate base mimics the classic cookie wafer.
- ✓Stabilized frosting bridges gaps perfectly for a smooth finish.
- ✓Highly customizable shape: Arrange as a circle, number, or rectangle.
- ✓Packed with real Oreo crumbs for authentic flavor in every bite.
- ✓Perfect for transporting to venues without sliding.
Equipment You’ll Need
- ✓2 standard 12-cup muffin tins
- ✓Cupcake liners (black or white)
- ✓Large mixing bowl
- ✓Stand mixer or electric hand mixer
- ✓Large cake board or serving platter
- ✓Offset spatula
- ✓Piping bag with large round tip
- ✓Food processor (for crushing cookies)
Ingredients
- ✓2 cups all-purpose flour
- ✓2 cups granulated sugar
- ✓3/4 cup dark unsweetened cocoa powder (Dutch-processed preferred)
- ✓2 tsp baking soda
- ✓1 tsp baking powder
- ✓1 tsp salt
- ✓2 large eggs, room temperature
- ✓1 cup whole milk
- ✓1/2 cup vegetable oil
- ✓2 tsp vanilla extract
- ✓1 cup boiling water
- ✓1.5 cups unsalted butter, softened (for frosting)
- ✓4-5 cups powdered sugar
- ✓1/4 cup heavy cream
- ✓25 Oreo cookies (15 crushed for topping, 10 whole for garnish)
Instructions
- Preheat your oven to 350°F (175°C) and line two muffin tins with cupcake liners.
- In a large bowl, whisk together flour, sugar, cocoa powder, baking soda, baking powder, and salt until well combined.
- Add the eggs, milk, oil, and vanilla extract. Beat on medium speed for about 2 minutes until the batter is smooth.
- Stir in the boiling water by hand. The batter will be very thin and watery; this is normal and ensures a moist cake.
- Fill cupcake liners about 2/3 full. Bake for 18-22 minutes, or until a toothpick inserted into the center comes out clean.
- Remove cupcakes from the oven and allow them to cool completely on a wire rack.
- While cupcakes cool, prepare the frosting. Beat the softened butter until pale and creamy (about 5 minutes).
- Gradually add powdered sugar, one cup at a time, mixing on low. Add vanilla and heavy cream, then whip on high for 3 minutes until fluffy.
- Arrange the cooled cupcakes on your cake board in your desired shape (a tight rectangle or circle). Use a dab of buttercream on the bottom of each liner to secure them to the board.
- Pipe a bridge of frosting between the gaps of the cupcakes to create a flat surface, then spread the remaining frosting evenly over the entire arrangement using an offset spatula.
- Crush 15 Oreos in a food processor or ziplock bag. Sprinkle the crumbs generously over the frosting.
- Garnish with the remaining whole Oreos, placing one on every other cupcake or creating a border.
Expert Cooking Tips
- ✓Use room temperature ingredients (eggs, milk, butter) to ensure a smooth batter and frosting emulsion.
- ✓Don’t skip the boiling water step; it blooms the cocoa powder for a more intense chocolate flavor.
- ✓When frosting, do a ‘crumb coat’ first if you are struggling with loose crumbs, chill for 10 minutes, then add the final layer.
- ✓Use an offset spatula dipped in warm water to smooth the buttercream for a professional finish.
- ✓If arranging in a specific shape (like a number), lay it out on the table first before transferring to the board to ensure it fits.
Substitutions and Variations
This recipe is quite versatile if you need to make dietary adjustments or use what you have on hand. For the flour, a 1:1 gluten-free baking flour blend works wonderfully, though the texture may be slightly denser. If you don’t have vegetable oil, melted coconut oil or canola oil are perfect swaps. For the dairy in the cake, you can use almond milk or oat milk, though whole milk provides the best tenderness. In the frosting, if you find it too sweet, swap half the butter for cream cheese to make a tangy Cream Cheese Oreo Frosting, which pairs beautifully with the dark chocolate. If you cannot find Dutch-processed cocoa, regular unsweetened cocoa powder is fine, but add 1/2 teaspoon of baking soda to balance the acidity. Finally, generic chocolate sandwich cookies can absolutely be used in place of brand-name Oreos without compromising the structural integrity of the cake.
Common Mistakes to Avoid
The most common mistake with pull-apart cakes is spacing the cupcakes too far apart. They need to be touching or very nearly touching so the frosting doesn’t fall into the abyss between them. Another frequent error is frosting the cupcakes while they are still slightly warm. This will cause the butter in the frosting to melt, leading to a greasy, sliding mess that won’t hold the cookie crumbs. Additionally, over-mixing the batter after adding the flour can lead to tough, chewy cupcakes rather than tender ones—mix just until combined. Lastly, forgetting to secure the cupcakes to the board with a dab of frosting is a recipe for disaster during transport; one sharp turn in the car and your beautiful design will shift and separate.
Serving Suggestions
Serve this masterpiece at a birthday party right from the cake board. Since it is a pull-apart cake, you don’t need a knife! Simply encourage guests to grab a cupcake and go. To make it a complete dessert spread, serve alongside cold glasses of milk (dairy or oat) to lean into the ‘cookies and cream’ theme. For an adult twist, pair it with an Espresso Martini or a dark stout beer, which complements the chocolate notes. If this is for a summer party, a scoop of vanilla bean ice cream on the side of each cupcake turns this into an indulgent plated dessert. You can also place a few candles directly into the cupcakes; just be careful not to set the paper liners on fire.
Storage and Reheating Tips
Because this cake features a buttercream frosting, it can sit out at cool room temperature for up to 2 days, provided it is covered with a cake dome or loosely tented with foil to keep dust and pets away. If your kitchen is hot, store the cake in the refrigerator. The cupcakes will stay fresh in the fridge for up to 4 days. Note that the Oreo garnish on top may soften after 24 hours due to the moisture in the frosting. If you want to freeze leftovers, separate the cupcakes and place them in an airtight container; they freeze well for up to 3 months. Thaw on the counter for an hour before eating. Do not freeze the cake whole on the board unless you have a massive freezer!
Nutrition Facts (Estimated)
| Serving Size | 1 Cupcake |
| Calories | 320 |
| Fat | 14g |
| Saturated Fat | 6g |
| Unsaturated Fat | 8g |
| Trans Fat | 0g |
| Cholesterol | 35mg |
| Sodium | 180mg |
| Carbohydrates | 45g |
| Fiber | 2g |
| Sugar | 28g |
| Protein | 3g |
Frequently Asked Questions
Can I make the cupcakes ahead of time?
Yes! You can bake the cupcakes 1-2 days in advance. Store them in an airtight container at room temperature. Make the frosting and assemble the pull-apart cake on the day of the event for the freshest taste.
How do I transport a pull-apart cake?
Transporting is easier if you use a sturdy cake board or a large baking sheet. Ensure the cupcakes are ‘glued’ down with frosting. Place the board on a non-slip mat in the trunk or on the floor of your car, never on a slanted seat.
Can I use store-bought frosting?
You can, but homemade buttercream is stiffer and bridges the gaps between cupcakes much better. If you use store-bought, whip it with a mixer and add a little extra powdered sugar to stiffen it up.
Why did my cupcakes sink in the middle?
Sinking usually happens if the oven door was opened too early, releasing heat, or if there was too much leavening agent (baking powder/soda). Ensure your oven is fully preheated before baking.
How many cupcakes does this recipe make?
This recipe yields approximately 24 standard-sized cupcakes. You can scale the recipe up or down depending on the size of the shape you want to create.
Can I use Golden Oreos instead?
Absolutely! Swap the dark cocoa powder in the cake for more flour (or use a vanilla cake base) and use Golden Oreos for the topping to create a ‘Golden Vanilla’ version.
Do I need to cut the domes off the cupcakes?
For a perfectly flat pull-apart cake, it helps to trim the domes slightly. However, if you pipe enough frosting into the gaps, you can often hide the unevenness without trimming.
What is ‘blooming’ the cocoa?
Blooming involves mixing cocoa powder with a hot liquid (like boiling water or coffee). This dissolves the cocoa butter and releases the flavor particles, resulting in a deeper, richer chocolate taste.
Can I fill the cupcakes?
Yes, coring the cupcakes and adding a ganache or cream filling is a great surprise. Just be careful not to make the cupcakes too fragile to handle.
Conclusion
The Fun Oreo Cookie Birthday Cake For Cupcake Pull Apart Cake Recipe is more than just a dessert; it is a conversation starter and a centerpiece that brings joy to any gathering. By combining the rich, sophisticated flavor of dark chocolate with the playful, nostalgic crunch of Oreos, you create a treat that appeals to every generation. The pull-apart format takes the stress out of serving, allowing you to enjoy the party rather than playing waiter. Whether you are a seasoned baker or a novice looking to impress, this recipe offers a high reward for your effort. So grab your milk, preheat your oven, and get ready to twist, lick, and dunk your way to the best birthday cake ever!