The Ultimate Fun Oreo Cookie Birthday Cake for 8-Inch Round Pans
Fun Oreo Cookie Birthday Cake For 8 Inch Round Pans Recipe
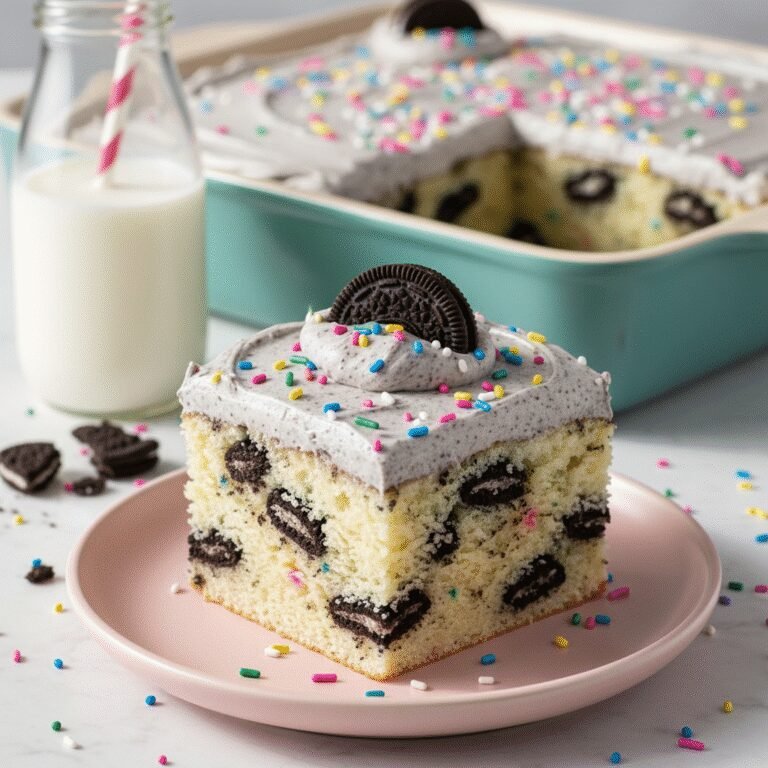
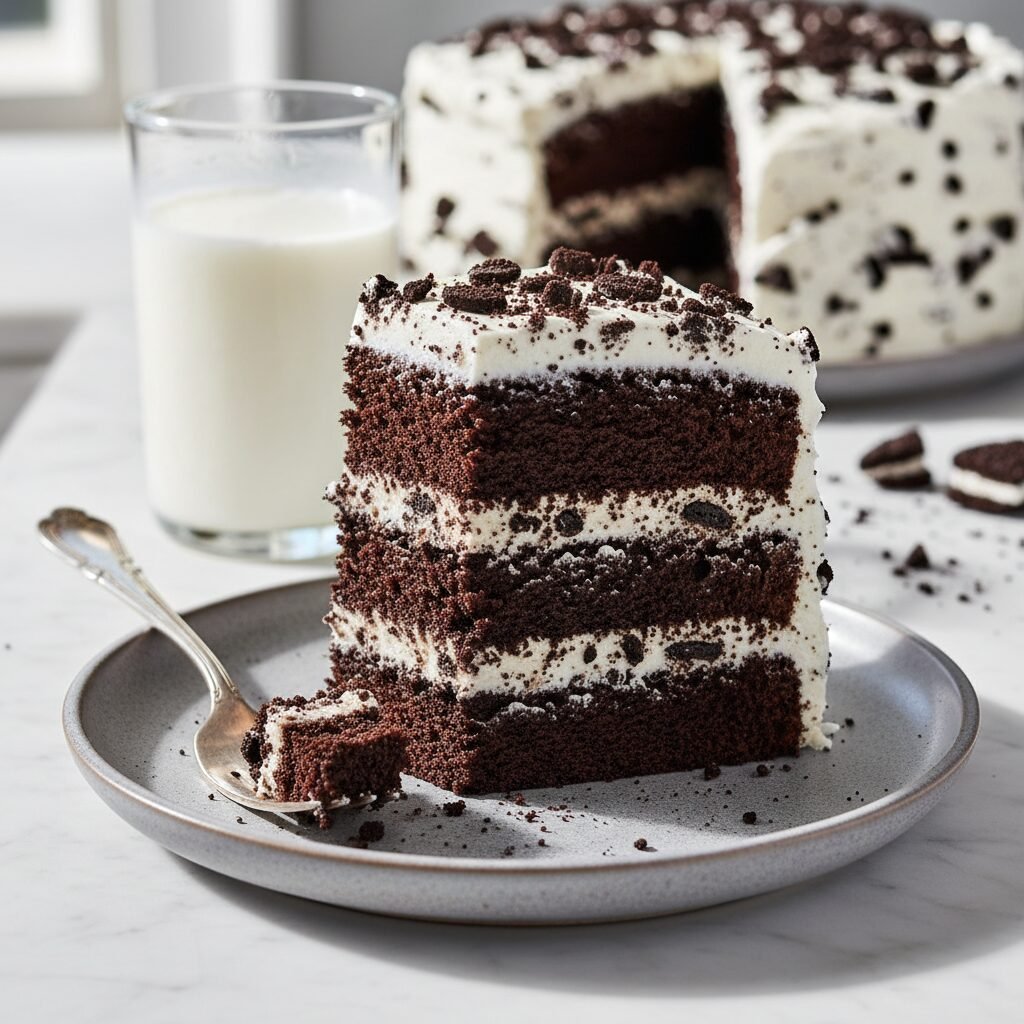
Celebrate in style with this decadent Oreo Cookie Birthday Cake, featuring moist dark chocolate layers packed with crushed cookies and enveloped in a fluffy cookies-and-cream buttercream. It is the perfect blend of nostalgic crunch and sophisticated chocolate flavor, sized perfectly for standard 8-inch pans.
45 minutes
35 minutes
1 hour 20 minutes
12-14 servings
Dessert
Baking
American
Vegetarian
There is something undeniably magical about the combination of dark, rich chocolate and the sweet, creamy crunch of an Oreo cookie. It transports us back to childhood afternoons spent twisting, licking, and dunking, but elevates that nostalgia into a show-stopping centerpiece worthy of any birthday celebration. This Fun Oreo Cookie Birthday Cake is not just a dessert; it is an experience. We start with a base of incredibly moist, tender chocolate cake that uses a specific blooming technique with hot coffee to intensify the cocoa flavor without making the cake taste like java. But the real star here is the texture. We fold generous amounts of roughly chopped Oreos directly into the batter, creating pockets of softened cookie goodness that meld perfectly with the crumb.
Moving beyond the cake layers, the frosting is a masterpiece of texture and sweetness. A Swiss Meringue Buttercream base—lighter and silkier than your standard American buttercream—is whipped to perfection before being loaded with finely processed cookie crumbs. This ensures every bite has that signature ‘grey stuff’ look (that is actually delicious!) and a consistent cookies-and-cream flavor profile. Whether you are baking for a child’s 5th birthday or a best friend’s 30th, this cake bridges the gap between fun, whimsical flavors and serious baking technique. It is sturdy enough to stack but melts in your mouth, proving that you do not need a professional bakery to produce a cake that looks and tastes like a million bucks. Get your 8-inch pans ready, because this is the only chocolate sandwich cookie cake recipe you will ever need.
History & Origins
To understand the gravity of this cake, we have to look at the history of its two main components: the birthday cake and the Oreo itself. The tradition of the birthday cake dates back to the ancient Romans, but the modern iteration—a sweet, frosted, multi-layered confection—really took shape in Germany during the Middle Ages with ‘Kinderfest,’ a celebration for children. However, it wasn’t until the Industrial Revolution that ingredients like sugar and baking powder became affordable enough for the average household to bake cakes regularly.
Enter the Oreo. Introduced by the National Biscuit Company (Nabisco) on March 6, 1912, in New York City, the Oreo was originally sold in a tin can with a glass top. It quickly outpaced its competitors to become the best-selling cookie in the United States. Over the last century, the Oreo has become a cultural icon, dubbed ‘Milk’s Favorite Cookie.’ Its design has remained largely unchanged, a testament to its perfection. The concept of integrating this specific cookie into cakes is a relatively modern phenomenon, popularized in the late 20th century as ‘Cookies and Cream’ became a staple ice cream flavor. This cake recipe honors that history by keeping the cookie front and center, celebrating over 100 years of snacking history in a format that pays homage to the centuries-old tradition of blowing out candles and making a wish.
Why This Recipe Works
This recipe succeeds where others fail because of three critical chemical interactions and textural balances. First, we utilize the ‘blooming’ method for the cocoa powder. By mixing the cocoa with boiling hot liquid (water or coffee) before adding it to the batter, we dissolve the cocoa butter and release the full depth of the chocolate flavor, preventing the cake from tasting dusty or dry. Second, we use a combination of oil and sour cream rather than just butter. Butter adds flavor, but oil ensures the cake stays moist for days, while the acidity in the sour cream tenderizes the gluten strands, resulting in a plush, soft crumb that can still support the weight of the frosting.
Finally, the frosting technique is key. Many Oreo cake recipes fail because the cookie chunks in the frosting are too large, making it a nightmare to spread smoothly. In this recipe, we divide the cookies for the frosting into two textures: a fine dust for flavor and color, and slightly larger crumbs for texture. This allows the buttercream to remain spreadable and pipeable while delivering maximum cookie impact. The structural integrity of the 8-inch rounds is also optimized; they bake flatter and more evenly than 9-inch pans with this volume of batter, reducing the need for excessive trimming and waste.
Why You’ll Love This Recipe
- ✓Intensely moist chocolate cake base enhanced with blooming cocoa.
- ✓Two textures of Oreos used: chunks in the batter and fine crumbs in the frosting.
- ✓Stable buttercream that holds up well at room temperature.
- ✓Perfectly scaled for two or three 8-inch round cake pans.
- ✓Visual stunner with a stark black-and-white contrast.
- ✓Keeps moist for up to 4 days without drying out.
Equipment You’ll Need
- ✓Two or three 8-inch round cake pans
- ✓Stand mixer or electric hand mixer
- ✓Large mixing bowls
- ✓Whisk
- ✓Rubber spatula
- ✓Parchment paper
- ✓Offset spatula
- ✓Wire cooling rack
- ✓Food processor (for crushing cookies)
Ingredients
- ✓2 cups granulated sugar
- ✓1 3/4 cups all-purpose flour
- ✓3/4 cup dark unsweetened cocoa powder
- ✓1 1/2 tsp baking powder
- ✓1 1/2 tsp baking soda
- ✓1 tsp salt
- ✓2 large eggs, room temperature
- ✓1 cup whole milk, room temperature
- ✓1/2 cup vegetable oil
- ✓2 tsp pure vanilla extract
- ✓1 cup boiling water
- ✓1 cup roughly chopped Oreo cookies (for batter)
- ✓1 1/2 cups unsalted butter, softened (for frosting)
- ✓4-5 cups powdered sugar
- ✓1/4 cup heavy cream
- ✓1 cup finely crushed Oreo crumbs (for frosting)
- ✓Whole Oreos and mini Oreos for decoration
Instructions
- Preheat your oven to 350°F (175°C). Grease two or three 8-inch round cake pans with butter and dust with cocoa powder, or line the bottoms with parchment paper for easy release.
- In the bowl of a stand mixer or a large bowl, whisk together the sugar, flour, cocoa, baking powder, baking soda, and salt until no lumps remain.
- Add the eggs, milk, oil, and vanilla extract. Beat on medium speed for about 2 minutes. The batter will look thick at first but will smooth out.
- Reduce the mixer speed to the lowest setting and carefully pour in the boiling water. Mix until just combined. The batter will be very thin and liquid; this is normal and essential for a moist cake.
- Gently fold in the 1 cup of roughly chopped Oreo cookies by hand using a rubber spatula so they don’t break down too much.
- Distribute the batter evenly between the prepared pans. Tap the pans gently on the counter to release any large air bubbles.
- Bake for 30-35 minutes, or until a wooden toothpick inserted into the center comes out clean or with just a few moist crumbs.
- Remove from the oven and let the cakes cool in the pans for 10 minutes. Then, run a knife around the edges and invert them onto a wire rack to cool completely before frosting.
- While the cakes cool, prepare the frosting. Beat the softened butter in a stand mixer on medium-high speed for 5 minutes until it is pale and creamy.
- Gradually add the powdered sugar, one cup at a time, mixing on low speed until incorporated. Add the heavy cream and vanilla extract.
- Increase speed to high and whip for another 3-4 minutes until fluffy. Fold in the finely crushed Oreo crumbs until evenly distributed.
- To assemble, place one cake layer on your serving plate or cake stand. Spread a generous layer of frosting over the top. Repeat with the second (and third, if using) layer.
- Cover the top and sides of the cake with the remaining frosting. Smooth with an offset spatula.
- Decorate with whole or chopped Oreos and chill for 20 minutes before slicing to set the buttercream.
Expert Cooking Tips
- ✓Do not skip the boiling water step; it blooms the cocoa and ensures the cake isn’t dry.
- ✓Room temperature ingredients (eggs, milk, butter) are crucial for a smooth, emulsified batter.
- ✓When crushing Oreos for the frosting, use a food processor to get fine dust. Large chunks will tear the cake when you try to spread the frosting.
- ✓If your cakes dome significantly during baking, use a serrated knife to level the tops before stacking.
- ✓Chill the cake layers for 30 minutes before frosting to reduce crumbs getting caught in the icing (crumb coat).
- ✓Use dark cocoa powder for a more intense, Oreo-like color in the cake layers.
Substitutions and Variations
If you need to adapt this recipe, there are several viable swaps. For a dairy-free version, substitute the whole milk with almond or soy milk, and use a high-quality plant-based butter stick for the frosting. The sour cream can be replaced with plain Greek yogurt or a dairy-free yogurt alternative. If you don’t have vegetable oil, melted coconut oil or canola oil works perfectly fine. For the flour, a 1:1 gluten-free all-purpose flour blend (preferably one with xanthan gum) can be used to make this gluten-free, provided you also use gluten-free sandwich cookies (many major brands now offer these). You can also swap the dark cocoa powder for regular Dutch-process cocoa, though the color will be lighter.
Common Mistakes to Avoid
The most common mistake with this cake is over-baking. Because the batter is dark, it is hard to see visual cues like browning. Rely on the toothpick test and start checking at the 30-minute mark. Another frequent error is adding the boiling water too quickly while the mixer is on high, which can splash and burn you, or cook the eggs slightly. Pour slowly on low speed. Regarding the frosting, failing to sift the powdered sugar or not crushing the cookies finely enough leads to a gritty, lumpy texture that is difficult to pipe or spread smoothly. Finally, do not try to frost a warm cake; the butter in the frosting will melt, causing the layers to slide off.
Serving Suggestions
This cake is rich, so serve it in thin slices. It pairs beautifully with a cold glass of milk, naturally, but also goes well with hot coffee or an espresso to balance the sweetness. For a birthday party, serve alongside vanilla bean ice cream. To make the presentation extra festive, you can pipe rosettes of frosting on top and place a mini Oreo in the center of each, or create a chocolate ganache drip down the sides for a dramatic effect.
Storage and Reheating Tips
Store this cake in an airtight cake keeper at room temperature for up to 3 days. The sugar acts as a preservative, and the oil keeps it moist. If you live in a very hot or humid climate, you may want to store it in the refrigerator, but be sure to let it come to room temperature for an hour before serving for the best texture. You can also freeze individual slices wrapped tightly in plastic wrap and foil for up to 3 months. Thaw in the fridge overnight.
Nutrition Facts (Estimated)
| Serving Size | 1 slice |
| Calories | 650 |
| Fat | 34g |
| Saturated Fat | 12g |
| Unsaturated Fat | 20g |
| Trans Fat | 0g |
| Cholesterol | 65mg |
| Sodium | 320mg |
| Carbohydrates | 82g |
| Fiber | 4g |
| Sugar | 45g |
| Protein | 6g |
Frequently Asked Questions
Can I use this recipe for cupcakes?
Yes! This batter works perfectly for cupcakes. It will yield approximately 24-28 cupcakes. Bake them at 350°F for 18-22 minutes.
Why is my batter so runny?
The batter is supposed to be very thin and liquid due to the milk and boiling water. Do not add more flour; it will firm up beautifully as it bakes.
Can I make the cake layers ahead of time?
Absolutely. You can bake the layers, let them cool completely, wrap them tightly in plastic wrap, and freeze them for up to a month. Frost them while frozen for easier handling.
Do I need to remove the cream from the Oreos before crushing?
No, leave the cream in! It adds sweetness and helps bind the crumbs slightly. Just throw the whole cookie into the food processor.
What if I only have 9-inch pans?
You can use two 9-inch pans, but the layers will be thinner. Reduce the baking time by about 5-8 minutes to prevent them from drying out.
Can I use a different flavor of Oreo?
Yes, Golden Oreos, Mint Oreos, or Peanut Butter Oreos all work great. Just be aware that Mint or Peanut Butter will change the flavor profile significantly.
How do I stop the cake from sticking to the pan?
The most reliable method is to trace the bottom of your pan on parchment paper, cut out the circle, and place it in the bottom of the greased pan.
Why did my cake sink in the middle?
This usually happens if the oven door was opened too early, causing a temperature drop, or if the baking powder/soda is expired. It can also happen if the batter was over-mixed.
Conclusion
This Fun Oreo Cookie Birthday Cake is more than just a recipe; it is a ticket to becoming the hero of the party. With its deep, dark chocolate layers and that unmistakable cookies-and-cream frosting, it satisfies the most demanding sweet tooth while looking professionally made. The process is straightforward enough for beginners, yet the results are sophisticated enough for seasoned bakers. So, grab your 8-inch pans, stock up on those iconic sandwich cookies, and get ready to bake a memory that tastes as good as it looks. Happy baking!