The Ultimate Fun Chocolate Peanut Butter Birthday Cake Recipe
Fun Chocolate Peanut Butter Birthday Cake Recipe
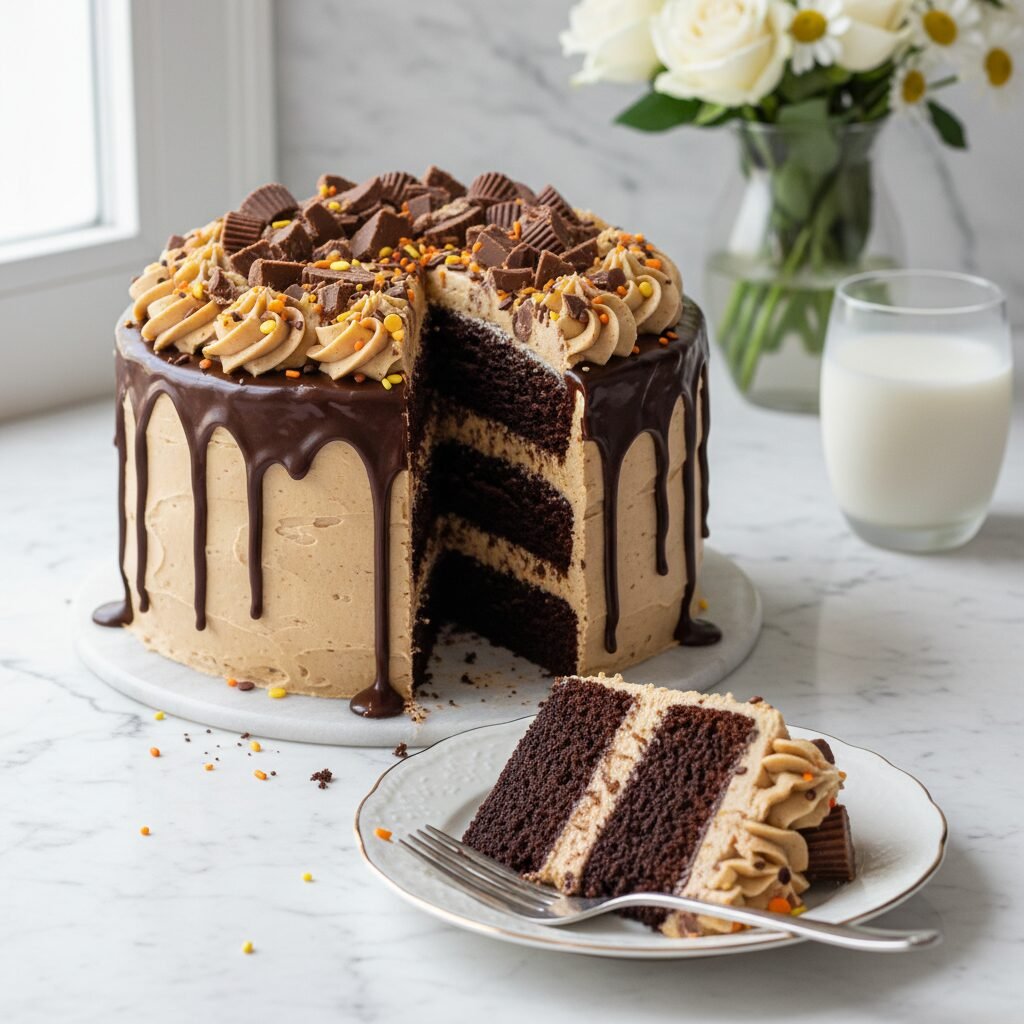
This show-stopping chocolate peanut butter birthday cake features ultra-moist dark chocolate layers, fluffy peanut butter buttercream, and a decadent chocolate ganache drip. It is the perfect salty-sweet celebration dessert that tastes just like a giant peanut butter cup!
45 minutes
35 minutes
1 hour 20 minutes (plus cooling)
12-14 servings
Dessert
Baking
American
Vegetarian
If there is one flavor combination that reigns supreme in the world of desserts, it is undoubtedly the marriage of rich, dark chocolate and creamy, salty peanut butter. This Fun Chocolate Peanut Butter Birthday Cake is not just a dessert; it is an experience designed to evoke the pure joy of childhood birthdays while delivering a sophisticated flavor profile that adults will adore. Imagine sinking your fork into three towering layers of impossibly moist chocolate cake, each crumb infused with the depth of brewed coffee and the richness of high-quality cocoa. Between these layers lies the true star of the show: a velvety, whipped peanut butter frosting that strikes the perfect balance between savory nuttiness and sweet indulgence.
What makes this cake truly “fun” and perfect for a birthday celebration is the decoration. We are talking about a glossy chocolate ganache drip that cascades down the sides, creating that irresistible Pinterest-worthy look, topped with a mountain of chopped peanut butter cups and festive sprinkles. This recipe is designed for the home baker who wants to achieve bakery-level results. The cake crumb is tender and stays fresh for days, thanks to a specific blend of oil and buttermilk, while the frosting is light enough to pipe but stable enough to hold up a towering masterpiece. Whether you are baking for a die-hard peanut butter lover or simply want to bring the “wow” factor to your next party, this cake promises to be the highlight of the event. Get your stand mixer ready, because we are about to create a confectionery legend.
History & Origins
The history of the chocolate peanut butter cake is a delicious journey through American culinary innovation. While chocolate has been consumed for millennia, dating back to the Mesoamerican civilizations who drank it as a bitter, spiced beverage, the concept of the chocolate cake as we know it did not emerge until the late 19th century. Early cakes were more like bread, but with the refinement of cocoa powder and the introduction of baking powder, lighter, fluffier textures became possible. By the 1930s, the “Devil’s Food” style of moist, dark chocolate cake had become a staple in American households, celebrated for its intense flavor and reddish hue.
Parallel to this, peanut butter was making its own history. While the Incas ground peanuts into paste, the modern spreadable version was patented by Marcellus Gilmore Edson in 1884. However, it was Harry Burnett Reese, a former dairy farmer and shipping foreman for Milton Hershey, who truly solidified the bond between chocolate and peanut butter. In 1928, in his basement in Hershey, Pennsylvania, Reese created the “Penny Cup,” later known as Reese’s Peanut Butter Cups. This invention sparked a national obsession with the flavor pairing.
Over the decades, home bakers began incorporating these candy flavors into baked goods. The specific iteration of the “Chocolate Peanut Butter Drip Cake” gained massive popularity in the 2010s with the rise of visual social media platforms like Pinterest and Instagram. Bakers moved away from simple sheet cakes to tall, multi-layered barrel cakes adorned with “drips” and candy toppings, turning the humble birthday cake into an edible art form. This recipe honors that century-long evolution, combining the classic 1930s-style chocolate sponge with the modern aesthetic of the gourmet drip cake.
Why This Recipe Works
This recipe succeeds where others fail due to the precise chemistry of the ingredients, specifically the interaction between the fats, acids, and cocoa. First, the chocolate cake base utilizes oil rather than butter. While butter adds flavor, it contains water which can lead to gluten development and a drier crumb upon refrigeration. Oil is 100% fat, ensuring the cake remains incredibly moist and tender even when served cold. We also use the “blooming” technique, where boiling hot coffee is poured over the cocoa powder. This releases the essential oils in the cocoa, intensifying the chocolate flavor without making the cake bitter; the coffee enhances the chocolate notes without imparting a distinct coffee taste.
Secondly, the leavening relies on a reaction between baking soda and the acidity of both the buttermilk and the natural cocoa powder. This creates a powerful lift, resulting in a tall, airy structure that can support heavy frosting without becoming dense. regarding the frosting, we use a high ratio of creamy peanut butter to butter. Many recipes use too much powdered sugar, masking the peanut flavor. By whipping the peanut butter with room-temperature butter before adding sugar, we create an emulsion that is fluffy and distinctly nutty. The addition of a pinch of fine sea salt to the frosting is the secret weapon; it cuts through the sugar and bridges the gap between the savory peanut butter and the sweet chocolate, creating that addictive “moreish” quality that keeps people coming back for a second slice.
Why You’ll Love This Recipe
- ✓Ultra-moist chocolate sponge that stays fresh for days.
- ✓Rich and creamy peanut butter frosting that isn’t too sweet.
- ✓Show-stopping chocolate ganache drip for professional presentation.
- ✓Perfect balance of salty and sweet flavors.
- ✓Can be made ahead of time for stress-free party prep.
Equipment You’ll Need
- ✓Three 8-inch round cake pans
- ✓Stand mixer or handheld electric mixer
- ✓Large mixing bowls
- ✓Wire cooling rack
- ✓Offset spatula
- ✓Bench scraper (for smooth sides)
- ✓Parchment paper
- ✓Saucepan (for ganache)
Ingredients
- ✓2 cups granulated sugar
- ✓1 3/4 cups all-purpose flour
- ✓3/4 cup dark unsweetened cocoa powder
- ✓1 1/2 teaspoons baking powder
- ✓1 1/2 teaspoons baking soda
- ✓1 teaspoon salt
- ✓2 large eggs, room temperature
- ✓1 cup whole milk or buttermilk, room temperature
- ✓1/2 cup vegetable oil
- ✓2 teaspoons vanilla extract
- ✓1 cup boiling hot coffee (or boiling water)
- ✓1 1/2 cups unsalted butter, softened (for frosting)
- ✓1 cup creamy peanut butter (commercial brand like Jif or Skippy, not natural)
- ✓4-5 cups powdered sugar
- ✓1/4 cup heavy cream (for frosting)
- ✓1/2 cup semi-sweet chocolate chips (for ganache)
- ✓1/3 cup heavy cream (for ganache)
- ✓1 cup chopped peanut butter cups (for garnish)
Instructions
- Preheat your oven to 350°F (175°C). Grease three 8-inch round cake pans with butter and dust with cocoa powder, or line the bottoms with parchment paper for easy release.
- In the bowl of a stand mixer or a large bowl, whisk together the sugar, flour, cocoa powder, baking powder, baking soda, and salt until well combined and no lumps remain.
- Add the eggs, buttermilk, vegetable oil, and vanilla extract. Beat on medium speed for about 2 minutes. The batter should be smooth and glossy.
- Reduce the mixer speed to the lowest setting and carefully pour in the boiling hot coffee. Mix just until combined. The batter will be very thin and liquid; this is normal and essential for a moist cake.
- Divide the batter evenly among the three prepared cake pans. Tap the pans gently on the counter to release any large air bubbles.
- Bake for 30 to 35 minutes, or until a wooden toothpick inserted into the center comes out clean or with just a few moist crumbs attached.
- Remove the cakes from the oven and let them cool in the pans for 10 minutes. Then, turn them out onto a wire rack to cool completely before frosting.
- While the cakes cool, make the frosting. In a large bowl, beat the softened butter and peanut butter together until smooth and creamy (about 2-3 minutes).
- Gradually add the powdered sugar, one cup at a time, beating on low speed. Once incorporated, increase to high speed and beat for 2 minutes until fluffy. Add the heavy cream and vanilla, beating for another minute. Add a pinch of salt if needed.
- To assemble, level the tops of the cake layers with a serrated knife if they have domed. Place one layer on a cake stand and spread a thick layer of peanut butter frosting over the top. Repeat with the second layer.
- Place the final layer upside down (flat side up) on top. Apply a thin ‘crumb coat’ of frosting all over the cake and refrigerate for 20 minutes to set.
- Apply the remaining frosting to the top and sides, smoothing it out with an offset spatula or bench scraper.
- Prepare the ganache by placing chocolate chips in a heatproof bowl. Heat the 1/3 cup heavy cream until just simmering, then pour over the chocolate. Let sit for 5 minutes, then whisk until smooth and glossy.
- Let the ganache cool slightly until it thickens but is still pourable. Using a spoon or squeeze bottle, drip the ganache down the edges of the chilled cake, then fill in the center top.
- Immediately top with chopped peanut butter cups and sprinkles before the ganache sets. Slice and serve!
Expert Cooking Tips
- ✓Use room temperature ingredients (eggs, buttermilk, butter) to ensure the batter and frosting emulsify properly without curdling.
- ✓Do not skip the boiling water/coffee step; it blooms the cocoa powder, unlocking a deeper, more intense chocolate flavor.
- ✓Use commercial creamy peanut butter (like Jif or Skippy) for the frosting. Natural peanut butter can separate and make the frosting oily or gritty.
- ✓Chill the cake layers before frosting. Cold cakes are firmer and much easier to stack and frost without crumbs getting into the icing.
- ✓Weigh your flour using a kitchen scale if possible. If using cups, spoon the flour into the cup and level it off to avoid packing it down, which causes dry cake.
- ✓Test the ganache consistency on a glass upside down before putting it on the cake. If it runs too fast, let it cool longer; if it’s too thick, warm it slightly.
Substitutions and Variations
This recipe is quite versatile if you need to make swaps based on dietary needs or pantry availability. For the flour, a high-quality 1:1 gluten-free all-purpose flour blend works exceptionally well; look for one that contains xanthan gum. If you don’t have buttermilk, you can make a quick substitute by adding one tablespoon of lemon juice or white vinegar to a cup of regular milk and letting it sit for 5 minutes until it curdles. For the oil, melted coconut oil or melted butter can be used, though vegetable or canola oil yields the moistest texture. In the frosting, if you have a peanut allergy, you can substitute the peanut butter with cookie butter (Biscoff) or sunflower seed butter for a similar texture, though the flavor profile will obviously change. For a dairy-free version, use plant-based milk in the cake and high-quality vegan butter sticks in the frosting. Finally, if you want to avoid caffeine, decaf coffee or simply boiling water works perfectly fine in the cake batter.
Common Mistakes to Avoid
The most common mistake with this cake is over-baking. Because the batter is dark, it is hard to see when it is browning. Rely on the toothpick test and start checking at the 30-minute mark; over-baked chocolate cake becomes dry and crumbly very quickly. Another frequent error is using natural peanut butter for the frosting. The oil separation in natural peanut butter can cause the buttercream to break or become greasy, refusing to hold its shape. Always use stabilized commercial peanut butter. Additionally, rushing the cooling process is a recipe for disaster. If you try to frost the cakes while they are even slightly warm, the butter in the frosting will melt, causing the layers to slide off one another. Finally, adding the ganache when it is too hot will melt your beautiful frosting job; ensure the ganache is slightly warm to the touch but thick enough to drip slowly.
Serving Suggestions
This rich cake is best served in thin slices, as it is quite decadent. It pairs beautifully with a cold glass of milk to cut through the richness of the peanut butter and chocolate. For an adult twist, serve it alongside a hot espresso or a dark roast coffee, which complements the cocoa notes in the sponge. If you are serving this for a birthday party, consider adding a scoop of vanilla bean ice cream on the side. To get the cleanest slices, dip a sharp chef’s knife into hot water, wipe it dry, and make a cut. Repeat this process for every slice to keep the layers distinct and the frosting smooth.
Storage and Reheating Tips
Because of the butter and cream in the frosting and ganache, this cake is best stored in the refrigerator, especially in warm weather. It can be kept at room temperature for up to 2 days if the house is cool (below 70°F). In the fridge, store it in an airtight cake carrier or cover the cut sections with plastic wrap to prevent them from drying out; it will last for up to 5 days. The cake actually tastes best when eaten at room temperature, so remove slices from the fridge about 30 to 60 minutes before serving to allow the buttercream to soften. For long-term storage, you can freeze individual slices wrapped tightly in plastic wrap and then foil for up to 3 months. Thaw in the fridge overnight before eating.
Nutrition Facts (Estimated)
| Serving Size | 1 slice |
| Calories | 680 |
| Fat | 38g |
| Saturated Fat | 14g |
| Unsaturated Fat | 20g |
| Trans Fat | 0g |
| Cholesterol | 65mg |
| Sodium | 340mg |
| Carbohydrates | 82g |
| Fiber | 4g |
| Sugar | 55g |
| Protein | 9g |
Frequently Asked Questions
Can I make this cake ahead of time?
Yes! You can bake the cake layers up to 2 days in advance. Wrap them tightly in plastic wrap and store them at room temperature or in the fridge. You can also make the frosting a day ahead, refrigerate it, and then re-whip it before using.
Why is my cake batter so runny?
Don’t panic! This recipe produces a very thin, liquid batter. This is intentional and is due to the high liquid content (milk, oil, coffee) which ensures the final cake is incredibly moist. It will bake up perfectly.
Can I use espresso powder instead of brewed coffee?
Absolutely. You can dissolve 1 to 2 teaspoons of instant espresso powder into 1 cup of boiling water to replace the brewed coffee. This is a great way to get that coffee depth without brewing a whole pot.
My frosting is too soft to pipe, what should I do?
If your kitchen is warm or the peanut butter was oily, the frosting might be soft. Place the bowl in the refrigerator for 15-20 minutes to firm up the butter, then re-whip it briefly before piping.
Can I make this into cupcakes instead?
Yes, this batter makes excellent cupcakes. Line standard muffin tins with liners and fill them 2/3 full. Bake at 350°F for 18-22 minutes. The recipe yields about 24-30 cupcakes.
Do I have to use dark cocoa powder?
We recommend dark or Dutch-processed cocoa for a fudgier texture and deeper color, but regular unsweetened cocoa powder works just fine. The cake might just be slightly lighter in color.
How do I get the smooth sides on the cake?
The secret is a ‘crumb coat’ (a thin initial layer of frosting to trap crumbs) followed by chilling. Then apply a thick final layer and use a metal bench scraper or cake smoother, holding it stationary while you rotate the cake turntable.
Why did my cake sink in the middle?
Sinking usually happens if the oven door was opened too early during baking, causing the temperature to drop before the structure set. It can also happen if there is too much leavening (baking soda/powder) measured incorrectly.
Conclusion
There you have it—the blueprint for the most delightful, indulgent, and fun Chocolate Peanut Butter Birthday Cake you will ever make. This recipe is more than just a set of instructions; it is a ticket to becoming the hero of any birthday party or gathering. The combination of the deep, dark chocolate sponge with the salty, creamy luxury of peanut butter frosting is a timeless classic that never fails to bring a smile to everyone’s face. Whether you are a seasoned pro or a beginner baker looking for a challenge that pays off, this cake is worth every minute of effort. So, grab your apron, preheat that oven, and get ready to create a delicious memory that your friends and family will be talking about until the next birthday rolls around. Happy baking!