The Ultimate Fun Chocolate Peanut Butter Birthday Cake for Class Parties
Fun Chocolate Peanut Butter Birthday Cake For Class Party Recipe
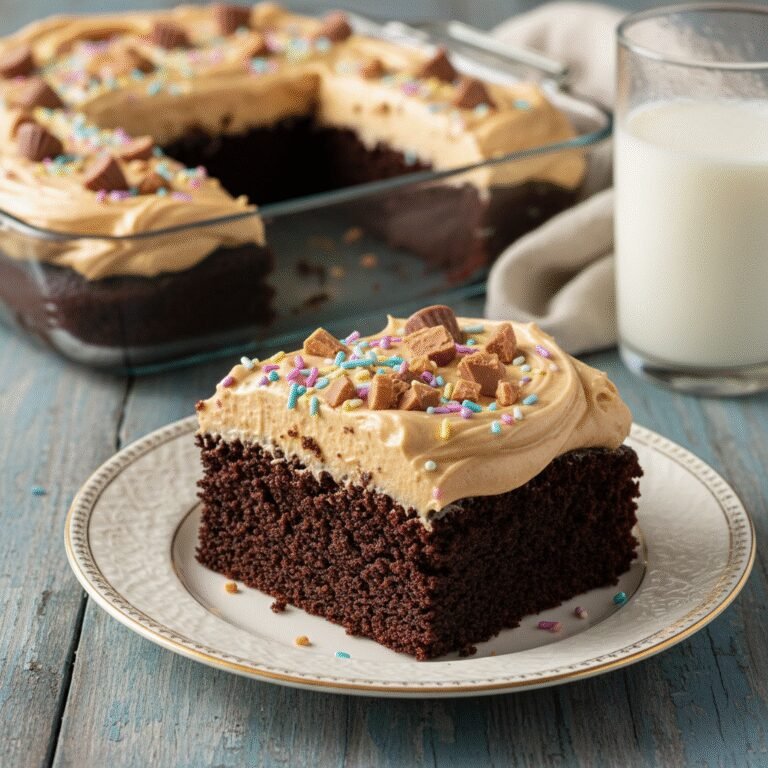
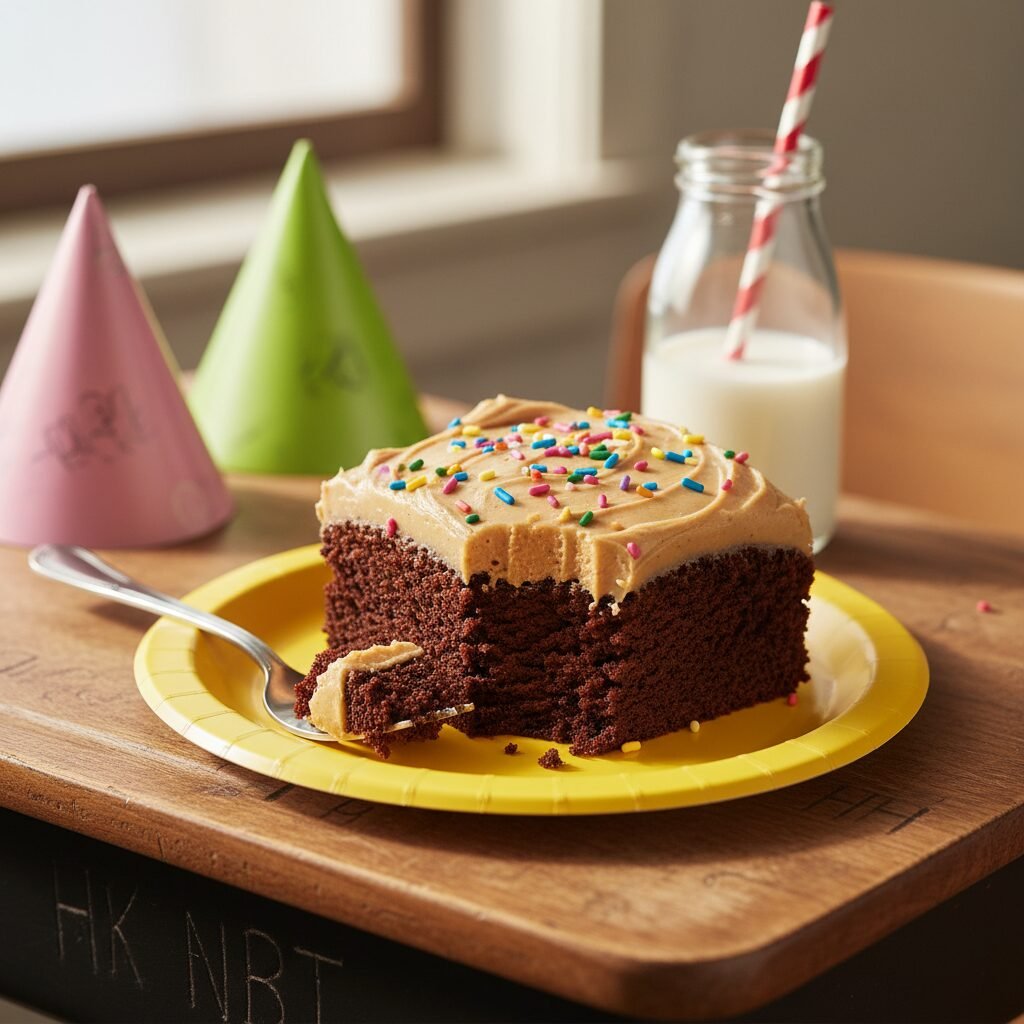
This crowd-pleasing chocolate sheet cake features a rich, moist crumb topped with a creamy, fluffy peanut butter frosting and festive sprinkles. It is the perfect easy-to-serve dessert for birthday celebrations, school events, or large gatherings where you need a guaranteed hit.
25 minutes
30 minutes
55 minutes
24 servings
Dessert
Baking
American
Vegetarian
There is something undeniably magical about the combination of rich chocolate and creamy peanut butter. It is a flavor marriage that has stood the test of time, evoking nostalgia and pure comfort in every bite. When it comes to planning a birthday treat for a class party or a large gathering of energetic kids, you need a recipe that ticks several specific boxes. First, it must be sturdy enough to transport without falling apart. Second, it needs to yield enough servings to feed a crowd without requiring you to spend the entire day in the kitchen baking multiple rounds. And third, and perhaps most importantly, it has to taste absolutely incredible. This Fun Chocolate Peanut Butter Birthday Cake is the answer to all your party planning prayers. Unlike complex layer cakes that require careful stacking and crumb coating, this sheet cake is baked in a single pan, making it incredibly forgiving and efficient. The base is a tender, deeply chocolatey cake that stays moist for days, thanks to the inclusion of buttermilk and oil. But the real star of the show is the frosting—a whipped peanut butter masterpiece that strikes the perfect balance between salty and sweet. It is smooth, luscious, and holds sprinkles beautifully, which is a non-negotiable requirement for any birthday celebration. As you slice into this cake, the knife glides through the frosting and sinks into the soft crumb, revealing a dessert that looks as good as it tastes. Whether you are a seasoned baker or a busy parent looking for a reliable win, this recipe delivers high-impact flavor with minimal stress. We have also included tips for making this allergy-friendly for schools with strict nut-free policies, ensuring every child can join in on the fun.
History & Origins
The concept of the sheet cake, often referred to as a ‘Texas Sheet Cake’ in its most famous iteration, is deeply rooted in mid-20th-century American home baking. As suburban life expanded and community gatherings became a staple of social interaction, home cooks needed recipes that could feed a multitude of people efficiently. The standard 13×9 or 18×13 inch pans became the vessels of choice for church potlucks, school bake sales, and neighborhood barbecues. The genius of the sheet cake lies in its surface area; by spreading the batter thin, the cake bakes quickly and evenly, and every single slice gets a generous, equitable portion of frosting. The specific pairing of chocolate and peanut butter, however, has its own distinct lineage. While chocolate has been consumed for millennia, and peanut paste has ancient origins, their sweet commercial union is often attributed to H.B. Reese in the 1920s. A former dairy farmer and shipping foreman for Milton S. Hershey, Reese began experimenting with confections in his basement. His invention of the peanut butter cup in 1928 cemented the duo as an American icon. Over the decades, this flavor profile migrated from candy aisles to bakery cases. By the 1970s and 80s, peanut butter frosting on chocolate cake became a beloved standard in community cookbooks across the Midwest and South. This recipe pays homage to that tradition, blending the practicality of the vintage sheet cake with the timeless, beloved flavor profile that has defined American treats for nearly a century.
Why This Recipe Works
This recipe succeeds where others fail because of a few key scientific interactions between the ingredients. First, we use the ‘blooming’ technique for the cocoa powder. By mixing the cocoa with hot water or coffee before adding it to the batter, we dissolve the cocoa butter and release the full depth of the chocolate flavor, preventing the cake from tasting dusty or mild. Second, the fat ratio is carefully balanced. We use vegetable oil instead of butter for the cake base. While butter offers flavor, oil remains liquid at room temperature, which ensures the cake stays incredibly moist and tender even after sitting out on a party table for hours. Butter-based cakes can sometimes dry out or become dense as they cool, but this oil-based crumb remains light and airy. For the frosting, we use a combination of room-temperature butter and creamy commercial peanut butter. Natural peanut butters can separate and cause the frosting to become oily or grainy, so the stabilizers in standard creamy peanut butter are actually an advantage here, creating a silky, emulsified texture that pipes and spreads like a dream. Finally, the addition of buttermilk provides the necessary acidity to react with the baking soda, creating a vigorous lift that prevents the heavy batter from becoming dense.
Why You’ll Love This Recipe
- ✓Feeds a large crowd easily with 24 generous servings.
- ✓Sturdy texture makes it perfect for transport to schools or parks.
- ✓Moist, tender crumb that stays fresh for up to 3 days.
- ✓Perfect balance of salty and sweet in the fluffy frosting.
- ✓Highly customizable with sprinkles and toppings for any theme.
- ✓Can be made nut-free with sunflower butter for allergy-safe classrooms.
Equipment You’ll Need
- ✓9×13 inch baking pan or half sheet pan
- ✓Large mixing bowl
- ✓Medium mixing bowl
- ✓Electric hand mixer or stand mixer
- ✓Whisk
- ✓Rubber spatula
- ✓Measuring cups and spoons
- ✓Offset spatula for frosting
Ingredients
- ✓2 cups all-purpose flour
- ✓2 cups granulated sugar
- ✓3/4 cup unsweetened cocoa powder
- ✓2 teaspoons baking soda
- ✓1 teaspoon baking powder
- ✓1 teaspoon salt
- ✓1 cup buttermilk, room temperature
- ✓1/2 cup vegetable oil
- ✓2 large eggs, room temperature
- ✓2 teaspoons vanilla extract
- ✓1 cup hot brewed coffee or boiling water
- ✓1/2 cup unsalted butter, softened (for frosting)
- ✓1 cup creamy peanut butter (for frosting)
- ✓3 cups powdered sugar (for frosting)
- ✓1/3 cup heavy cream or milk (for frosting)
- ✓1 teaspoon vanilla extract (for frosting)
- ✓1/2 cup colorful sprinkles (for decoration)
Instructions
- Preheat your oven to 350°F (175°C). Grease a 9×13 inch baking pan heavily with butter or non-stick cooking spray and lightly dust with flour, or line it with parchment paper for easy removal.
- In a large mixing bowl, sift together the flour, sugar, cocoa powder, baking soda, baking powder, and salt. Whisk vigorously to ensure all dry ingredients are evenly distributed.
- In a medium bowl, whisk together the buttermilk, vegetable oil, eggs, and vanilla extract until the mixture is smooth and the eggs are fully broken down.
- Pour the wet ingredients into the dry ingredients. Using an electric mixer on low speed, beat until just combined. Do not overmix at this stage.
- Slowly pour in the hot coffee (or boiling water) while the mixer is running on the lowest speed. Be careful to avoid splashing. Mix until the batter is smooth and glossy. The batter will be very thin; this is normal and ensures a moist cake.
- Pour the batter into the prepared baking pan. Tap the pan gently on the counter a few times to release any large air bubbles.
- Bake for 30-35 minutes, or until a wooden toothpick inserted into the center comes out clean or with just a few moist crumbs attached.
- Remove the cake from the oven and place the pan on a wire rack. Allow the cake to cool completely in the pan before frosting. This usually takes about 1 to 1.5 hours.
- While the cake cools, prepare the frosting. In a large bowl using a handheld or stand mixer, beat the softened butter and peanut butter together on medium speed until creamy and smooth (about 2 minutes).
- Gradually add the powdered sugar, one cup at a time, mixing on low speed until incorporated. The mixture will be thick and crumbly.
- Add the vanilla extract and the heavy cream (or milk). Increase the mixer speed to high and whip the frosting for 3-4 minutes until it is light, fluffy, and spreadable. If it is too stiff, add more milk one teaspoon at a time.
- Once the cake is fully cooled, dollop the frosting over the top. Use an offset spatula to spread it evenly to the edges, creating swirls if desired.
- Immediately top with colorful sprinkles before the frosting sets / crusts over.
- Slice into squares and serve directly from the pan.
Expert Cooking Tips
- ✓Ensure all cold ingredients like eggs and buttermilk are at room temperature to prevent the batter from seizing or curdling.
- ✓Do not skip the hot liquid step; blooming the cocoa powder is essential for a deep chocolate flavor.
- ✓Use commercial creamy peanut butter (like Jif or Skippy) rather than natural styles to prevent the frosting from separating.
- ✓If transporting the cake, chill it in the fridge for 30 minutes after frosting to set the top, making it less messy to cover.
- ✓Sift your powdered sugar before making the frosting to avoid gritty lumps in your smooth topping.
- ✓Check the cake 5 minutes before the timer goes off; ovens vary, and you want to avoid overbaking to keep it moist.
Substitutions and Variations
This recipe is quite resilient and allows for several substitutions. If you need to make the cake gluten-free, swap the all-purpose flour for a high-quality 1:1 gluten-free baking flour blend that includes xanthan gum. For a dairy-free version, replace the buttermilk with a mixture of almond milk and a teaspoon of vinegar (let it sit for 5 minutes to curdle), and use a plant-based butter stick and dairy-free milk for the frosting. The most critical substitution for a class party is often the peanut butter due to allergies. You can replace the peanut butter in the frosting with an equal amount of sunflower seed butter or cookie butter (speculoos). Both provide a delicious, creamy texture and rich flavor that pairs well with chocolate. If you do not want to use coffee in the batter, boiling water works perfectly fine, though the coffee does enhance the chocolate notes without making the cake taste like java. Lastly, vegetable oil can be substituted with melted coconut oil or canola oil.
Common Mistakes to Avoid
The most common mistake with this cake is overbaking. Because the batter is dark, it is hard to see browning cues. rely on the toothpick test and start checking early. Another frequent error is frosting the cake while it is still warm. Even a slightly warm cake will melt the butter in the frosting, causing it to slide off and become greasy. Patience is key here. In the frosting stage, adding the powdered sugar too quickly can result in a cloud of sugar dust and a lumpy texture; go slow. Also, using natural peanut butter that requires stirring can lead to oil separation in the frosting, making it weep over time. Stick to the stabilized, creamy varieties for the best structural integrity. Finally, do not overmix the batter once the flour is added, as this develops gluten and can make the cake tough rather than tender.
Serving Suggestions
This cake is best served straight from the pan, embracing its rustic, communal nature. For a birthday party, cut it into generous squares and serve on colorful paper plates with a cold glass of milk or a scoop of vanilla ice cream on the side. If you want to elevate the presentation for adults, you can plate individual slices and drizzle them with chocolate ganache or salted caramel sauce. To make cutting easier and cleaner, wipe your knife with a warm, damp cloth between slices. This keeps the layers distinct and prevents the frosting from smearing onto the cake crumb. For a festive touch, you can use themed sprinkles that match the party decor, or even add small fondant toppers or candles directly into the fluffy frosting.
Storage and Reheating Tips
This cake stores exceptionally well, thanks to the oil and sugar content. It can be kept at room temperature in an airtight container or covered tightly with plastic wrap for up to 3 days. If your kitchen is particularly hot or humid, it is safer to store it in the refrigerator to keep the frosting stable; just be sure to let it come to room temperature before serving for the best texture and flavor. You can also freeze the frosted cake. Place slices on a baking sheet to freeze the frosting solid, then wrap them individually in plastic wrap and foil. They will keep for up to 3 months. Thaw unwrapped at room temperature to prevent condensation from ruining the frosting finish.
Nutrition Facts (Estimated)
| Serving Size | 1 slice |
| Calories | 380 |
| Fat | 18g |
| Saturated Fat | 6g |
| Unsaturated Fat | 10g |
| Trans Fat | 0g |
| Cholesterol | 35mg |
| Sodium | 210mg |
| Carbohydrates | 48g |
| Fiber | 2g |
| Sugar | 32g |
| Protein | 6g |
Frequently Asked Questions
Can I make this cake ahead of time?
Yes, this cake is actually better the next day as the flavors have time to meld. You can bake and frost it one day in advance and keep it covered at room temperature.
What if the school has a strict no-peanut policy?
Absolutely switch to sunflower seed butter or soy butter. The texture is very similar to peanut butter and works perfectly in the frosting recipe.
Can I use a different size pan?
Yes, you can use two 9-inch round pans for a layer cake, but you will need to reduce the baking time to about 25-30 minutes. You can also use a jelly roll pan for a thinner cake, baking for 20 minutes.
Why is the batter so runny?
The batter is supposed to be thin! The high liquid content from the coffee and buttermilk ensures the cake remains moist and light after baking. Do not add more flour.
Can I use Dutch-process cocoa?
Yes, Dutch-process cocoa will give the cake a darker color and a smoother, less acidic flavor. Natural cocoa powder works well too, providing a classic taste.
My frosting is too stiff, what do I do?
Simply add more milk or heavy cream, one teaspoon at a time, and whip until it reaches your desired spreading consistency.
Can I reduce the sugar in the recipe?
Baking is chemistry, so reducing sugar in the cake batter can affect texture and moisture. However, you can reduce the sugar in the frosting slightly, though it may be less stiff.
Do I have to use coffee?
No, you can use hot water. Coffee simply enhances the chocolate flavor without adding a distinct coffee taste. Decaf coffee is also a great option for kids.
Conclusion
This Fun Chocolate Peanut Butter Birthday Cake is more than just a dessert; it is a centerpiece for memories. From the ease of the one-bowl batter to the joy of spreading swirls of peanut butter frosting, every step is designed to be stress-free and rewarding. It captures the essence of childhood celebrations—simple, sweet, and shared with friends. Whether you are navigating a busy school week or planning a weekend bash, this recipe is a trusty companion that guarantees smiles all around. So grab your sprinkles, preheat your oven, and get ready to be the hero of the class party with a cake that tastes like a giant, fluffy peanut butter cup.