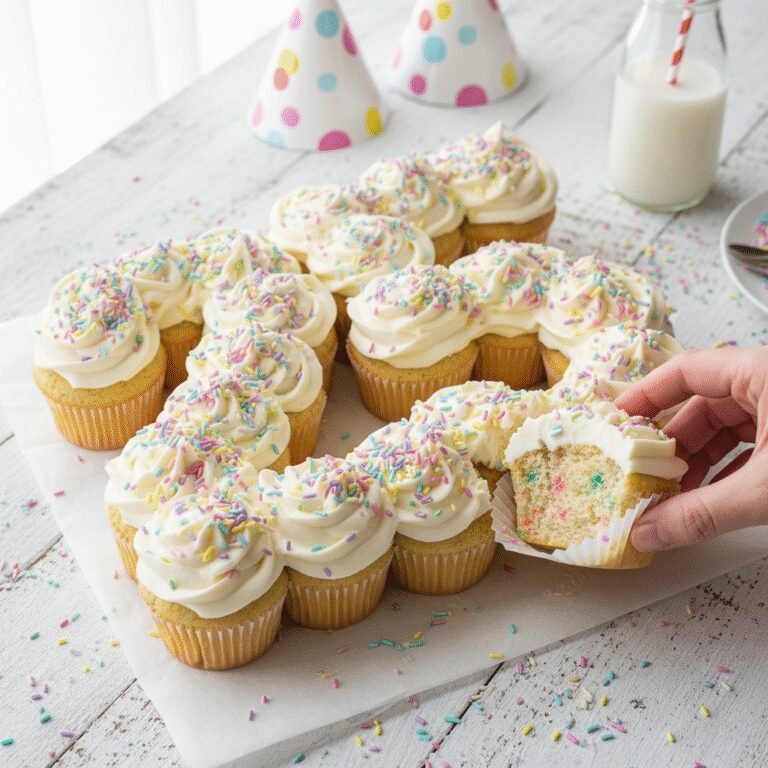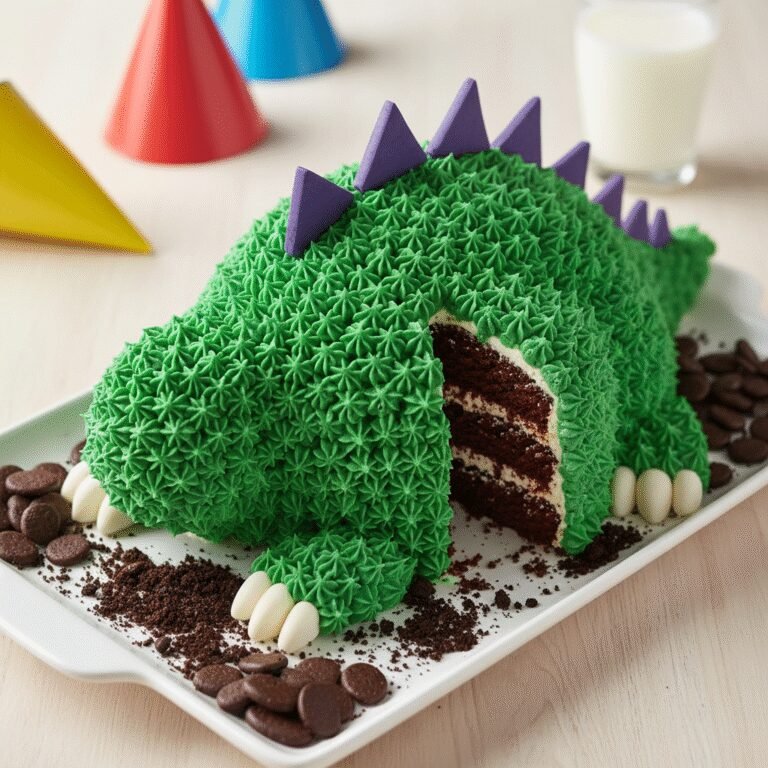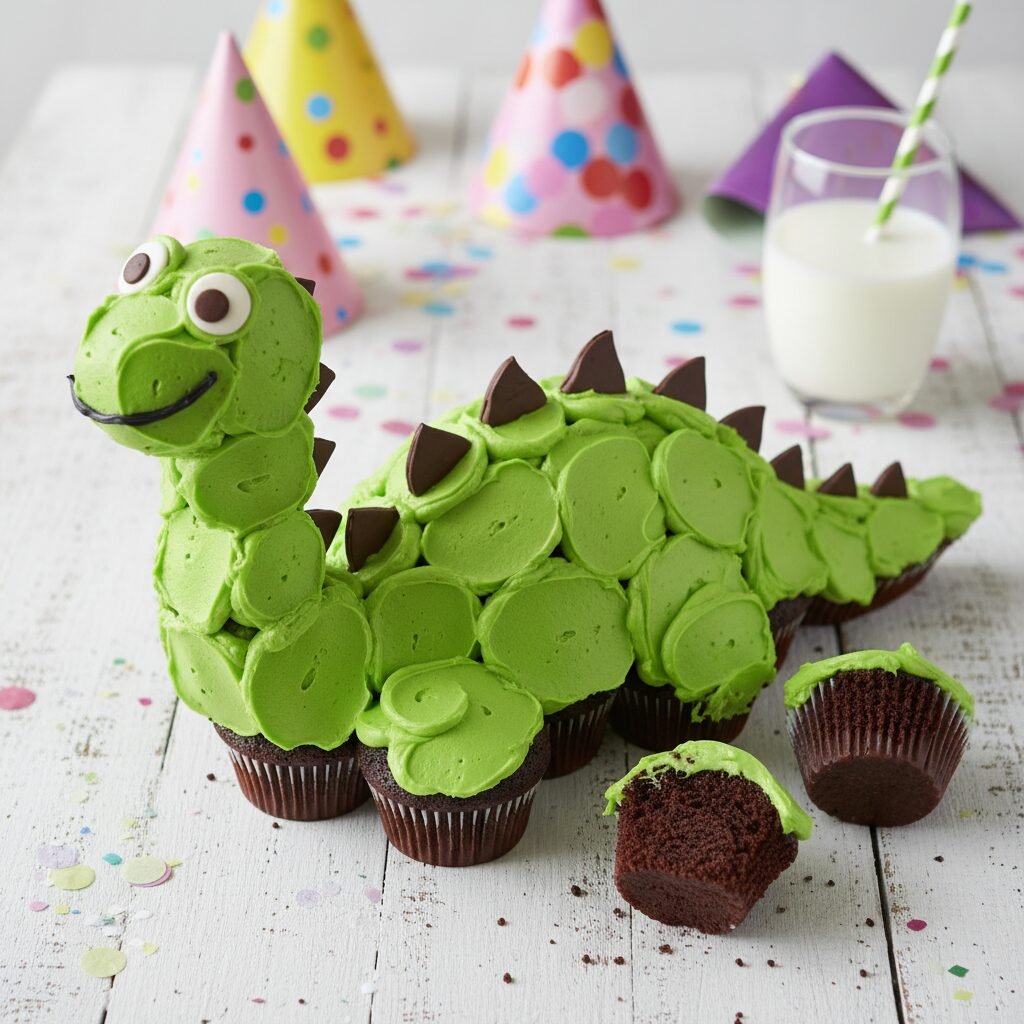
Roaringly Good Chocolate Dinosaur Pull-Apart Cupcake Cake
Fun Chocolate Dinosaur Birthday Cake For Cupcake Pull Apart Cake Recipe
Make your little paleontologist’s birthday legendary with this fun and easy Chocolate Dinosaur Pull-Apart Cupcake Cake! Featuring moist, rich chocolate cupcakes arranged in a dinosaur shape and frosted together, this treat eliminates the need for cutting knives and plates—just grab a cupcake and roar!
45 minutes
20 minutes
1 hour 30 minutes
24 Cupcakes
Dessert
Baking
American
Vegetarian
Planning a child’s birthday party often involves a chaotic mix of decorations, entertainment, and the high-pressure moment of serving the cake. Enter the pull-apart cupcake cake: the ultimate party hack that combines the visual impact of a custom sheet cake with the convenience of individual servings. This Chocolate Dinosaur Pull-Apart Cupcake Cake is designed to be the centerpiece of a prehistoric party theme, eliciting gasps of delight from kids and sighs of relief from parents.
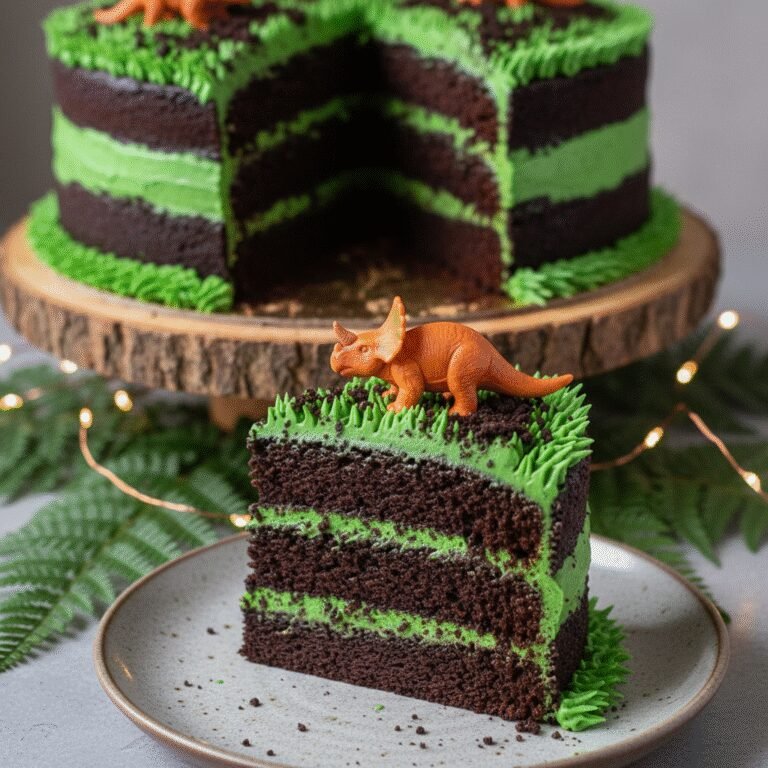
At the heart of this creation is a deeply chocolatey, incredibly moist cupcake base. We aren’t using a box mix here; this scratch-made recipe utilizes hot coffee to bloom the cocoa powder, intensifying the chocolate flavor, while sour cream ensures a tender crumb that stays fresh for days. But the real magic happens in the assembly. By arranging the cupcakes on a large board to form the silhouette of a dinosaur—be it a T-Rex or a friendly Apatosaurus—and frosting them as a single unit, you create a cohesive image that looks professionally done.
The frosting is a sturdy yet creamy vanilla bean American buttercream, dyed a vibrant ‘dino green’ (or whatever color matches your theme). It is piped specifically to bridge the gaps between the cupcakes, creating a smooth surface that hides the individual cakes underneath until it’s time to eat. When it is time for dessert, there is no need to hunt for a knife or struggle with cutting even slices while twenty kids scream for sugar. You simply pull a cupcake away from the formation and hand it out. It is fun, interactive, and significantly less messy than traditional cake. Whether you are a baking novice or a seasoned pro, this guide will walk you through every step of constructing your edible dinosaur.
History & Origins
While the concept of the pull-apart cupcake cake feels like a modern Pinterest invention, its roots are deeply entrenched in the evolution of the cupcake itself. The term ‘cupcake’ first appeared in 1828 in Eliza Leslie’s ‘Receipts,’ though back then, it often referred to the measurement (a cup of butter, a cup of sugar) rather than the size. Throughout the 19th and early 20th centuries, these small cakes, sometimes called ‘number cakes’ or ‘gem cakes,’ were baked in pottery cups or ramekins. They were practical, cooking faster than large hearth cakes and allowing for better heat distribution in the unpredictable ovens of the era.
The mid-20th century saw the rise of the modern cupcake, aided by the invention of the muffin tin and paper liners, which standardized the size and shape. However, the specific innovation of the ‘pull-apart cake’ or ‘cupcake cake’ is a product of the late 20th and early 21st-century home baking renaissance. As supermarket bakeries began offering them as convenient alternatives to sheet cakes in the 1990s, they quickly gained traction. Parents loved them for school events where knives were prohibited, and offices loved them for easy portioning.
The rise of food blogging and social media platforms like Pinterest in the 2010s catapulted the pull-apart cake into an art form. No longer just a grid of cupcakes, creative bakers realized they could arrange these circles into mosaics—shapes of animals, cartoon characters, and numbers. The dinosaur shape became particularly iconic due to the enduring popularity of dinosaur themes in children’s pop culture. This recipe honors that history by combining the scratch-baking quality of the 19th century with the creative, convenient presentation style of the modern digital age.
Why This Recipe Works
This recipe succeeds where others fail because it addresses the two main challenges of a pull-apart cake: structural integrity and moisture retention. Many cupcake cakes suffer from drying out because they aren’t sealed in fondant like a traditional cake. Our chocolate cupcake base uses a combination of oil and butter. The butter provides the classic flavor, while the oil ensures the cupcakes remain soft and moist even when sitting out on a party table for hours. Furthermore, the addition of boiling water to the batter blooms the cocoa powder, releasing flavor compounds that cold mixing simply cannot achieve, resulting in a rich, dark chocolate taste that isn’t overly sweet.
Structurally, the frosting recipe is engineered to be the ‘glue’ of the operation. A standard soft buttercream might slide off or sink into the gaps between cupcakes. This recipe uses a high-ratio American Buttercream that is whipped to be fluffy but contains enough powdered sugar to crust slightly on the outside. This ‘crusting’ is crucial for a pull-apart cake because it allows you to smooth the surface over the gaps without the frosting dragging or tearing. The result is a seamless finish that looks like a solid cake but breaks apart easily when pulled. Additionally, the instruction to chill the cupcakes before frosting ensures the crumbs are locked in, preventing a messy, speckled finish on your smooth green dinosaur.
Why You’ll Love This Recipe
- ✓No cutting required – simply pull and serve!
- ✓Deeply chocolaty, moist cake base made from scratch.
- ✓Fun, customizable dinosaur shape perfect for themed parties.
- ✓Sturdy buttercream that bridges gaps perfectly for a smooth look.
- ✓Kid-friendly decorating activity.
- ✓Easier to transport than a tiered layer cake.
Equipment You’ll Need
- ✓2 Standard 12-cup muffin tins
- ✓Cupcake liners (green or brown preferred)
- ✓Large rectangular cake board or serving platter (at least 16×20 inches)
- ✓Stand mixer or electric hand mixer
- ✓Large mixing bowls
- ✓Whisk
- ✓Piping bags
- ✓Large round piping tip (or open coupler)
- ✓Offset spatula
- ✓Cooling rack
Ingredients
- ✓2 cups granulated sugar
- ✓1 3/4 cups all-purpose flour
- ✓3/4 cup unsweetened cocoa powder (Dutch-processed preferred)
- ✓1 1/2 teaspoons baking powder
- ✓1 1/2 teaspoons baking soda
- ✓1 teaspoon salt
- ✓2 large eggs, room temperature
- ✓1 cup whole milk, room temperature
- ✓1/2 cup vegetable oil
- ✓2 teaspoons vanilla extract
- ✓1 cup boiling water
- ✓1 1/2 cups unsalted butter, softened (for frosting)
- ✓5-6 cups powdered sugar, sifted
- ✓1/4 cup heavy cream
- ✓Green gel food coloring
- ✓Assorted sprinkles or candy rocks
- ✓Candy eyes
- ✓Chocolate chips or fondant triangles (for spikes)
Instructions
- 1. Preheat your oven to 350°F (175°C). Line two standard muffin tins with paper liners.
- 2. In a large mixing bowl, whisk together the sugar, flour, cocoa, baking powder, baking soda, and salt until well combined and no lumps remain.
- 3. Add the eggs, milk, oil, and vanilla extract. Beat with a mixer on medium speed for 2 minutes. The batter will be thick at this stage.
- 4. Carefully stir in the boiling water by hand. The batter will become very thin and watery; this is normal and essential for moisture.
- 5. Fill the cupcake liners about 2/3 full. Do not overfill, or they will mushroom over the top and make arranging difficult.
- 6. Bake for 18-22 minutes, or until a toothpick inserted into the center comes out clean. Remove from the oven and let cool in the pans for 5 minutes, then transfer to a wire rack to cool completely.
- 7. While cupcakes cool, make the frosting. Beat the softened butter until creamy (about 3 minutes). Gradually add powdered sugar, alternating with heavy cream and vanilla. Beat on high for 3-4 minutes until fluffy. Add green gel food coloring until you reach your desired dinosaur shade.
- 8. Arrange the completely cooled cupcakes on your large board. For a standard dinosaur (like a Brontosaurus): Use 4 cupcakes for the body in a cluster, arch 5-6 cupcakes for a long neck, 3 for the head, 6 for a long tail, and 2-3 for legs. Adjust the shape until you are happy with the silhouette.
- 9. Apply a small dab of frosting to the bottom of each cupcake liner to ‘glue’ it to the board so they don’t slide while decorating.
- 10. Put the frosting in a piping bag with a large round tip. Pipe a generous swirl on top of each cupcake. Then, pipe extra frosting in the ‘V’ gaps between the cupcakes to bridge them.
- 11. Use an offset spatula to smooth the frosting over the entire surface, blending the individual swirls into one continuous shape. It should look like one flat cake.
- 12. Add texture by tapping the spatula on the frosting to create ‘scales’ or use a fork.
- 13. Place candy eyes on the head. Use chocolate chips, candy corn, or fondant triangles to create spikes along the back and tail. Add candy rocks or sprinkles at the feet for terrain.
- 14. Let the frosting set for at least 30 minutes before serving.
Expert Cooking Tips
- ✓Ensure your boiling water is truly boiling; this activates the cocoa powder for a deeper flavor.
- ✓Do not overfill the cupcake liners. Flat tops are better for pull-apart cakes than high domes.
- ✓If your cupcakes do dome significantly, use a serrated knife to trim the tops flat before arranging them.
- ✓Use gel food coloring rather than liquid drops to avoid changing the consistency of your frosting.
- ✓Chill the arranged cupcakes for 15 minutes before frosting to firm them up and reduce crumbs.
- ✓Sketch your dinosaur shape on a piece of paper first to ensure you have enough cupcakes.
- ✓If you have leftover batter, bake a few extra cupcakes as ‘backups’ in case one breaks.
Substitutions and Variations
This recipe is highly adaptable to various dietary needs and pantry limitations. For a **Gluten-Free** version, substitute the all-purpose flour with a high-quality 1:1 gluten-free baking flour blend (one that includes xanthan gum). The moisture in this recipe works very well with GF flours, preventing the gritty texture often found in GF goods.
If you need an **Egg-Free** option, you can substitute the 2 eggs with 1/2 cup of unsweetened applesauce or a commercial egg replacer like Bob’s Red Mill. The texture will be slightly denser but still delicious.
For **Dairy-Free**, use almond milk or oat milk in the cake batter, and swap the butter in the frosting for high-quality plant-based butter sticks (not tub margarine) and the heavy cream for coconut cream.
If you don’t have **sour cream** (though not listed in the main ingredients, it’s a common addition), the buttermilk/milk and oil combo works fine, but you can add a tablespoon of vinegar to the milk to create homemade buttermilk. For the decoration, if you don’t have fondant for spikes, triangular cookies, sliced strawberries, or even Bugles snacks work perfectly as dinosaur spikes.
Common Mistakes to Avoid
The most common mistake with pull-apart cakes is **frosting while the cupcakes are still warm**. Even a hint of warmth will cause the butter-based frosting to melt, slide off, and ruin the dinosaur shape. Ensure the cakes are cool to the touch.
Another frequent error is **placing the cupcakes too far apart**. You want the liner rims to be touching. If the gaps are too wide, the frosting will collapse into the holes, breaking the illusion of a single cake.
A third mistake is **using a board that is too small**. Once you start arranging the neck and tail of a dinosaur, the surface area grows quickly. Always measure your intended shape or lay out the empty liners on your board before you even start baking to ensure it fits. Finally, avoid using a ‘whipped’ store-bought frosting from a tub; it is often too soft to bridge the gaps effectively. Stick to the homemade buttercream or a stiffened store-bought version.
Serving Suggestions
Serve this masterpiece on a large, rigid board or a piece of plywood covered in food-safe foil or wrapping paper. Since this is a party favorite, surround the dinosaur feet with ‘edible terrain’—crumbled chocolate cookies for dirt, green-dyed coconut for grass, or candy rocks.
When it is time to serve, provide plenty of napkins. The ‘pull-apart’ nature is fun, but since the frosting bridges the gaps, pulling one cupcake away often brings a generous amount of frosting with it. You can serve this alongside vanilla ice cream to cut the richness of the chocolate, or with a cold glass of milk. If you are doing a full dinosaur theme, label the cake ‘Herbivore’s Delight’ (if using green frosting) or ‘T-Rex Treats’ to keep the immersion going.
Storage and Reheating Tips
Because this cake uses American Buttercream, it can safely sit out at cool room temperature for up to 2 days. In fact, room temperature is preferred for serving, as the butter in the frosting will be soft and creamy. If you are making this a day in advance and your kitchen is warm, store the entire board in the refrigerator. However, you must take it out at least 2-3 hours before the party to allow the frosting and cake to come back to room temperature; cold butter frosting is hard and waxy.
If you have leftovers (which is rare!), you can pull the remaining cupcakes apart and store them in an airtight container. They will keep for 3-4 days on the counter or up to a week in the fridge. You can also freeze the individual frosted cupcakes for up to 3 months; just thaw them on the counter before eating.
Nutrition Facts (Estimated)
| Serving Size | 1 Cupcake |
| Calories | 340 |
| Fat | 16g |
| Saturated Fat | 6g |
| Unsaturated Fat | 9g |
| Trans Fat | 0g |
| Cholesterol | 45mg |
| Sodium | 180mg |
| Carbohydrates | 48g |
| Fiber | 2g |
| Sugar | 32g |
| Protein | 3g |
Frequently Asked Questions
Can I make the cupcakes ahead of time?
Yes! You can bake the cupcakes up to 2 days in advance and store them in an airtight container at room temperature. You can also freeze the unfrosted cupcakes for up to a month.
How do I transport this cake?
Transporting a large pull-apart cake is tricky. It is best to assemble and frost it at the venue if possible. If not, use a very rigid board (double up cardboard or use wood) and place it in the trunk of a car on a non-slip mat. Do not put it on a slanted car seat.
My frosting is falling into the gaps. What do I do?
Your frosting might be too thin, or the gaps are too big. Try adding more powdered sugar to thicken the frosting. Alternatively, stick a small marshmallow or a piece of cookie in the gap to act as a bridge support before frosting over it.
Can I use a box mix instead of scratch?
Absolutely. A Devil’s Food box mix works great. Just be sure to use the oil/milk/egg ratios on the box, perhaps adding an extra egg for stability.
How much frosting do I really need?
You need more than you think. Because you are covering the tops AND bridging the gaps, plan for about 1.5x the amount of frosting you would use for standard individual cupcakes.
What other dinosaur shapes can I make?
A T-Rex (large head, small arms, big legs), a Stegosaurus (arched back with cookie spikes), or a Triceratops (large fan head) are all popular. A quick Google search for ‘dinosaur cupcake cake template’ will give you grid layouts.
Can I use cream cheese frosting?
Cream cheese frosting is delicious but softer than buttercream. If you use it, you may need to keep the cake refrigerated until just before serving to maintain the structure.
How do I get a really dark green color?
Start with a green gel coloring. If you want a swampy, realistic dino green, add a tiny drop of brown or black to deepen the shade. Let the color sit for an hour; it darkens as it develops.
Do I have to use liners?
Yes, liners keep the cupcakes moist and make them sanitary and easy to grab during the party. Green or brown liners blend in best.
Conclusion
The Chocolate Dinosaur Pull-Apart Cupcake Cake is more than just a dessert; it is a memory-maker. It combines the nostalgia of a homemade birthday cake with the clever practicality needed for modern entertaining. By following this recipe, you get the best of both worlds: a rich, bakery-quality chocolate flavor and a whimsical presentation that will light up your child’s face. So preheat that oven, mix up your ‘dino-mite’ green frosting, and get ready to be the hero of the birthday party. It’s time to bake a cake that is truly prehistoric in scale and deliciousness!