Fun Candy Explosion Birthday Cake Recipe: The Ultimate DIY Piñata Cake
Fun Candy Explosion Birthday Cake Recipe
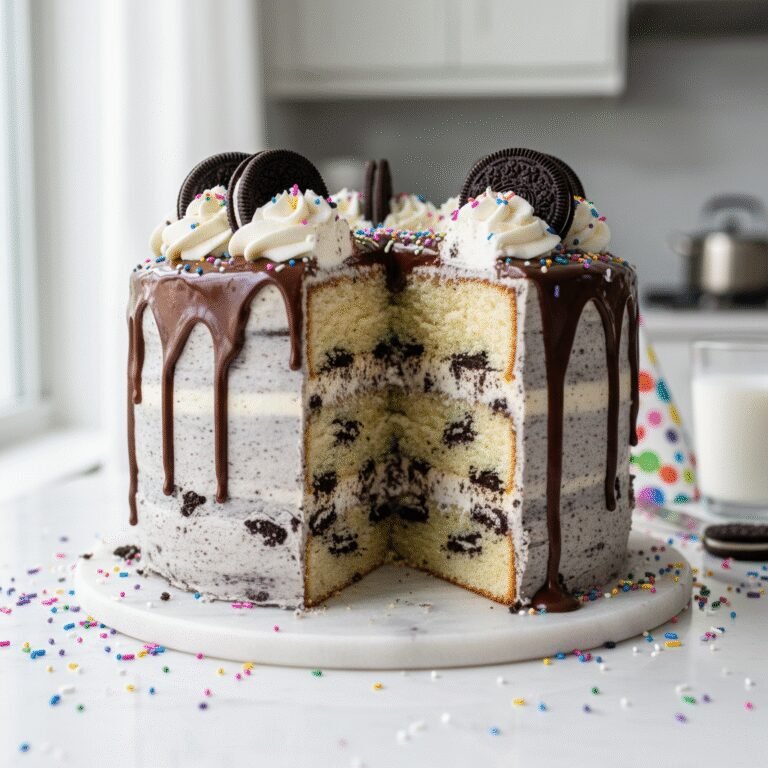
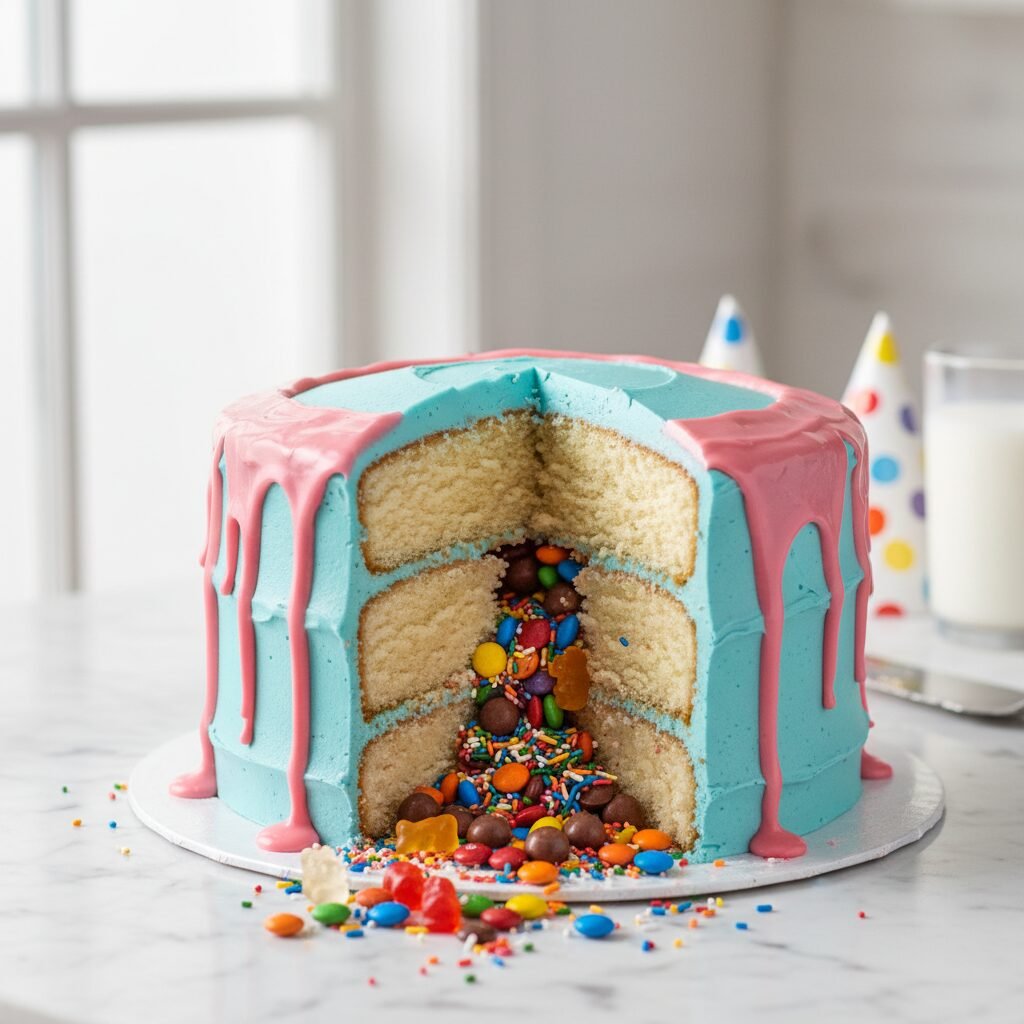
Get ready to be the star of the party with this show-stopping Candy Explosion Birthday Cake! Also known as a Piñata Cake, this vanilla funfetti masterpiece hides a secret center filled with cascading chocolates and sprinkles that spill out when you slice into it, creating an unforgettable moment of joy.
1 hour
35 minutes
2 hours 30 minutes
12-14 servings
Dessert
Baking
American
Vegetarian
There is something undeniably magical about a birthday cake that offers more than meets the eye. We all love a beautifully frosted confection, but when you slice into a cake and a treasure trove of colorful candies, chocolates, and sprinkles tumbles out, the excitement in the room is palpable. This Fun Candy Explosion Birthday Cake, often referred to as a Piñata Cake, is the ultimate celebration dessert. It captures the whimsical essence of childhood wonder and wraps it in layers of moist, tender vanilla sponge and creamy, homemade buttercream.
Perfect for birthdays, gender reveals, or any festive gathering, this recipe is designed to be as delicious as it is theatrical. While it looks incredibly professional—like something you’d see in a high-end bakery window or a viral Pinterest pin—it is surprisingly achievable for the home baker. The secret lies in the structural assembly, which we will guide you through step-by-step.
Beyond the visual spectacle, the flavor profile is a nostalgic nod to classic birthday parties. The cake itself is a dense yet fluffy vanilla bean sponge, sturdy enough to hold the weight of the candy filling without collapsing, yet tender enough to melt in your mouth. The buttercream is whipped to perfection, offering a silky contrast to the crunch of the hidden candy gems. Whether you are baking for a child’s 5th birthday or a best friend’s 30th, this cake guarantees smiles, gasps, and a rush to grab the first slice with the most candy!
History & Origins
The concept of the ‘surprise inside’ dish has a fascinating lineage that dates back much further than the Instagram baking trends of the 21st century. Historically, the element of surprise in food was a hallmark of medieval European banquets. In the Middle Ages, it was considered the height of entertainment to serve ‘entremets’—elaborate dishes designed to amuse guests between courses. The most famous of these were pies filled with live birds or frogs that would fly or hop out when the crust was cut, famously referenced in the nursery rhyme ‘Sing a Song of Sixpence.’
Fortunately, culinary hygiene and tastes have evolved, and today we prefer our surprises to be sweet and edible. The modern iteration of the Piñata Cake began gaining serious traction in the early 2010s, coinciding with the rise of food blogging and visual social media platforms like Pinterest. Bakers started experimenting with hollowed-out layers to hide M&Ms, sprinkles, and gummy bears, mimicking the Mexican tradition of the piñata, where breaking a papier-mâché vessel releases treats.
This cake represents a cultural shift in home baking where the visual experience is just as important as the taste. It transforms dessert from a simple course into an interactive event. Over the last decade, the trend has expanded from simple sprinkle fillings to elaborate gender reveal cakes (hiding pink or blue candies) and proposal cakes. This specific recipe honors that modern tradition, refining the technique to ensure structural integrity while maximizing the ‘explosion’ effect that makes this cake a timeless party favorite.
Why This Recipe Works
This recipe is meticulously calibrated to solve the two biggest problems home bakers face when attempting a Piñata Cake: structural collapse and dry sponge. Many ‘surprise’ cakes fail because the removal of the center cake makes the stack unstable. To combat this, this recipe uses a ‘reverse creaming’ method for the batter, which coats the flour proteins in fat before liquid is added. This inhibits gluten formation, resulting in a velvety, tender crumb that is simultaneously dense enough to support the hollowed-out center without crumbling under the weight of the upper layers and frosting.
Furthermore, we utilize a combination of butter and oil. Butter provides that classic, rich birthday cake flavor, while the oil ensures the cake remains moist for days, even after being refrigerated (which is often necessary for decorating). The buttercream recipe included has a higher ratio of heavy cream to sugar than standard American buttercream, making it silkier and easier to smooth over the ‘seams’ of the cake layers, effectively hiding the secret chamber inside.
Finally, the ‘candy geometry’ is key. We recommend a mix of small sprinkles and heavier coated chocolates. The small sprinkles fill the gaps between the larger candies, creating a solid column of treats that supports the top layer from the inside, preventing the lid from sagging. When cut, the differing sizes ensure a dramatic, cascading avalanche effect rather than a clumpy tumble.
Why You’ll Love This Recipe
- ✓Hidden center reveals a cascading avalanche of candy when sliced.
- ✓Moist vanilla bean sponge that stays fresh for days.
- ✓Sturdy construction method ensures the cake doesn’t collapse.
- ✓Customizable filling—use M&Ms, sprinkles, or gummy bears.
- ✓Silky, pipeable vanilla buttercream frosting.
- ✓Perfect for creating viral, Instagram-worthy moments.
Equipment You’ll Need
- ✓Four 8-inch round cake pans
- ✓Stand mixer with paddle attachment
- ✓Round cookie cutter (approx. 3-4 inches)
- ✓Offset spatula
- ✓Bench scraper
- ✓Piping bag and tips
- ✓Cake turntable
- ✓Serrated bread knife
Ingredients
- ✓3 cups cake flour, sifted
- ✓2 1/2 cups granulated sugar
- ✓1 tbsp baking powder
- ✓1 tsp salt
- ✓1 cup unsalted butter, room temperature, cubed
- ✓1 cup whole milk, room temperature
- ✓1/2 cup vegetable oil
- ✓1 tbsp pure vanilla extract
- ✓4 large eggs, room temperature
- ✓2 cups assorted candies (M&Ms, sprinkles, chocolate rocks, etc.)
- ✓2 cups unsalted butter (for frosting), softened
- ✓7 cups powdered sugar
- ✓1/4 cup heavy cream
- ✓Gel food coloring (optional)
Instructions
- Preheat your oven to 350°F (175°C). Grease four 8-inch round cake pans, line the bottoms with parchment paper, and grease the paper. Dust with flour and tap out excess.
- In the bowl of a stand mixer fitted with the paddle attachment, combine the flour, sugar, baking powder, and salt on low speed for 30 seconds.
- Add the cubed butter one piece at a time while the mixer is running on low. Continue mixing until the mixture resembles moist sand and no large chunks of butter remain.
- In a separate jug, whisk together the milk, oil, vanilla, and eggs. Slowly pour this liquid mixture into the dry ingredients while the mixer is on low speed.
- Once added, increase speed to medium and beat for exactly 2 minutes to build structure. Scrape down the sides of the bowl and mix for another 30 seconds.
- Divide the batter evenly among the four prepared pans. Bake for 30-35 minutes, or until a toothpick inserted into the center comes out clean.
- Allow cakes to cool in pans for 10 minutes, then turn out onto a wire rack to cool completely. Wrap in plastic wrap and chill in the fridge for 1 hour to make carving easier.
- To make the frosting, whip the 2 cups of butter on high speed for 5-7 minutes until pale and creamy. Gradually add powdered sugar, one cup at a time. Add heavy cream and vanilla, whipping on high for another 3 minutes until fluffy.
- Level the tops of all four cooled cake layers using a serrated knife.
- Take two of the cake layers and use the round cookie cutter to remove the exact center, creating a ring of cake. Leave the other two layers (bottom and top) intact.
- Place the solid bottom layer on your cake board. Spread a thin layer of buttercream on top. Place one ‘ring’ layer on top. Frost the ring. Place the second ‘ring’ layer on top.
- You now have a cake with a deep hole in the center. Fill this hole to the brim with your assorted candies and sprinkles.
- Apply frosting to the top of the second ring layer. Place the final solid cake layer on top to seal the candy inside.
- Crumb coat the entire cake with a thin layer of frosting and chill for 20 minutes.
- Apply the final coat of frosting, smooth with a bench scraper, and decorate as desired with extra sprinkles or a chocolate drip.
Expert Cooking Tips
- ✓Chill your cake layers before cutting the centers; warm cake crumbles easily and makes messy cuts.
- ✓Do not use fresh fruit or wet fillings inside the surprise chamber, as they will make the cake soggy and the candy dissolve.
- ✓Measure your flour by weight (or spoon and level) to avoid a dense, dry cake.
- ✓Use a mix of large and small candies for the filling; the small ones act as ‘grout’ to stabilize the structure.
- ✓When frosting the rim of the hole layers, be careful not to get buttercream inside the hole, or the candy will stick to it instead of falling out.
- ✓If you only have two pans, bake in batches, but keep the remaining batter at room temperature.
- ✓Use a serrated knife for leveling to keep the crumb structure open and fluffy.
Substitutions and Variations
If you don’t have cake flour, you can make a DIY version by removing 2 tablespoons of all-purpose flour from every cup and replacing it with cornstarch, then sifting 3 times. For a dairy-free version, substitute the butter in the cake with high-quality margarine or vegan butter blocks (not tub spread), and use almond or oat milk instead of whole milk. The vegetable oil can be swapped for melted coconut oil or canola oil. For the filling, if you want to avoid chocolate, you can use dried fruits (like cranberries or raisins) or nuts, though this changes the ‘fun’ vibe slightly. Gluten-free 1:1 baking flour blends generally work well with this reverse-creaming method, but ensure your baking powder is also certified gluten-free.
Common Mistakes to Avoid
The most common mistake is cutting the center hole out of *all* layers or the wrong layers. Remember: Bottom is solid, middle layers are rings, top is solid. Another frequent error is under-filling the center. If you don’t fill the candy to the very top, the top layer of cake may sag or crack in the middle because it lacks support. Avoid using ‘wet’ candies like marshmallows or gummies that might sweat inside the cake if made too far in advance. Finally, rushing the cooling process is a disaster waiting to happen; if the cake is even slightly warm, the buttercream will slide, the layers will shift, and your perfect cylinder will become a leaning tower.
Serving Suggestions
Serve this cake at room temperature. While it needs to be stored in the fridge if made ahead, take it out at least 2-3 hours before the party so the butter in the sponge and frosting can soften. This maximizes flavor and texture. When it’s time to cut, use a large, sharp chef’s knife dipped in hot water and wiped dry. Make the first cut a generous wedge and pull it out slowly to let the candy spill dramatically. Serve with a scoop of vanilla bean ice cream or a glass of cold milk to balance the sweetness. For an adult twist, a glass of champagne pairs beautifully with the vanilla and sugar profile.
Storage and Reheating Tips
This cake is best enjoyed within 48 hours of assembly for the freshest candy crunch. However, the cake itself can be baked and frozen (wrapped tightly in plastic) for up to a month before assembly. Once assembled, store the cake in a dedicated cake box or under a large dome in the refrigerator for up to 4 days. The cut face of the cake should be pressed with plastic wrap to prevent drying out. Note that after 24 hours in the fridge, some colored candies (like Skittles or non-coated sprinkles) may start to bleed color into the surrounding sponge or soften slightly due to moisture migration.
Nutrition Facts (Estimated)
| Serving Size | 1 slice |
| Calories | 650 |
| Fat | 30g |
| Saturated Fat | 18g |
| Unsaturated Fat | 10g |
| Trans Fat | 0.5g |
| Cholesterol | 85mg |
| Sodium | 320mg |
| Carbohydrates | 88g |
| Fiber | 1g |
| Sugar | 55g |
| Protein | 6g |
Frequently Asked Questions
Can I make this cake ahead of time?
Yes, you can bake the layers up to 2 days in advance and keep them wrapped in the fridge. Assemble the cake the day before or the morning of the event. Do not assemble more than 24 hours ahead to keep the candy crunchy.
What size cake pans should I use?
This recipe is optimized for four 8-inch round pans. You can use 9-inch pans, but the layers will be thinner, so reduce baking time by 5-8 minutes. For 6-inch pans, you will have extra batter (cupcakes!).
My candy stuck together inside the cake. Why?
This happens if moisture gets into the center. Ensure your cake layers are fully cooled before assembly, and avoid using refrigerator-cold candies which might condensate. Also, avoid sticky candies like unwrapped gummies.
Can I use store-bought frosting?
Technically yes, but you will need about 3-4 tubs. However, homemade buttercream acts as a better ‘cement’ for the structural integrity of a tall layer cake.
How do I transport this cake?
Transport it in a sturdy cake box on the flattest surface of your car (usually the floor of the passenger seat or trunk, not the seat itself). Ensure the cake is chilled before transport so the buttercream is hard.
Can I make this chocolate?
Absolutely! Substitute 1/2 cup of the flour with high-quality cocoa powder and proceed with the recipe as written.
How much candy do I really need?
Ideally, buy more than you think you need. For an 8-inch cake, 2 cups is a safe minimum, but having 3 cups allows you to pack it tight for the best spill effect.
Why did my cake sink in the middle?
This usually means the cake was underbaked or the oven door was opened too early. Use an oven thermometer to ensure accurate temperature.
Conclusion
The Fun Candy Explosion Birthday Cake is more than just a recipe; it’s a memory maker. The look of pure delight on your guests’ faces when the hidden cascade of treats is revealed is worth every minute of prep time. It transforms a standard birthday tradition into an interactive performance that people will talk about for years to come. Whether you stick to classic rainbow sprinkles or customize the filling to match a specific theme, this cake delivers joy in every slice. Happy baking, and enjoy the sweet surprise!