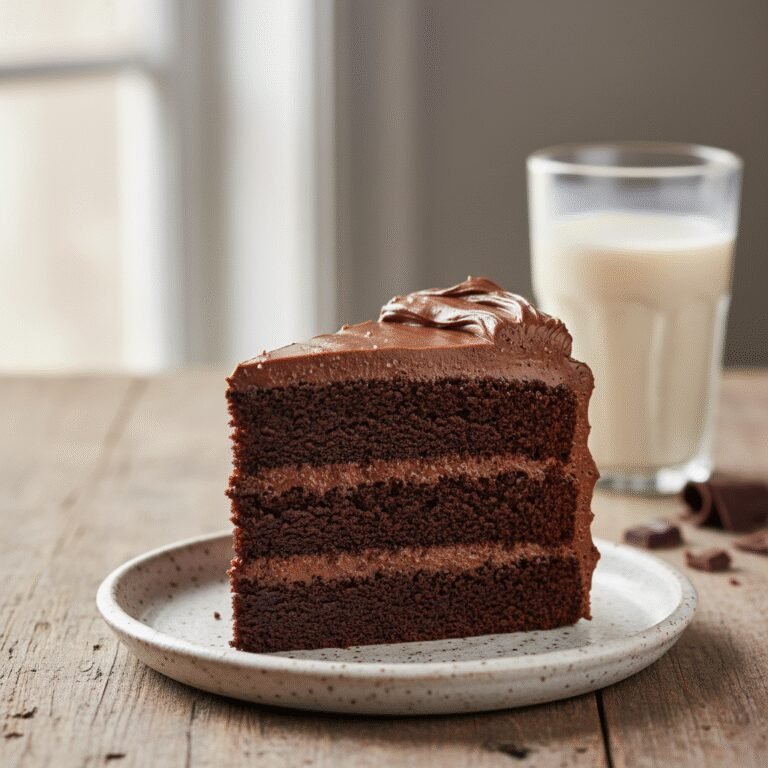
The Ultimate Moist Eggless Chocolate Cake Recipe
Moist Eggless Chocolate Cake Recipe
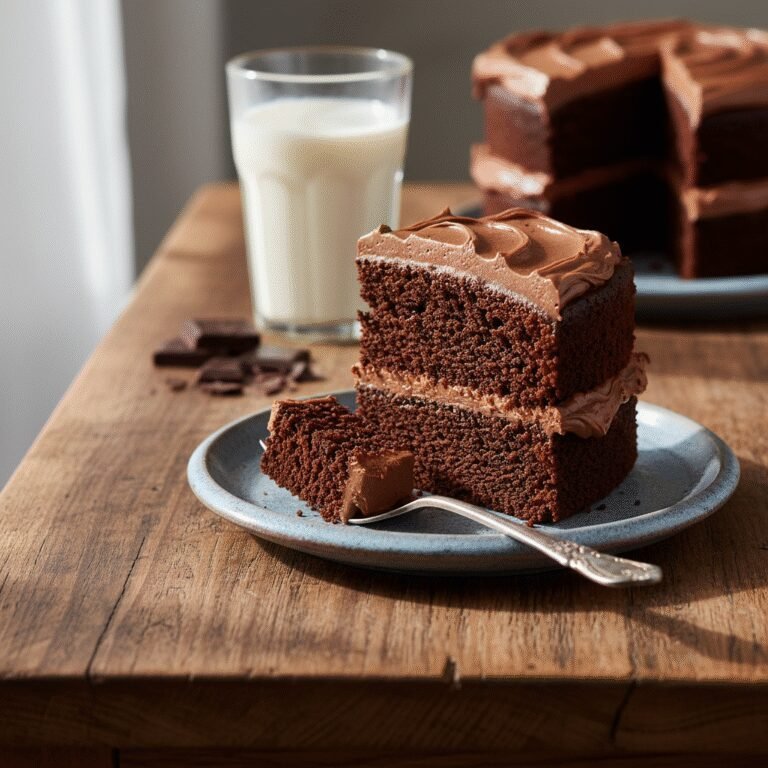
Discover the secret to the most decadent, fudgy, and moist chocolate cake made completely without eggs, butter, or milk. This foolproof Depression-era recipe uses pantry staples to create a rich dessert that rivals any bakery classic.
15 minutes
30 minutes
45 minutes
1 8-inch round cake (8 servings)
Dessert
Baking
American
Vegan
Welcome to what might just become the most requested recipe in your repertoire. If you have ever been skeptical about eggless baking, prepare to have your mind completely changed. This Moist Eggless Chocolate Cake, often affectionately known as ‘Wacky Cake’ or ‘Depression Cake’, is a marvel of food chemistry and culinary ingenuity. It defies the common misconception that eggs are essential for structure and richness in baking. Instead, this cake relies on a brilliant reaction between vinegar and baking soda to provide a tender, airy crumb, while oil ensures a level of moisture that butter-based cakes often struggle to maintain over time.
Imagine a slice of cake so dark and chocolaty that it satisfies your deepest cocoa cravings, yet so light that you could easily go for seconds. The texture is impossibly soft, almost velvety, with a fudgy density that pairs perfectly with a silky ganache or a fluffy buttercream. Because it requires no perishable dairy or eggs, it is the ultimate pantry-raid dessert—perfect for last-minute gatherings, midnight cravings, or for those navigating dietary restrictions like egg allergies or lactose intolerance. Whether you are a seasoned baker looking for a reliable vegan-friendly option or a beginner wanting a foolproof recipe that requires no mixer, this cake is about to become your new best friend. Let’s dive into the chocolatey goodness.
History & Origins
The history of the eggless chocolate cake is a fascinating journey through American resilience and ingenuity, deeply rooted in the era of the Great Depression and World War II. During these times, ingredients like milk, butter, and eggs were either scarce, expensive, or heavily rationed. Home cooks, determined to keep spirits high and celebrations alive, had to get creative with what they had available in their pantries. Thus, the ‘Depression Cake’ was born.
Also known as ‘Wacky Cake’ or ‘Crazy Cake’, this recipe became a staple in American households during the 1930s and 40s. The name ‘Wacky’ likely comes from the unconventional method of mixing the batter right in the baking pan (though we often use a bowl today for even distribution) and the ‘crazy’ ingredients list that omitted the traditional pillars of baking. Instead of eggs for lift, bakers discovered that the chemical reaction between vinegar (an acid) and baking soda (a base) produced carbon dioxide bubbles, causing the cake to rise beautifully. Instead of butter, they used oil or shortening, and water or coffee replaced milk.
This cake wasn’t just a substitute; it became a beloved classic in its own right. It represents a time when nothing went to waste and when the comfort of a homemade dessert was a necessary balm for difficult times. Over the decades, the recipe has been passed down through generations, often written on index cards with notes like ‘Grandma’s Magic Cake’. Today, it has seen a resurgence not out of necessity, but because it is genuinely delicious and incidentally plant-based, aligning perfectly with modern dietary trends.
Why This Recipe Works
You might be wondering how a cake without eggs or butter can possibly be good, let alone ‘the best’. The science behind this recipe is simple yet profound. In traditional baking, eggs provide structure (protein) and leavening, while butter provides flavor and tenderness. In this recipe, we replace those functions using alternative chemistry.
The combination of baking soda and vinegar is the powerhouse here. When the acetic acid in the vinegar hits the sodium bicarbonate, it creates an immediate release of carbon dioxide gas. These bubbles get trapped in the batter, expanding in the heat of the oven to create a light, airy lift. This mimics the leavening action usually provided by whipped eggs.
Furthermore, the use of oil instead of butter is the secret to the cake’s incredible moisture. Butter is about 20% water, which evaporates during baking, and it solidifies at room temperature, which can sometimes lead to a drier or denser texture once the cake cools. Oil, on the other hand, is 100% fat and remains liquid at room temperature. This coats the flour proteins (gluten) more effectively, preventing them from becoming tough, and ensures the cake stays soft and moist for days. Finally, blooming the cocoa powder in hot water or coffee intensifies the chocolate flavor, releasing the aromatic compounds that fat alone cannot unlock, resulting in a deeper, richer taste profile.
Why You’ll Love This Recipe
- ✓Requires no eggs, butter, or milk – completely vegan friendly.
- ✓Incredibly moist texture that stays soft for days.
- ✓One-bowl method means minimal cleanup.
- ✓Uses simple pantry staples you likely already have.
- ✓Rich, deep chocolate flavor enhanced by coffee.
- ✓Perfect for those with dairy or egg allergies.
Equipment You’ll Need
- ✓8-inch round cake pan or 8×8 square pan
- ✓Large mixing bowl
- ✓Whisk
- ✓Sifter or fine-mesh sieve
- ✓Measuring cups and spoons
- ✓Parchment paper
- ✓Wire cooling rack
Ingredients
- ✓1 ½ cups All-purpose flour
- ✓1 cup Granulated sugar
- ✓1/4 cup Unsweetened cocoa powder (Dutch-processed preferred)
- ✓1 tsp Baking soda
- ✓1/2 tsp Salt
- ✓1/3 cup Vegetable oil (or any neutral oil like canola)
- ✓1 tsp Pure vanilla extract
- ✓1 tsp White vinegar or apple cider vinegar
- ✓1 cup Cold water (or brewed coffee for richer flavor)
Instructions
- Preheat your oven to 350°F (175°C). Grease an 8-inch round cake pan or an 8×8 square baking dish with a little oil and line the bottom with parchment paper for easy removal.
- In a large mixing bowl, sift together the all-purpose flour, granulated sugar, cocoa powder, baking soda, and salt. Sifting is crucial here to remove any lumps from the cocoa powder and ensure an even rise.
- Whisk the dry ingredients together until they are well combined and uniform in color.
- Create three small wells (depressions) in the dry ingredients. In the first well, pour the vegetable oil. In the second well, pour the vinegar. In the third well, pour the vanilla extract.
- Pour the cold water (or cold coffee) over the entire mixture.
- Using a whisk, stir the batter together until just combined and smooth. Do not overmix; stop as soon as the streaks of flour disappear to keep the cake tender.
- Immediately pour the batter into the prepared baking pan. Tap the pan gently on the counter once to release any large air bubbles.
- Bake in the preheated oven for 30 to 35 minutes. The cake is done when a toothpick inserted into the center comes out clean or with just a few moist crumbs attached.
- Remove the cake from the oven and let it cool in the pan for about 10 minutes.
- Run a knife around the edges to loosen the cake, then invert it onto a wire rack to cool completely before frosting or dusting with powdered sugar.
Expert Cooking Tips
- ✓Use brewed coffee instead of water to intensify the chocolate flavor without making the cake taste like coffee.
- ✓Do not skip the vinegar; it is essential for the chemical reaction with baking soda that makes the cake rise.
- ✓Sift your cocoa powder to avoid bitter lumps in the final batter.
- ✓Avoid overmixing the batter once the wet ingredients are added to prevent a rubbery texture.
- ✓Wait until the cake is completely cool before frosting, as this cake is very tender and can tear if handled while warm.
Substitutions and Variations
This recipe is highly adaptable. If you do not have white vinegar, Apple Cider Vinegar or even lemon juice works perfectly as the acid component. For the oil, you can use melted coconut oil for a slight coconut flavor, or light olive oil, though a neutral vegetable or canola oil yields the most classic taste. If you want to make this gluten-free, a high-quality 1:1 gluten-free all-purpose flour blend usually works very well, though the texture may be slightly denser. For the sweetener, while granulated sugar is standard, cane sugar works fine. Brown sugar can be used for a deeper, molasses-like flavor, but it changes the moisture content slightly, so watch the baking time. If you don’t have vanilla extract, you can omit it, but it does round out the chocolate flavor nicely.
Common Mistakes to Avoid
The most common mistake with this specific cake is letting the batter sit too long before baking. Because the leavening reaction between the vinegar and baking soda happens immediately upon contact, you need to get the cake into the oven right away to capture those bubbles. Another mistake is overmixing. Since there are no eggs to provide structure, overworking the gluten in the flour will make the cake tough and gummy rather than tender. Ensure your baking soda is fresh; if it’s expired, the cake will not rise and will be dense and heavy. Lastly, do not open the oven door too early during baking, as the sudden drop in temperature can cause the center to collapse.
Serving Suggestions
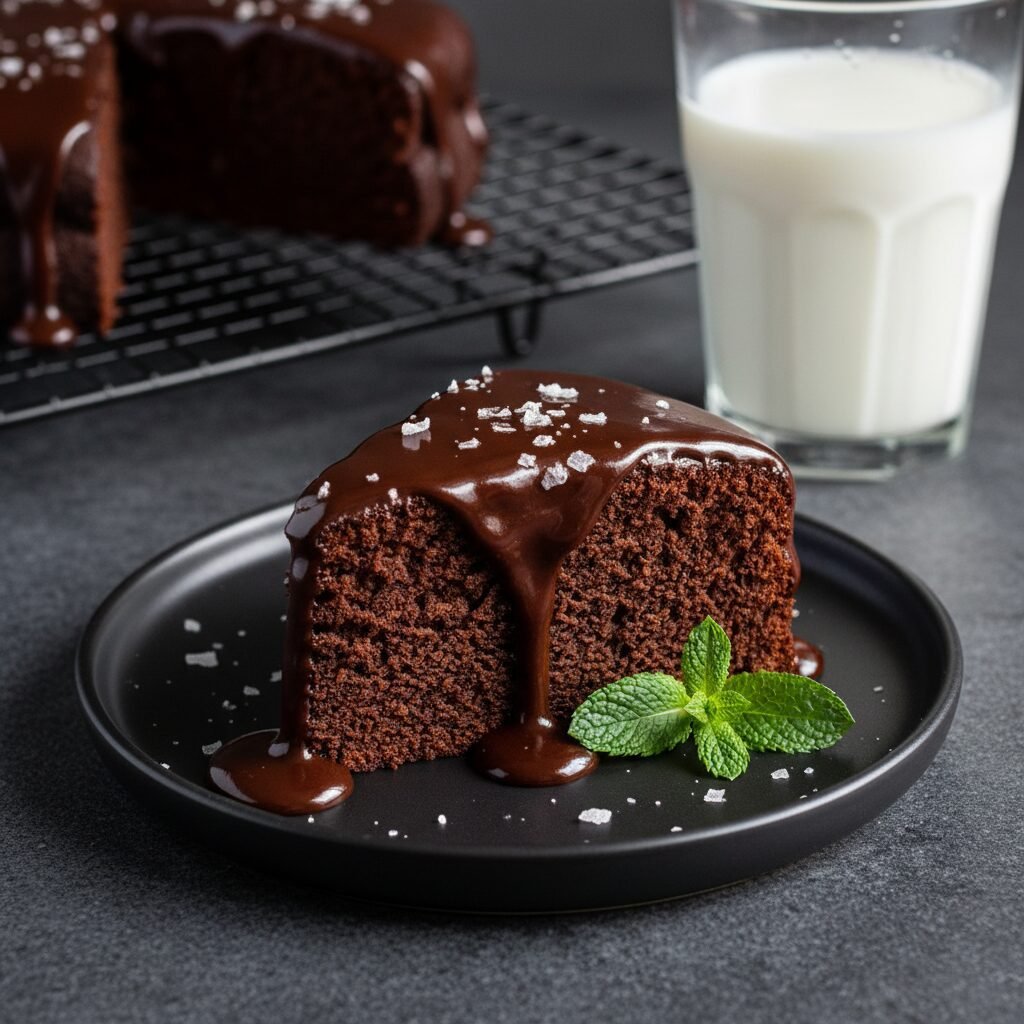
This cake is versatile enough to be served in many ways. For a simple, rustic look, dust it heavily with powdered sugar and serve with fresh raspberries or strawberries on the side. It pairs beautifully with a scoop of vanilla bean ice cream or a dollop of coconut whipped cream. If you want to dress it up, cover it in a vegan chocolate ganache made from coconut milk and dark chocolate chips, or a classic buttercream frosting. A drizzle of salted caramel sauce or a sprinkle of sea salt flakes on top of the frosting creates a sophisticated sweet-salty balance.
Storage and Reheating Tips
This cake stores exceptionally well due to its oil content. It can be kept at room temperature in an airtight container for up to 3 days without drying out. In fact, it often tastes even better the next day as the flavors meld. For longer storage, keep it in the refrigerator for up to a week. If you want to freeze it, wrap the unfrosted cake tightly in plastic wrap, then in foil, and freeze for up to 3 months. Thaw it on the counter at room temperature before serving. If frosted, freeze it uncovered for an hour to set the frosting, then wrap and freeze.
Nutrition Facts (Estimated)
| Serving Size | 1 slice |
| Calories | 290 |
| Fat | 14g |
| Saturated Fat | 2g |
| Unsaturated Fat | 11g |
| Trans Fat | 0g |
| Cholesterol | 0mg |
| Sodium | 280mg |
| Carbohydrates | 38g |
| Fiber | 2g |
| Sugar | 22g |
| Protein | 3g |
Frequently Asked Questions
Can I double this recipe?
Yes, you can easily double the ingredients to make a two-layer cake or a 9×13 sheet cake. Just be sure to monitor the baking time, as a larger pan might require a few extra minutes.
Why did my cake sink in the middle?
Sinking usually happens if the oven door was opened too early, the baking soda was old, or the batter sat out too long before going into the oven. Ensure your oven is fully preheated before you start mixing.
Can I use milk instead of water?
Technically yes, but using dairy milk changes the ‘Depression Cake’ nature of the recipe. The water or coffee keeps the flavor pure chocolate. If you use milk, the texture might be slightly different, but still edible.
Does it taste like vinegar?
Absolutely not. The vinegar reacts completely with the baking soda to create lift, and the flavor is neutralized in the process. You will only taste rich chocolate.
Can I use self-rising flour?
It is not recommended. This recipe relies on a specific ratio of baking soda and acid. Self-rising flour contains baking powder and salt already, which would throw off the chemistry and taste.
Is this cake suitable for nut allergies?
Yes, as long as your ingredients (like the oil and cocoa powder) are processed in a nut-free facility. It contains no nuts in the base recipe.
Can I make cupcakes with this batter?
Yes! This batter makes excellent cupcakes. Fill liners about 2/3 full and bake for 18-22 minutes at 350°F.
Why is my cake rubbery?
A rubbery texture is a classic sign of overmixing. When you add the wet ingredients to the dry, mix only until the flour just disappears.
Conclusion
There is something truly magical about pulling a beautiful, fragrant chocolate cake out of the oven knowing you made it with the simplest of ingredients. This Moist Eggless Chocolate Cake is a testament to the idea that limitations can breed creativity and that you don’t need expensive or fancy ingredients to create a masterpiece. Whether you are baking for a vegan friend, dealing with an empty fridge, or just craving a damn good piece of chocolate cake, this recipe delivers every single time. It’s humble, it’s delicious, and it’s waiting for you to bake it. Enjoy every bite!