The Ultimate Fun Oreo Cookie Birthday Cake: 9×13 Sheet Pan Recipe
Fun Oreo Cookie Birthday Cake For 9×13 Pan Recipe
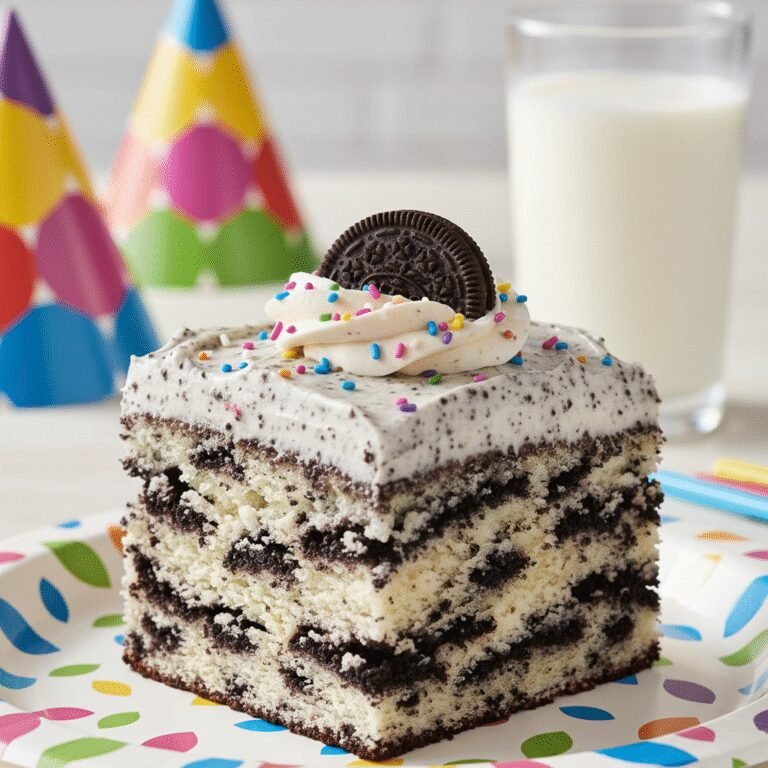
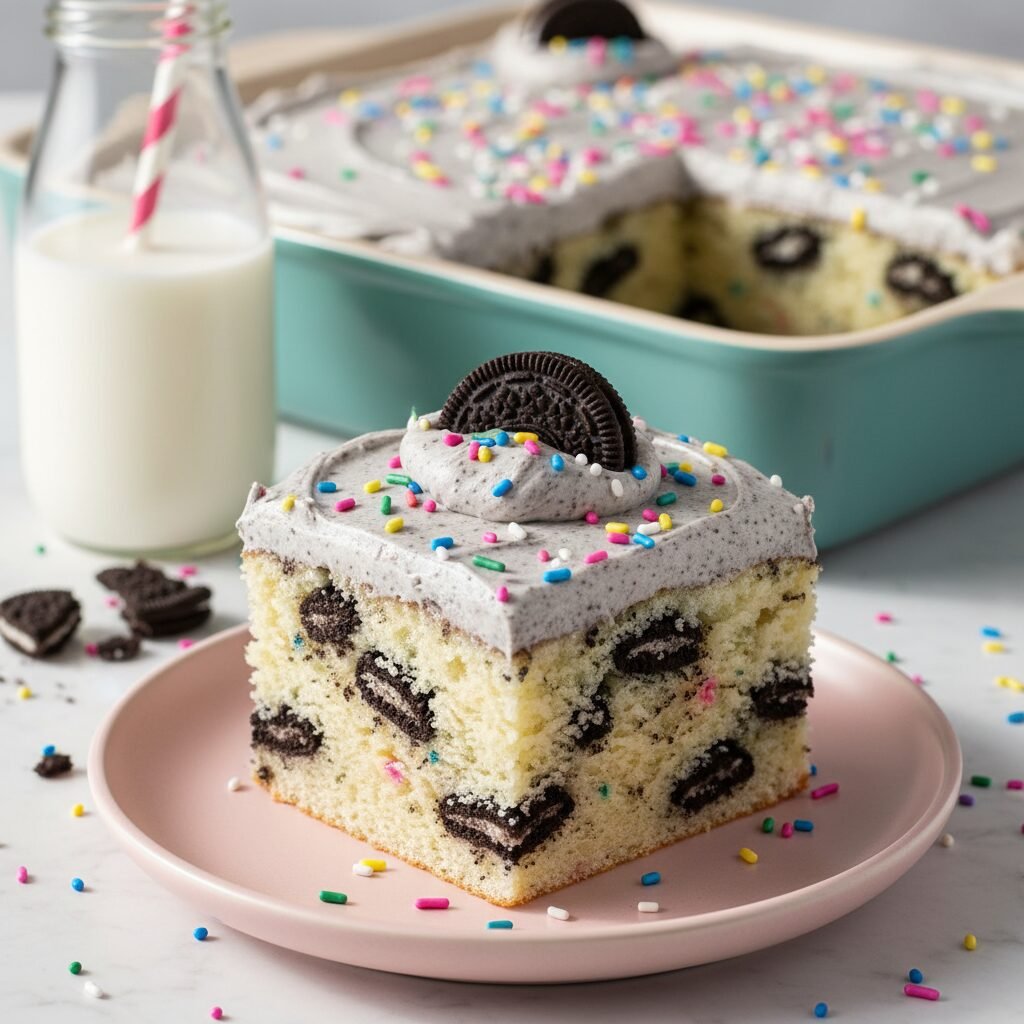
This crowd-pleasing Oreo Cookie Birthday Cake combines the nostalgia of cookies and cream with the festive joy of a classic birthday confetti cake. Baked in a convenient 9×13 pan, it features a fluffy vanilla bean base packed with crushed Oreos and colorful sprinkles, topped with a luscious whipped Oreo buttercream.
25 minutes
35 minutes
1 hour 15 minutes
15 servings
Dessert
Baking
American
Vegetarian
There is something undeniably magical about the combination of chocolate sandwich cookies and vanilla cake. It bridges the gap between the childhood joy of dunking cookies in milk and the celebratory grandeur of a birthday cake. This Fun Oreo Cookie Birthday Cake is designed for the busy baker who wants maximum impact with minimal structural engineering. Unlike towering layer cakes that require dowels, leveling, and a prayer that they don’t slide during transport, this 9×13 sheet cake is sturdy, portable, and effortlessly chic.
The base of the cake is not your average yellow box mix; it is a homemade white velvet cake that uses buttermilk and egg whites to achieve a crumb that is tender, moist, and sturdy enough to hold generous chunks of Oreo cookies without them sinking to the bottom. We fold in a handful of rainbow sprinkles to give it that quintessential ‘birthday’ look, creating a beautiful contrast against the dark cookie crumbs. The crowning glory is the frosting: a whipped vanilla buttercream that is loaded with finely crushed Oreo dust, turning it a lovely speckled grey and infusing every bite with intense cookies and cream flavor. Whether you are hosting a child’s birthday party, a casual office celebration, or simply craving a slice of nostalgia on a Tuesday night, this recipe delivers on all fronts. It is the kind of dessert that looks impressive on a Pinterest board but is forgiving enough for a novice baker to master on the first try.
History & Origins
The history of this cake is a delicious intersection of two American icons: the Oreo cookie and the sheet cake. The Oreo biscuit was first developed and produced by the National Biscuit Company (today known as Nabisco) in 1912 at its Chelsea, New York City factory. Originally sold in bulk tins, it quickly became the best-selling cookie in the United States. Interestingly, the ‘Cookies and Cream’ flavor profile didn’t truly explode until the late 1970s and early 1980s, largely popularized by the ice cream industry. It became a cultural phenomenon, eventually making its way into cheesecakes, milkshakes, and finally, layer cakes.
Parallel to the rise of the Oreo was the evolution of the 9×13 baking pan. Following World War II, the standardization of American kitchen ovens and the boom in suburban entertaining led to the popularity of ‘sheet cakes’ or ‘kitchen cakes.’ Brands like Pyrex and Nordic Ware mass-produced these rectangular pans, which became the vessel of choice for potlucks, church socials, and birthday parties. The sheet cake represented community and convenience. By combining the century-old tradition of the Oreo with the mid-century practicality of the sheet cake, this recipe represents a modern classic—a dessert that honors the history of American snacking while catering to the contemporary desire for visually stunning yet accessible home baking.
Why This Recipe Works
This recipe succeeds where many other ‘cookies and cream’ cakes fail due to three specific chemical and structural factors. First is the use of ‘high-ratio’ mixing techniques (or a modified creaming method) combined with acidic buttermilk. The acidity in the buttermilk breaks down the long gluten strands in the flour, resulting in a significantly more tender crumb, while the baking soda reacts with the acid to provide a powerful lift. This lift is crucial because Oreo chunks are heavy; without a robust structure, the cookies would sink to the bottom, creating a dense, soggy layer.
Second, we use egg whites rather than whole eggs. The yolks would add a yellow tint and a richness that distracts from the pure vanilla and chocolate contrast. By using whites, we maintain a snowy white cake base that allows the black cookie crumbs and colorful sprinkles to pop visually.
Finally, the frosting technique utilizes ‘Oreo dust’ rather than chunks. By pulverizing the cookies into a fine powder before adding them to the buttercream, we stabilize the frosting. Large chunks can tear the cake surface when spreading, but the dust acts similarly to cocoa powder, stiffening the buttercream slightly and ensuring it holds its shape in the 9×13 pan without weeping, even at room temperature.
Why You’ll Love This Recipe
- ✓No-fuss 9×13 format means no leveling or stacking layers.
- ✓Uses both crushed Oreos and sprinkles for maximum festive appeal.
- ✓Sturdy crumb structure prevents cookies from sinking to the bottom.
- ✓Whipped Oreo buttercream is perfectly sweet and stable.
- ✓Easily transportable for potlucks and parties.
- ✓Can be made ahead of time and stays moist for days.
Equipment You’ll Need
- ✓9×13 inch baking pan (metal preferred)
- ✓Stand mixer or electric hand mixer
- ✓Large mixing bowls
- ✓Rubber spatula
- ✓Whisk
- ✓Food processor or rolling pin (for crushing cookies)
- ✓Offset spatula
Ingredients
- ✓2 1/2 cups Cake flour, sifted
- ✓2 teaspoons Baking powder
- ✓1/2 teaspoon Baking soda
- ✓1 teaspoon Salt
- ✓3/4 cup Unsalted butter, softened to room temperature
- ✓1 1/2 cups Granulated sugar
- ✓1/2 cup Vegetable oil (for moisture)
- ✓5 large Egg whites, room temperature
- ✓1 tablespoon Pure vanilla extract
- ✓1 cup Buttermilk, room temperature
- ✓12 Oreo cookies, roughly chopped (for the cake)
- ✓1/3 cup Rainbow sprinkles (jimmies, not nonpareils)
- ✓1 cup Unsalted butter (for frosting), softened
- ✓4 cups Powdered sugar
- ✓1/4 cup Heavy cream
- ✓8 Oreo cookies, finely pulverized (for frosting)
- ✓Additional Oreos and sprinkles for garnish
Instructions
- Preheat your oven to 350°F (175°C). Grease a 9×13 inch baking pan generously with butter or non-stick spray, and line the bottom with parchment paper for easy removal.
- In a medium bowl, whisk together the cake flour, baking powder, baking soda, and salt. Set this dry mixture aside.
- In the bowl of a stand mixer fitted with the paddle attachment, beat the 3/4 cup softened butter and granulated sugar on medium-high speed for about 3-4 minutes until the mixture is pale, light, and fluffy. This aeration is key for a light cake.
- Lower the speed to medium and drizzle in the vegetable oil and vanilla extract. Beat until combined.
- Add the egg whites one at a time, mixing well after each addition and scraping down the sides of the bowl to ensure everything is incorporated.
- Reduce the mixer speed to low. Add the dry ingredients in three parts, alternating with the buttermilk in two parts (Dry-Wet-Dry-Wet-Dry). Mix only until just combined and no streaks of flour remain. Do not overmix.
- Remove the bowl from the mixer. Gently fold in the chopped Oreos and rainbow sprinkles by hand using a rubber spatula. Be gentle to avoid crushing the cake structure or bleeding the sprinkle colors.
- Pour the batter into the prepared pan and smooth the top with an offset spatula. Bake for 30-35 minutes, or until a toothpick inserted into the center comes out clean or with just a few moist crumbs.
- Remove the cake from the oven and let it cool completely in the pan on a wire rack. It must be 100% cool before frosting.
- While the cake cools, make the frosting. Beat the 1 cup of butter on high speed for 5 minutes until white and creamy. Gradually add the powdered sugar, one cup at a time, alternating with the heavy cream.
- Once the frosting is fluffy, fold in the finely pulverized Oreo crumbs. Spread evenly over the cooled cake. Top with extra crushed Oreos and sprinkles.
Expert Cooking Tips
- ✓Use room temperature ingredients: Cold eggs or buttermilk can curdle the batter and prevent the cake from rising properly.
- ✓Don’t over-crush the cake Oreos: You want distinct chunks in the batter, not dust, or the cake will turn grey.
- ✓Use ‘Jimmies’ sprinkles: Avoid nonpareils (the tiny balls) as they tend to bleed color into the batter instantly.
- ✓Cool completely: If the cake is even slightly warm, the butter in the frosting will melt and slide off.
- ✓Weigh your flour: If possible, use a scale (120g per cup) to avoid a dense, dry cake.
- ✓Metal vs. Glass pans: If using a glass pan, reduce oven temp by 25°F and check for doneness 5 minutes early.
Substitutions and Variations
If you do not have cake flour, you can make a substitute by measuring 1 cup of all-purpose flour, removing 2 tablespoons, and replacing them with 2 tablespoons of cornstarch. Sift this mixture twice before using. For the buttermilk, you can create a ‘sour milk’ alternative by adding 1 tablespoon of white vinegar or lemon juice to a cup of whole milk and letting it sit for 5 minutes. If you prefer a chocolate base, swap 1/2 cup of the flour for unsweetened cocoa powder. For a dairy-free version, use high-quality plant-based butter blocks and unsweetened soy milk mixed with vinegar.
Common Mistakes to Avoid
The most common mistake with this recipe is overmixing the batter after adding the flour. Once the gluten is activated, too much agitation will result in a tough, rubbery cake rather than a tender one. Another frequent error is using ‘soft’ tub margarine instead of stick butter; the water content in margarine is too high and will affect the structure. Finally, ensure you do not open the oven door frequently during the first 20 minutes of baking, as the fluctuation in temperature can cause the center of the cake to collapse.
Serving Suggestions
This cake is best served straight from the pan for a casual gathering. Slice it into generous squares and serve with a scoop of vanilla bean ice cream or a cold glass of milk. To elevate the presentation for a party, you can pipe the frosting using a large star tip rather than just spreading it, and garnish each square with a whole mini Oreo and a maraschino cherry.
Storage and Reheating Tips
Store the frosted cake in the pan, covered tightly with plastic wrap or a specialized lid, at room temperature for up to 3 days. The sugar in the frosting acts as a preservative. If you live in a very hot or humid climate, you may store it in the refrigerator, but let it come to room temperature before eating for the best texture. To freeze, place individual slices on a baking sheet to freeze the frosting solid, then wrap them tightly in plastic wrap and foil. They will keep for up to 3 months.
Nutrition Facts (Estimated)
| Serving Size | 1 slice |
| Calories | 480 |
| Fat | 22g |
| Saturated Fat | 12g |
| Unsaturated Fat | 8g |
| Trans Fat | 0g |
| Cholesterol | 45mg |
| Sodium | 310mg |
| Carbohydrates | 68g |
| Fiber | 1g |
| Sugar | 42g |
| Protein | 5g |
Frequently Asked Questions
Can I use Golden Oreos instead of regular ones?
Absolutely! Golden Oreos work perfectly and will give the cake a stronger vanilla flavor profile without the chocolate contrast.
Why did my Oreos sink to the bottom?
This usually happens if the batter is too thin or the Oreo chunks are too large. Ensure your batter is thick and creamy, and chop the cookies into medium pieces, not massive boulders.
Can I make this into cupcakes?
Yes, this recipe yields approximately 24-28 standard cupcakes. Bake them at 350°F for 18-22 minutes.
Do I have to use egg whites? Can I use whole eggs?
You can use 3 whole large eggs instead of 5 egg whites, but the cake will be more yellow in color and have a slightly richer, denser texture.
Can I make the cake layers ahead of time?
Yes, you can bake the cake, let it cool, wrap it tightly in plastic wrap, and freeze it for up to a month before frosting.
What kind of sprinkles work best?
Always use ‘jimmies’ (the cylinder-shaped sprinkles). Nonpareils or fancy shaped sprinkles often bleed or melt during baking.
Is the oil necessary if there is butter?
Yes. Butter provides flavor, but oil remains liquid at room temperature, ensuring the cake stays moist for days.
How do I get the frosting so fluffy?
The key is whipping the butter alone for at least 5 minutes before adding sugar. This incorporates air and removes the yellow hue.
Conclusion
This Fun Oreo Cookie Birthday Cake proves that you don’t need a degree in pastry arts to create a show-stopping dessert. It captures the pure, unadulterated joy of a childhood birthday party in every bite. The combination of the tender, vanilla-scented crumb, the crunch of the cookies, and the creamy richness of the frosting makes it an instant classic in any recipe rotation. Whether you are celebrating a milestone or just surviving the work week, this 9×13 pan recipe is your ticket to a delicious, stress-free celebration. Happy baking!