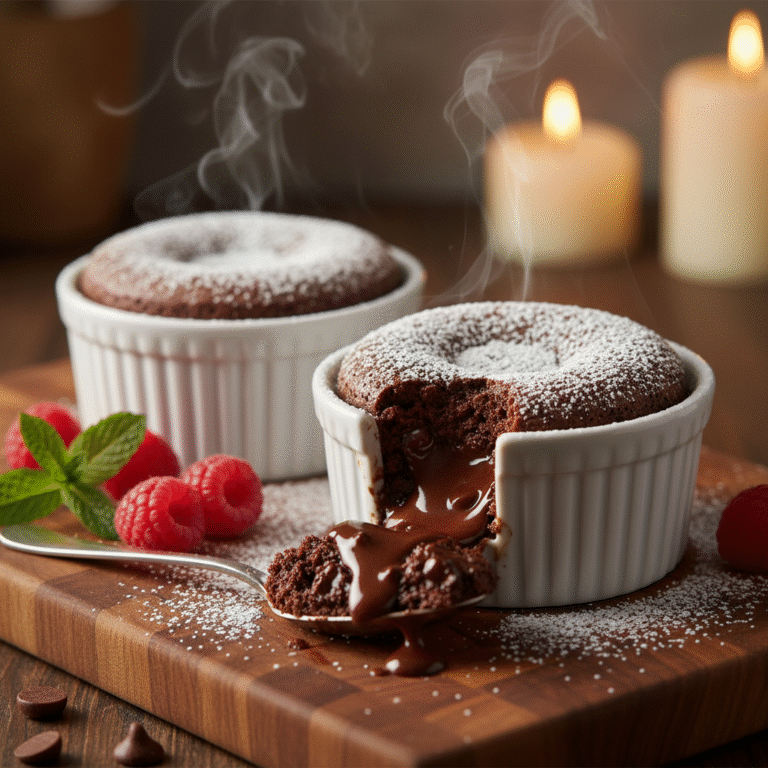
The Ultimate 2-Minute Gluten-Free Chocolate Mug Cake
Quick Microwave Chocolate Mug Cake Gluten Free Version Recipe
Satisfy your deepest chocolate cravings in mere minutes with this rich, fudgy, and completely gluten-free chocolate mug cake. It delivers the texture of a premium bakery brownie using simple pantry staples and a microwave, making it the perfect single-serving dessert for late-night indulgences.
2 minutes
1 minute
3 minutes
1 Serving
Dessert
Microwave
American
Gluten-Free
We have all been there: it is late at night, the house is quiet, and suddenly a craving for something sweet and chocolatey hits you like a freight train. You do not want to preheat the oven, dirty a dozen bowls, or bake an entire cake that will sit on the counter for days. You want chocolate, and you want it now. Enter the gluten-free chocolate mug cake, a culinary miracle that bridges the gap between instant gratification and gourmet satisfaction. For those living a gluten-free lifestyle, the stakes are often higher; quick convenience foods frequently rely on wheat-based binders, leaving us with dry, crumbly, or rubbery alternatives. This recipe changes the narrative entirely. By meticulously balancing the ratio of gluten-free flour blend to fat and liquid, we have cracked the code on a mug cake that is moist, tender, and deeply chocolaty, without that characteristic grit often found in gluten-free baked goods. This is not just a compromise for speed; it is a legitimate dessert experience. The texture sits somewhere comfortably between a molten lava cake and a fudgy brownie. It is warm, comforting, and because it is made in the vessel you eat it from, the cleanup is virtually non-existent. Whether you are a college student in a dorm, a busy parent needing a moment of solace, or simply a chocolate lover, this recipe is your new secret weapon.
History & Origins
While the concept of the ‘mug cake’ feels like a distinctly modern, internet-era phenomenon, its roots can be traced back to the earliest days of American baking, albeit in a different form. In 1796, Amelia Simmons wrote ‘American Cookery,’ which featured recipes for ‘a cake to be baked in small cups.’ These were the precursors to the modern cupcake, baked in pottery cups or ramekins in hearth ovens. However, the specific evolution of the microwave mug cake is tied directly to the adoption of the microwave oven in the late 20th century. Originally marketed as ‘radar ranges’ for reheating leftovers, microwaves eventually became a tool for actual cooking. The mug cake trend specifically exploded with the rise of food blogging and Pinterest in the late 2000s and early 2010s. It offered a solution to the ‘single-serving’ dilemma and the desire for portion control. As the gluten-free movement gained momentum in the last decade due to increased awareness of Celiac disease and gluten sensitivity, home cooks began adapting these viral recipes. Early gluten-free iterations were often disappointing—dense pucks of rice flour that hardened instantly as they cooled. Over time, as commercial gluten-free flour blends improved with the addition of xanthan gum and better starch ratios, the gluten-free mug cake evolved from a sad substitute into a decadent treat that rivals its wheat-based counterparts. This recipe represents the culmination of that history: modern convenience meeting dietary necessity without sacrificing culinary joy.
Why This Recipe Works
The science behind this gluten-free mug cake relies on understanding how microwaves cook food compared to traditional ovens, and how gluten-free flours react to hydration. Microwaves work by dielectric heating, agitating water, fat, and sugar molecules to generate heat from within. This happens rapidly, which is why traditional baking rules often fail in a mug. In a conventional oven, a cake rises slowly, allowing the gluten structure (or xanthan gum structure) to set before the steam escapes. In a microwave, steam is generated instantly. To combat the rubbery texture that often plagues microwave cakes, this recipe uses a higher ratio of fat (oil) to flour. Oil coats the protein and starch molecules, preventing them from forming a tough matrix. Furthermore, we use a specific balance of chemical leavening (baking powder) to ensure the cake rises quickly enough to trap the steam, creating a fluffy crumb rather than a dense paste. For the gluten-free aspect, we rely on a 1:1 baking flour that includes xanthan gum; however, the addition of cocoa powder is crucial. Cocoa powder is naturally gluten-free and acts as a starch, absorbing liquid. By using Dutch-processed cocoa, we reduce acidity, which ensures the baking powder works effectively without neutralizing the flavor. The result is a cake that cooks evenly in 60 to 90 seconds, retaining moisture and delivering a premium mouthfeel.
Why You’ll Love This Recipe
- ✓Ready in under 5 minutes from start to finish
- ✓Rich, fudgy texture similar to a brownie
- ✓Completely gluten-free and safe for Celiacs
- ✓No eggs required, making it easily vegan-adaptable
- ✓Minimal cleanup with only one mug and one spoon needed
- ✓customizable with mix-ins like nuts or caramel
Equipment You’ll Need
- ✓Microwave-safe mug (12-14 oz capacity)
- ✓Small whisk or fork
- ✓Measuring spoons
Ingredients
- ✓4 tablespoons Gluten-Free All-Purpose Flour Blend (ensure it contains xanthan gum)
- ✓2 tablespoons granulated sugar
- ✓2 tablespoons unsweetened cocoa powder
- ✓1/4 teaspoon baking powder
- ✓1 pinch salt
- ✓4 tablespoons milk (dairy or almond/oat for dairy-free)
- ✓2 tablespoons vegetable oil or melted coconut oil
- ✓1/4 teaspoon vanilla extract
- ✓1 tablespoon semi-sweet chocolate chips (optional but recommended)
Instructions
- Select a microwave-safe mug that holds at least 12 ounces to prevent overflowing.
- Add the dry ingredients (gluten-free flour, sugar, cocoa powder, baking powder, and salt) directly into the mug.
- Use a fork or small whisk to mix the dry ingredients thoroughly, ensuring there are no clumps of cocoa powder or flour at the bottom.
- Add the wet ingredients (milk, oil, and vanilla extract) to the mug.
- Stir vigorously until the batter is completely smooth. Scrape the bottom edges of the mug to incorporate any dry pockets.
- Sprinkle the chocolate chips on top of the batter; do not stir them in, as they will sink during cooking.
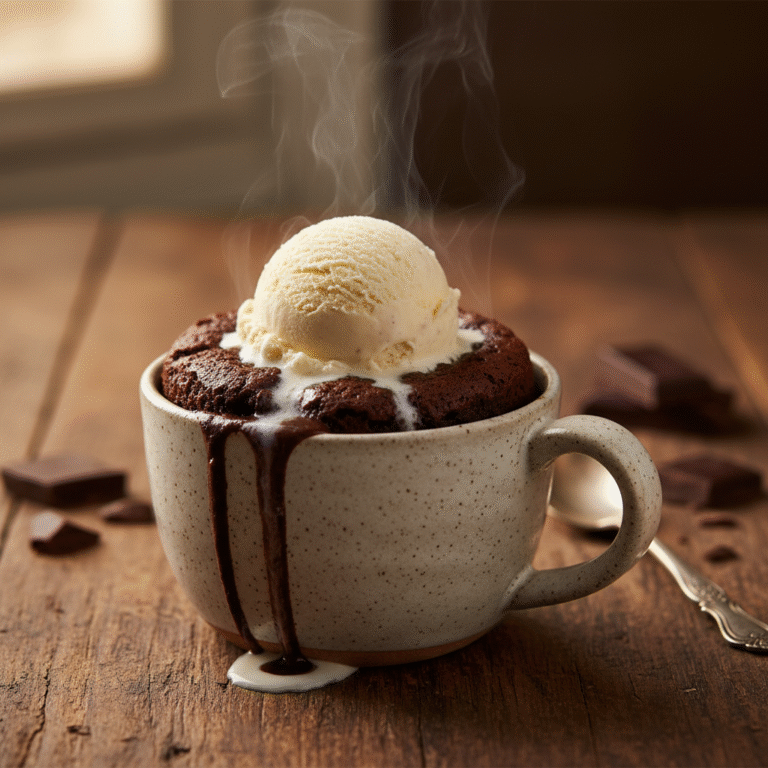
- Microwave on high power for 60 seconds. Check the cake; it should be risen and mostly set but slightly shiny on top. If it looks raw, cook for an additional 15-30 seconds.
- Remove the mug carefully from the microwave (it will be hot) and let it sit for 1-2 minutes to cool and finish setting before eating.
Expert Cooking Tips
- ✓Do not overcook the cake; microwaves vary in power, so start with 60 seconds and add time in small increments to avoid a rubbery texture.
- ✓Use a wide mug rather than a tall, narrow one to ensure even cooking and prevent the batter from spilling over.
- ✓If your gluten-free flour blend does not contain xanthan gum, add 1/8 teaspoon to the dry ingredients to prevent crumbling.
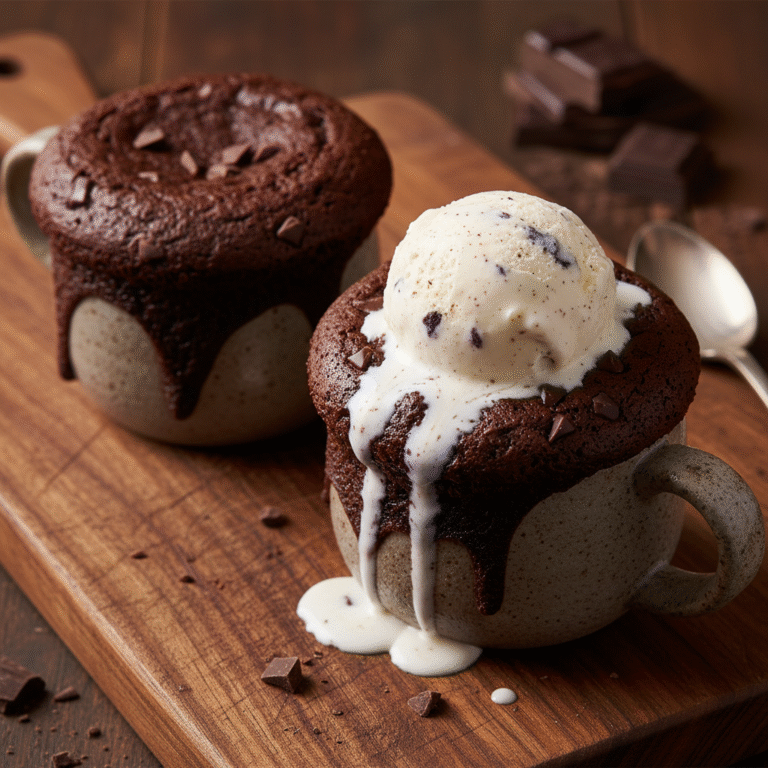
- ✓For an extra molten center, press a square of chocolate into the middle of the batter just before microwaving.
- ✓Letting the cake rest for a minute after cooking is crucial as the internal heat continues to cook the center without drying out the edges.
Substitutions and Variations
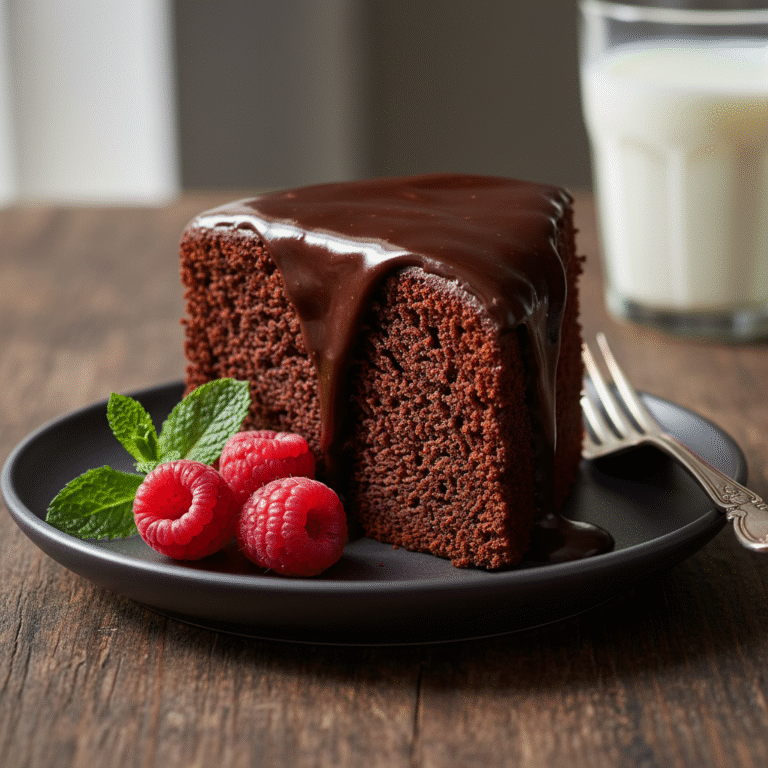
This recipe is highly adaptable to various dietary needs and pantry limitations. If you are dairy-free or vegan, simply swap the cow’s milk for unsweetened almond milk, oat milk, or soy milk; the texture remains largely unchanged. For the fat source, vegetable oil or canola oil provides the moistest crumb, but melted coconut oil works beautifully and adds a subtle tropical flavor. If you prefer butter, you can use melted unsalted butter, though the cake may be slightly denser. For sweetener substitutions, you can use brown sugar for a deeper molasses flavor, or coconut sugar for a lower glycemic index option. Liquid sweeteners like maple syrup or honey can be used, but you may need to reduce the milk by a teaspoon to balance the hydration. If you do not have a specific gluten-free flour blend, oat flour can work in a pinch, though the texture will be heartier and less like a traditional cake. Finally, the mix-ins are endless: try white chocolate chips, chopped walnuts, a swirl of peanut butter, or even a few raspberries for a tart contrast.
Common Mistakes to Avoid
The most common mistake with mug cakes is overcooking. Because microwaves cook unevenly and rapidly, leaving the cake in for even 15 seconds too long can turn a moist delight into a hard, rubbery puck. Always err on the side of undercooking, as the residual heat will finish the job. Another frequent error is not mixing the batter thoroughly. It is easy to leave pockets of dry flour at the bottom of the mug, which results in an unpleasant, powdery mouthful. Make sure to scrape the bottom corners of the mug well. Using the wrong size mug is also a recipe for disaster; if the mug is too small, the batter will rise and spill over, creating a mess in your microwave. Always use a mug with plenty of headspace. Lastly, do not skip the oil. Some people try to make the recipe ‘healthier’ by removing the fat, but in a gluten-free microwave recipe, the fat is essential for tenderness. Without it, the rice flour in the blend will become gritty and tough.
Serving Suggestions
While this mug cake is delicious straight out of the microwave, dressing it up can turn it into a cafe-style dessert. The classic pairing is a scoop of vanilla bean ice cream, which melts into the warm cake, creating a creamy sauce. Fresh whipped cream and a dusting of cocoa powder or shaved chocolate add a touch of elegance. For a fruitier approach, top with fresh raspberries or sliced strawberries, which cut through the richness of the chocolate. If you are feeling decadent, a drizzle of salted caramel sauce or warm hot fudge takes it to the next level. For a cozy winter treat, serve it alongside a hot cup of coffee or a tall glass of cold milk.
Storage and Reheating Tips
Mug cakes are best enjoyed immediately after cooking. The texture of microwave-baked goods tends to degrade quickly, becoming dry or stale within hours. However, if you cannot finish it, you can cover the mug tightly with plastic wrap and store it in the refrigerator for up to 24 hours. To reheat, remove the plastic wrap and microwave on high for 10-15 seconds just to warm it through. Do not overheat it again, or it will become tough. We do not recommend freezing the cooked cake, as the texture upon thawing is often spongy and unappealing. If you want to meal prep, you can mix the dry ingredients in small jars or ziplock bags in advance. When the craving hits, simply dump a bag into a mug, add the wet ingredients, and cook.
Nutrition Facts (Estimated)
| Serving Size | 1 mug cake |
| Calories | 380 |
| Fat | 18g |
| Saturated Fat | 3g |
| Unsaturated Fat | 14g |
| Trans Fat | 0g |
| Cholesterol | 5mg |
| Sodium | 180mg |
| Carbohydrates | 52g |
| Fiber | 4g |
| Sugar | 22g |
| Protein | 4g |
Frequently Asked Questions
Why is my mug cake rubbery?
Rubbery texture is almost always caused by overcooking or over-mixing. Microwaves cook very fast. Next time, reduce the cooking time by 10-15 seconds. Also, mix just until the ingredients are combined; overworking the batter can develop a tough structure, even with gluten-free flour.
Can I use almond flour instead of a GF blend?
Almond flour reacts differently than a standard GF flour blend because it is higher in fat and lacks starch. You can use it, but the cake will be denser and less fluffy. You may need to add a pinch more baking powder to help it rise.
Is this recipe vegan?
It can easily be made vegan! The base recipe uses oil (which is vegan), so you just need to use a plant-based milk like almond, soy, or oat milk, and ensure your chocolate chips are dairy-free.
Can I make this in the oven?
Technically yes, but it defeats the purpose of a quick mug cake. If you must, pour the batter into a greased ramekin and bake at 350°F (175°C) for about 12-15 minutes. The texture will be slightly different than the microwave version.
Why did my cake overflow?
The chemical reaction between the baking powder and the heat causes rapid expansion. If your mug is too small, it will spill. Always use a mug that is at least double the volume of the batter.
Can I use water instead of milk?
You can, but the cake will be less rich and flavorful. Milk adds fat and sugar (lactose) which contributes to the tenderness and browning of the cake.
Do I need to grease the mug?
Generally, no. The oil in the batter usually prevents sticking. However, if you want to turn the cake out onto a plate to serve, spraying the mug with a little non-stick spray beforehand helps.
Can I double the recipe?
Do not double the recipe in a single mug; it will not cook evenly. If you want to make two, mix them in separate mugs and cook them one at a time for the best results.
Why is my cake dry?
Dryness usually comes from measuring the flour incorrectly (packing it into the spoon) or overcooking. Use the ‘spoon and level’ method for flour and check the cake early.
Is baking powder gluten-free?
Most baking powder is gluten-free, using cornstarch or potato starch as a carrier, but always check the label to be sure, especially if you have severe Celiac disease.
Conclusion
The Quick Microwave Chocolate Mug Cake is more than just a recipe; it is a lifestyle hack for the gluten-free foodie. It proves that dietary restrictions do not have to mean missing out on the simple, spontaneous joys of a warm, homemade dessert. With a handful of pantry staples and a few minutes of your time, you can create a treat that is rich, comforting, and perfectly portioned. No longer do you need to watch others enjoy bakery treats while you abstain; you have the power of the mug cake in your hands. So the next time that chocolate craving strikes at midnight, do not fight it. Grab your favorite mug, stir up a little magic, and enjoy a spoonful of gluten-free bliss.