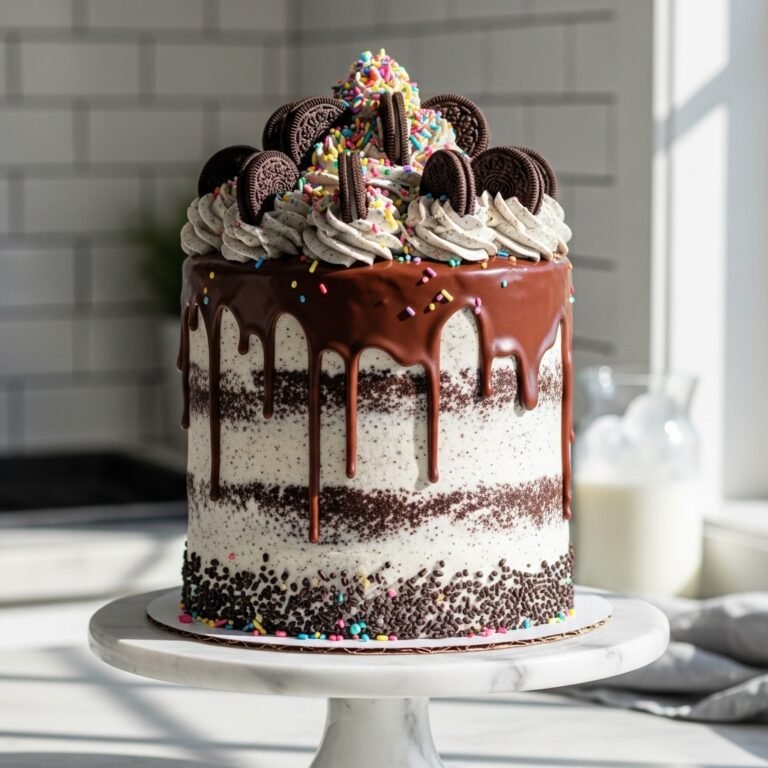
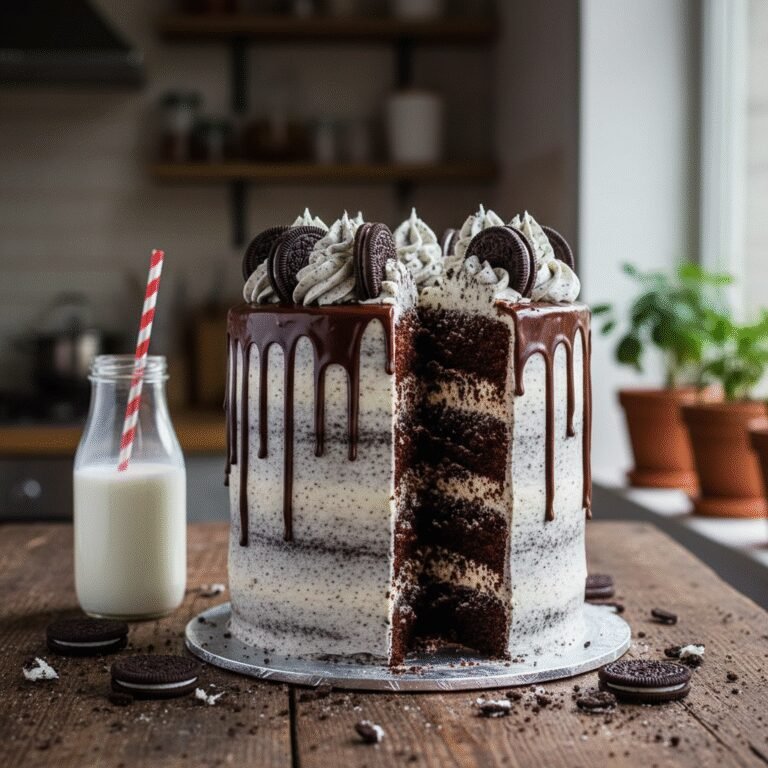
Tall Chocolate Drip Cake: The Ultimate Single Layer Recipe
Tall Chocolate Drip Cake Single Layer Cake Recipe
This show-stopping tall chocolate drip cake proves you don’t need multiple tiers to make a statement. Featuring a deeply fudgy, high-rising single layer of chocolate mud cake topped with silky vanilla buttercream and a glossy dark chocolate ganache drip, it is the perfect centerpiece for intimate celebrations.
30 minutes
55 minutes
2 hours 30 minutes
8-10 servings
Dessert
Baking
American Modern
Vegetarian
In the world of cake decorating, height is often synonymous with elegance and drama. Traditionally, achieving a towering cake meant baking multiple layers, leveling them, and stacking them with precarious precision. However, the modern baking landscape has embraced the ‘tall single layer’ cake—a concept that delivers all the visual impact of a tiered confection with half the effort. This Tall Chocolate Drip Cake is the epitome of that trend. It is designed to be baked in a smaller, deeper pan (typically 6 inches wide by 3 or 4 inches deep), resulting in a cake that stands proud and statuesque without the need for dowels or stacking. The texture of this cake is closer to a mud cake than a sponge; it is dense, moist, and sturdy enough to hold its shape while supporting a generous crown of frosting and toppings. The flavor profile is an intense chocolate experience, deepened by the addition of hot coffee which blooms the cocoa powder, unlocking floral and roasted notes that simple milk or water cannot achieve. Contrasting this richness is a cloud of whipped vanilla buttercream, providing a sweet, creamy relief from the dark chocolate crumb. The pièce de résistance, of course, is the chocolate drip. A technique popularized by modern Australian bakers, the drip adds a sense of movement and decadence to the cake. Whether you are a novice baker looking to try your first drip cake or a seasoned pro wanting a quick but impressive dessert for a smaller gathering, this recipe offers a foolproof roadmap to a bakery-quality result right in your home kitchen.
History & Origins
The history of the chocolate cake is a journey from a gritty beverage to the refined dessert we know today. Until the mid-19th century, chocolate was primarily consumed as a drink. It wasn’t until 1828, when Coenraad van Houten invented the cocoa press, that cocoa powder became affordable and accessible, paving the way for chocolate baking. The first recorded recipes for chocolate cake appeared in the United States in the late 19th century, often using molasses and spices. However, the specific style of the ‘Drip Cake’ is a much more recent phenomenon in the culinary timeline, representing a seismic shift in cake decorating trends. Around 2015, the cake world began to pivot away from the perfectly smooth, fondant-covered cakes that dominated the early 2000s (think ‘Ace of Cakes’). This shift was largely driven by the rise of Instagram and Pinterest, where visual appeal is paramount. Australian baker Katherine Sabbath is widely credited with popularizing the modern drip cake. Her neon-colored, candy-topped creations featuring a chaotic yet controlled ganache drip broke all the rules of traditional French patisserie. This style celebrated the ‘perfectly imperfect,’ embracing fun, color, and texture over rigid structure. The single-layer tall cake evolved alongside this trend as the ‘micro-wedding’ and small-batch baking movement gained traction, especially during the global lockdowns of the early 2020s. Bakers realized that by using a 6-inch pan with high sides, they could create a cake that looked substantial and professional—perfect for photos and small families—without the waste or labor of a traditional 8-inch, three-layer cake. This recipe honors that modern history, combining the timeless appeal of chocolate cake with the contemporary aesthetic of the drip.
Why This Recipe Works
This recipe succeeds where others fail because it addresses the specific physics required for a tall, single-layer cake. Standard sponge recipes are often too airy; if you bake them in a deep pan, they tend to collapse in the center or dry out on the edges before the middle is cooked. This recipe utilizes a ‘reverse creaming’ or ‘mud cake’ method where fats and liquids are high, and the batter is quite fluid. This ensures that the heat penetrates the batter evenly, resulting in a flat top and a moist crumb from edge to center. We use a combination of oil and buttermilk. Oil remains liquid at room temperature, ensuring the cake stays soft for days, while buttermilk breaks down the gluten strands for a tender crumb and activates the baking soda for that crucial rise. The height is achieved by using a 6-inch by 3-inch (or 4-inch) cake pan. The smaller diameter forces the batter upward rather than outward, creating that dramatic vertical look. For the drip, the ratio of chocolate to cream is scientifically calibrated for a semi-sweet chocolate (typically 1:1 by weight). Many recipes fail because the ganache is too thin (running all the way to the plate) or too thick (looking like a solid hat). This recipe provides the exact temperature and consistency cues—waiting until the ganache is the consistency of heavy syrup—to ensure those beautiful, suspended drips that stop midway down the cake.
Why You’ll Love This Recipe
- ✓No stacking or leveling required: One pan, one tall cake.
- ✓Intense chocolate flavor enhanced by hot coffee.
- ✓Stays moist for up to 4 days due to the oil-based batter.
- ✓Foolproof ganache ratio for the perfect drip every time.
- ✓Visual stunning: Looks like a professional bakery creation.
- ✓Versatile base: Can be paired with peanut butter, berry, or caramel frostings.
Equipment You’ll Need
- ✓6-inch round cake pan (at least 3 inches deep)
- ✓Electric hand mixer or stand mixer
- ✓Large mixing bowls
- ✓Wire cooling rack
- ✓Small saucepan (for ganache)
- ✓Offset spatula
- ✓Cake turntable (optional but recommended)
- ✓Drip bottle or teaspoon
- ✓Parchment paper
Ingredients
- ✓1 cup All-purpose flour
- ✓1 cup Granulated sugar
- ✓1/2 cup Unsweetened cocoa powder (Dutch-processed preferred)
- ✓1 tsp Baking powder
- ✓1/2 tsp Baking soda
- ✓1/2 tsp Salt
- ✓1 large Egg, room temperature
- ✓1/2 cup Buttermilk, room temperature
- ✓1/4 cup Vegetable oil or Canola oil
- ✓1 tsp Vanilla extract
- ✓1/2 cup Hot brewed coffee (strong)
- ✓1 cup Unsalted butter, softened (for frosting)
- ✓3 cups Powdered sugar (for frosting)
- ✓2 tbsp Heavy cream (for frosting)
- ✓1/2 cup Semi-sweet chocolate chips (for drip)
- ✓1/2 cup Heavy cream (for drip)
Instructions
- 1. Preheat your oven to 350°F (175°C). Grease a 6-inch round cake pan deeply and line the bottom and sides with parchment paper. The side lining should extend 1 inch above the rim of the pan to support the rise.
- 2. In a large bowl, whisk together the flour, sugar, cocoa powder, baking powder, baking soda, and salt until well combined and no lumps remain.
- 3. Add the egg, buttermilk, oil, and vanilla extract to the dry ingredients. Beat on medium speed with a mixer for about 2 minutes. The batter will be thick at this stage.
- 4. Reduce the mixer speed to low and carefully pour in the hot coffee. Mix until just combined. The batter will be very liquid; this is normal.
- 5. Pour the batter into the prepared cake pan. Bake for 50-60 minutes, or until a wooden skewer inserted into the center comes out clean or with just a few moist crumbs.
- 6. Allow the cake to cool in the pan for 20 minutes. This is crucial as the cake is fragile when hot. Then, invert onto a wire rack to cool completely.
- 7. While the cake cools, make the frosting. Beat the softened butter on high speed for 5 minutes until pale and creamy. Gradually add powdered sugar, one cup at a time, beating well after each addition. Add vanilla and heavy cream, and whip for another 3 minutes until fluffy.
- 8. Once the cake is completely cool, trim any domed top if necessary to make it flat. Apply a generous layer of buttercream to the top and sides, smoothing it with an offset spatula. Place the frosted cake in the refrigerator for at least 30 minutes to chill. A cold cake is essential for a good drip.
- 9. Prepare the ganache drip. Place chocolate chips in a heatproof bowl. Heat the 1/2 cup heavy cream in a saucepan until it just begins to simmer (do not boil). Pour the hot cream over the chocolate. Let it sit for 5 minutes, then whisk gently until smooth and glossy.
- 10. Let the ganache cool until it is slightly thicker than heavy cream (about 85°F-90°F). Test a drip on the side of a glass bowl to check consistency.
- 11. Remove the cake from the fridge. Using a spoon or squeeze bottle, apply the drip around the top edge of the cake, letting it run down the sides. Fill in the center of the top with the remaining ganache and smooth carefully.
- 12. Garnish immediately with sprinkles, chocolate shards, or piped buttercream swirls before the ganache sets.
Expert Cooking Tips
- ✓Room temperature ingredients (egg, buttermilk) are mandatory to ensure the batter emulsifies properly without curdling.
- ✓Do not skip the parchment paper collar. Since this is a tall cake, the batter needs support as it climbs up the pan.
- ✓If your ganache is too thick, add a teaspoon of warm cream. If it’s too thin, let it sit at room temperature for another 5-10 minutes.
- ✓Chill your frosted cake before dripping. The cold buttercream shocks the warm ganache, stopping the drip midway down the cake for a controlled look.
- ✓Use Dutch-processed cocoa powder for a darker color and a smoother, less acidic chocolate flavor.
- ✓Tap the cake pan on the counter before baking to release any large air bubbles that could cause tunnels in the crumb.
- ✓If the top of the cake is browning too quickly but the center is still raw, tent a piece of foil loosely over the top for the last 15 minutes of baking.
Substitutions and Variations
This recipe is quite adaptable to various dietary needs. For a gluten-free version, substitute the all-purpose flour with a high-quality 1:1 gluten-free baking flour blend that contains xanthan gum; the texture will be slightly more fragile but delicious. If you need to avoid dairy in the cake, swap the buttermilk for a mix of soy milk and 1 teaspoon of vinegar (let it sit for 5 minutes to curdle), and ensure your cocoa powder is dairy-free. For the frosting and ganache, use plant-based butter sticks and full-fat coconut milk or a dairy-free heavy cream alternative. If you are sensitive to caffeine, decaf coffee works perfectly, or you can substitute the coffee with hot water or hot milk, though the chocolate flavor will be slightly less intense. Vegetable oil can be replaced with melted coconut oil or canola oil. For the sugar, standard granulated sugar is best for structure, but you can use caster sugar for a finer crumb.
Common Mistakes to Avoid
The most common mistake is rushing the cooling process. Because this is a tall, dense cake, it holds heat in the center for a long time. Frosting a warm cake will cause the buttercream to slide right off. Another frequent error is the temperature of the drip. If the ganache is too hot, it will melt the buttercream and run all the way to the plate, creating a puddle. If it is too cold, it will clump and look like candle wax. Always test the consistency on a glass or the back of a spoon before applying it to the cake. Overmixing the batter after adding the flour can lead to a tough, rubbery cake, so mix only until the flour disappears. Finally, opening the oven door too early can cause the cake to sink in the middle; try to resist checking until at least the 45-minute mark.
Serving Suggestions
This cake is rich and decadent, so it pairs beautifully with elements that cut through the sweetness. Serve slices with a dollop of unsweetened whipped cream or crème fraîche. Fresh berries, such as raspberries or strawberries, add a tart contrast that balances the heavy chocolate and sugar. For a warm beverage pairing, a dark roast espresso or a peppermint tea complements the chocolate notes perfectly. If you want to elevate the presentation for a party, serve each slice on a plate dusted with cocoa powder and a sprig of fresh mint. It also works wonderfully with a scoop of vanilla bean ice cream if served slightly warmed.
Storage and Reheating Tips
Store the fully decorated cake at room temperature in a cake keeper for up to 2 days; the buttercream seals the moisture inside. If your kitchen is very warm (above 75°F), store the cake in the refrigerator to prevent the frosting from melting, but bring it back to room temperature for 1-2 hours before serving for the best texture and flavor. Cold chocolate cake can feel dry and waxy, while room temperature cake is soft and fudgy. For longer storage, you can freeze individual slices wrapped tightly in plastic wrap and then foil for up to 2 months. Thaw unwrapped at room temperature. The un-frosted cake layer can be wrapped in plastic and frozen for up to 3 months.
Nutrition Facts (Estimated)
| Serving Size | 1 slice |
| Calories | 580 |
| Fat | 32g |
| Saturated Fat | 14g |
| Unsaturated Fat | 16g |
| Trans Fat | 0g |
| Cholesterol | 85mg |
| Sodium | 320mg |
| Carbohydrates | 68g |
| Fiber | 4g |
| Sugar | 45g |
| Protein | 6g |
Frequently Asked Questions
Can I bake this in an 8-inch pan instead?
Yes, but it will not be a ‘tall’ cake. It will be a standard single layer, about 1.5 to 2 inches tall. You will need to reduce the baking time to approximately 30-35 minutes as the batter is spread thinner.
Why did my cake sink in the middle?
Sinking is usually caused by opening the oven door too early, which drops the temperature, or by underbaking. It can also happen if there is too much leavening (baking soda/powder) or if the batter was overmixed.
Can I make the ganache with white chocolate?
Yes, but the ratio changes. White chocolate contains no cocoa solids, so you need less cream. Use a ratio of 3 parts white chocolate to 1 part cream (e.g., 1/2 cup chips to 2-3 tablespoons cream) to get the right dripping consistency.
Do I really need to use coffee?
You don’t *have* to, but it is highly recommended. The coffee enhances the chocolate flavor without making the cake taste like coffee. Hot water is an acceptable substitute if you absolutely cannot use coffee.
How do I get smooth sides on my buttercream?
Use a turntable and a metal bench scraper or large offset spatula. Dip the metal tool in hot water and wipe it dry before smoothing; the heat slightly melts the outer layer of fat, creating a glass-smooth finish.
Can I double this recipe?
Yes, doubling the recipe will yield enough batter for two 6-inch tall cakes (for a super tall double barrel cake) or two standard 8-inch layers. Bake time may need adjustment depending on your oven capacity.
Why is my ganache grainy?
Grainy ganache usually means the chocolate seized (got water in it) or the cream was too hot and separated the fats. Try whisking in a teaspoon of boiling water to bring it back together, or strain it through a sieve.
Can I use natural cocoa powder instead of Dutch-processed?
This recipe uses both baking powder and baking soda, so natural cocoa can work, but the flavor will be more acidic and the color lighter. Dutch-processed is preferred for that deep, Oreo-like color and mellow flavor.
Conclusion
This Tall Chocolate Drip Cake is more than just a dessert; it’s a testament to how simple techniques can yield spectacular results. By focusing on quality ingredients and mastering the art of the single-layer bake, you can create a centerpiece that rivals any high-end bakery. Whether you are celebrating a birthday, an anniversary, or just a Friday night craving for something decadent, this cake delivers on all fronts—taste, texture, and visual appeal. We hope this recipe becomes a staple in your baking repertoire. Don’t forget to snap a photo of your beautiful drips and share it with us on Pinterest and Instagram!