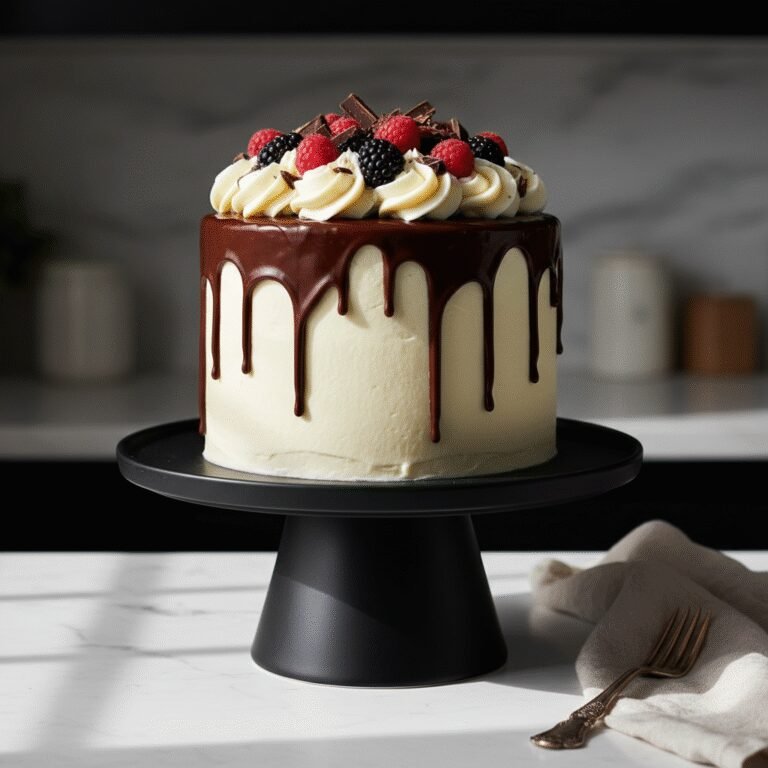
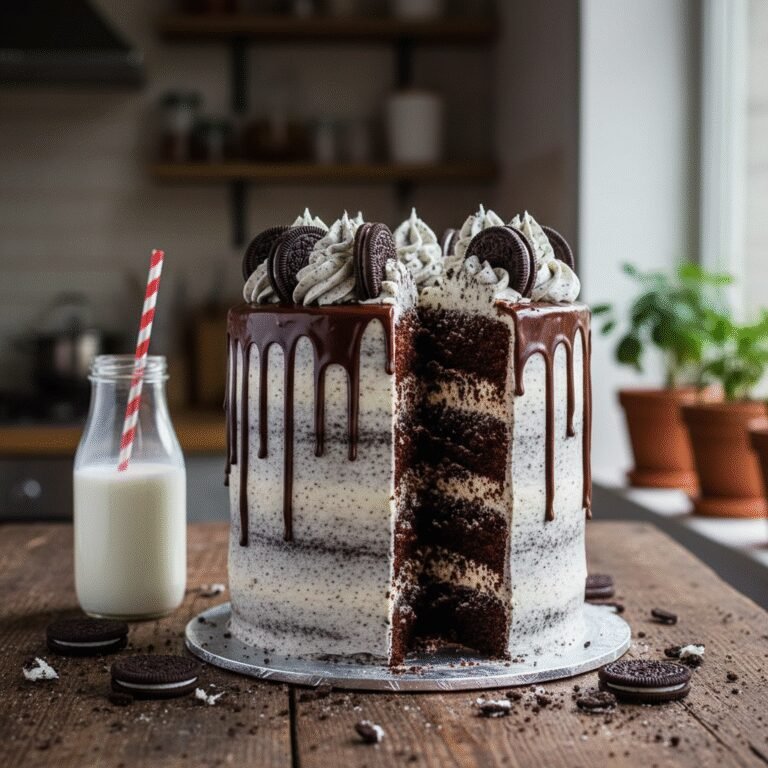
Ultimate Tall Chocolate Drip Cake: Four Layers of Decadence
Tall Chocolate Drip Cake Four Layer Cake Recipe
This show-stopping tall chocolate drip cake features four layers of moist, rich chocolate sponge, filled with silky buttercream and topped with a luxurious chocolate ganache drip. It is the perfect centerpiece for birthdays, weddings, or any celebration requiring a touch of dramatic elegance.
1 hour
45 minutes
4 hours (includes cooling)
16-20 servings
Dessert
Baking
American
Vegetarian
There is something undeniably magical about a tall, towering cake that commands attention the moment it enters a room. This Tall Chocolate Drip Cake is not just a dessert; it is an architectural marvel of confectionery delight. Comprising four impressive layers of deeply chocolatey, tender sponge, this recipe is designed for those who want to bake to impress. The beauty of this cake lies in the contrast between the structured, sharp edges of the buttercream and the organic, luscious flow of the chocolate ganache drip. While the visual appeal is undeniable, the flavor profile is where this cake truly shines. We use a combination of Dutch-processed cocoa powder and hot coffee in the batter to bloom the chocolate, ensuring an intense, complex flavor that is never overly sweet. The texture is moist and dense enough to support the height, yet light enough to melt in your mouth. The filling acts as the perfect glue, balancing the richness of the sponge with creamy sweetness. Whether you are a seasoned baker looking for your next challenge or a novice wanting to try your hand at the trendy drip cake style, this guide covers every detail. From stabilizing the layers to achieving that perfect drip consistency, we dive deep into the art of modern cake decorating. Prepare to create a masterpiece that tastes even better than it looks.
History & Origins
The concept of the layer cake has deep roots in Western baking traditions, evolving significantly from the dense, yeast-leavened breads of the past into the chemically leavened, fluffy sponges we adore today. The mid-19th century introduction of baking powder revolutionized cake making, allowing for the rise of the multi-layered American style cake. However, the specific ‘drip cake’ phenomenon is a much more modern invention, largely credited to the explosion of visual food culture on social media platforms like Instagram and Pinterest in the mid-2010s. Australian baker Katherine Sabbath is often hailed as the queen of the drip cake, popularizing the style of vibrant colors, towering heights, and that signature ganache drip cascading down the sides. This specific recipe marries the classic, nostalgic comfort of a traditional devil’s food cake with this contemporary aesthetic. Chocolate cake itself dates back to 1764 when Dr. James Baker discovered how to make chocolate by grinding cocoa beans between massive circular millstones. By the 1880s, American cooks began adding chocolate to cake batters, creating the first mahogany cakes. Over decades, as cocoa processing improved, cakes became darker and richer. This four-layer giant pays homage to that history while embracing the modern demand for height and visual drama, representing the perfect intersection of culinary history and modern art.
Why This Recipe Works
Achieving a four-layer cake that stands tall without leaning or collapsing requires a specific balance of structural integrity and moisture. This recipe works because it utilizes the ‘reverse creaming’ method or a high-liquid oil-based batter which inhibits gluten formation, resulting in a tender crumb that is still sturdy enough to be stacked. We use oil instead of butter in the sponge to ensure the cake stays moist even after refrigeration, which is crucial since tall cakes often need to be chilled during the decorating process to stabilize the buttercream. The addition of hot coffee is a critical chemical step; the heat blooms the cocoa powder, releasing flavor compounds that cold liquids cannot, providing a depth of chocolate flavor that is sophisticated rather than flat. Furthermore, the buttercream recipe provided has a high ratio of butter to sugar, creating a stiff enough consistency to act as ‘cement’ between the layers, preventing the dreaded ‘sliding’ effect. Finally, the ganache drip ratio is calculated precisely—typically a 1:1 ratio of heavy cream to chocolate—to ensure it flows smoothly but sets firm, avoiding drips that run all the way to the platter and look messy.
Why You’ll Love This Recipe
- ✓Impressive four-layer height for a dramatic presentation
- ✓Deep, intense chocolate flavor enhanced by hot coffee
- ✓Sturdy crumb structure that stacks perfectly without sliding
- ✓Foolproof ganache ratio for the perfect drip consistency
- ✓Versatile buttercream base that can be flavored or colored
- ✓Detailed assembly instructions for professional-looking edges
Equipment You’ll Need
- ✓Four 6-inch or 8-inch round cake pans
- ✓Stand mixer with paddle attachment
- ✓Large mixing bowls
- ✓Whisk
- ✓Digital kitchen scale
- ✓Offset spatula
- ✓Bench scraper or cake smoother
- ✓Turntable
- ✓Parchment paper
- ✓Cake boards
- ✓Squeeze bottle or spoon (for the drip)
Ingredients
- ✓3 cups All-purpose flour
- ✓2 1/2 cups Granulated sugar
- ✓1 cup Unsweetened Dutch-process cocoa powder
- ✓2 1/2 tsp Baking soda
- ✓1 tsp Baking powder
- ✓1 tsp Salt
- ✓3 Large eggs, room temperature
- ✓1 1/2 cups Buttermilk, room temperature
- ✓1 cup Strong hot coffee
- ✓3/4 cup Vegetable oil
- ✓2 tsp Pure vanilla extract
- ✓2 cups Unsalted butter, softened (for frosting)
- ✓6-7 cups Powdered sugar (for frosting)
- ✓1/4 cup Heavy cream (for frosting)
- ✓1/2 cup Semi-sweet chocolate chips (for drip)
- ✓1/2 cup Heavy cream (for drip)
Instructions
- Preheat your oven to 350°F (175°C). Grease four 6-inch or 8-inch round cake pans with butter and dust with cocoa powder. Line the bottoms with parchment paper rounds.
- In the bowl of a stand mixer, sift together the flour, sugar, cocoa powder, baking soda, baking powder, and salt. Mix on low speed for 30 seconds to combine.
- In a separate large bowl, whisk together the eggs, buttermilk, vegetable oil, and vanilla extract until fully combined.
- With the mixer on low speed, slowly pour the wet ingredients into the dry ingredients. Mix until just combined, scraping down the sides of the bowl as needed.
- With the mixer running on low, carefully pour in the hot coffee in a steady stream. The batter will be very thin and liquid; this is normal. Mix only until combined to avoid overworking the gluten.
- Divide the batter evenly among the four prepared cake pans. Using a kitchen scale ensures perfectly even layers.
- Bake for 35-40 minutes, or until a toothpick inserted into the center comes out clean or with just a few moist crumbs. Rotate pans halfway through baking if your oven has hot spots.
- Remove cakes from the oven and let them cool in the pans for 15 minutes. Then, turn them out onto a wire rack to cool completely. Wrap in plastic wrap and chill in the fridge for 30 minutes to make stacking easier.
- While cakes chill, make the frosting. Beat the softened butter on medium-high speed for 5 minutes until pale and creamy. Gradually add powdered sugar, one cup at a time, mixing on low. Add heavy cream and vanilla, then whip on high for 3-5 minutes until fluffy.
- To assemble, place a dab of frosting on a cake board. Place the first cake layer down. Spread an even layer of frosting on top. Repeat with the remaining layers. Insert a center dowel if traveling with the cake.
- Apply a thin layer of frosting all over the cake (crumb coat) to trap crumbs. Chill for 20 minutes.
- Apply the final thick layer of frosting. Use a bench scraper to smooth the sides and create sharp edges. Chill the cake again for at least 30 minutes so the buttercream is firm.
- Prepare the drip: Heat 1/2 cup heavy cream until simmering (do not boil). Pour over chocolate chips in a heat-proof bowl. Let sit for 5 minutes, then stir gently until smooth and glossy. Let it cool until it is slightly thickened but still pourable.
- Using a squeeze bottle or spoon, carefully drip the ganache over the edges of the chilled cake, allowing it to run down the sides. Fill in the center of the top with the remaining ganache and smooth with an offset spatula.
- Garnish with extra piped buttercream, sprinkles, or chocolates before the ganache sets completely.
Expert Cooking Tips
- ✓Ensure all refrigerated ingredients (eggs, buttermilk) are at room temperature to create a smooth emulsion.
- ✓Do not skip the crumb coat; it is essential for a professional, clean finish without cake crumbs marring the frosting.
- ✓Chill the cake thoroughly before applying the drip; if the cake is warm, the drip will run all the way to the bottom.
- ✓Test your drip consistency on a chilled glass or the side of a bowl before applying it to the cake.
- ✓Weigh your batter into the pans to ensure perfectly even layers that cook at the same rate.
- ✓Use Dutch-process cocoa for a darker color and smoother, less acidic chocolate flavor.
Substitutions and Variations
If you do not have buttermilk, you can make a quick substitute by adding one tablespoon of white vinegar or lemon juice to a cup of whole milk and letting it sit for 5 minutes. For a gluten-free version, substitute the all-purpose flour with a high-quality 1:1 gluten-free flour blend that includes xanthan gum. If you prefer a less sweet frosting, try a Swiss Meringue Buttercream instead of the American Buttercream listed here; it is silkier and holds up well for stacking. Coffee enhances chocolate flavor without making the cake taste like coffee, but if you must avoid it, substitute with hot water or hot decaf coffee. Vegetable oil can be swapped for melted coconut oil or canola oil. For the drip, dark chocolate can be used for a richer, less sweet contrast, or white chocolate (adjusting the cream ratio to less cream) for a colored drip effect.
Common Mistakes to Avoid
The most common mistake with tall cakes is rushing the assembly. If the cake layers are even slightly warm, the buttercream will melt, causing the layers to slide and the cake to lean. Always cool cakes completely, preferably chilling them. Another issue is over-mixing the batter after adding the flour; this develops gluten and leads to a tough, bread-like texture rather than a tender crumb. When applying the drip, if the ganache is too hot, it will melt the buttercream and look messy. If it is too cold, it will clump and won’t drip naturally. Patience is key. Finally, failing to level the cakes (cutting off the domed tops) will result in a crooked tower that is structurally unsound.
Serving Suggestions
Serve this majestic cake in thin, tall slices. Because it is four layers high, a standard wedge can be quite large; consider cutting the cake grid-style or cutting a slice in half horizontally for smaller portions. It pairs beautifully with a scoop of vanilla bean ice cream to cut through the richness, or a side of fresh raspberries or strawberries to add a tart contrast. A glass of cold milk or a hot espresso is the perfect beverage accompaniment. For a party, present the cake on a pedestal stand to heighten the drama before slicing.
Storage and Reheating Tips
Store the frosted cake at room temperature in a cake keeper for up to 2 days if the climate is cool. If the weather is hot, or for longer storage, keep it in the refrigerator for up to 5 days. The cut section should be covered with plastic wrap or extra frosting to prevent the sponge from drying out. Allow the cake to come to room temperature for at least an hour before serving for the best texture and flavor. Unfrosted cake layers can be wrapped tightly in plastic wrap and frozen for up to 3 months; thaw in the fridge overnight before assembling.
Nutrition Facts (Estimated)
| Serving Size | 1 slice |
| Calories | 650 |
| Fat | 35g |
| Saturated Fat | 18g |
| Unsaturated Fat | 15g |
| Trans Fat | 0.5g |
| Cholesterol | 85mg |
| Sodium | 320mg |
| Carbohydrates | 80g |
| Fiber | 4g |
| Sugar | 45g |
| Protein | 8g |
Frequently Asked Questions
Can I make this cake in advance?
Yes, absolutely. The cake layers can be baked, cooled, wrapped, and frozen weeks in advance. The assembled cake can also be stored in the fridge for 2 days before serving. Just add the drip on the day of serving for the best shine.
Why did my drip run all the way to the bottom?
This usually happens if the ganache is too hot or too thin, or if the cake wasn’t chilled enough. Ensure your cake is cold and your ganache has cooled to a consistency similar to honey before applying.
Do I need dowels for this cake?
For a 4-layer 6-inch cake, you can often get away without dowels if you are not transporting it. However, for an 8-inch cake or if you plan to drive with it, inserting a central wooden dowel or using bubble tea straws as supports is highly recommended for stability.
Can I use 9-inch pans instead?
Yes, but you will likely get only 3 layers instead of 4, or the layers will be much thinner. You will need to reduce the baking time slightly, checking around the 25-30 minute mark.
My frosting is too soft, what do I do?
If your kitchen is warm, put the frosting bowl in the fridge for 10-15 minutes, then rewhip. You can also add a bit more powdered sugar to stiffen it up.
How do I get smooth sides on the cake?
A metal bench scraper and a turntable are essential. Apply more frosting than you think you need, then hold the scraper stationary while rotating the turntable to scrape off the excess and smooth the surface. Dip the scraper in hot water and wipe dry for a final super-smooth pass.
Can I use milk chocolate for the drip?
Yes, but milk chocolate contains more sugar and milk solids, so it is softer. You will need to reduce the amount of heavy cream slightly to achieve the same drip consistency.
Why is my cake dry?
Overbaking is the main culprit. Watch the oven closely. Also, measuring flour by scooping the cup into the bag can pack it down, leading to too much flour. Use a scale or the spoon-and-level method.
Conclusion
Creating this Tall Chocolate Drip Cake is a labor of love that rewards you with gasps of delight and satisfied silence as your guests take their first bite. It is a project that builds confidence in the kitchen, teaching you valuable skills in structure, temperature control, and aesthetics. While it may seem intimidating at first glance, breaking it down into manageable steps makes it entirely achievable. The result is a bakery-quality dessert right from your home kitchen—a decadent, towering tribute to chocolate that makes any occasion feel special. So preheat that oven, brew some strong coffee, and get ready to bake the ultimate chocolate cake.