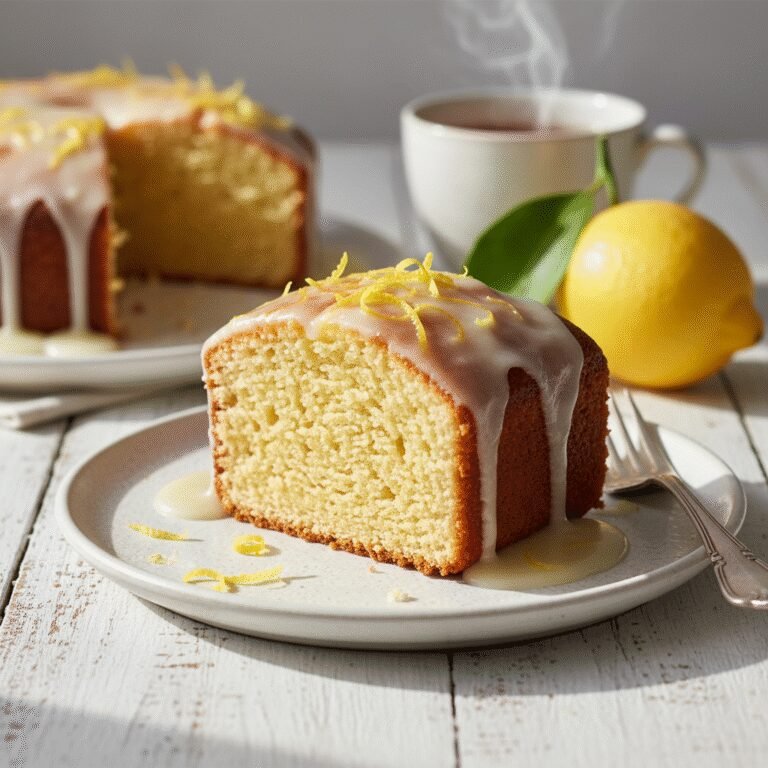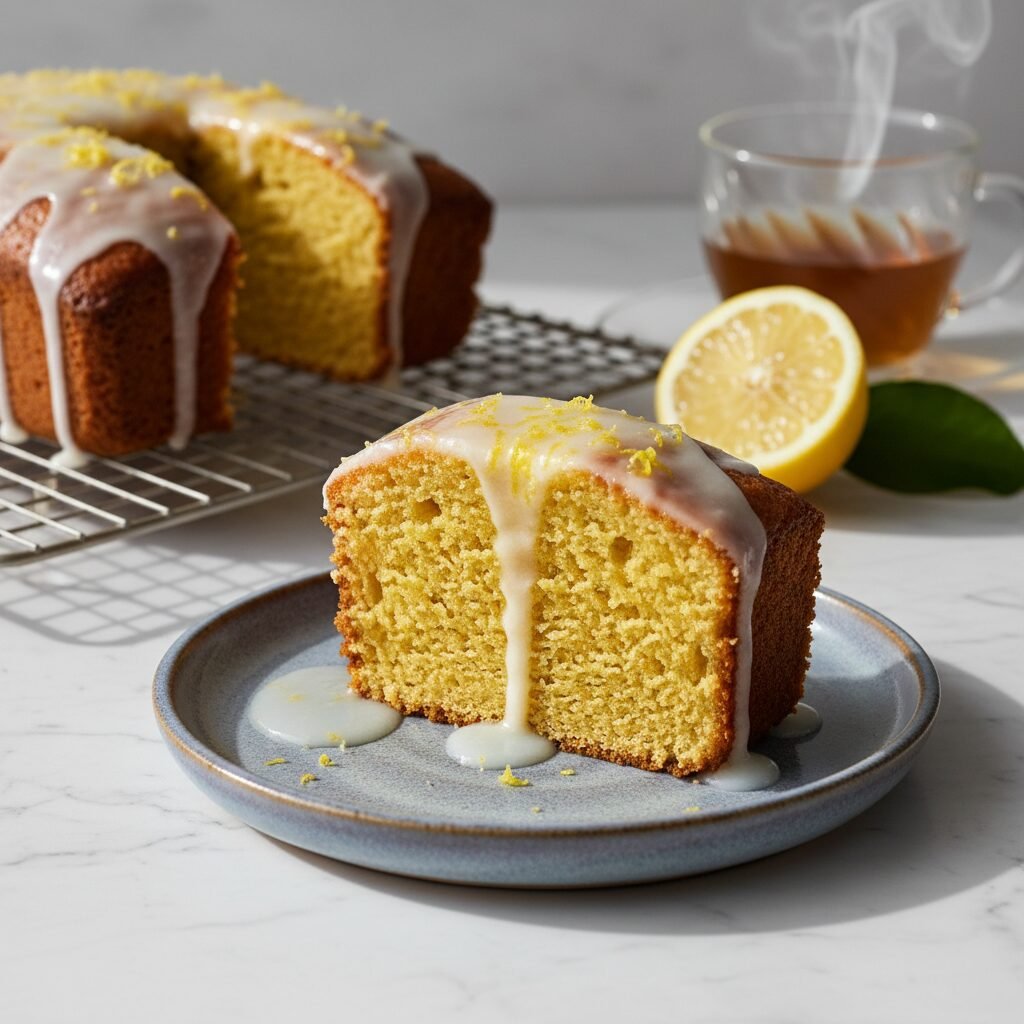
The Ultimate Moist Keto Lemon Pound Cake With Stevia
Moist Keto Lemon Pound Cake With Stevia Recipe
Discover the perfect balance of zesty citrus and buttery richness with this Moist Keto Lemon Pound Cake. Sweetened with Stevia and baked to golden perfection, it is the ultimate low-carb treat that pairs wonderfully with your morning coffee or afternoon tea.
15 minutes
45 minutes
1 hour 15 minutes
10 slices
Dessert
Baking
American
Keto
If there is one dessert that truly bridges the gap between nostalgic comfort food and a modern low-carb lifestyle, it is the classic pound cake. For many of us on a ketogenic journey, the hardest hurdles are not the savory meals, but the tender, crumbly textures of baked goods we grew up loving. This Moist Keto Lemon Pound Cake with Stevia is my love letter to those missing the dense, velvety crumb of a traditional Starbucks lemon loaf but wanting to stay strictly within their macros. Unlike many keto desserts that suffer from being overly dry or having a distinct ‘cooling’ aftertaste from excessive sugar alcohols, this recipe utilizes the natural sweetness of Stevia combined with high-fat dairy to create a texture that is indistinguishable from its wheat-based counterpart. The secret lies in the hydration; almond flour can be thirsty, and coconut flour even more so. By incorporating full-fat sour cream and real butter, we ensure that every slice remains incredibly moist for days. The bright, acidic punch of fresh lemon juice and zest cuts through the richness of the almond flour, providing a refreshing palate cleanser that feels decadent yet light. Whether you are hosting a brunch, looking for a meal-prep friendly breakfast, or simply craving a slice of sunshine on a rainy day, this pound cake delivers on all fronts. It is a testament to the fact that healthy eating does not require sacrificing flavor or texture.
History & Origins
The pound cake is a dessert with a lineage as rich as its flavor profile. Its origins can be traced back to Northern Europe in the early 1700s. The name ‘pound cake’ was quite literal; the original recipes called for a pound each of four ingredients: flour, butter, eggs, and sugar. This simple 1:1:1:1 ratio made it easy for bakers to remember the recipe in an era before standardized measuring cups and spoons were commonplace. As the recipe migrated to America and evolved through the 19th and 20th centuries, leavening agents like baking powder and baking soda were introduced, allowing for a lighter, airier crumb compared to the dense, brick-like consistency of the original loaves. Variations began to emerge, incorporating sour cream, milk, and various flavorings like vanilla, almond, and citrus. In the context of the ketogenic diet, the pound cake represents a unique culinary challenge. The traditional reliance on wheat flour for structure and sugar for moisture and tenderness means that keto bakers must reinvent the wheel. The rise of grain-free baking in the early 21st century, driven by the popularity of Atkins, Paleo, and Keto diets, saw the introduction of almond and coconut flours as staples. Stevia, a natural sweetener derived from the Stevia rebaudiana plant, became a crucial tool in this evolution, offering sweetness without the glycemic spike. This recipe honors the history of the traditional pound cake by maintaining its dense, satisfying texture while adapting the ingredients for the modern, health-conscious era.
Why This Recipe Works
This recipe succeeds where many other low-carb cakes fail due to a precise understanding of keto baking chemistry. First, the combination of almond flour and coconut flour is critical. Almond flour provides the bulk and a rich, nutty fat content that mimics the tenderness of cake flour, while a small amount of coconut flour acts as a desiccant, absorbing excess moisture and providing structure so the cake doesn’t collapse. Without the gluten found in wheat flour, keto cakes rely on eggs and protein structures to hold their shape; this recipe uses four large eggs to ensure a stable lift. Furthermore, the inclusion of sour cream is a game-changer. The acidity in the sour cream not only tenderizes the protein strands in the eggs and flour but also reacts with the baking powder to create a better rise. It adds a necessary fat content that keeps the crumb moist, counteracting the drying nature of coconut flour. Finally, sweetening with Stevia can be tricky due to its potential for a bitter aftertaste. By using a high-quality Stevia baking blend and balancing it with the strong, aromatic oils from the lemon zest and the acidity of the lemon juice, any metallic notes from the sweetener are completely masked, leaving only a pure, sweet citrus flavor.
Why You’ll Love This Recipe
- ✓Only 3g net carbs per slice
- ✓Incredibly moist texture thanks to sour cream
- ✓Sugar-free and sweetened naturally with Stevia
- ✓Bursting with fresh lemon zest and juice
- ✓Freezes beautifully for meal prep
- ✓Gluten-free and grain-free
Equipment You’ll Need
- ✓8×4 inch Loaf Pan
- ✓Large Mixing Bowl
- ✓Medium Mixing Bowl
- ✓Electric Hand Mixer or Stand Mixer
- ✓Rubber Spatula
- ✓Microplane or Zester
- ✓Measuring Cups and Spoons
- ✓Parchment Paper
- ✓Wire Cooling Rack
Ingredients
- ✓2 cups Super Fine Almond Flour
- ✓1/4 cup Coconut Flour
- ✓1 cup Granulated Stevia Baking Blend (measures like sugar)
- ✓1 tbsp Baking Powder
- ✓1/2 tsp Sea Salt
- ✓1/2 cup Unsalted Butter, softened to room temperature
- ✓4 large Eggs, room temperature
- ✓1/3 cup Full-Fat Sour Cream, room temperature
- ✓1/4 cup Fresh Lemon Juice
- ✓2 tbsp Fresh Lemon Zest (approx. 2 lemons)
- ✓1 tsp Vanilla Extract
- ✓Optional Glaze: 1/2 cup Powdered Stevia, 2 tbsp Heavy Cream, 1 tbsp Lemon Juice
Instructions
- Preheat your oven to 350°F (175°C). Line an 8×4 inch loaf pan with parchment paper, leaving an overhang on the sides for easy removal, and lightly grease the paper.
- In a medium bowl, whisk together the almond flour, coconut flour, baking powder, and salt until well combined and free of lumps. Set aside.
- In a large mixing bowl or the bowl of a stand mixer, cream the softened butter and granulated Stevia sweetener together on medium-high speed for about 2-3 minutes until the mixture is pale and fluffy.
- Add the eggs one at a time, beating well after each addition to ensure they are fully incorporated. Scrape down the sides of the bowl as needed.
- Mix in the sour cream, fresh lemon juice, lemon zest, and vanilla extract. The batter may look slightly curdled at this point due to the acidity of the lemon juice reacting with the dairy; this is normal.
- Reduce the mixer speed to low and slowly add the dry ingredient mixture to the wet ingredients. Mix only until just combined. Do not overmix, as this can make the cake dense.
- Pour the batter into the prepared loaf pan and smooth the top with a rubber spatula. Tap the pan gently on the counter to release any trapped air bubbles.
- Bake in the preheated oven for 40-50 minutes. Check the cake at the 40-minute mark. If the top is browning too quickly, tent it loosely with aluminum foil.
- The cake is done when a toothpick inserted into the center comes out clean or with just a few moist crumbs attached.
- Remove from the oven and let the cake cool in the pan for at least 20 minutes. This is crucial as keto cakes are fragile when hot.
- Lift the cake out of the pan using the parchment paper handles and transfer it to a wire rack to cool completely before slicing or glazing.
- If using the glaze, whisk together the powdered Stevia, heavy cream, and lemon juice until smooth. Drizzle over the completely cooled cake.
Expert Cooking Tips
- ✓Ensure all dairy ingredients and eggs are at room temperature before starting. This prevents the butter from seizing and ensures a smooth emulsion.
- ✓Sift your almond flour if it looks lumpy. Clumps of almond flour can create dry pockets in the finished cake.
- ✓Do not skip the cooling time. Almond flour cakes need time to set their structure as they cool; slicing too early will result in a crumbly mess.
- ✓For extra lemon flavor, rub the lemon zest into the granulated Stevia with your fingers before creaming it with the butter. This releases the essential oils.
- ✓If you don’t have sour cream, full-fat Greek yogurt is an excellent 1:1 substitute.
Substitutions and Variations
Keto baking is flexible but precise. If you need to substitute ingredients, here are the best options. For the sweetener, if you prefer not to use Stevia or find it has an aftertaste, you can substitute it with a Monk Fruit and Erythritol blend or pure Erythritol. Keep in mind that Erythritol can have a cooling effect, so a blend is usually best. If you are dairy-free, you can replace the butter with coconut oil (solid state) or a vegan butter alternative. The sour cream can be replaced with a dairy-free coconut yogurt or thick coconut cream, though this may impart a slight coconut flavor. Regarding flours, do not try to substitute the almond flour with coconut flour at a 1:1 ratio; coconut flour is extremely absorbent and will dry out the cake. If you have a nut allergy, sunflower seed flour is the closest 1:1 substitute for almond flour, though it may turn green when reacting with baking powder (a harmless chemical reaction). To prevent this, use a baking powder that is aluminum-free and add a splash of acid like apple cider vinegar.
Common Mistakes to Avoid
The most common mistake with this recipe is using cold ingredients. When cold eggs or sour cream hit the creamed butter, the butter hardens instantly, breaking the emulsion and leading to a greasy or heavy cake. Another frequent error is over-measuring the flour. If you scoop the measuring cup directly into the bag of almond flour, you pack it down and end up with too much. Instead, spoon the flour into the cup and level it off. Underbaking is also a risk; keto cakes often look done on the outside while being wet in the middle. Always use the toothpick test. Conversely, overbaking will dry out the almond flour significantly. Check the oven 5-10 minutes before the timer goes off. Finally, do not use liquid Stevia drops as a direct replacement for the granulated sweetener without adjusting the dry ingredients, as the bulk of the granulated sweetener is necessary for the cake’s volume.
Serving Suggestions
This lemon pound cake is versatile and elegant. Serve a slice slightly warmed with a dollop of sugar-free whipped cream and a few fresh raspberries or blueberries on the side for a beautiful contrast in color and tartness. It pairs exceptionally well with a hot cup of Earl Grey tea, as the bergamot notes complement the lemon perfectly. For a summery dessert, grill a slice briefly to caramelize the edges and serve it with a scoop of keto vanilla ice cream. It also makes a fantastic breakfast on the go; simply wrap a slice in parchment paper. If you want to dress it up for a party, garnish the glazed top with thin twists of lemon peel and edible flowers.
Storage and Reheating Tips
Because this cake contains no preservatives and has a high moisture content, proper storage is key. Store the cake in an airtight container at room temperature for up to 3 days. If you live in a hot or humid climate, it is safer to store it in the refrigerator, where it will last for up to a week. Note that the butter in the cake will harden in the fridge, making the texture denser. Allow the slice to come to room temperature or zap it in the microwave for 10 seconds before eating to restore the soft crumb. For long-term storage, this cake freezes beautifully. Slice the cake, wrap each slice individually in plastic wrap, and then place them in a freezer-safe bag. They can be frozen for up to 3 months. Thaw on the counter for 30 minutes before enjoying.
Nutrition Facts (Estimated)
| Serving Size | 1 slice |
| Calories | 245 |
| Fat | 21g |
| Saturated Fat | 8g |
| Unsaturated Fat | 11g |
| Trans Fat | 0g |
| Cholesterol | 85mg |
| Sodium | 180mg |
| Carbohydrates | 6g |
| Fiber | 3g |
| Sugar | 1g |
| Protein | 7g |
Frequently Asked Questions
Can I use liquid Stevia instead of granulated?
It is not recommended to simply swap them. Granulated sweetener provides bulk and volume to the batter. If you use liquid, you would need to add more almond flour or another bulking agent to compensate, which changes the recipe chemistry.
Why did my cake fall in the center?
This usually happens if the cake was underbaked or if the oven door was opened too early, causing a sudden temperature drop. It can also occur if too much baking powder was used.
Can I bake this in a bundt pan?
Yes, but you may need to double the recipe depending on the size of your bundt pan. Be sure to grease the pan very well with butter and almond flour to prevent sticking, as keto cakes are more prone to sticking.
Is this cake safe for diabetics?
Generally, yes. It uses low-glycemic ingredients like almond flour and Stevia. However, everyone’s blood sugar response is different, so it is always best to check your levels if you are unsure.
Why does my cake taste bitter?
Bitterness usually comes from the brand of Stevia used or using too much of it. Pure Stevia is incredibly potent. Using a ‘baking blend’ helps mitigate this, as does the lemon juice.
Can I make this recipe dairy-free?
Yes, substitute butter with coconut oil or vegan butter, and sour cream with coconut cream or dairy-free yogurt. The texture might be slightly different but still delicious.
What is the best brand of almond flour to use?
Look for ‘super fine’ blanched almond flour. Avoid almond meal, which contains the skins and is coarser, resulting in a gritty, heavy cake.
How do I know when it is completely cool?
Feel the bottom of the loaf pan. If it is still warm to the touch, the center of the cake is likely still warm. Wait until the entire pan is cool before removing.
Conclusion
Baking on a ketogenic diet doesn’t have to mean settling for second best. This Moist Keto Lemon Pound Cake with Stevia proves that you can have your cake and eat it too—literally. With its bright, sunny flavor and satisfyingly dense texture, it is sure to become a staple in your low-carb recipe rotation. Whether you are a seasoned keto veteran or just looking to reduce your sugar intake, this loaf offers a comforting, delicious experience without the guilt. Don’t forget to share your results on Pinterest and tag us; we love seeing your beautiful creations! Happy baking!