The Ultimate Moist Keto Cheesecake With Stevia: A Low-Carb Masterpiece
Moist Keto Cheesecake With Stevia Recipe
Discover the holy grail of low-carb desserts with this ultra-creamy, dense, and rich Keto Cheesecake sweetened exclusively with Stevia. Featuring a buttery almond flour crust and a velvety vanilla filling, this recipe delivers all the decadence of a New York-style classic without the sugar crash.
20 minutes
1 hour 15 minutes
8 hours (includes cooling)
12 servings
Dessert
Baking
American
Gluten-Free
If there is one dessert that reigns supreme in the world of comfort food, it is undoubtedly cheesecake. Its dense, creamy texture and rich flavor profile have made it a favorite across generations. However, for those embarking on a ketogenic or low-carb lifestyle, the traditional cheesecake—loaded with refined sugar and a gluten-heavy graham cracker crust—is strictly off-limits. This creates a significant void, as the craving for that specific, velvety mouthfeel is hard to replicate with sugar-free alternatives. Enter the Moist Keto Cheesecake with Stevia, a recipe meticulously designed to bridge the gap between dietary discipline and pure indulgence. Unlike many keto desserts that suffer from a gritty texture or a cooling aftertaste often associated with sugar alcohols, this recipe leverages the clean sweetness of high-quality Stevia to complement the tang of the cream cheese. We have stripped away the carbohydrates but kept the soul of the dessert intact. The crust is a nutty, buttery base made from superfine almond flour that crumbles perfectly under the fork, mimicking the traditional texture we all know and love. The filling is a triumph of kitchen chemistry—rich, smooth, and incredibly moist, thanks to the addition of sour cream and a precise baking method. Whether you are hosting a dinner party for non-keto guests or simply treating yourself after a week of clean eating, this cheesecake promises to satisfy the most discerning sweet tooth. It is not just ‘good for keto’; it is simply a delicious cheesecake, period. Prepare to be amazed by how a few simple ingredient swaps can result in a dessert that rivals the best bakeries in New York.
History & Origins
The history of cheesecake is a culinary journey that spans thousands of years, long before it became a staple of New York delis. Its origins can be traced back to ancient Greece, specifically on the island of Samos. Anthropologists have found cheese molds dating back to 2000 B.C., but the first recorded reference to a cheesecake-like dish was served to athletes during the first Olympic Games in 776 B.C. to provide them with energy. The Romans later adopted the recipe after conquering Greece, modifying it with crushed cheese and eggs, and spreading it across their empire to Great Britain and Western Europe. However, the modern cheesecake as we know it today was born out of an accidental discovery in the United States. In 1872, a New York dairyman named William Lawrence was attempting to replicate the French cheese Neufchâtel. Instead, he stumbled upon a process that resulted in an unripened cheese that was richer and creamier—what we now call cream cheese. This invention revolutionized the dessert, leading to the iconic New York Style cheesecake in the early 20th century. The transition of cheesecake into the low-carb and ketogenic sphere is a much more recent phenomenon, rising in popularity alongside the Atkins diet in the early 2000s and exploding with the current Keto movement. Innovative home cooks began experimenting with almond and coconut flours to replace the wheat crust and swapping sugar for natural sweeteners like Stevia and Erythritol. This recipe represents the culmination of that evolution, honoring the ancient tradition of a cheese-based cake while adapting it for modern metabolic health.
Why This Recipe Works
This recipe succeeds where many other low-carb cheesecakes fail due to three critical factors: the fat-to-protein ratio, the baking environment, and the sweetener integration. First, the foundation of a moist cheesecake lies in the fat content. By using full-fat cream cheese and incorporating full-fat sour cream, we introduce necessary lipids that prevent the cake from becoming rubbery—a common issue when using Stevia, which lacks the bulking properties of sugar. The sour cream also introduces an acidic tang that cuts through the richness, balancing the flavor profile. Second, the almond flour crust works exceptionally well because almonds have a high oil content. When baked with butter, they toast beautifully, creating a sturdy base that doesn’t get soggy, mimicking the crunch of graham crackers without the carbs. Third, and perhaps most importantly, is the use of a water bath (bain-marie) and the cooling method. Stevia-sweetened batters can be more sensitive to heat. The water bath ensures gentle, even cooking, preventing the edges from overcooking before the center sets. Furthermore, allowing the cheesecake to cool gradually in the oven with the door cracked prevents the sudden temperature drop that causes surface cracks. This scientific approach ensures a texture that is indistinguishable from a sugar-laden version.
Why You’ll Love This Recipe
- ✓100% Sugar-Free and Keto-Friendly
- ✓Authentic New York Style Texture
- ✓Gluten-Free Almond Flour Crust
- ✓No Chemical Aftertaste
- ✓High in Healthy Fats
- ✓Perfect for Make-Ahead Meal Prep
Equipment You’ll Need
- ✓9-inch Springform Pan
- ✓Large Roasting Pan (for water bath)
- ✓Electric Hand Mixer or Stand Mixer
- ✓Rubber Spatula
- ✓Aluminum Foil (heavy duty)
- ✓Mixing Bowls
- ✓Measuring Cups and Spoons
Ingredients
- ✓2 cups Superfine Almond Flour (for crust)
- ✓1/3 cup Unsalted Butter, melted (for crust)
- ✓3 tbsp Powdered Stevia or Sweetener Blend (for crust)
- ✓1 tsp Vanilla Extract (for crust)
- ✓32 oz Full-Fat Cream Cheese, softened to room temperature
- ✓1 cup Full-Fat Sour Cream, room temperature
- ✓1 cup Powdered Stevia or Monk Fruit/Stevia Blend
- ✓1 tbsp Vanilla Extract
- ✓3 Large Eggs, room temperature
- ✓1 Large Egg Yolk, room temperature
- ✓1 tsp Lemon Zest (optional)
Instructions
- Preheat your oven to 325°F (163°C). Grease the bottom and sides of a 9-inch springform pan with butter or non-stick spray.
- In a medium bowl, combine the almond flour, melted butter, 3 tablespoons of sweetener, and 1 teaspoon of vanilla extract. Mix until the texture resembles wet sand.
- Press the crust mixture firmly into the bottom of the prepared springform pan, ensuring an even layer. Bake for 10 minutes until slightly golden. Remove and let cool while you prepare the filling.
- Reduce oven temperature to 300°F (150°C). This lower temperature helps prevent cracks.
- In a large mixing bowl, beat the softened cream cheese with the powdered Stevia until smooth and creamy. Do not overbeat; keep the mixer on low-medium speed.
- Add the sour cream, vanilla extract, and lemon zest (if using). Mix until fully incorporated.
- Add the eggs and the extra yolk one at a time, mixing gently after each addition just until the yolk disappears. Avoid over-mixing at this stage to prevent incorporating too much air, which causes cracks.
- Prepare the water bath: Wrap the bottom and sides of the springform pan with 2-3 layers of heavy-duty aluminum foil to ensure no water seeps in.
- Pour the cheesecake batter over the cooled crust and smooth the top with a spatula.
- Place the springform pan inside a large roasting pan. Pour boiling water into the roasting pan until it reaches about halfway up the sides of the springform pan.
- Bake in the center of the oven for 60-75 minutes. The cheesecake is done when the edges are set but the center still jiggles slightly like Jell-O.
- Turn off the oven and crack the door open slightly (you can use a wooden spoon to hold it ajar). Let the cheesecake cool inside the oven for 1 hour. This slow cooling is crucial.
- Remove from the oven and water bath. Run a thin knife around the edge to release it from the pan. Let it cool completely to room temperature.
- Cover with plastic wrap and refrigerate for at least 6 hours, preferably overnight, to allow the flavor and texture to fully set.
Expert Cooking Tips
- ✓Room temperature ingredients are non-negotiable; cold ingredients cause lumpy batter.
- ✓Use powdered Stevia rather than granular to avoid a gritty texture in the final product.
- ✓Do not skip the water bath; it regulates the heat and keeps the cheesecake moist.
- ✓Avoid opening the oven door during the first hour of baking to prevent temperature fluctuations.
- ✓If the top browns too quickly, tent it loosely with foil halfway through baking.
- ✓Tap the bowl of batter on the counter a few times before pouring to release trapped air bubbles.
Substitutions and Variations
Flexibility is key in keto baking, and there are several substitutions you can make if you don’t have all the ingredients on hand. For the crust, if you have a nut allergy, you can use sunflower seed flour or a crushed keto-friendly cookie base instead of almond flour. Pecan flour also makes a delicious, rich alternative. Regarding the sweetener, while this recipe calls for Stevia, a Monk Fruit and Erythritol blend often yields a taste closer to sugar with less cooling effect. If you use pure liquid Stevia, be very careful with measurements as it is highly concentrated. For the dairy, if you don’t have sour cream, full-fat Greek yogurt is an excellent substitute that provides a similar tang and texture. Ensure all dairy is full-fat; low-fat versions contain fillers and higher carb counts that will affect the set of the cheesecake.
Common Mistakes to Avoid
The most common mistake when making keto cheesecake is overbeating the batter once the eggs are added. Overbeating incorporates excess air, which expands in the oven and causes the cheesecake to rise rapidly and then collapse, leading to unsightly cracks. Another frequent error is rushing the cooling process. Moving a hot cheesecake directly to the fridge will almost certainly cause it to crack due to thermal shock; patience with the oven-cooling method is essential. Finally, failing to wrap the springform pan securely with foil can lead to a soggy crust if water from the bain-marie seeps in. Always use heavy-duty foil and consider using a slow cooker liner bag around the pan for extra insurance.
Serving Suggestions
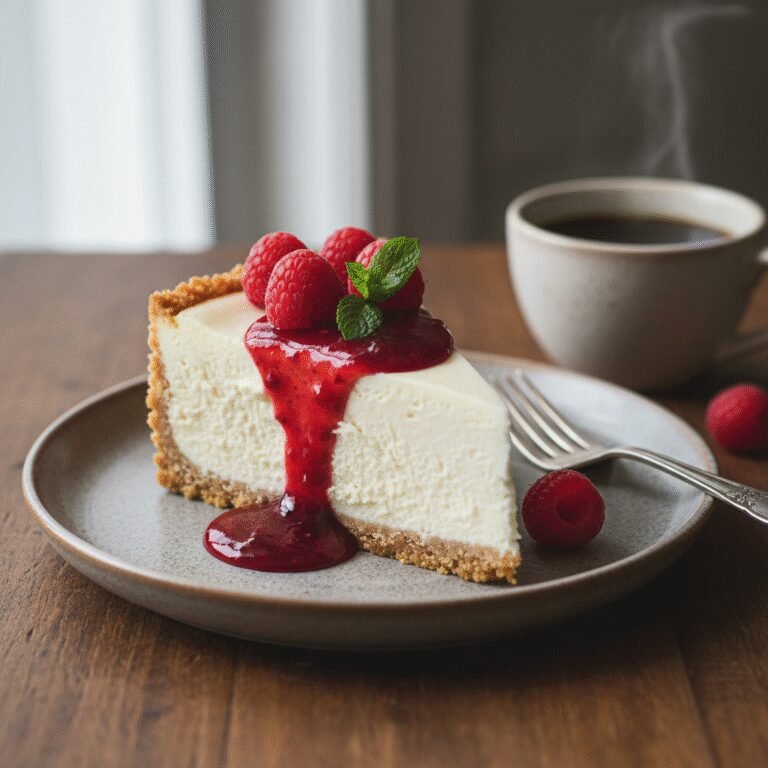
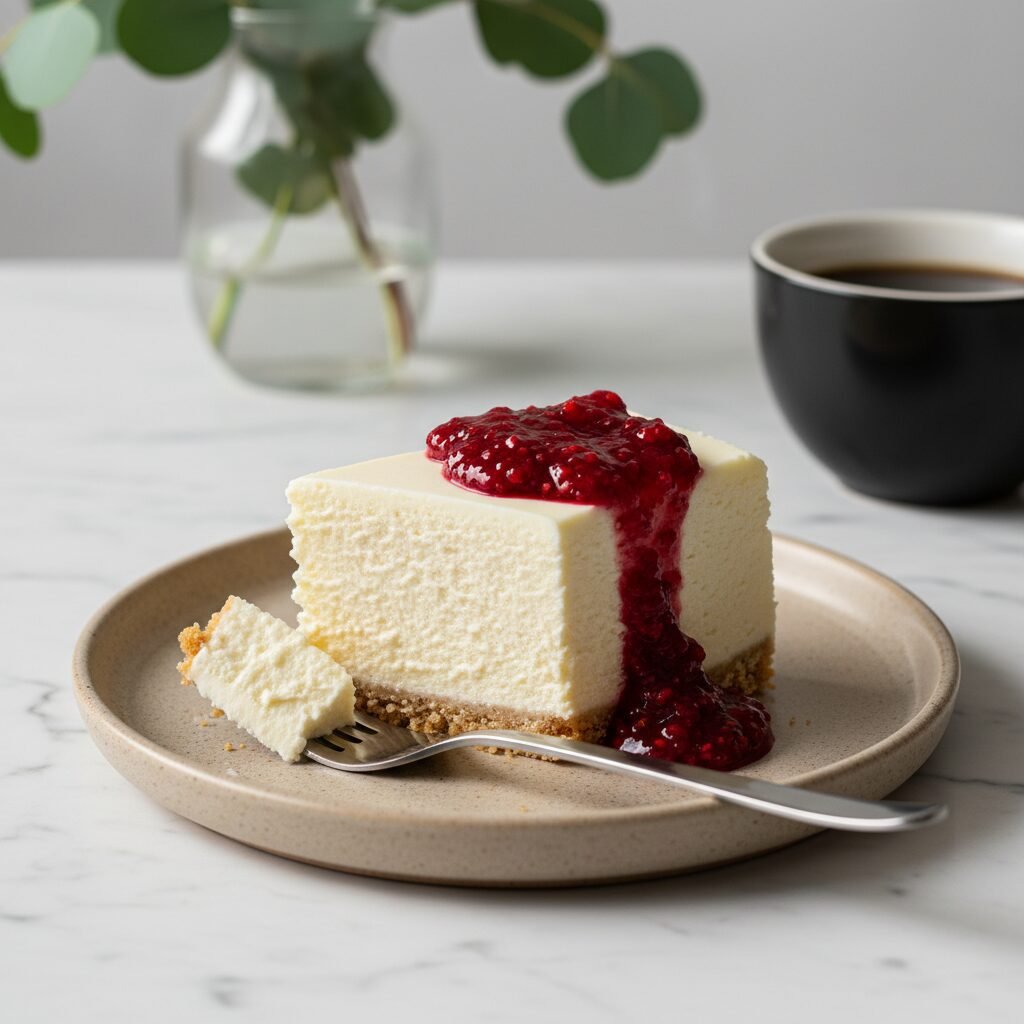
This cheesecake is rich and decadent on its own, but it serves as a perfect canvas for low-carb toppings. A fresh berry compote made by simmering raspberries or strawberries with a touch of water and sweetener is a classic choice that cuts through the richness. You can also top it with a dollop of unsweetened whipped cream and a sprinkle of lemon zest for freshness. For a more indulgent treat, drizzle with a keto-friendly salted caramel sauce or melted sugar-free dark chocolate. Serve chilled for the best texture, using a knife dipped in hot water to get clean, professional-looking slices.
Storage and Reheating Tips
Cheesecake stores beautifully and actually tastes better the next day. Keep the cheesecake in the springform pan or transfer it to an airtight container and store it in the refrigerator for up to 5 days. For long-term storage, this cheesecake freezes exceptionally well. Slice the cake first, then wrap each slice individually in plastic wrap followed by a layer of aluminum foil. Place the wrapped slices in a freezer-safe bag. They can be frozen for up to 2 months. Thaw individual slices in the refrigerator overnight before serving. Do not refreeze thawed cheesecake as the texture will deteriorate.
Nutrition Facts (Estimated)
| Serving Size | 1 slice |
| Calories | 380 |
| Fat | 36g |
| Saturated Fat | 18g |
| Unsaturated Fat | 15g |
| Trans Fat | 0g |
| Cholesterol | 115mg |
| Sodium | 210mg |
| Carbohydrates | 6g |
| Fiber | 2g |
| Sugar | 2g |
| Protein | 8g |
Frequently Asked Questions
Can I make this cheesecake without a water bath?
Technically yes, but it is not recommended. Without a water bath, the cheesecake is more likely to crack, brown unevenly, and have a rubbery texture around the edges. The steam from the water bath ensures a creamy, uniform consistency.
Why did my cheesecake crack?
Cracks are usually caused by over-mixing the batter (adding too much air), over-baking (drying it out), or cooling it too quickly (thermal shock). Follow the cooling instructions carefully to avoid this.
Does Stevia leave a bitter aftertaste?
Pure Stevia can sometimes be bitter. This is why we recommend using a high-quality brand or a blend with Erythritol. The fat in the cream cheese and the vanilla extract also help mask any potential aftertaste.
How do I know when the cheesecake is done?
The cheesecake is done when the edges are slightly puffy and set, but the center 2-3 inches still jiggle like gelatin when you gently shake the pan. It will firm up as it cools.
Can I use liquid Stevia instead of powdered?
Yes, but the conversion ratio varies by brand. Generally, 1 teaspoon of liquid Stevia equals about 1 cup of sugar, but check your specific bottle. You may also need to add a tablespoon of coconut flour to balance the moisture.
Is this recipe gluten-free?
Yes, this recipe is 100% gluten-free as it uses almond flour for the crust instead of wheat-based graham crackers.
Can I use low-fat cream cheese?
It is not advised for a keto diet or for the texture of this cake. Low-fat cheese has higher carbs and water content, which can lead to a less creamy, more icy texture.
How many carbs are in a slice?
Each slice contains approximately 6g of total carbohydrates and 2g of fiber, resulting in about 4g of net carbs per slice, making it perfect for a ketogenic diet.
Conclusion
Mastering the art of the Moist Keto Cheesecake with Stevia is a game-changer for anyone living a low-carb lifestyle. It proves that you do not have to sacrifice texture, flavor, or the joy of baking to maintain your health goals. This recipe delivers a dessert that is sophisticated enough for a holiday table yet simple enough for a weekend treat. The creamy, tangy filling paired with the nutty crust creates a harmony of flavors that will have even your non-keto friends asking for the recipe. So, gather your ingredients, prepare your water bath, and get ready to enjoy a guilt-free slice of heaven. Happy baking!