The Ultimate Moist Keto Cheesecake: New York Style & Sugar-Free
Moist Keto Cheesecake Recipe
Indulge in this ultra-creamy, dense, and rich keto cheesecake that rivals any traditional New York bakery slice. Featuring a buttery almond flour crust and a silky, vanilla-infused filling, this low-carb masterpiece proves you don’t have to sacrifice dessert to stay in ketosis.
20 minutes
1 hour 15 minutes
8 hours (includes cooling and chilling)
12 servings
Dessert
Baking
American
Gluten-Free
If there is one dessert that defines pure comfort and indulgence, it is undoubtedly cheesecake. For those embarking on a ketogenic lifestyle, the thought of giving up this rich, tangy, and creamy delight can be heartbreaking. However, the beauty of modern low-carb baking is that we no longer have to settle for dry, flavorless substitutes. This Moist Keto Cheesecake recipe is the result of extensive testing to replicate the dense, velvety texture of a classic New York-style cheesecake without the sugar crash or the gluten.
The secret to a truly exceptional keto cheesecake lies in the balance of moisture and structure. Many low-carb recipes rely too heavily on eggs, resulting in a texture that resembles a quiche rather than a dessert, or they lack the necessary fat content, leading to a dry, crumbly mouthfeel. This recipe bridges that gap by utilizing full-fat cream cheese, sour cream for that signature tang and extra moisture, and a slow-baking process that ensures a smooth, crack-free surface.
From the moment you take your first bite, you will notice the distinct lack of ‘cooling’ aftertaste often associated with keto sweeteners, thanks to a carefully balanced sweetener blend. The crust, made from superfine almond flour and real butter, provides a nutty, salty contrast to the sweet, creamy filling. Whether you are hosting a dinner party for non-keto guests or simply treating yourself to a weekend reward, this cheesecake is indistinguishable from its high-carb sugary counterparts. It is rich, sophisticated, and perfectly satisfying.
History & Origins
The history of cheesecake is a culinary journey that spans thousands of years, long before the concept of a ‘ketogenic diet’ ever existed. Its origins can be traced back to ancient Greece, specifically on the island of Samos, where physical anthropologists excavated cheese molds dating back to 2,000 B.C. In ancient times, cheesecake was considered a potent source of energy, and there is evidence that it was served to athletes during the first Olympic Games in 776 B.C. The Romans later adopted the recipe after conquering Greece, calling it ‘libum,’ and spread it across Europe as they expanded their empire.
However, the cheesecake we know and love today—specifically the New York style—has a much more recent history. It wasn’t until 1872 that a New York dairyman named William Lawrence accidentally invented modern cream cheese while attempting to replicate the French cheese Neufchâtel. This happy accident paved the way for the dense, smooth cheesecakes that became iconic in American delis during the 20th century.
The evolution of the *Keto* cheesecake is a fascinating chapter in this history. With the rise of the Atkins diet in the 90s and the explosion of the Ketogenic lifestyle in the 2010s, home bakers began experimenting with grain-free flours and alternative sweeteners. Almond flour replaced the traditional graham cracker crust, offering a lower glycemic index and a rich, nutty flavor profile. Erythritol and monk fruit replaced refined sugar, allowing the dessert to maintain its sweetness without spiking insulin levels. Today, the keto cheesecake stands as a testament to culinary innovation, proving that traditional favorites can be adapted to meet modern health needs without losing their historical soul.
Why This Recipe Works
This recipe succeeds where many other low-carb cheesecakes fail due to three critical factors: ingredient temperature, the fat ratio, and the baking environment. First, the insistence on room-temperature ingredients is not merely a suggestion; it is a chemical necessity. When the cream cheese, eggs, and sour cream are all at the same ambient temperature, they emulsify seamlessly. Cold ingredients lead to lumps, and over-beating to remove those lumps introduces air bubbles, which are the primary cause of surface cracks.
Secondly, the inclusion of full-fat sour cream is a game-changer. While cream cheese provides the body, sour cream introduces acidity and additional fat that tenderizes the protein structure of the eggs. This prevents the cheesecake from becoming rubbery or ‘eggy,’ a common complaint in low-carb baking. The sour cream also mimics the slight tanginess found in traditional recipes that usually use sugar to balance the acidity.
Finally, the methodology of the water bath (bain-marie) and the ‘oven-off’ cooling technique ensures gentle, even heat distribution. Cheesecake is essentially a custard; high heat causes the proteins to seize and crack. By baking it in a humid environment and letting it cool gradually within the oven, the structure sets slowly, resulting in that coveted, ultra-smooth, creamy consistency that defines a high-quality cheesecake.
Why You’ll Love This Recipe
- ✓Only 5g Net Carbs per slice
- ✓Ultra-creamy, dense New York-style texture
- ✓Gluten-free almond flour crust
- ✓No ‘cooling effect’ from sweeteners
- ✓Freezer-friendly for long-term storage
- ✓Foolproof water bath method prevents cracking
Equipment You’ll Need
- ✓9-inch Springform Pan
- ✓Electric Hand Mixer or Stand Mixer
- ✓Large Roasting Pan (for water bath)
- ✓Aluminum Foil (heavy duty)
- ✓Parchment Paper
- ✓Rubber Spatula
- ✓Mixing Bowls
Ingredients
- ✓2 cups Almond Flour (superfine)
- ✓1/3 cup Unsalted Butter (melted)
- ✓3 tbsp Powdered Erythritol (for crust)
- ✓1 tsp Vanilla Extract (for crust)
- ✓32 oz Full-Fat Cream Cheese (room temperature)
- ✓1 1/4 cups Powdered Erythritol or Monk Fruit Sweetener
- ✓3 large Eggs (room temperature)
- ✓1/2 cup Full-Fat Sour Cream (room temperature)
- ✓1 tbsp Vanilla Extract (for filling)
- ✓1 tsp Lemon Zest (optional)
- ✓1/4 tsp Sea Salt
Instructions
- Preheat your oven to 325°F (163°C). Grease the bottom and sides of a 9-inch springform pan. Line the bottom with parchment paper for easy removal later.
- In a medium bowl, combine the almond flour, melted butter, 3 tablespoons of sweetener, and 1 teaspoon of vanilla extract. Mix until the texture resembles wet sand.
- Press the crust mixture firmly into the bottom of the prepared pan. You can use the bottom of a flat glass to ensure it is even. Bake the crust for 10-12 minutes until slightly golden. Remove and let it cool while you prepare the filling. Reduce oven temperature to 300°F (150°C).
- Triple-wrap the bottom and sides of your springform pan with heavy-duty aluminum foil. This is crucial to prevent water from seeping in during the water bath.
- In a large mixing bowl, beat the softened cream cheese and powdered sweetener on low speed until completely smooth and creamy. Do not overmix.
- Add the sour cream, vanilla extract, lemon zest, and salt. Mix on low until combined.
- Add the eggs one at a time, mixing on the lowest speed just until the yellow disappears. Crucial: Do not overbeat after adding eggs, as this adds air which leads to cracks.
- Pour the batter over the slightly cooled crust. Tap the pan gently on the counter a few times to release any trapped air bubbles.
- Place the foil-wrapped springform pan inside a large roasting pan. Place the roasting pan in the oven, then carefully pour boiling water into the roasting pan until it reaches halfway up the sides of the springform pan.
- Bake at 300°F (150°C) for 60-75 minutes. The cheesecake is done when the edges are set but the center still jiggles slightly like Jell-O.
- Turn off the oven and crack the door open slightly (you can use a wooden spoon to hold it ajar). Let the cheesecake cool in the oven for 1 hour. This slow cooling prevents sinking and cracking.
- Remove the cheesecake from the water bath and remove the foil. Run a thin knife around the edge to loosen it from the pan. Let it cool completely to room temperature on a wire rack.
- Cover with plastic wrap and refrigerate for at least 6 hours, preferably overnight, to allow the texture to firm up and flavors to meld.
Expert Cooking Tips
- ✓Room temperature ingredients are non-negotiable; cold cream cheese will result in a lumpy batter.
- ✓Use powdered sweetener instead of granular to avoid a gritty texture in the final cake.
- ✓Do not skip the water bath; it keeps the heat gentle and ensures a creamy, non-rubber texture.
- ✓Avoid opening the oven door during the first 45 minutes of baking to prevent temperature fluctuations.
- ✓If you don’t have heavy-duty foil, use two layers of regular foil and consider placing the springform pan inside a slightly larger cake pan, then placing that in the water bath.
- ✓Letting the cheesecake chill overnight significantly improves the flavor and makes slicing much cleaner.
- ✓Use a knife dipped in hot water and wiped dry between each cut for professional-looking slices.
Substitutions and Variations
For the crust, if you have a nut allergy, you can substitute sunflower seed flour or pumpkin seed flour in a 1:1 ratio for the almond flour. Alternatively, crushed keto-friendly cookies can be used. For the sweetener, a monk fruit/erythritol blend is best, but pure Allulose is also excellent for a smooth texture and no cooling effect, though it browns faster. If you cannot find powdered sweetener, you can blitz granular sweetener in a coffee grinder until fine. In terms of dairy, while full-fat cream cheese is standard, you can substitute half of the cream cheese with Mascarpone for an even richer, Italian-style flavor. The sour cream can be replaced with full-fat Greek yogurt if necessary, though sour cream provides the best texture.
Common Mistakes to Avoid
The most common mistake is overmixing the batter once the eggs are added. This incorporates air, which expands in the oven and causes the cheesecake to rise rapidly and then collapse and crack. Another frequent error is baking at too high a temperature; low and slow is the key to a custard-based dessert like this. Rushing the cooling process by putting a warm cheesecake directly into the fridge will almost guarantee condensation forming on the surface (making it soggy) and deep structural cracks due to thermal shock. Finally, using ‘spreadable’ cream cheese from a tub instead of brick cream cheese will result in a runny filling that never sets properly.
Serving Suggestions
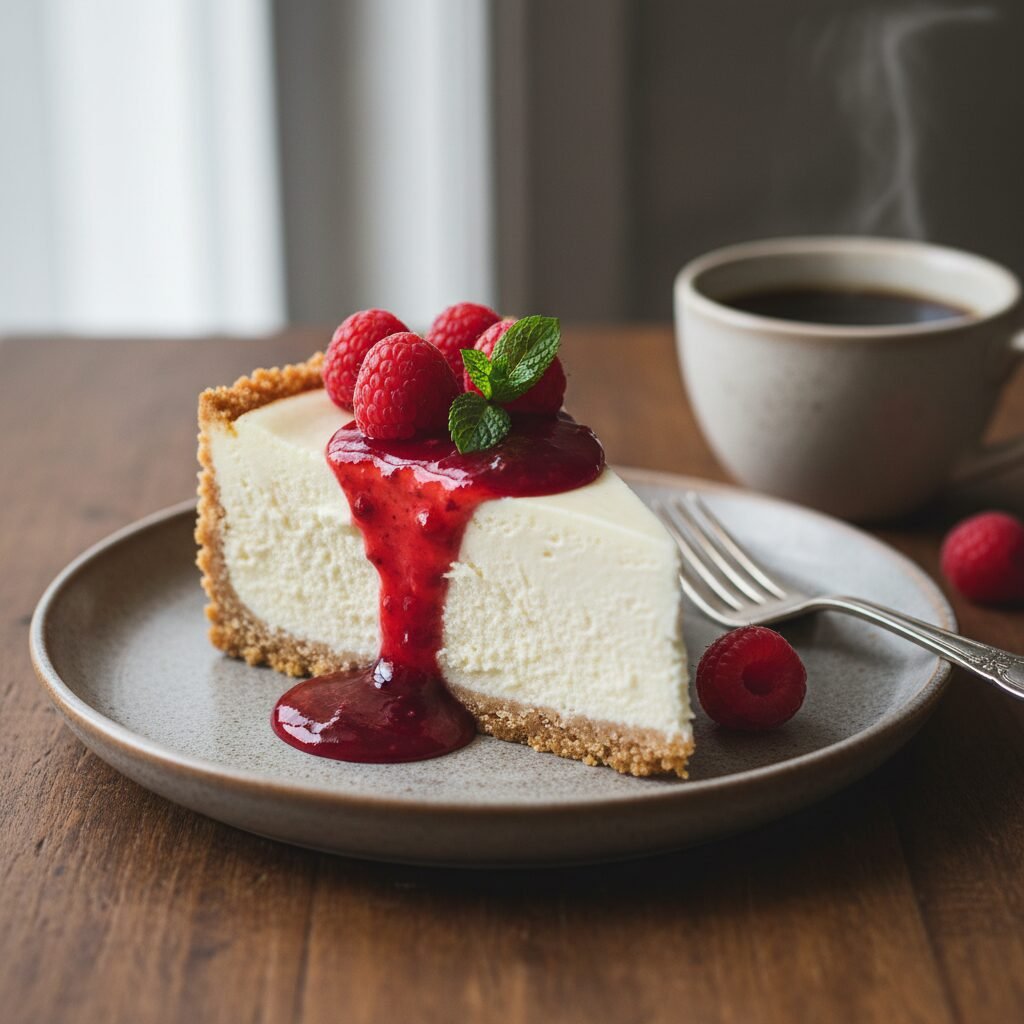
Serve this cheesecake chilled. It pairs beautifully with a homemade sugar-free berry coulis (simmer raspberries or strawberries with a little water and sweetener). Fresh berries, a sprig of mint, or a dollop of keto-friendly whipped cream are classic toppings. For a decadent twist, drizzle with a sugar-free dark chocolate ganache or a keto salted caramel sauce. A hot cup of black coffee or espresso cuts through the richness perfectly.
Storage and Reheating Tips
Store the cheesecake in the refrigerator, loosely covered with plastic wrap or in an airtight cake carrier, for up to 5 days. For longer storage, this cheesecake freezes exceptionally well. Slice the cake, then wrap each slice individually in plastic wrap followed by a layer of aluminum foil. Place the wrapped slices in a freezer-safe bag. They can be frozen for up to 2 months. To thaw, place a slice in the refrigerator overnight or on the counter for 30 minutes before serving.
Nutrition Facts (Estimated)
| Serving Size | 1 slice |
| Calories | 420 |
| Fat | 38g |
| Saturated Fat | 18g |
| Unsaturated Fat | 16g |
| Trans Fat | 0g |
| Cholesterol | 145mg |
| Sodium | 310mg |
| Carbohydrates | 7g |
| Fiber | 2g |
| Sugar | 2g |
| Protein | 9g |
Frequently Asked Questions
Why did my cheesecake crack?
Cracks usually happen due to overmixing the eggs (adding air), baking at too high a temperature, or cooling it too quickly. The water bath and oven-off cooling method help prevent this.
Can I make this dairy-free?
It is difficult to make a keto cheesecake dairy-free as the main ingredients are cream cheese and butter. While vegan cream cheese exists, the texture and carb count may vary significantly.
Does it taste like ‘diet’ food?
Not at all. Because of the high fat content and the use of quality vanilla and sour cream, the flavor is rich and authentic. Most people cannot tell it is sugar-free.
Can I use liquid stevia?
It is not recommended as the primary sweetener. The bulk of the powdered sweetener helps provide structure to the filling. You can use a few drops to boost sweetness, but stick to erythritol or monk fruit for the base.
How do I know when it’s done?
The ‘jiggle test’ is key. Gently shake the pan; the outer 2 inches should look firm and set, while the center should wobble slightly like gelatin. If it’s liquid in the center, it needs more time.
Is the water bath absolutely necessary?
Technically no, but highly recommended. Without it, the edges may overcook and become dry before the center sets, and the surface is much more likely to crack.
What size eggs should I use?
Always use large eggs for standard baking recipes. Using extra-large or medium eggs can throw off the liquid-to-solid ratio.
Why is my crust soggy?
This can happen if water leaked into the springform pan from the water bath. Ensure you use heavy-duty foil and wrap it thoroughly. Par-baking the crust also helps keep it crisp.
Can I use granulated sweetener?
You can, but it may not dissolve fully, leaving a gritty texture. Powdered is always preferred for custards and cheesecakes.
What is the best brand of cream cheese to use?
Philadelphia brick style is the gold standard for consistency and carb count, but any full-fat brick cream cheese (not tub/whipped) will work.
Conclusion
Mastering the art of the Keto Cheesecake opens up a world of dessert possibilities that fit perfectly within your low-carb lifestyle. This recipe offers the perfect canvas for your culinary creativity—whether you top it with tart berries, rich chocolate, or enjoy it in its pure, vanilla glory. It requires a bit of patience with the baking and cooling process, but the reward is a slice of heaven that is indistinguishable from the real thing. Share this with friends and family, and watch their disbelief when you tell them it’s sugar-free. Happy baking!