The Ultimate Moist Dairy-Free Red Velvet Cake with Creamy Vegan Buttercream
Moist Dairy Free Red Velvet Cake With Dairy Free Buttercream Recipe
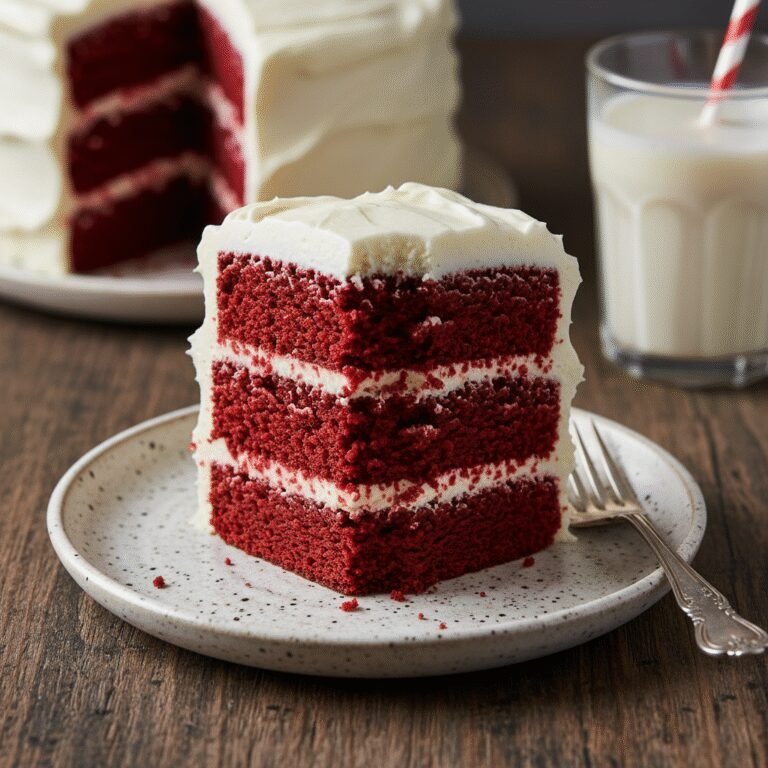
Experience the most velvety, tender crumb you have ever tasted with this foolproof Dairy-Free Red Velvet Cake recipe. Paired with a silky, whipped dairy-free vanilla buttercream, this classic Southern dessert proves you don’t need milk or butter to achieve bakery-quality perfection.
30 minutes
30 minutes
1 hour 15 minutes
12 servings (2 layer 8-inch cake)
Dessert
Baking
American
Dairy-Free
Red Velvet cake is an enigma of the baking world—not quite chocolate, not quite vanilla, but entirely its own category of deliciousness. For those living a dairy-free lifestyle or managing lactose intolerance, finding a red velvet cake that retains that signature ‘velvety’ texture without becoming dry or dense can be a massive challenge. Traditional recipes rely heavily on buttermilk and butter to create that tender crumb and tangy flavor profile. However, after extensive testing in our kitchen, we have cracked the code to the ultimate moist, dairy-free version that rivals any conventional bakery offering.
This recipe is a celebration of texture and flavor contrast. The cake itself is incredibly soft, boasting a mild cocoa flavor with that crucial hint of acidity that defines a true red velvet. By utilizing a homemade ‘vegan buttermilk’ and a high-quality vegetable oil instead of solid fats, we ensure the cake stays moist for days rather than drying out once it cools. The vibrant red hue makes it a showstopper for holidays, birthdays, and Valentine’s Day, but it is the taste that will keep you coming back. We pair this sponge with a luscious, cloud-like dairy-free buttercream that mimics the richness of cream cheese frosting without the dairy. Whether you are a seasoned vegan baker or just trying to accommodate a dietary restriction, this cake promises a luxurious experience in every bite, proving that plant-based baking requires absolutely no compromise on taste or texture.
History & Origins
The history of Red Velvet cake is as rich and layered as the cake itself, often debated among food historians. The term ‘velvet’ was actually used in the Victorian era to distinguish soft, fine-crumbed cakes from the coarser sponge cakes of the time. However, the ‘red’ aspect has a more scientific origin. Originally, the reddish hue wasn’t a result of food coloring, but rather a chemical reaction. In the early 20th century, raw cocoa powder (which contains anthocyanins) would react with the acidic ingredients in the cake, such as buttermilk and vinegar, turning the batter a dark, reddish-brown mahogany color. This natural chemical reaction is less common today because most modern cocoa powders are Dutch-processed (alkalized), which neutralizes the acidity and prevents the color change.
The vibrant, fire-engine red cake we know today became popularized during the Great Depression. As a marketing tactic to sell more food dyes and extracts, the Adams Extract company in Texas began printing recipe cards for a ‘Red Velvet Cake’ that utilized red food coloring. This coincided with World War II rationing, where bakers would sometimes use boiled beet juices to enhance moisture and color in their cakes. The cake solidified its place in American culinary history as a Southern staple, though it gained massive nationwide resurgence after appearing in the 1989 film ‘Steel Magnolias’ in the form of an armadillo. Today, it stands as an iconic American dessert, representing celebration and indulgence, and this dairy-free adaptation honors that long lineage while modernizing it for today’s dietary needs.
Why This Recipe Works
This recipe succeeds where many dairy-free cakes fail because it focuses heavily on the chemistry of moisture retention and lift. In traditional baking, butter provides flavor, but it also contains water which can evaporate, sometimes leading to a drier crumb if not handled perfectly. By swapping butter for a neutral oil in the cake batter, we coat the flour proteins more effectively, inhibiting gluten formation. This results in a sensationally tender texture that stays moist even when refrigerated. Oil remains liquid at room temperature, whereas butter creates a solid structure; for a cake that is meant to be soft and melting, oil is actually the superior fat.
Furthermore, the ‘tang’ is crucial to red velvet. Since we cannot use traditional dairy buttermilk, we create a robust substitute by curdling high-protein soy milk or almond milk with apple cider vinegar. This mixture mimics the acidity of buttermilk, which is essential not just for flavor, but for reacting with the baking soda. This acid-base reaction produces carbon dioxide bubbles, giving the cake a tremendous lift and an airy, open crumb structure. Finally, the addition of a small amount of boiling water (or hot coffee) at the end of mixing blooms the cocoa powder, intensifying the chocolate notes without overpowering the vanilla, ensuring the flavor profile is perfectly balanced.
Why You’ll Love This Recipe
- ✓Incredibly moist texture that stays soft for days.
- ✓100% Dairy-Free and Vegan-friendly without sacrificing flavor.
- ✓Vibrant, show-stopping red color perfect for celebrations.
- ✓Simple ‘vegan buttermilk’ hack ensures a tender crumb.
- ✓Sturdy enough for layer cakes but soft enough for cupcakes.
Equipment You’ll Need
- ✓Two 8-inch or 9-inch round cake pans
- ✓Electric hand mixer or stand mixer
- ✓Large mixing bowls
- ✓Sifter or fine-mesh sieve
- ✓Wire cooling rack
- ✓Measuring cups and spoons
- ✓Parchment paper
- ✓Offset spatula
Ingredients
- ✓2 1/2 cups All-purpose flour (or cake flour for extra lightness)
- ✓1 1/2 cups Granulated white sugar
- ✓1 tsp Baking soda
- ✓1/2 tsp Salt
- ✓2 tbsp Unsweetened cocoa powder (natural or regular, not Dutch-process)
- ✓1 1/2 cups Unsweetened soy milk or almond milk (room temperature)
- ✓1 tbsp Apple cider vinegar (or white vinegar)
- ✓1 1/2 cups Vegetable oil (or canola oil)
- ✓1 tsp Vanilla extract
- ✓1-2 tbsp Red food coloring (gel preferred for vibrancy)
- ✓1 cup Vegan butter sticks, slightly softened (for frosting)
- ✓3-4 cups Powdered sugar, sifted (for frosting)
- ✓1 tsp Vanilla bean paste or extract (for frosting)
- ✓1-2 tbsp Plant-based milk (for frosting consistency)
Instructions
- Preheat your oven to 350°F (175°C). Grease two 8-inch round cake pans with oil and line the bottoms with parchment paper to ensure easy release.
- Prepare the vegan buttermilk: In a measuring cup, combine the soy milk and apple cider vinegar. Whisk gently and let it sit for 5-10 minutes until it slightly curdles and thickens.
- In a large bowl, sift together the flour, sugar, baking soda, salt, and cocoa powder. Sifting is crucial here to remove any cocoa lumps and aerate the flour.
- In a separate medium bowl, whisk together the vegetable oil, the prepared vegan buttermilk mixture, vanilla extract, and red food coloring. Whisk until the color is fully incorporated and the mixture is emulsified.
- Pour the wet ingredients into the dry ingredients. Using a whisk or a spatula, mix gently until just combined and no streaks of flour remain. Do not overmix, or the cake will become tough.
- Divide the batter evenly between the two prepared cake pans. Tap the pans gently on the counter a few times to release any large air bubbles.
- Bake for 28-32 minutes, or until a toothpick inserted into the center comes out clean or with just a few moist crumbs attached. Be careful not to overbake.
- Remove cakes from the oven and let them cool in the pans for 10 minutes. Then, carefully invert them onto a wire rack to cool completely before frosting. They must be fully cool, or the frosting will melt.
- While the cakes cool, make the buttercream. In a large bowl using a hand mixer or stand mixer, beat the softened vegan butter until creamy and pale (about 3-5 minutes).
- Gradually add the powdered sugar, one cup at a time, beating on low speed until incorporated. Add the vanilla and 1 tablespoon of plant milk.
- Increase the speed to high and whip for another 3-5 minutes until the frosting is fluffy and white. If it is too stiff, add another tablespoon of milk. If too soft, add a bit more sugar.
- To assemble, place one cake layer on your serving plate. Spread a generous layer of frosting on top. Place the second cake layer on top. Use the remaining frosting to cover the top and sides of the cake.
- Slice and serve immediately, or chill for 30 minutes to set the frosting for cleaner slices.
Expert Cooking Tips
- ✓Ingredients at Room Temperature: Ensure your soy milk and vegan butter are at room temperature. Cold ingredients can cause the batter to seize or the frosting to curdle.
- ✓Weigh Your Flour: For the most accurate results, use a kitchen scale. If using cups, spoon the flour into the cup and level it off; never scoop directly from the bag.
- ✓The Vinegar is Key: Do not skip the vinegar. It activates the baking soda and provides the necessary acid to tenderize the gluten.
- ✓Gel vs. Liquid Color: Use concentrated gel food coloring if possible. It provides a much more vibrant red without adding excess liquid to the batter.
- ✓Cool Completely: Dairy-free frostings can be more sensitive to heat than dairy butter. Ensure the cake is stone cold before applying frosting.
- ✓Crumb Coat: Apply a thin layer of frosting first to trap crumbs, chill for 20 minutes, then apply the final thick layer for a professional look.
Substitutions and Variations
Baking is a science, but there is room for flexibility with specific ingredients. If you need this to be gluten-free, swap the all-purpose flour for a high-quality 1:1 Gluten-Free Baking Flour blend that contains xanthan gum. For the oil, melted coconut oil can be used, but it may impart a slight coconut flavor; avocado oil is a great neutral alternative to vegetable oil. If you want to avoid red food dye entirely, you can use beet powder or reduced beet juice, though be warned this will change the flavor profile to be earthier and the color will be a muted brownish-red rather than vibrant crimson. For the ‘buttermilk,’ soy milk works best due to its high protein content, but almond milk or oat milk will work adequately. If you cannot find vegan butter sticks, high-quality vegetable shortening can be used for the frosting, though the mouthfeel will be slightly waxy compared to vegan butter.
Common Mistakes to Avoid
The most common mistake with this cake is overmixing the batter. Once the wet and dry ingredients meet, gluten begins to form. Mixing too vigorously will result in a rubbery, dense cake rather than a soft, velvety one. Another error is overbaking; because the cake is red, it is hard to tell by sight when it is done. Rely on the toothpick test and remember the cake continues to cook slightly as it cools in the pan. Regarding the frosting, a common pitfall is using tub margarine instead of vegan butter sticks. Tub margarine has too high a water content and will result in a soupy frosting that slides off the cake. Always use sticks that are solid at fridge temperature. Finally, failing to sift the cocoa powder can leave bitter, dry lumps of cocoa in your beautiful red batter.
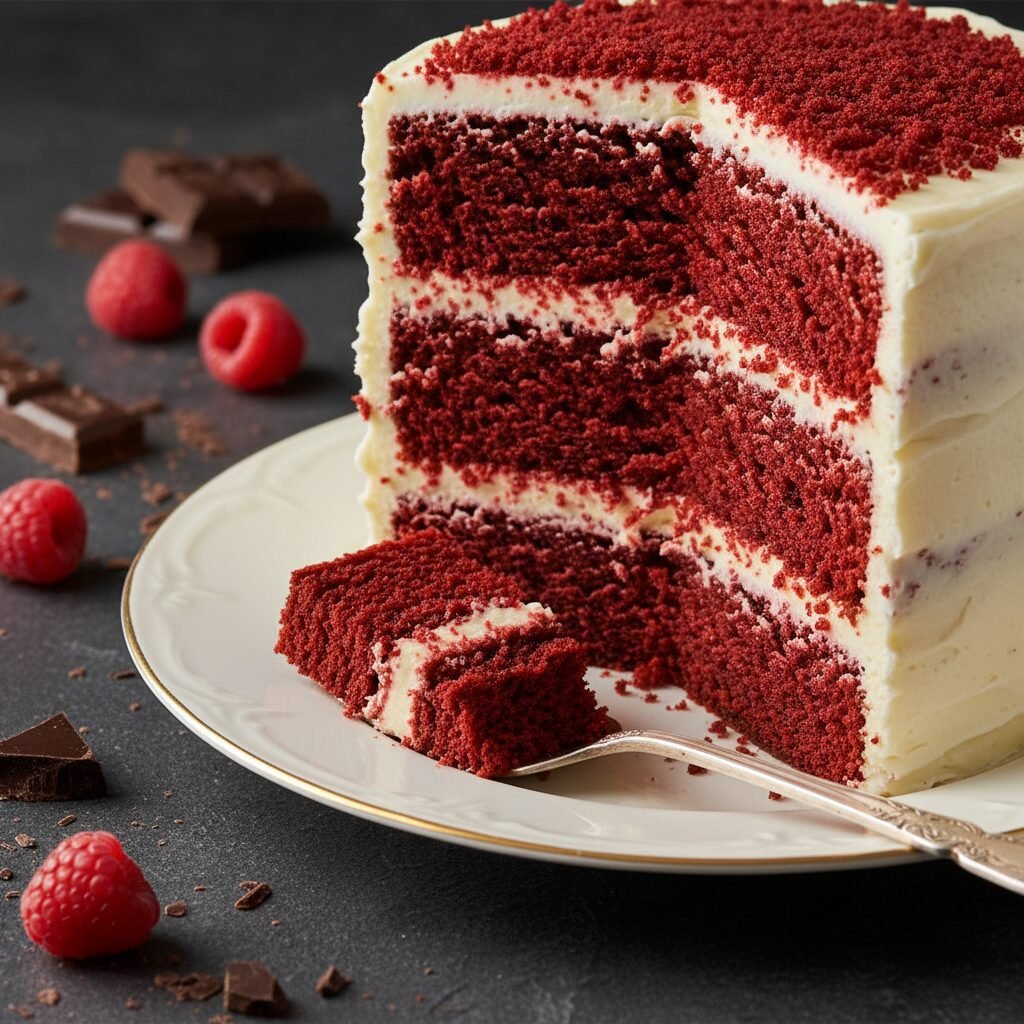
Serving Suggestions
This cake is a stunning centerpiece on its own, but it pairs beautifully with contrasting garnishes. Sprinkle the top with fresh red raspberries or strawberries to cut through the sweetness of the frosting. A dusting of cocoa powder or cake crumbs (saved from trimming the layers) adds a professional bakery finish. For beverages, serve this with a hot cup of dark roast coffee or espresso; the bitterness of the coffee perfectly balances the sweet vanilla notes of the cake. For a celebration, a glass of cold almond milk or a flute of champagne makes for an excellent pairing.
Storage and Reheating Tips
Store the frosted cake in an airtight cake carrier at room temperature for up to 2 days. Because it is dairy-free, it does not strictly require refrigeration and actually tastes best at room temperature where the frosting is soft. However, if your kitchen is warm, store it in the fridge to keep the frosting stable. If refrigerated, let the cake sit on the counter for 30-60 minutes before serving to allow the crumb and frosting to soften. You can also freeze the unfrosted cake layers. Wrap them tightly in plastic wrap, then foil, and freeze for up to 3 months. Thaw in the refrigerator overnight before frosting.
Nutrition Facts (Estimated)
| Serving Size | 1 slice |
| Calories | 580 |
| Fat | 28g |
| Saturated Fat | 6g |
| Unsaturated Fat | 22g |
| Trans Fat | 0g |
| Cholesterol | 0mg |
| Sodium | 320mg |
| Carbohydrates | 78g |
| Fiber | 2g |
| Sugar | 45g |
| Protein | 4g |
Frequently Asked Questions
Can I make this recipe into cupcakes?
Absolutely. This recipe will yield approximately 24 standard cupcakes. Bake them at 350°F for 18-22 minutes. Check for doneness sooner as they cook faster than cake layers.
Why did my cake turn brown instead of red?
This usually happens if you use not enough food coloring or if you use a very alkaline Dutch-process cocoa powder which neutralizes the acid. Stick to natural cocoa powder and ensure you use enough dye.
Is this cake vegan?
Yes, as written, this recipe contains no animal products (no eggs, no dairy milk, no butter). Just ensure your sugar is vegan-certified (bone-char free) if you are strictly vegan.
Can I use a different frosting?
Yes, while vanilla buttercream is classic, a dairy-free cream cheese frosting is traditional for red velvet. You can buy vegan cream cheese and swap half the butter in the frosting recipe for it.
What makes red velvet different from chocolate cake?
Red velvet is not just chocolate cake with red dye. It has significantly less cocoa powder, resulting in a milder chocolate flavor, and relies on the tangy buttermilk and vinegar for a distinct acidic flavor profile.
Can I reduce the sugar in this recipe?
We don’t recommend reducing the sugar significantly in the cake batter as sugar provides moisture and structure, not just sweetness. Reducing it can lead to a dry, tough cake.
My frosting is too runny, how do I fix it?
If your vegan butter was too warm, the frosting will be soft. Place the bowl in the fridge for 15 minutes, then whip again. You can also add more powdered sugar to stiffen it.
Can I use liquid food coloring instead of gel?
Yes, you can, but you will need to use significantly more liquid coloring (about a whole 1oz bottle) to get a deep red, which adds extra liquid to the batter. Gel is more concentrated and preferred.
Conclusion
There is something truly magical about slicing into a Red Velvet cake to reveal that brilliant scarlet interior against the stark white frosting. This Moist Dairy-Free Red Velvet Cake proves that dietary restrictions should never mean missing out on life’s most celebratory desserts. With its tender, melt-in-your-mouth crumb and rich, tangy-sweet flavor profile, it is bound to become a requested favorite in your household. So, preheat your oven, grab your mixer, and get ready to bake a masterpiece that looks as incredible as it tastes. Happy baking!