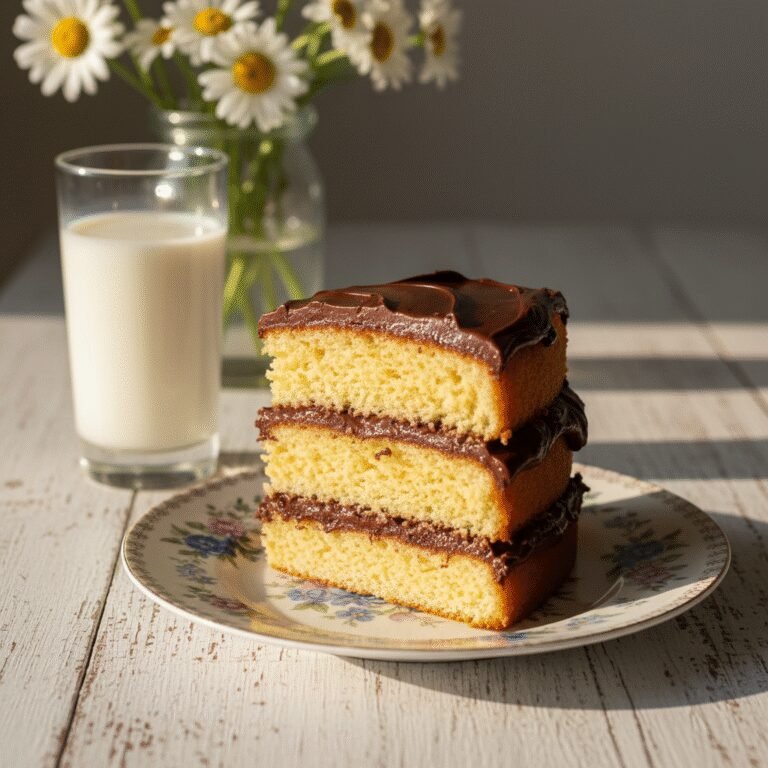
The Ultimate Moist Dairy-Free Chocolate Cake with Creamy Vegan Buttercream
Moist Dairy Free Chocolate Cake With Dairy Free Buttercream Recipe
Discover the secret to the most decadent, fudgy, and unbelievably moist chocolate cake that happens to be completely dairy-free. Paired with a silky smooth, whipped dairy-free buttercream, this recipe rivals any traditional bakery cake and is perfect for birthdays and special occasions.
30 minutes
35 minutes
1 hour 30 minutes
12-14 servings (One 2-layer 8-inch cake)
Dessert
Baking
American
Dairy-Free
There is a pervasive myth in the world of baking that removing dairy equates to sacrificing texture and flavor. For years, home bakers have feared that without butter or whole milk, a cake is destined to be dry, crumbly, or lacking that essential richness we crave in a dessert. This recipe is here to shatter that misconception entirely. We are talking about a chocolate cake so incredibly moist, so deeply chocolatey, and so tender that if you served it to a room full of dairy lovers, not a single one would guess it was missing the butter or milk. This is the ‘Holy Grail’ of allergy-friendly baking: a cake that stands on its own merit, not just ‘good for being dairy-free,’ but simply excellent, period.
The magic lies in the balance of ingredients. Chocolate, by its nature, has a robust and dominating flavor profile that pairs beautifully with oil-based batters. Unlike vanilla cakes, which often rely heavily on the flavor of butter, chocolate cakes thrive on the moisture that neutral oils provide. This recipe creates a crumb that is soft and plush, staying fresh for days rather than drying out overnight. But a cake is only as good as its frosting. The crowning jewel here is the dairy-free buttercream—a frosting that whips up fluffy, pipes beautifully, and melts in your mouth without that waxy coating often associated with shortening-based icings. Whether you are baking for someone with a lactose intolerance, a milk allergy, or simply looking for a lighter-feeling yet indulgent dessert, this cake is your answer. Prepare to create a centerpiece that looks professional and tastes like a slice of heaven.
History & Origins
The history of chocolate cake is a journey from a beverage to the fluffy layers we know today. Until the mid-19th century, chocolate was primarily consumed as a drink. It wasn’t until 1828, when Coenraad van Houten discovered a way to extract fat from cacao beans to make cocoa powder, that baking with chocolate became feasible. However, the specific lineage of *dairy-free* chocolate cake has roots deeply embedded in American history, specifically during the Great Depression and World War II.
During the 1930s, ingredients like butter, milk, and eggs were often scarce or prohibitively expensive. Resourceful home cooks developed what became known as ‘Wacky Cake’ or ‘Depression Cake.’ These cakes relied on a chemical reaction between vinegar and baking soda to provide lift, completely eliminating the need for dairy and eggs. While our recipe today is a modern evolution that may use eggs for structure (though it can be made vegan), it owes a debt to these early innovations that proved oil and hot water could create a superior chocolate texture.
In recent decades, the demand for dairy-free options has surged, moving from niche health food stores to mainstream culinary acceptance. This shift was driven by a growing awareness of lactose intolerance, which affects approximately 65% of the human population to some degree, as well as the rise of plant-based lifestyles. Modern food science has also given us high-quality plant-based butters and milks that mimic their dairy counterparts with startling accuracy, allowing us to revisit classic recipes and adapt them without compromise. This cake represents the culmination of that history—blending the frugal ingenuity of the Depression era with the premium ingredients of the modern pantry.
Why This Recipe Works
This recipe succeeds where others fail due to the specific chemistry of the ingredients used. First and foremost is the use of oil instead of butter in the cake batter. While butter tastes great, it is about 20% water and solid at room temperature. Oil is 100% fat and remains liquid at room temperature. This means that an oil-based cake feels significantly moister on the palate and retains that texture even when the cake cools down. In chocolate cake specifically, the cocoa flavor is strong enough that you do not miss the butter flavor in the sponge itself.
Secondly, the inclusion of boiling water (or hot coffee) is non-negotiable. Cocoa powder is essentially starch. When you add boiling liquid to the cocoa powder, you ‘bloom’ it. This process dissolves the cocoa solids and releases flavor compounds that are otherwise locked away, resulting in a more intense, profound chocolate taste. The heat also helps to disperse the cocoa butter content evenly throughout the batter.
For the frosting, the success relies on using high-quality plant-based butter *sticks* rather than tub margarine. Tub spreads have a high water content and will cause the frosting to ‘weep’ or become soupy. Sticks have a lower moisture content and a higher melting point, allowing you to whip air into the fat just like traditional dairy butter, creating a stable structure that holds its shape when piped.
Why You’ll Love This Recipe
- ✓Incredibly moist texture that stays fresh for days
- ✓Deep, rich chocolate flavor enhanced by hot coffee
- ✓Silky, stable buttercream that pipes perfectly
- ✓Completely dairy-free and easily adaptable to be vegan
- ✓No stand mixer required for the cake batter
- ✓Uses standard pantry ingredients found in most kitchens
Equipment You’ll Need
- ✓Two 8-inch round cake pans
- ✓Parchment paper
- ✓Large mixing bowl
- ✓Whisk
- ✓Electric hand mixer or Stand mixer (for frosting)
- ✓Wire cooling rack
- ✓Sifter or fine-mesh sieve
- ✓Offset spatula
Ingredients
- ✓2 cups granulated sugar
- ✓1 3/4 cups all-purpose flour
- ✓3/4 cup unsweetened cocoa powder (Dutch-processed preferred)
- ✓1 1/2 teaspoons baking powder
- ✓1 1/2 teaspoons baking soda
- ✓1 teaspoon salt
- ✓2 large eggs (room temperature)
- ✓1 cup unsweetened almond milk (or oat/soy milk)
- ✓1/2 cup vegetable oil or melted coconut oil
- ✓2 teaspoons pure vanilla extract
- ✓1 cup boiling water (or boiling hot coffee for deeper flavor)
- ✓1 cup dairy-free butter sticks (slightly softened)
- ✓4 cups powdered sugar (confectioners’ sugar)
- ✓1/4 cup unsweetened cocoa powder (for chocolate buttercream variation, optional)
- ✓2-3 tablespoons dairy-free milk (for frosting consistency)
Instructions
- Preheat your oven to 350°F (175°C). Grease two 8-inch round cake pans with oil and line the bottoms with parchment paper. Dust the sides with a little cocoa powder to prevent sticking.
- In a large bowl, sift together the flour, sugar, cocoa powder, baking powder, baking soda, and salt. Whisk well to ensure the raising agents are evenly distributed.
- In a separate medium bowl, whisk together the eggs, almond milk, oil, and vanilla extract until combined.
- Pour the wet ingredients into the dry ingredients. Whisk by hand or beat on low speed just until combined. Do not overmix at this stage.
- Carefully pour the boiling water (or hot coffee) into the batter. Whisk gently by hand until the water is fully incorporated. The batter will be very thin and liquid; this is normal and essential for moisture.
- Divide the batter evenly between the two prepared cake pans.
- Bake for 30-35 minutes, or until a wooden toothpick inserted into the center comes out clean or with just a few moist crumbs attached.
- Remove from the oven and let the cakes cool in the pans for about 10 minutes. Then, carefully turn them out onto a wire rack to cool completely. They must be 100% cool before frosting.
- To make the frosting: In a large bowl using a hand mixer or stand mixer, beat the softened dairy-free butter sticks on medium-high speed for about 5 minutes until pale and fluffy.
- Gradually add the powdered sugar, about 1 cup at a time, beating on low speed until incorporated. If making chocolate frosting, add the extra cocoa powder here.
- Add the vanilla extract and 1 tablespoon of dairy-free milk. Increase speed to high and whip for another 3-5 minutes until airy and creamy. Add more milk 1 teaspoon at a time if the frosting is too stiff.
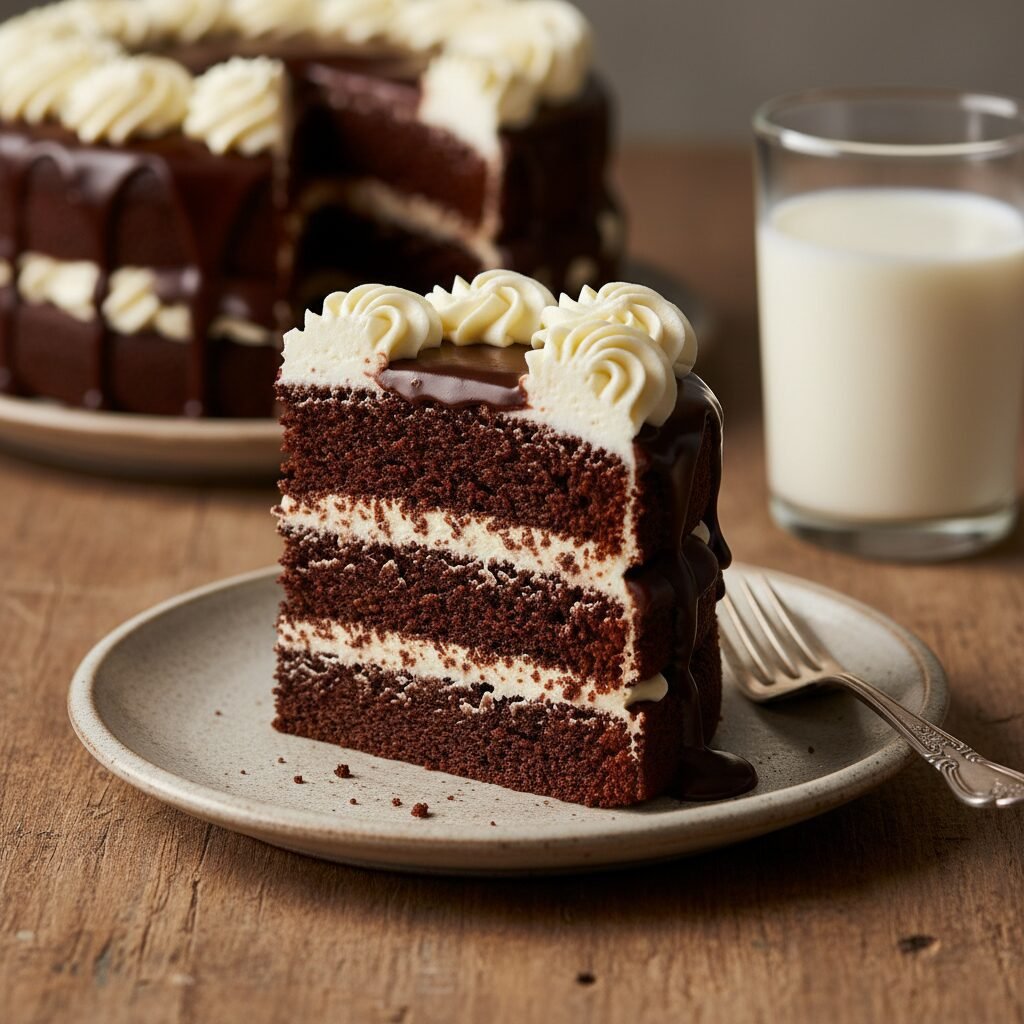
- Assemble the cake: Place one layer on your serving plate. Spread a generous layer of frosting on top. Place the second cake layer on top (flat side up). Frost the top and sides of the cake with the remaining buttercream.
Expert Cooking Tips
- ✓Use room temperature eggs and milk to ensure the batter emulsifies properly.
- ✓Do not skip the parchment paper circles; dairy-free cakes can sometimes be more fragile and stick to the pan.
- ✓Weigh your flour using a kitchen scale (approx. 120g per cup) to avoid a dense, dry cake.
- ✓Bloom the cocoa with hot coffee instead of water; it won’t taste like coffee but will make the chocolate taste more intense.
- ✓When making the buttercream, ensure your dairy-free butter is not melted, just slightly softened, or the frosting will be greasy.
- ✓Tap the cake pans on the counter before baking to release large air bubbles.
- ✓Chill the cake layers for 20 minutes before frosting to make them easier to handle and reduce crumbs in the frosting.
Substitutions and Variations
This recipe is highly versatile. For the flour, you can use a high-quality 1:1 Gluten-Free All-Purpose Flour blend (like Bob’s Red Mill or King Arthur) to make the cake both gluten and dairy-free. If you need to make the cake vegan (egg-free), you can substitute the 2 eggs with ‘flax eggs’ (2 tbsp ground flaxseed meal mixed with 6 tbsp warm water, let sit for 5 mins) or a commercial egg replacer, though the cake may be slightly denser. Any neutral oil works well; canola, vegetable, grapeseed, or melted refined coconut oil are excellent choices. For the milk, almond, soy, and oat milk are best. Avoid canned coconut milk for the batter as it is too heavy, but it can be used for a ganache topping. For the sweetener, stick to granulated sugar for the best structure; reducing sugar significantly will alter the texture.
Common Mistakes to Avoid
The most common mistake is over-baking. Because the batter is dark, it is hard to see browning. Trust the toothpick test and check at the 30-minute mark. Another error is using tub margarine for the frosting. Tub spreads contain too much water and will result in a sloppy icing that slides off the cake. Always use ‘buttery sticks.’ Also, do not add the boiling water too fast while the mixer is on high speed, or you risk splashing hot liquid and over-developing the gluten. Finally, frosting the cake while it is even slightly warm will melt the fat in the dairy-free buttercream immediately, ruining the aesthetic.
Serving Suggestions
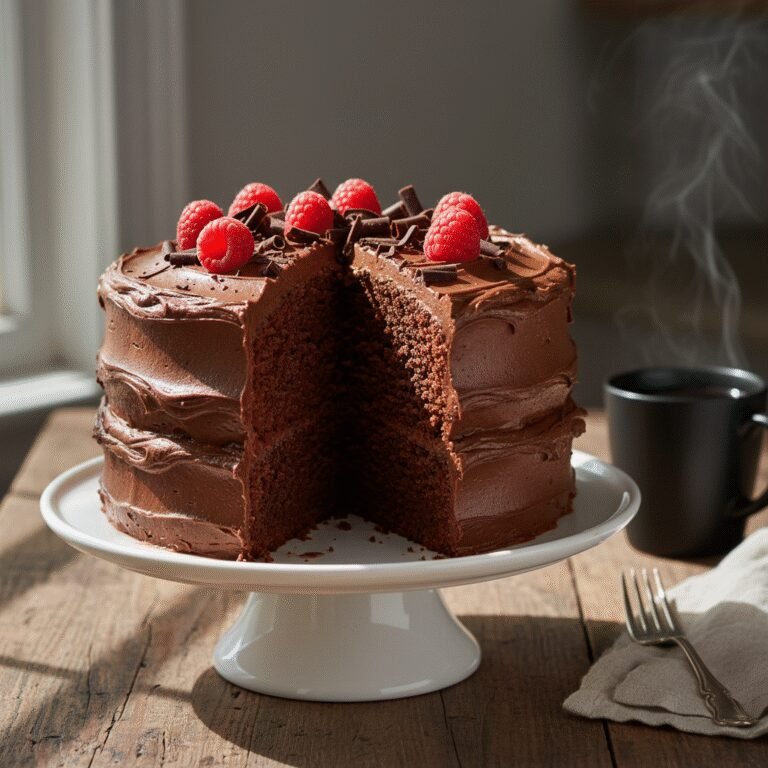
This cake is rich, so serve it in modest slices. It pairs beautifully with fresh berries like raspberries or strawberries, which provide a tart contrast to the sweet chocolate. A dollop of dairy-free coconut whipped cream on the side adds a nice texture. For a warm beverage pairing, serve with an espresso or a tall glass of cold oat milk. If you are feeling fancy, garnish the top of the cake with chocolate shavings, edible flowers, or a drizzle of dairy-free salted caramel sauce.
Storage and Reheating Tips
Store the frosted cake at room temperature in an airtight cake carrier for up to 2 days. Dairy-free buttercream is shelf-stable for this duration. If your kitchen is very warm (over 75°F), store the cake in the refrigerator to prevent the frosting from melting. Bring it back to room temperature before serving for the best texture and flavor. To freeze, wrap individual slices or the whole unfrosted layers tightly in plastic wrap, then foil. They can be frozen for up to 3 months. Thaw in the fridge overnight.
Nutrition Facts (Estimated)
| Serving Size | 1 slice |
| Calories | 580 |
| Fat | 32g |
| Saturated Fat | 8g |
| Unsaturated Fat | 22g |
| Trans Fat | 0g |
| Cholesterol | 45mg |
| Sodium | 320mg |
| Carbohydrates | 72g |
| Fiber | 4g |
| Sugar | 45g |
| Protein | 6g |
Frequently Asked Questions
Can I make this recipe into cupcakes?
Yes! This recipe makes approximately 24 standard cupcakes. Bake them at 350°F for 18-22 minutes.
Why is the batter so runny?
The batter is intentionally thin because of the high liquid content (milk, oil, boiling water). This ensures the cocoa blooms and the cake stays moist during the baking process. Do not add more flour.
Can I use olive oil?
You can, but olive oil has a distinct flavor. If you enjoy the combination of chocolate and olive oil, go for it. Otherwise, stick to neutral oils like vegetable or canola.
What brand of dairy-free butter is best for frosting?
Brands like Miyoko’s Creamery, Country Crock Plant Butter (sticks), or Earth Balance (sticks) work best. Avoid spreads sold in tubs.
Why did my cake sink in the middle?
This usually happens if the oven door was opened too early during baking, causing a temperature drop, or if the leavening agents (baking soda/powder) were expired. It can also happen if the cake is underbaked.
Can I reduce the sugar?
Sugar provides moisture and structure, not just sweetness. Reducing it by more than 1/4 cup may result in a drier, tougher cake.
Can I use Dutch-processed cocoa?
Yes, Dutch-processed cocoa is actually preferred for this recipe as it has a smoother, less acidic flavor and a darker color.
My frosting is too sweet, how can I fix it?
Add a pinch of salt or a teaspoon of lemon juice to cut the sweetness. You can also add more cocoa powder if making chocolate frosting.
Can I make this in a 9×13 pan?
Yes, pour the batter into a greased 9×13 inch pan and bake for 35-40 minutes. Check with a toothpick.
Is this cake vegan?
The recipe as written contains eggs, so it is dairy-free but not vegan. However, you can substitute the eggs with flax eggs or a commercial egg replacer to make it fully vegan.
Conclusion
There you have it—the only dairy-free chocolate cake recipe you will ever need. It is a testament to the fact that dietary restrictions do not have to mean restriction on flavor or joy. Whether you are an experienced baker or a novice in the kitchen, this forgiving batter and foolproof frosting will make you look like a pro. The deep, dark chocolate crumb combined with the cloud-like sweetness of the buttercream creates a dessert experience that brings people together, regardless of their dietary needs. So, preheat that oven, brew some strong coffee, and get ready to bake a cake that will disappear from the plate faster than you can say ‘dairy-free.’ Happy baking!