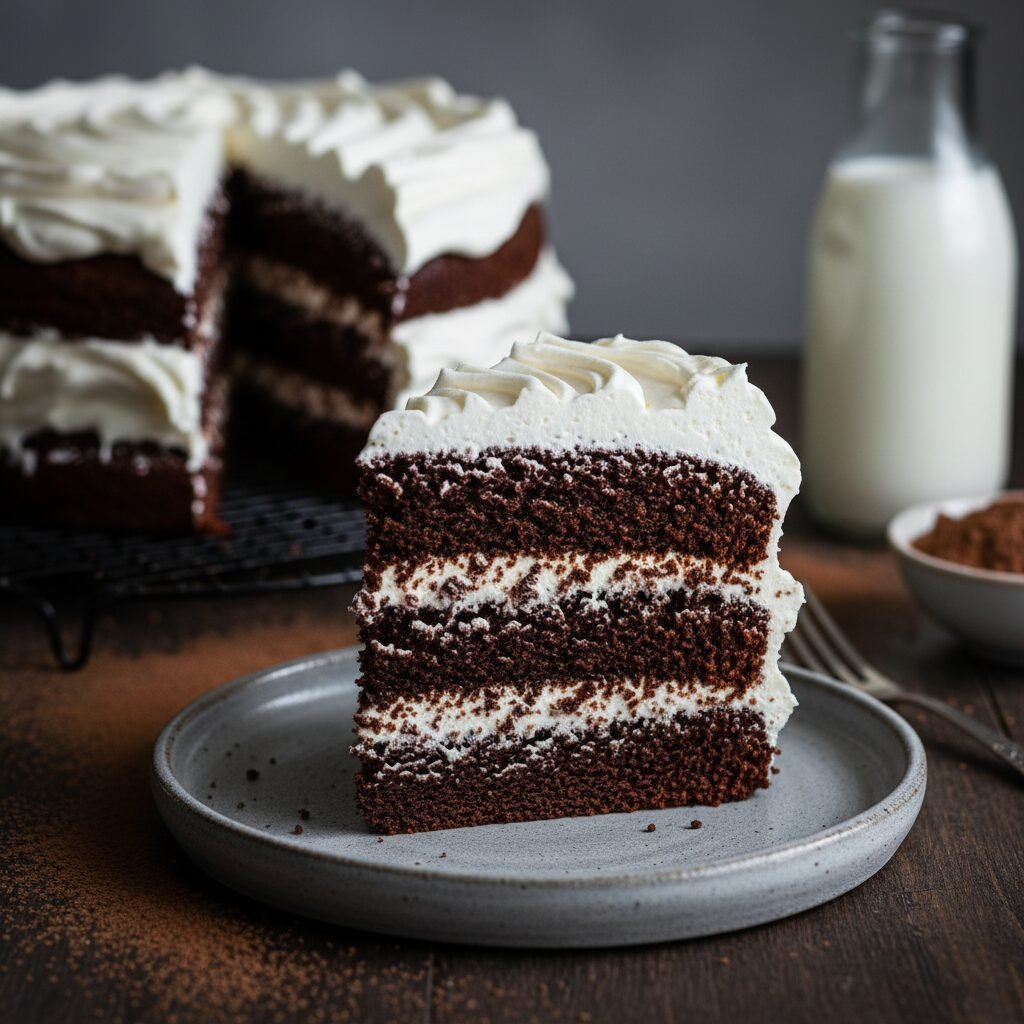
Decadent Moist Dairy-Free Chocolate Cake With Coconut Cream Frosting
Moist Dairy Free Chocolate Cake With Coconut Cream Frosting Recipe
Discover the ultimate indulgence with this incredibly moist dairy-free chocolate cake, proving you don’t need butter for a rich dessert. Topped with a cloud-like, luscious coconut cream frosting, it is the perfect allergy-friendly treat for birthdays and special occasions that everyone will love.
30 minutes
35 minutes
1 hour 15 minutes
12 servings
Dessert
Baking
American
Dairy-Free
For decades, home bakers have labored under the misconception that removing dairy from a cake recipe inevitably results in a dry, crumbly, or lackluster dessert. This Moist Dairy-Free Chocolate Cake is here to shatter that myth completely. We are talking about a cake with a crumb so tender, velvety, and deeply chocolaty that it rivals the finest offerings from high-end bakeries. The secret lies not in finding artificial substitutes, but in understanding the science of baking ingredients. By utilizing oil instead of butter and creating a homemade dairy-free buttermilk, we achieve a texture that stays moist for days longer than traditional butter-based cakes. But the cake itself is only half the story. The crowning jewel is the Coconut Cream Frosting. If you have never whipped full-fat coconut milk, you are in for a revelation. When chilled and whipped, coconut cream transforms into a billowing, snow-white topping that is lighter than buttercream yet richer than meringue. It carries a subtle, tropical whisper that pairs magnificently with the dark, intense cocoa notes of the sponge. This recipe is designed for everyone—whether you are strictly lactose intolerant, baking for a friend with allergies, or simply out of butter and eggs. It is a celebration of how plant-based ingredients can elevate, rather than limit, our culinary experiences. Prepare to make a mess of your kitchen in the best way possible, as the aroma of blooming cocoa powder fills your home, promising a dessert that is as comforting as it is sophisticated. This isn’t just a ‘good for being dairy-free’ cake; it is simply one of the best chocolate cakes you will ever eat.
History & Origins
The history of chocolate cake is a fascinating journey through culinary innovation and economic necessity. While chocolate has been consumed as a beverage for millennia, dating back to the Aztecs and Mayans, its incorporation into flour-based confections is a relatively modern phenomenon. In the early 19th century, chocolate was too coarse and expensive to be used effectively in cakes. It wasn’t until 1828, when Coenraad van Houten invented the hydraulic cocoa press, that cocoa powder became accessible, allowing for a finer texture and more concentrated flavor in baking. The first ‘chocolate cakes’ were actually yellow cakes with chocolate frosting. It wasn’t until the late 1800s that cooks began mixing chocolate directly into the batter, giving birth to the ‘Devil’s Food’ cake, named for its dark, reddish-black hue, standing in contrast to the snowy ‘Angel Food’ cake. However, the lineage of dairy-free baking saw its most significant rise during the Great Depression and World War II. With rationing of butter, milk, and eggs, resourceful home cooks developed ‘Depression Cake’ or ‘Wacky Cake,’ which relied on the chemical reaction between vinegar and baking soda for lift, and oil for moisture. These recipes proved that dairy wasn’t strictly necessary for a delicious outcome. In recent decades, the health and wellness movement, along with a surge in veganism, has revitalized interest in dairy-free baking. The discovery that chilled coconut cream could be whipped into a stable frosting is a modern culinary hack that has revolutionized dairy-free desserts, moving away from shortening-based frostings to more natural, flavorful alternatives. This recipe honors that history by combining the oil-based moisture techniques of the wartime era with the modern luxury of coconut cream.
Why This Recipe Works
This recipe succeeds where others fail due to a precise balance of fat, acidity, and temperature. First, let’s talk about the fat source. Butter is approximately 80% fat and 20% water, and while it provides flavor, it solidifies at room temperature. Vegetable oil, however, is 100% fat and remains liquid at room temperature. This means that an oil-based cake will always feel moister on the palate than a butter-based one, and it retains that tenderness even after refrigeration. Secondly, we create a ‘dairy-free buttermilk’ by combining almond milk with apple cider vinegar. This acidity is crucial; it reacts with the baking soda to create carbon dioxide gas, providing lift and a tender crumb structure that prevents the cake from becoming dense or gummy. Another critical technique employed here is ‘blooming’ the cocoa powder with boiling hot coffee or water. Cocoa powder is full of cocoa butter and starch particles. Adding boiling liquid dissolves the cocoa powder instantly, releasing the full depth of the chocolate flavor and ensuring there are no dry, powdery pockets in the batter. The coffee enhances the chocolate notes without making the cake taste like mocha. Finally, the frosting works because of the high saturated fat content in coconut milk. When chilled, these fats crystallize, allowing the cream to hold air bubbles when whipped, mimicking the structure of heavy dairy cream without the lactose.
Why You’ll Love This Recipe
- ✓Stays moist for days thanks to the oil-based batter.
- ✓Intense chocolate flavor boosted by hot coffee.
- ✓Silky, cloud-like coconut frosting that is naturally dairy-free.
- ✓No fancy mixer required for the cake batter.
- ✓Perfect for those with lactose intolerance or dairy allergies.
Equipment You’ll Need
- ✓Two 8-inch round cake pans
- ✓Stand mixer or hand mixer (for frosting)
- ✓Large mixing bowl
- ✓Medium mixing bowl
- ✓Whisk
- ✓Rubber spatula
- ✓Wire cooling rack
- ✓Parchment paper
Ingredients
- ✓2 cups all-purpose flour
- ✓2 cups granulated sugar
- ✓3/4 cup unsweetened cocoa powder
- ✓2 teaspoons baking powder
- ✓1 1/2 teaspoons baking soda
- ✓1 teaspoon salt
- ✓1 cup unsweetened almond milk (or soy milk)
- ✓1 tablespoon apple cider vinegar
- ✓1/2 cup vegetable oil (or melted coconut oil)
- ✓2 large eggs (room temperature)
- ✓2 teaspoons vanilla extract
- ✓1 cup boiling hot coffee (or boiling water)
- ✓3 cans (13.5 oz each) full-fat coconut milk, chilled in fridge overnight
- ✓1/2 cup powdered sugar, sifted
- ✓1 teaspoon vanilla bean paste or extract
Instructions
- Preheat your oven to 350°F (175°C). Grease two 8-inch round cake pans and line the bottoms with parchment paper. Dust the sides with a little cocoa powder.
- In a measuring cup, combine the almond milk and apple cider vinegar. Let it sit for 5-10 minutes to curdle and create a dairy-free ‘buttermilk’.
- In a large mixing bowl, whisk together the flour, sugar, cocoa powder, baking powder, baking soda, and salt until well combined and no lumps remain.
- Add the eggs, oil, vanilla extract, and the curdled almond milk mixture to the dry ingredients. Mix on low speed or whisk by hand until just combined.
- Carefully pour in the boiling hot coffee. Whisk gently until combined. The batter will be very thin and liquid; this is normal and ensures a moist cake.
- Divide the batter evenly between the two prepared cake pans.
- Bake for 30-35 minutes, or until a toothpick inserted into the center comes out clean or with just a few moist crumbs.
- Remove from the oven and let the cakes cool in the pans for 10 minutes. Then, run a knife around the edges and invert them onto a wire rack to cool completely before frosting.
- To make the frosting: Remove the chilled cans of coconut milk from the fridge without shaking them. Open the cans and scoop out the thick, hardened coconut cream that has separated to the top into a mixing bowl. Discard the liquid water or save it for smoothies.
- Using a hand mixer or stand mixer with the whisk attachment, beat the coconut cream on high speed for 2-4 minutes until it becomes fluffy and light.
- Add the sifted powdered sugar and vanilla bean paste. Whip for another 1-2 minutes until smooth and creamy.
- Place one cooled cake layer on a serving plate. Spread a thick layer of coconut cream frosting over the top. Place the second cake layer on top and frost the top and sides of the cake.
- Refrigerate the frosted cake for at least 30 minutes before slicing to allow the frosting to set.
Expert Cooking Tips
- ✓Ensure your baking powder and baking soda are fresh; expired leaveners will result in a flat cake.
- ✓Do not skip the boiling water/coffee step; it blooms the cocoa for maximum flavor.
- ✓Chill your coconut milk cans for at least 24 hours to ensure the cream separates from the water.
- ✓Use ‘full-fat’ coconut milk only; ‘light’ coconut milk will not whip up.
- ✓Let the cake cool completely before frosting, otherwise, the coconut cream will melt.
- ✓If the frosting is too soft, place the bowl in the fridge for 15 minutes and re-whip.
- ✓Tap the cake pans on the counter before baking to release large air bubbles.
Substitutions and Variations
This recipe is highly adaptable to various dietary needs. If you need to make this cake 100% vegan (egg-free), you can substitute the 2 eggs with ‘flax eggs’ (2 tablespoons ground flaxseed meal mixed with 6 tablespoons warm water, let sit for 5 minutes). For a gluten-free version, swap the all-purpose flour for a high-quality 1:1 gluten-free baking flour blend that contains xanthan gum. If you have a nut allergy and cannot use almond milk, soy milk or oat milk work perfectly as substitutes for the ‘buttermilk’ mixture. For the oil, canola, vegetable, or melted coconut oil all work well; olive oil can be used but may impart a slight savory flavor. In the frosting, if you don’t like coconut, you can use a store-bought dairy-free butter stick and make a traditional buttercream, or use a ganache made from dairy-free chocolate chips and warm coconut milk. For the sweetener, regular granulated sugar is best for texture, but coconut sugar can be used for a lower glycemic index, though it will change the flavor profile slightly to be more caramel-like.
Common Mistakes to Avoid
The most common mistake with this recipe is over-mixing the batter once the flour is added. Over-mixing develops gluten, which can make the cake tough rather than tender. Mix until just combined. Another frequent error involves the coconut frosting: trying to whip room-temperature coconut milk will result in a liquid soup. The cans must be very cold to separate the fat. Also, be careful not to over-bake the cake. Because the batter is dark, it’s hard to see browning. Rely on the toothpick test and start checking at the 30-minute mark. Finally, do not try to frost a warm cake. Coconut oil melts at 76°F, so if your cake is even slightly warm, your beautiful frosting will slide right off.
Serving Suggestions
This rich cake pairs beautifully with fresh acidity to cut through the chocolate and coconut fats. Serve generous slices with a side of fresh raspberries, strawberries, or a tart berry coulis. For an elegant touch, garnish the top of the cake with toasted coconut flakes, shavings of dark dairy-free chocolate, or edible flowers. A scoop of dairy-free vanilla bean ice cream or a dollop of extra whipped coconut cream on the side makes it ultra-decadent. Beverage-wise, a hot espresso or a cold glass of oat milk complements the deep cocoa flavors perfectly.
Storage and Reheating Tips
Because the frosting is based on coconut cream, this cake is best stored in the refrigerator. It can be left out for about an hour before serving, but if the room is warm, the frosting may soften. Store the cake in an airtight cake carrier or cover the cut sections with plastic wrap to prevent drying out. It will stay fresh in the fridge for up to 5 days. For freezing, you can freeze the unfrosted cake layers wrapped tightly in plastic wrap for up to 3 months. You can also freeze individual slices of the frosted cake; place them on a baking sheet to freeze solid, then wrap them individually in plastic wrap and foil. Thaw in the refrigerator overnight before eating.
Nutrition Facts (Estimated)
| Serving Size | 1 slice |
| Calories | 480 |
| Fat | 26g |
| Saturated Fat | 14g |
| Unsaturated Fat | 10g |
| Trans Fat | 0g |
| Cholesterol | 35mg |
| Sodium | 310mg |
| Carbohydrates | 58g |
| Fiber | 4g |
| Sugar | 32g |
| Protein | 6g |
Frequently Asked Questions
Can I use light coconut milk for the frosting?
No, light coconut milk does not contain enough fat to whip up and hold its shape. You must use full-fat canned coconut milk or canned coconut cream.
Why do I need to add boiling coffee?
Boiling liquid blooms the cocoa powder, releasing its full flavor potential. Coffee specifically enhances the chocolate taste without making the cake taste like coffee. You can use boiling water if you prefer.
Can I make this into cupcakes?
Yes! This batter makes excellent cupcakes. Line a muffin tin with liners and fill them 2/3 full. Bake at 350°F for 18-22 minutes.
My coconut cream didn’t separate in the can. Why?
Some brands of coconut milk contain emulsifiers like guar gum that prevent separation. Look for brands with minimal ingredients, or buy cans specifically labeled ‘Coconut Cream’.
Can I use a different type of vinegar?
Yes, white distilled vinegar or lemon juice works just as well to sour the milk and create the buttermilk reaction.
Is this cake gluten-free?
The recipe as written uses wheat flour, so it is not gluten-free. However, it works very well with a 1:1 gluten-free flour blend.
Can I make the cake layers ahead of time?
Absolutely. You can bake the layers, let them cool, wrap them tightly in plastic wrap, and store them in the fridge for 2 days or freeze them for a month before frosting.
What if I am allergic to nuts?
Simply swap the almond milk for soy milk, oat milk, or rice milk. The result will be virtually the same.
Does the frosting taste like coconut?
Yes, the frosting has a distinct coconut flavor. If you dislike coconut, consider using a dairy-free margarine-based buttercream instead.
Why is my batter so runny?
This is intentional! A thin, liquid batter allows the flour to hydrate fully and results in a much moister cake than a thick batter would. Trust the process.
Conclusion
There is something incredibly satisfying about baking a cake that accommodates dietary restrictions without compromising on the sheer joy of dessert. This Moist Dairy-Free Chocolate Cake with Coconut Cream Frosting is a testament to that balance. It’s rich, it’s messy, it’s beautiful, and most importantly, it brings people together. Whether you are a seasoned vegan baker or just trying to reduce dairy in your diet, this recipe is a reliable staple that will never let you down. So, grab your whisk, brew that coffee, and get ready to enjoy a slice of chocolate heaven. Don’t forget to snap a picture of your creation and tag us on social media—we love seeing your baking triumphs!