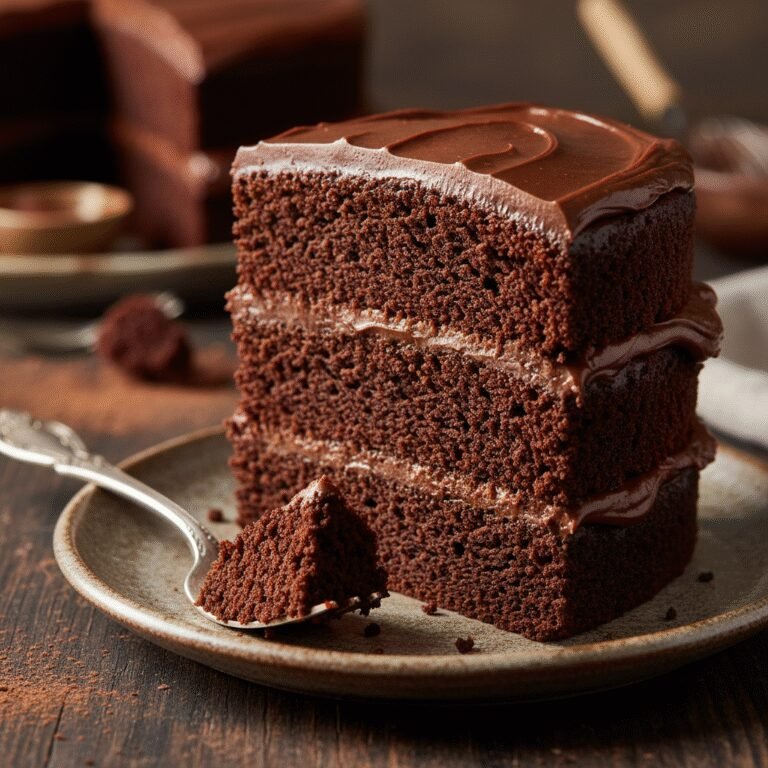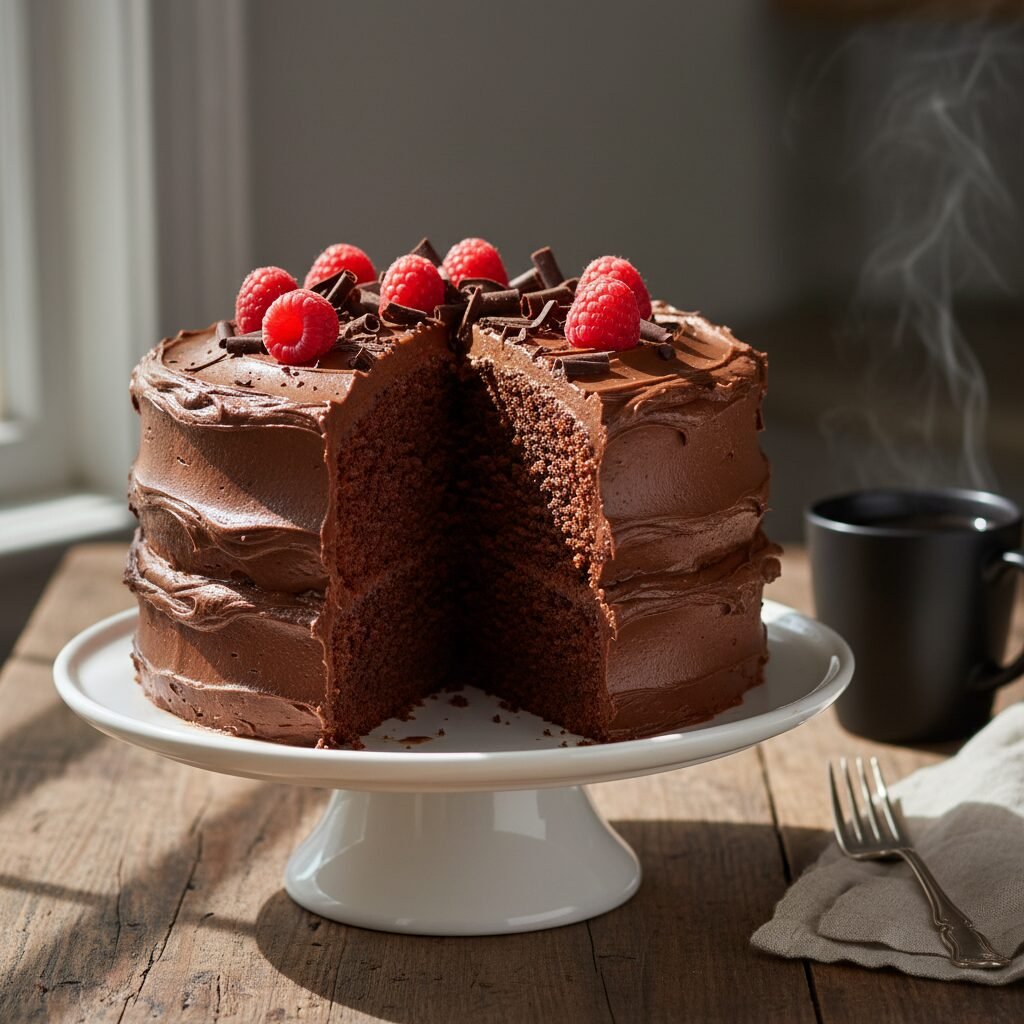
The Ultimate Moist Dairy-Free Chocolate Cake
Moist Dairy Free Chocolate Cake Recipe
Discover the secret to a chocolate cake so incredibly moist, rich, and decadent, you will never believe it is completely dairy-free. This foolproof recipe uses simple pantry staples and hot coffee to bloom the cocoa, resulting in a deep, fudgy flavor and a tender crumb that stays fresh for days.
20 minutes
35 minutes
55 minutes
12-14 servings (Two 8-inch rounds)
Dessert
Baking
American
Dairy-Free
There is a common misconception in the world of baking that you need pounds of butter and cups of heavy cream to achieve a truly decadent dessert. I am here to shatter that myth with a forkful of this Moist Dairy-Free Chocolate Cake. For years, home bakers have struggled with dairy-free alternatives that turn out dry, crumbly, or lacking in that signature richness we all crave. This recipe is the antithesis of those disappointments. It is dark, deeply chocolatey, and possesses a crumb so tender it practically melts on your tongue.
The magic lies not in expensive substitutes or hard-to-find gums, but in the chemistry of oil-based cakes and the technique of blooming cocoa powder. Unlike butter-based cakes which can firm up when cool, this oil-based marvel stays impeccably soft at room temperature and even straight from the fridge. Whether you are baking for someone with a lactose intolerance, a dairy allergy, or simply ran out of milk, this cake does not feel like a compromise—it feels like an upgrade.
Imagine a slice that is sturdy enough to hold a thick layer of frosting yet delicate enough to require nothing more than a dusting of powdered sugar. The inclusion of hot coffee intensifies the chocolate notes without imparting a coffee flavor, creating a complex profile that rivals any bakery offering. This is the kind of recipe that becomes a family heirloom, passed down not because it is ‘healthy’ or ‘dietary-friendly,’ but simply because it is the best chocolate cake anyone at the table has ever tasted.
History & Origins
The history of dairy-free chocolate cake is deeply rooted in American ingenuity during times of scarcity. While we often associate dairy-free baking with modern health trends or veganism, its origins are firmly planted in the Great Depression and the rationing era of World War II. During the 1930s, ingredients like milk, butter, and eggs were expensive and often hard to come by for the average family. This necessity birthed the ‘Depression Cake,’ also affectionately known as ‘Wacky Cake’ or ‘Crazy Cake.’
These early iterations relied on a reaction between vinegar and baking soda to provide lift in the absence of eggs, and oil was used as the primary fat source instead of butter. The result was a surprisingly light and moist cake that became a staple in American households. As the decades passed and rationing ended, butter and milk returned to vogue, pushing these resourceful recipes to the back of the recipe box.
However, the culinary world has seen a resurgence of these techniques, not just out of necessity, but out of a preference for texture. Professional bakers have long known that oil creates a moister cake than butter because it remains liquid at room temperature. This modern Dairy-Free Chocolate Cake is a sophisticated evolution of those wartime recipes. It retains the oil for moisture but often reintroduces eggs (unless making a vegan version) for better structure, and utilizes modern plant-based milks to mimic the richness of dairy without the lactose. It serves as a delicious bridge between historical resourcefulness and modern dietary consciousness.
Why This Recipe Works
This recipe succeeds where others fail due to three critical scientific principles: the fat source, the blooming technique, and the acidity. First, we use neutral oil instead of butter or dairy-free margarine. Butter is about 80% fat and 20% water/solids; when it melts and then cools, it solidifies, which can make a cake feel dense or dry. Oil is 100% fat and stays liquid, ensuring the cake remains sensationally moist and tender for days. It also coats the flour proteins effectively, inhibiting gluten formation which results in a softer crumb.
Second, the recipe calls for boiling hot water or coffee. When you mix hot liquid with cocoa powder, you ‘bloom’ the cocoa. This process dissolves the cocoa butter and solids, releasing flavor compounds that are otherwise trapped. This ensures every crumb is packed with intense chocolate flavor rather than a dusty, mild cocoa taste.
Finally, the combination of brown sugar (which is acidic) and Dutch-processed or natural cocoa with baking soda creates a robust leavening reaction. This lift is crucial in a heavy batter, ensuring the cake rises high and fluffy rather than turning into a dense brownie. The addition of a plant-based milk mixed with a touch of vinegar creates a ‘buttermilk’ substitute that further tenderizes the gluten strands.
Why You’ll Love This Recipe
- ✓Incredibly moist texture that stays soft for days
- ✓Deep, intense chocolate flavor enhanced by hot coffee
- ✓Completely dairy-free (lactose-free and casein-free)
- ✓Simple one-bowl mixing method
- ✓Versatile batter suitable for layer cakes or cupcakes
- ✓Uses standard pantry ingredients—no specialty gums required
Equipment You’ll Need
- ✓Two 8-inch round cake pans
- ✓Large mixing bowl
- ✓Whisk
- ✓Electric mixer (optional, hand whisking works fine)
- ✓Measuring cups and spoons
- ✓Parchment paper
- ✓Wire cooling rack
Ingredients
- ✓2 cups granulated sugar
- ✓1 3/4 cups all-purpose flour
- ✓3/4 cup unsweetened cocoa powder (high quality preferred)
- ✓1 1/2 teaspoons baking powder
- ✓1 1/2 teaspoons baking soda
- ✓1 teaspoon salt
- ✓2 large eggs (room temperature)
- ✓1 cup unsweetened almond milk (or soy/oat milk)
- ✓1/2 cup vegetable oil (or canola/melted coconut oil)
- ✓2 teaspoons pure vanilla extract
- ✓1 cup boiling hot coffee (or boiling water)
Instructions
- Preheat your oven to 350°F (175°C). Grease two 8-inch round cake pans with oil and dust with cocoa powder, or line the bottoms with parchment paper for easy removal.
- In a large mixing bowl, whisk together the sugar, flour, cocoa powder, baking powder, baking soda, and salt. Ensure there are no large lumps of cocoa powder.
- Add the eggs, almond milk, oil, and vanilla extract to the dry ingredients. Beat on medium speed with an electric mixer or whisk vigorously by hand for about 2 minutes. The batter should look smooth and glossy.
- Stir in the boiling hot coffee (or water) by hand. Pour it in slowly to avoid splashing. The batter will become very thin and liquidy—this is completely normal and essential for the moist texture.
- Pour the batter evenly into the prepared cake pans.
- Bake for 30 to 35 minutes. Test for doneness by inserting a wooden toothpick into the center of the cake; it should come out clean or with just a few moist crumbs attached.
- Remove the cakes from the oven and let them cool in the pans for about 10 minutes. This allows them to set slightly so they don’t break when moved.
- Run a knife around the edges to loosen, then invert the cakes onto a wire rack to cool completely before frosting.
- Frost with your favorite dairy-free buttercream or ganache once the cakes are cool to the touch.
Expert Cooking Tips
- ✓Do not overbake. Check the cake 5 minutes before the timer goes up. Overbaking is the number one cause of dry cake.
- ✓Use high-quality cocoa powder. Since chocolate is the main flavor, a premium brand like Ghirardelli or Valrhona makes a huge difference.
- ✓Don’t skip the boiling liquid. The heat blooms the cocoa powder, releasing the full depth of the chocolate flavor.
- ✓Room temperature ingredients (eggs and milk) mix better and create a more uniform emulsion than cold ingredients.
- ✓If using coconut oil, ensure all other ingredients are room temperature so the oil doesn’t solidify into chunks upon contact.
- ✓Tap the pans on the counter before baking to release any large air bubbles trapped in the batter.
Substitutions and Variations
This recipe is quite flexible. If you don’t have almond milk, you can use soy milk, oat milk, or even rice milk. For a nut-free version, oat or soy are excellent choices. If you want to avoid caffeine, decaf coffee works perfectly, or you can simply use boiling water; however, the coffee truly enhances the chocolate flavor without making it taste like mocha. For the oil, any neutral oil works (canola, vegetable, grapeseed). You can use melted coconut oil, but it may impart a slight coconut flavor. To make this cake gluten-free, substitute the all-purpose flour with a high-quality 1:1 Gluten-Free Baking Flour blend that contains xanthan gum. If you are vegan, you can replace the 2 eggs with 2 flax eggs (2 tbsp ground flaxseed meal mixed with 6 tbsp water, let sit for 5 minutes), though the cake will be slightly denser.
Common Mistakes to Avoid
The most common mistake is over-measuring the flour. If you scoop the measuring cup directly into the flour bag, you compact it, leading to a dry cake. Instead, use the ‘spoon and level’ method: spoon flour into the cup and level it off with a knife. Another mistake is opening the oven door too early, which can cause the cake to sink in the middle. Wait until at least 25 minutes have passed before checking. Finally, do not try to frost the cake while it is even slightly warm. The frosting will slide right off or melt into the cake. Patience is key for the perfect finish.
Serving Suggestions
This cake is rich and stands up well to a variety of toppings. For a classic birthday cake feel, frost it with a dairy-free chocolate buttercream made with vegan butter sticks and cocoa powder. For a lighter option, serve a slice with a dollop of coconut whipped cream and fresh raspberries or strawberries. The tartness of fresh berries cuts through the richness of the chocolate beautifully. If you are feeling decadent, a warm dairy-free chocolate ganache drizzle (made with coconut cream and dark chocolate chips) is a showstopper.
Storage and Reheating Tips
Because this cake is oil-based, it stays moist for a long time. Store the frosted cake at room temperature in an airtight cake carrier for up to 3 days. If your kitchen is very hot or humid, store it in the refrigerator for up to 5 days, but let it come to room temperature before serving for the best texture. Unfrosted cake layers can be wrapped tightly in plastic wrap, then foil, and frozen for up to 3 months. Thaw frozen layers in the refrigerator overnight before frosting.
Nutrition Facts (Estimated)
| Serving Size | 1 slice |
| Calories | 380 |
| Fat | 18g |
| Saturated Fat | 2.5g |
| Unsaturated Fat | 15g |
| Trans Fat | 0g |
| Cholesterol | 35mg |
| Sodium | 320mg |
| Carbohydrates | 52g |
| Fiber | 3g |
| Sugar | 28g |
| Protein | 5g |
Frequently Asked Questions
Can I make this recipe into cupcakes?
Yes, absolutely. This batter makes excellent cupcakes. Line a muffin tin with paper liners and fill them about 2/3 full. Bake at 350°F for 18-22 minutes. It should yield about 24 cupcakes.
Will the cake taste like coffee?
No, it will not. The coffee serves to intensify the chocolate flavor, making it taste ‘more chocolatey.’ You won’t detect a distinct coffee flavor in the final product.
Can I use olive oil?
You can use mild olive oil, but extra virgin olive oil has a strong flavor that might clash with the chocolate. Stick to ‘light’ or ‘pure’ olive oil, or vegetable oil for the most neutral taste.
Why is my batter so runny?
This is intentional! The batter is supposed to be very thin compared to butter-based cakes. This high liquid content ensures the flour fully hydrates and results in a super moist crumb.
Can I use gluten-free flour?
Yes, a 1:1 gluten-free all-purpose baking blend (like King Arthur or Bob’s Red Mill) works very well in this recipe. The texture may be slightly different, but still delicious.
What is the best dairy-free frosting to use?
A simple American buttercream using high-quality vegan butter sticks (not tub margarine) and powdered sugar is the most stable. Alternatively, a ganache made from full-fat canned coconut milk and dairy-free chocolate chips is rich and glossy.
Can I use cacao powder instead of cocoa powder?
Raw cacao powder is more acidic and absorbs liquid differently than roasted cocoa powder. While you can use it, the cake might be slightly lighter in color and drier. Standard unsweetened cocoa powder is recommended.
How do I prevent the cake from sticking to the pan?
The best insurance policy is parchment paper. Trace the bottom of your pan on parchment paper, cut it out, and place it in the bottom of the greased pan. The cake will release perfectly every time.
Conclusion
There you have it—the definitive guide to making a Moist Dairy-Free Chocolate Cake that requires zero compromise on flavor or texture. This recipe proves that dietary restrictions don’t have to mean missing out on life’s sweetest moments. Whether you are celebrating a birthday, a holiday, or just a Tuesday night craving, this cake delivers pure chocolate bliss. Gather your ingredients, boil that water, and get ready to bake a dessert that will have everyone asking for the recipe, completely shocked when you tell them it’s dairy-free. Happy baking!