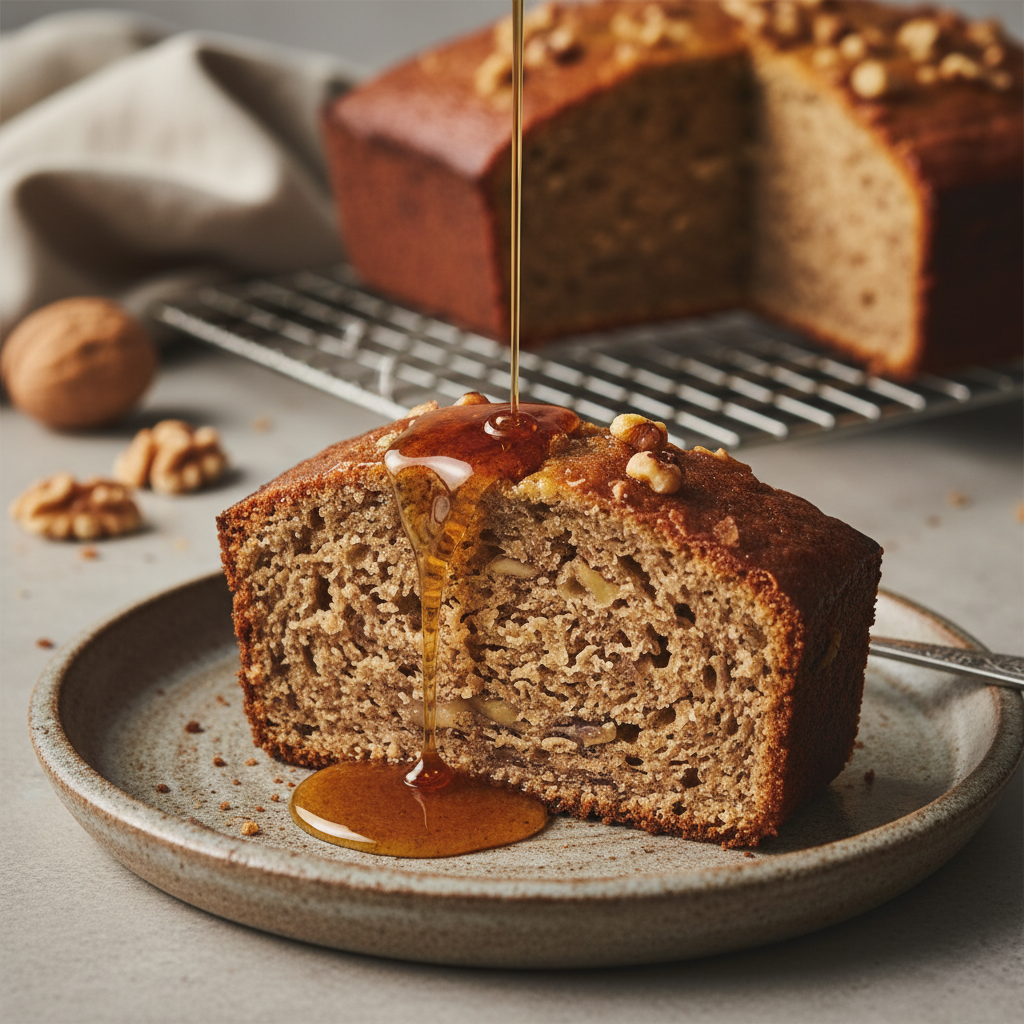
The Ultimate Low Sugar Banana Cake with Maple Syrup
Low Sugar Low Sugar Banana Cake With Maple Syrup Recipe
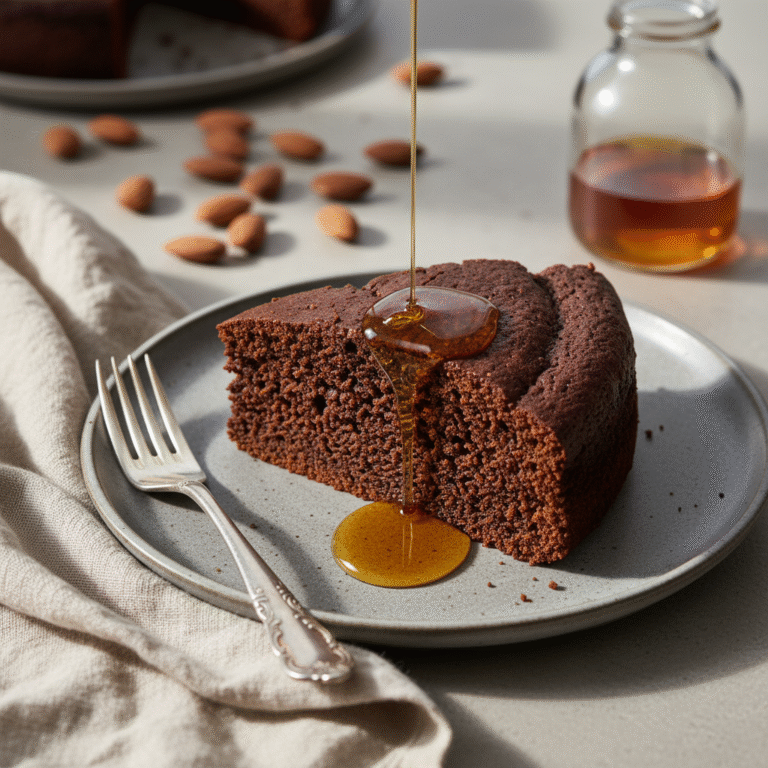
Indulge in this guilt-free, naturally sweetened banana cake that uses pure maple syrup instead of refined sugar. It is incredibly moist, fluffy, and packed with banana flavor, making it the perfect healthy treat for breakfast or dessert.
15 minutes
45 minutes
1 hour
12 servings
Dessert
Baking
American
Vegetarian
There is something undeniably comforting about the aroma of baking bananas filling the kitchen. It speaks of home, warmth, and the simple joy of turning overripe fruit into something spectacular. However, traditional banana cake recipes are often laden with cups of white granulated sugar, turning a potentially wholesome snack into a sugar crash waiting to happen. This Low Sugar Banana Cake with Maple Syrup recipe is the answer for those of us who want to enjoy the tender crumb of a classic cake without the heavy load of processed ingredients. By harnessing the intense natural sweetness of spotted, brown bananas and pairing them with the rich, complex notes of pure maple syrup, we achieve a depth of flavor that white sugar simply cannot compete with. The maple syrup adds a subtle caramel undertone that complements the tropical fruitiness of the bananas perfectly, while also contributing to a moisture level that keeps this cake soft for days. This recipe isn’t just about removing ‘bad’ ingredients; it is about elevating the flavor profile using better ones. Whether you are looking for a toddler-friendly snack, a lighter dessert option, or just a way to use up those bananas on the counter, this cake delivers on all fronts. It is dense enough to be satisfying but light enough to not feel heavy, with a golden-brown crust that is slightly sticky and utterly delicious. We’ve stripped back the unnecessary additives to let the star ingredients shine, resulting in a bake that feels wholesome yet indulgent. Prepare to redefine what ‘low sugar’ tastes like, because this cake proves you don’t need a cup of sugar to make life sweet.
History & Origins
The history of banana cake and banana bread is a fascinating journey through American culinary innovation, deeply rooted in the economic necessity of the Great Depression. While bananas were being imported to the United States since the late 19th century, it wasn’t until the widespread availability of baking powder and baking soda in the 1930s that ‘quick breads’ became a household staple. During the Depression, throwing away food was unthinkable. Housewives needed a way to use overripe bananas that were too mushy to eat out of hand, leading to the birth of the mashed banana batter. Over the decades, this humble loaf evolved into a sweeter, more cake-like dessert, often frosted with cream cheese or loaded with chocolate chips. However, parallel to this history is the ancient tradition of maple syrup production in North America. Long before European settlers arrived, Indigenous peoples in the northeastern woodlands were harvesting sap from maple trees and boiling it down into syrup and sugar. It was a primary source of energy and sweetness. Merging these two histories—the Depression-era resourcefulness of banana bread with the native, unrefined sweetness of maple syrup—creates a modern classic that honors the past. In recent years, as the ‘clean eating’ movement has gained momentum, there has been a concerted effort to return to these pre-industrial sweeteners. We are seeing a culinary shift back to ingredients that offer nutritional benefits alongside flavor, moving away from the post-war boom of processed white sugar and back towards the earthier, historic sweeteners like maple and honey.
Why This Recipe Works
This recipe works exceptionally well because it balances the science of baking with the art of flavor layering. In baking, sugar does more than just sweeten; it is a hygroscopic agent, meaning it attracts and holds onto water molecules. This helps retain moisture in the cake. By substituting granulated sugar with maple syrup, which is a liquid sweetener, we are introducing moisture right from the start. However, simply swapping them 1:1 would ruin the texture. This recipe adjusts the ratio of dry ingredients (flour) to wet ingredients (eggs, oil, syrup) to accommodate the extra liquid, ensuring the cake rises properly rather than becoming a dense pudding. Furthermore, the acidity in the maple syrup reacts beautifully with the baking soda. This acid-base reaction produces carbon dioxide bubbles, which are trapped in the batter as it bakes, giving the cake a superior lift and a tender, airy crumb. We also rely heavily on the bananas themselves. By insisting on ‘very ripe’ bananas, we maximize the fructose content, allowing us to reduce added sweeteners significantly. The oil (preferably coconut or a neutral oil) coats the flour proteins, preventing excessive gluten formation, which ensures the cake remains tender rather than chewy. The result is a chemically balanced batter that yields a cake that is structurally sound, incredibly moist, and perfectly sweet.
Why You’ll Love This Recipe
- ✓Refined Sugar-Free: Sweetened entirely with fruit and maple syrup.
- ✓Incredibly Moist: The liquid sweetener and oil ensure a tender crumb.
- ✓One-Bowl Wonder: Minimal cleanup required for this easy batter.
- ✓Kid-Friendly: A healthy option for lunchboxes or after-school snacks.
- ✓Freezer Friendly: Slices freeze beautifully for meal prep.
- ✓Versatile: Easy to customize with nuts, seeds, or chocolate chips.
Equipment You’ll Need
- ✓9×5 inch loaf pan or 8×8 square pan
- ✓Large mixing bowl
- ✓Medium mixing bowl
- ✓Whisk
- ✓Rubber spatula
- ✓Measuring cups and spoons
- ✓Wire cooling rack
Ingredients
- ✓3 large overripe bananas (mashed, approx. 1.5 cups)
- ✓1/2 cup pure maple syrup (Grade A or B)
- ✓1/3 cup melted coconut oil (or neutral vegetable oil)
- ✓2 large eggs (room temperature)
- ✓1 teaspoon pure vanilla extract
- ✓1/4 cup Greek yogurt or sour cream (optional, for extra moisture)
- ✓2 cups all-purpose flour (or white whole wheat flour)
- ✓1 teaspoon baking soda
- ✓1/2 teaspoon baking powder
- ✓1/2 teaspoon salt
- ✓1 teaspoon ground cinnamon
- ✓1/2 cup chopped walnuts or pecans (optional)
Instructions
- Preheat your oven to 350°F (175°C). Grease your 9×5 inch loaf pan or 8×8 square baking pan with non-stick spray or line it with parchment paper for easy removal.
- In a large mixing bowl, peel the ripe bananas and mash them thoroughly with a fork or potato masher until they are smooth with only small lumps remaining.
- Add the melted coconut oil and maple syrup to the mashed bananas. Whisk vigorously until the oil and syrup are fully incorporated.
- Crack the eggs into the bowl one at a time, whisking well after each addition. Stir in the vanilla extract and the Greek yogurt (if using).
- In a separate medium bowl, whisk together the flour, baking soda, baking powder, salt, and cinnamon. This ensures the leavening agents are evenly distributed.
- Pour the dry ingredients into the wet ingredients. Using a rubber spatula, gently fold the mixture together. Stop mixing as soon as the flour streaks disappear. Do not overmix.
- If you are adding nuts or any other mix-ins, gently fold them in now.
- Pour the batter into the prepared baking pan and smooth the top with the spatula.
- Bake in the preheated oven for 40-50 minutes. Check at the 40-minute mark. A toothpick inserted into the center should come out clean or with just a few moist crumbs attached.
- If the top is browning too quickly before the center is cooked, loosely tent the pan with aluminum foil for the last 10-15 minutes of baking.
- Remove the cake from the oven and let it cool in the pan for 10 minutes. Then, lift it out onto a wire rack to cool completely before slicing.
Expert Cooking Tips
- ✓Use the ripest bananas you can find; the browner the skin, the sweeter the cake.
- ✓Room temperature eggs incorporate better into the batter, creating a smoother emulsion.
- ✓Measure your flour correctly by spooning it into the cup and leveling it off, rather than scooping directly from the bag.
- ✓Do not overmix the batter once the flour is added, or the cake will become rubbery and tough.
- ✓If using coconut oil, ensure your other wet ingredients aren’t cold, or the oil will solidify into chunks.
- ✓Toast your nuts before adding them to the batter for a richer, nuttier flavor.
- ✓Let the cake cool completely before slicing to prevent it from crumbling.
Substitutions and Variations
This recipe is quite resilient and allows for several substitutions to fit your dietary needs. For the flour, you can substitute up to 50% of the all-purpose flour with white whole wheat flour or oat flour for added fiber; however, using 100% whole wheat may result in a denser loaf. For a gluten-free version, use a high-quality 1:1 gluten-free baking flour blend containing xanthan gum. If you do not have maple syrup, honey or agave nectar are excellent liquid sweetener alternatives, though honey will brown faster in the oven. The coconut oil can be replaced with melted unsalted butter for a more traditional flavor, or any neutral oil like canola or avocado oil. If you are out of eggs, you can try using ‘flax eggs’ (1 tablespoon ground flaxseed mixed with 3 tablespoons water per egg), though the texture will be slightly denser. The Greek yogurt is optional but can be swapped for sour cream or even applesauce if you want to reduce the fat content further.
Common Mistakes to Avoid
The most common mistake when making banana cake is using under-ripe bananas. Yellow or green bananas lack the necessary sugar content and moisture, resulting in a bland, dry cake. Always wait until they are covered in brown spots. Another frequent error is overmixing the batter. Once the wet and dry ingredients meet, gluten begins to develop. Mixing too much creates a tough, chewy texture rather than a soft crumb. Additionally, be careful with your oven temperature. If the oven is too hot, the outside will burn before the inside cooks. An oven thermometer is a great tool to ensure accuracy. Finally, cutting into the cake while it is still hot is tempting, but it releases steam that is essential for keeping the cake moist. Patience during the cooling process pays off with a better texture.
Serving Suggestions
This Low Sugar Banana Cake is versatile enough to be served at any time of day. For a decadent breakfast, serve a warm slice topped with a dollop of Greek yogurt, a drizzle of almond butter, and a sprinkle of chia seeds. It pairs beautifully with a hot cup of coffee or herbal tea. For an afternoon snack, it is delicious on its own or lightly toasted with a smear of salted butter. If you want to turn it into a dessert, consider serving it with a scoop of vanilla bean ice cream or a homemade maple-sweetened whipped cream. A dusting of cinnamon or a few fresh berries on the side adds a lovely pop of color and freshness to the plate.
Storage and Reheating Tips
To keep your banana cake fresh, store it in an airtight container at room temperature for up to 3 days. The moisture content is high, so if you live in a very humid climate, you may prefer to store it in the refrigerator, where it will last for up to a week. This cake freezes exceptionally well. To freeze, wrap individual slices tightly in plastic wrap and then place them in a heavy-duty freezer bag. They can be frozen for up to 3 months. Thaw slices on the counter for an hour or warm them in the microwave for 20-30 seconds for an instant warm treat. Avoid storing the cake while it is still warm, as the trapped condensation will make the crust soggy.
Nutrition Facts (Estimated)
| Serving Size | 1 slice |
| Calories | 210 |
| Fat | 9g |
| Saturated Fat | 6g |
| Unsaturated Fat | 3g |
| Trans Fat | 0g |
| Cholesterol | 35mg |
| Sodium | 180mg |
| Carbohydrates | 30g |
| Fiber | 2g |
| Sugar | 12g |
| Protein | 4g |
Frequently Asked Questions
Can I use frozen bananas for this recipe?
Yes, absolutely! Thaw the frozen bananas completely in a bowl before using. They will release a lot of liquid; do not discard this liquid, as it contains flavor and sugar. Mash the bananas including the liquid and proceed with the recipe as normal.
Is this cake suitable for diabetics?
While this cake uses maple syrup instead of refined sugar, it still contains carbohydrates and natural sugars from the fruit and syrup. It is ‘lower’ sugar than traditional cakes, but individuals with diabetes should check the nutrition facts and consult their dietary guidelines.
Why did my banana cake sink in the middle?
Sinking usually happens if the cake is underbaked in the center. Even if the top looks done, the middle might still be liquid. Use the toothpick test. It can also happen if you open the oven door too frequently, causing a sudden drop in temperature.
Can I bake this as muffins instead?
Yes, this batter works great for muffins. Grease a standard muffin tin or use liners. Bake at 350°F (175°C) for approximately 18-22 minutes. The yield will be about 12 standard muffins.
Can I reduce the maple syrup further?
You can reduce the maple syrup to 1/3 cup, but the cake will be less sweet and slightly drier. If you reduce the liquid sweetener, you might need to add a tablespoon of milk or applesauce to maintain the moisture balance.
My cake is too dark on the outside but raw inside. What do I do?
This indicates your oven might be running hot. Tent the cake with aluminum foil to prevent further browning and continue baking until the center is set. Next time, try lowering the oven temperature by 25 degrees.
Can I add chocolate chips?
Definitely! Dark chocolate chips are a great addition and keep with the lower-sugar theme compared to milk chocolate. Add about 1/2 cup when you fold in the flour.
What is the best way to ripen bananas quickly?
If you need ripe bananas immediately, place unpeeled bananas on a baking sheet and bake at 300°F for about 15-20 minutes until the skins are black and the fruit is soft.
Conclusion
We hope this Low Sugar Banana Cake with Maple Syrup becomes a staple in your kitchen just as it has in ours. It is the perfect example of how wholesome ingredients can come together to create something truly delightful, proving that you don’t need excessive amounts of refined sugar to enjoy a sweet treat. Whether you are baking for your family, prepping snacks for the week, or just treating yourself to a cozy afternoon baking session, this recipe is sure to impress. Don’t forget to share your creations with us on social media or leave a comment below about how it turned out for you. Happy baking!