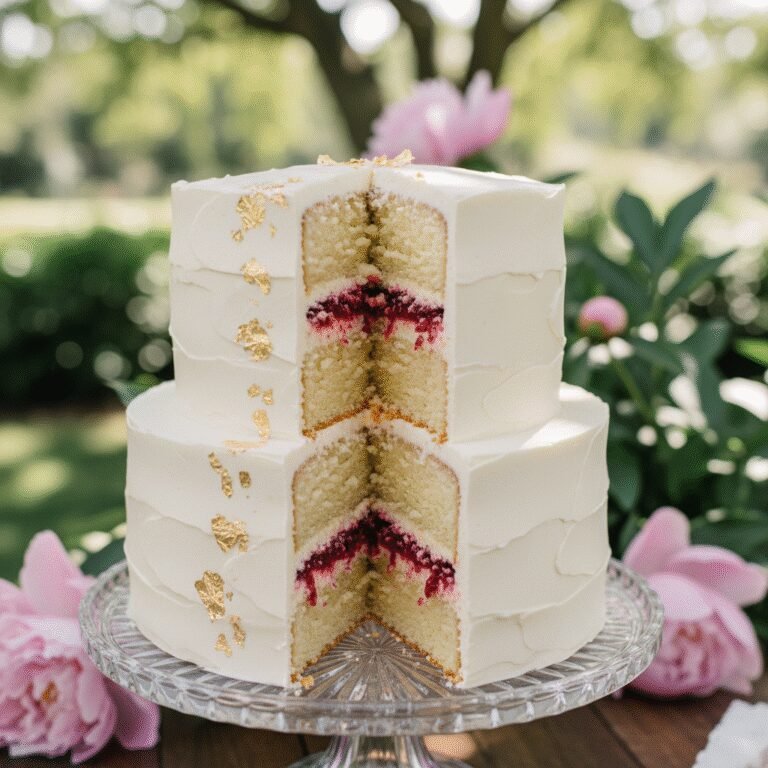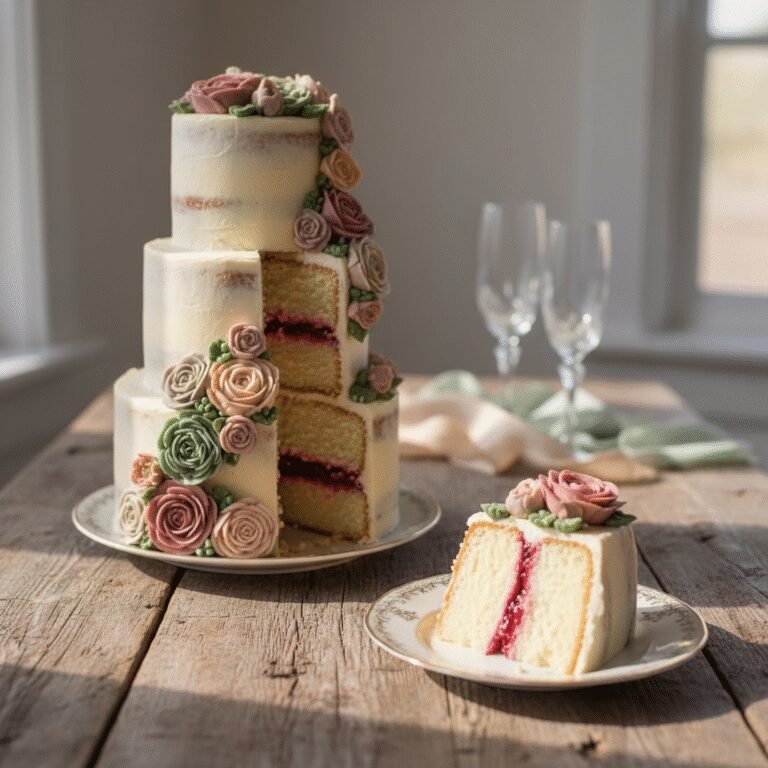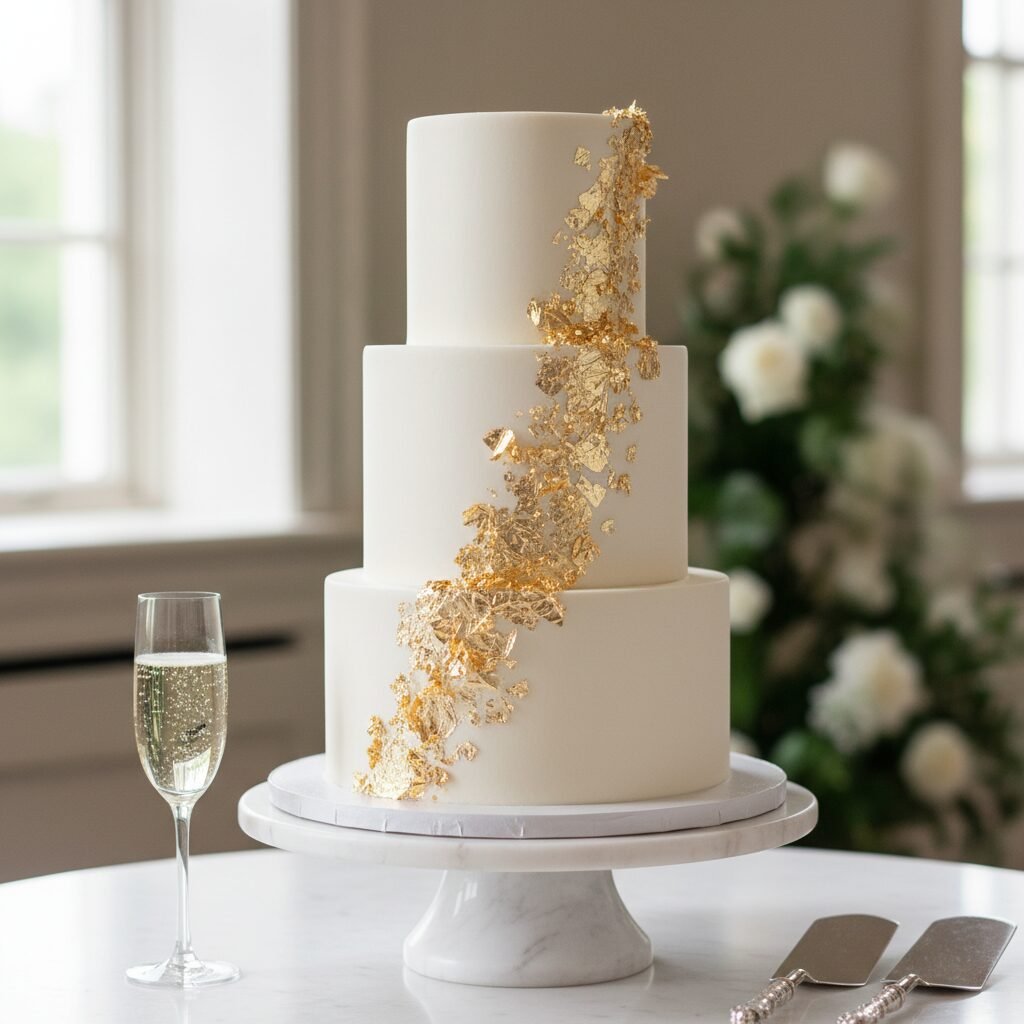
Elegant White Wedding Cake With Gold Leaf Decoration
Elegant White Wedding Cake With Gold Leaf Decoration Recipe
Create a show-stopping centerpiece with this recipe for an elegant white wedding cake. Featuring tender, velvety vanilla layers and silky Swiss meringue buttercream, this masterpiece is finished with delicate edible gold leaf for a touch of modern luxury perfect for your special day.
2 hours
50 minutes
5 hours (includes cooling & assembly)
3-Tier Cake (6, 8, and 10 inch rounds) – Approx. 50-60 servings
Dessert
Baking
American / French
Vegetarian
There is perhaps no dessert more iconic, more photographed, or more anticipated than the wedding cake. While the prospect of baking a wedding cake at home might seem daunting, reserved only for professional pastry chefs with industrial kitchens, the reality is that with the right recipe and a bit of patience, you can create a confection that rivals any high-end bakery. This Elegant White Wedding Cake with Gold Leaf Decoration is designed specifically for the ambitious home baker who wants to infuse their special day with a deeply personal touch.
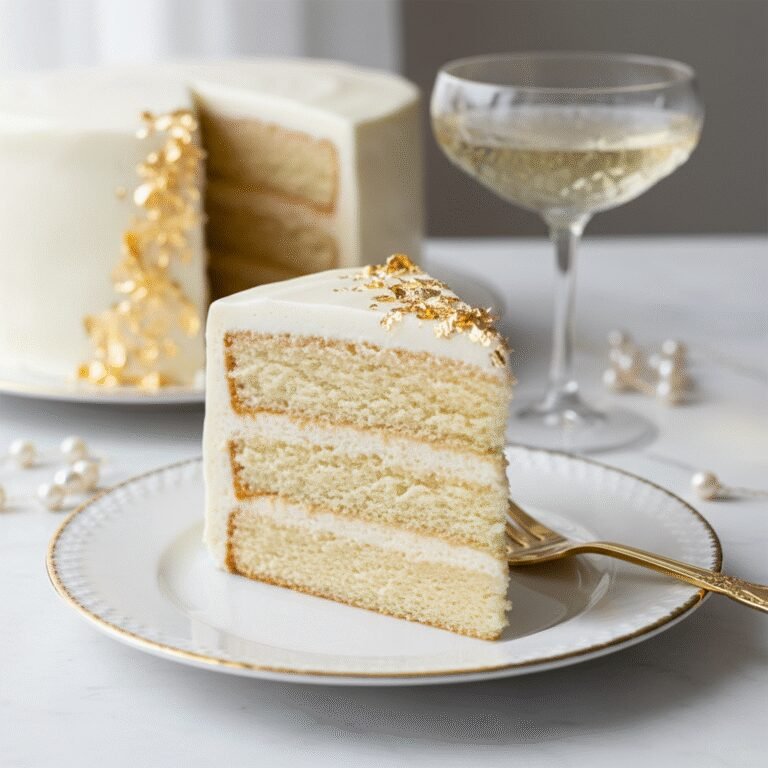
The cake itself is a triumph of texture and flavor. We move away from the dry, dense sponges often associated with mass-produced wedding cakes and instead embrace a ‘high-ratio’ white cake. By using the reverse creaming method and incorporating sour cream and egg whites, we achieve a crumb that is incredibly tight and velvety, yet moist and tender. It has a pure, clean vanilla flavor that pairs perfectly with almost any filling, though here we stick to a classic, sophisticated profile.
The exterior is cloaked in a Swiss Meringue Buttercream. Unlike the gritty sweetness of American buttercream, this frosting is silky, not overly sweet, and dries to a perfect semi-matte finish that serves as the ideal canvas for our decoration. The pièce de résistance is the application of 24-karat edible gold leaf. The gold adds an organic, cascading shimmer that catches the light and elevates the simple white design into a work of modern art. Whether you are making this for your own wedding, a friend’s nuptials, or an elegant anniversary celebration, this cake is a statement of love, skill, and refined taste.
History & Origins
The tradition of the wedding cake is steeped in centuries of folklore, evolving significantly from its humble origins. In Ancient Rome, the custom involved breaking a loaf of barley bread over the bride’s head to symbolize fertility and good fortune; the guests would then scramble for the crumbs. By the Medieval period in England, this had evolved into a tradition where guests brought small spiced buns, stacking them in a high pile. If the bride and groom could kiss over the top of the stack without knocking it over, a lifetime of prosperity was guaranteed. This practice eventually inspired the tiered structure we recognize today, said to be modeled after the spire of St. Bride’s Church in London.
The concept of the ‘white’ wedding cake, however, is a relatively modern luxury that solidified during the Victorian era. Before the mid-19th century, cakes were often fruitcakes, dark and dense. White sugar was an incredibly expensive commodity, so a cake with pure white icing was a supreme status symbol, indicating the family’s wealth. When Queen Victoria wed Prince Albert in 1840, her cake was coated in a hard, pure white sugar paste—what we now call ‘royal icing.’ This cemented the association between white cakes and weddings, symbolizing purity and affluence.
The addition of gold leaf to food dates back even further, to the nobility of Renaissance Europe and Ancient Egypt, where gold was believed to possess magical properties that would bring the consumer closer to the divine. Today, combining the Victorian tradition of the white tier with the ancient luxury of gold leaf creates a bridge between history and modern aesthetics, offering a design that is timeless yet contemporary.
Why This Recipe Works
This recipe succeeds where many others fail because it addresses the three main challenges of wedding cake baking: structural integrity, moisture retention, and visual perfection. First, we utilize the **reverse creaming method** (mixing the fats into the dry ingredients before adding liquids). This coats the flour proteins in fat, inhibiting gluten formation. The result is a cake with a plush, velvety crumb that bakes up incredibly flat, reducing the need for leveling and waste. It provides a sturdy structure necessary for stacking tiers without being dense or heavy.
Secondly, the inclusion of **sour cream and egg whites** is crucial. Egg whites ensure the cake remains starkly white, avoiding the yellow tint of yolks, while also providing structure. The acidity in the sour cream tenderizes the gluten strands and adds necessary moisture that keeps the cake fresh for days—a vital requirement for wedding cakes that are often baked in advance.
Finally, the choice of **Swiss Meringue Buttercream (SMBC)** over American buttercream is essential for the gold leaf application. SMBC is stable and smooths out to a porcelain-like finish. It doesn’t crust over as quickly or as harshly as powdered-sugar-based frostings, allowing you to manipulate the surface. However, once chilled, it becomes firm, providing a solid foundation that prevents the delicate gold leaf from sinking into the frosting or dissolving.
Why You’ll Love This Recipe
- ✓Velvety, tight crumb texture perfect for stacking
- ✓Pure white color without artificial whiteners
- ✓Silky, stable Swiss Meringue Buttercream
- ✓Modern, luxurious edible gold leaf finish
- ✓Stays moist for days due to sour cream content
- ✓Detailed instructions for doweling and stacking
Equipment You’ll Need
- ✓Stand mixer with paddle and whisk attachments
- ✓3 Cake pans (6-inch, 8-inch, 10-inch round, 3 inches deep)
- ✓Kitchen scale (essential)
- ✓Parchment paper
- ✓Cake turntable
- ✓Offset spatula and bench scraper
- ✓Cake boards (6, 8, and 10 inch)
- ✓Plastic or wooden dowels
- ✓Food-safe paintbrush (for gold leaf)
- ✓Tweezers (for gold leaf)
Ingredients
- ✓900g Cake flour, sifted
- ✓800g Granulated sugar
- ✓3 tbsp Baking powder
- ✓1.5 tsp Salt
- ✓450g Unsalted butter, room temperature, cut into cubes
- ✓12 Large egg whites, room temperature
- ✓450g Full-fat sour cream, room temperature
- ✓2 tbsp Clear vanilla extract (to maintain white color)
- ✓1 cup Whole milk, room temperature
- ✓10 Large egg whites (for buttercream)
- ✓500g Granulated sugar (for buttercream)
- ✓680g Unsalted butter, slightly cool (for buttercream)
- ✓1 tbsp Pure vanilla bean paste
- ✓1 book (25 sheets) 24k Edible Gold Leaf (transfer sheets recommended)
Instructions
- 1. Prep the Oven and Pans: Preheat your oven to 335°F (168°C). Grease your 6, 8, and 10-inch cake pans. Line the bottoms with parchment paper and grease the paper. Dust with flour and tap out the excess.
- 2. Mix Dry Ingredients: In the bowl of a stand mixer fitted with the paddle attachment, combine the cake flour, sugar, baking powder, and salt. Mix on low speed for 30 seconds to blend.
- 3. Reverse Creaming: Add the cubed, room-temperature butter to the dry ingredients. Mix on low speed until the mixture resembles coarse damp sand. There should be no large chunks of butter left.
- 4. Combine Liquids: In a separate medium bowl, whisk together the egg whites, sour cream, milk, and clear vanilla extract until smooth.
- 5. Make the Batter: Pour half of the liquid mixture into the mixer bowl. Mix on medium speed for 2 minutes to develop the cake’s structure. Scrape down the sides and bottom of the bowl. Add the remaining liquid in two batches, mixing on low speed for 20 seconds after each addition. Do not overmix.
- 6. Bake: Distribute the batter into the prepared pans, filling them about 2/3 full. (Use a scale for precision). Bake for 35-50 minutes. The 6-inch will finish first, followed by the 8-inch, then the 10-inch. They are done when a toothpick inserted into the center comes out clean or with a few moist crumbs.
- 7. Cool: Let the cakes cool in the pans for 15 minutes, then turn them out onto a wire rack to cool completely. Wrap in plastic wrap and chill in the fridge for at least 2 hours (chilled cake is easier to stack).
- 8. Make the Swiss Meringue Buttercream: Whisk egg whites and sugar in a heatproof bowl over a pot of simmering water (double boiler). Whisk constantly until the sugar is dissolved and the mixture reaches 160°F (71°C).
- 9. Whip Meringue: Transfer to the stand mixer with the whisk attachment. Whip on high speed until stiff peaks form and the bowl feels cool to the touch (approx 10-15 minutes).
- 10. Add Butter: Switch to the paddle attachment. With the mixer on low, add the butter one cube at a time. Once all butter is added, increase speed to medium-high and whip until silky and smooth. Add vanilla bean paste and mix to combine.
- 11. Stack and Crumb Coat: Level the tops of your cake layers if necessary. Place the 10-inch layer on a cake board. Spread a layer of buttercream, top with the next layer of cake. Repeat for all tiers separately. Apply a thin ‘crumb coat’ of frosting to seal in crumbs. Chill for 30 minutes.
- 12. Final Coat: Apply a thick, smooth layer of buttercream to each tier. Use a bench scraper to get perfectly straight sides and sharp edges. Chill until firm.
- 13. Assembly: Insert dowels into the bottom (10-inch) and middle (8-inch) tiers to support the weight of the cakes above them. Carefully stack the tiers.
- 14. Gold Leaf Decoration: Ensure your hands are dry. Using tweezers or a dry food-safe brush, gently lift sheets or flakes of gold leaf. Press them onto the side of the cake. For a cascading effect, apply more gold at the top of a tier and let it scatter as it goes down. Use the brush to gently tap the gold so it adheres to the buttercream.
- 15. Serve: Keep the cake in a cool room until ready to display and serve.
Expert Cooking Tips
- ✓Room Temperature is Key: Ensure your butter, eggs, milk, and sour cream are all at room temperature. Cold ingredients will cause the batter to curdle and the cake to be dense.
- ✓Weigh Your Ingredients: For baking, especially high-stakes baking like a wedding cake, volume measurements (cups) are unreliable. Use a digital scale.
- ✓Don’t Rush the Cooling: Never try to frost a warm cake. The butter in the buttercream will melt, and your layers will slide. Chilled cake is best for stacking.
- ✓The Crumb Coat: Do not skip the crumb coat step. It locks in loose crumbs so your final layer of white frosting remains pristine and speckle-free.
- ✓Gold Leaf Handling: Gold leaf is incredibly light and will fly away if you breathe on it too hard. Turn off fans and close windows when applying it.
- ✓Clear Vanilla: Use clear vanilla extract for the cake batter to ensure the sponge remains bright white rather than ivory.
Substitutions and Variations
If you cannot find **cake flour**, you can make a substitute by removing 2 tablespoons of all-purpose flour from every cup and replacing it with cornstarch, sifted together multiple times. However, for a wedding cake, store-bought cake flour yields the most reliable tenderness.
**Sour cream** can be substituted with full-fat plain Greek yogurt in a 1:1 ratio; the fat content is necessary for moisture.
If you prefer a different flavor profile, you can replace the vanilla extract with **almond extract** (use half the amount as it is potent) or **lemon extract**.
For the **buttercream**, if you are intimidated by Swiss Meringue, you can use American Buttercream, but be aware it is much sweeter and will crust, making the gold leaf application slightly different (you’ll need to apply the gold before the frosting crusts completely).
**Edible Gold Leaf** can be substituted with edible silver leaf for a cooler tone, or edible gold luster dust mixed with vodka for a painted gold look, though the leaf provides the specific texture shown in the photos.
Common Mistakes to Avoid
The most common mistake is **insufficient structural support**. A 3-tier cake is heavy. If you do not use dowels (plastic or wooden rods inserted into the lower tiers), the bottom cake will be crushed by the weight of the top tiers, causing the cake to bulge or collapse.
Another error is **overmixing the batter**. Once the flour is added, you must mix only until combined. Overmixing develops gluten, resulting in a tough, bread-like texture rather than a tender cake.
Regarding the aesthetic, touching the **gold leaf** with your fingers is a mistake; the oils in your skin will cause the gold to tarnish or stick to you instead of the cake. Always use tools.
Finally, **skipping the chilling steps** leads to disaster. The buttercream needs to be cold and firm to support the stacking process.
Serving Suggestions
Serve this cake as the grand finale of your wedding reception. It pairs beautifully with dry Champagne or a crisp Prosecco, which cuts through the richness of the buttercream. For a plated presentation, serve each slice with a coulis of fresh raspberries or strawberries to add a pop of color and a tart contrast to the sweet vanilla. A sprig of fresh mint or an edible flower (like a pansy or viola) on the plate adds an extra touch of elegance. When cutting, use a sharp, warm knife (dipped in hot water and wiped dry) to get clean cuts through the fondant-like smoothness of the buttercream.
Storage and Reheating Tips
If the wedding is outdoors or in a warm venue, keep the cake refrigerated as long as possible, bringing it out 1-2 hours before the cutting ceremony to come to room temperature. Swiss Meringue Buttercream can melt in high heat.
**Leftovers:** Slices can be stored in an airtight container in the refrigerator for up to 4 days.
**Freezing:** To save the top tier for your first anniversary (a classic tradition), wrap the cake (without any fresh fruit fillings) tightly in two layers of plastic wrap, followed by a layer of aluminum foil. Place it in a freezer-safe container. It can be frozen for up to 1 year. Thaw it in the refrigerator for 24 hours before eating.
Nutrition Facts (Estimated)
| Serving Size | 1 slice |
| Calories | 450 |
| Fat | 24g |
| Saturated Fat | 14g |
| Unsaturated Fat | 8g |
| Trans Fat | 0.5g |
| Cholesterol | 75mg |
| Sodium | 210mg |
| Carbohydrates | 55g |
| Fiber | 0.5g |
| Sugar | 35g |
| Protein | 4g |
Frequently Asked Questions
Can I bake the cake layers in advance?
Yes, absolutely. In fact, it’s recommended. You can bake the layers up to 3 weeks in advance. Wrap them tightly in plastic wrap (two layers) and foil, then freeze them. Thaw in the fridge the day before decorating. Frozen cakes are actually easier to handle and often moister.
How much gold leaf do I need?
For a cascading effect on a 3-tier cake, one booklet of 25 sheets (transfer type is easiest) is usually sufficient. If you want to fully cover a tier in gold, you may need 2-3 booklets.
Why did my buttercream curdle?
If your Swiss Meringue Buttercream looks like cottage cheese, the butter was likely too cold or the meringue was too warm. Keep mixing! It almost always comes back together. If it’s too soupy, put the bowl in the fridge for 15 minutes then whip again.
Do I really need dowels?
Yes. Never stack more than two layers of cake without internal support. The dowels take the weight of the upper tiers so the cake beneath doesn’t get squashed.
Can I make this cake gluten-free?
Yes, you can use a high-quality 1:1 Gluten-Free baking flour blend (like King Arthur or Bob’s Red Mill). The texture will be slightly different, but the reverse creaming method helps keep it tender.
How do I transport the cake?
Ideally, stack the tiers at the venue. If you must transport it stacked, ensure a wooden dowel is driven through the entire center of all three tiers into the bottom board for stability, and drive carefully with the AC on high.
Is gold leaf tasteless?
Yes, pure 24k edible gold leaf has no flavor or texture. It melts away in the mouth and is purely for aesthetic purposes.
What size cake boards should I use?
For the tiers themselves, use boards exactly the same size as the cake (6, 8, and 10 inches). For the very bottom base that holds the whole structure, use a drum board that is at least 2 inches wider than the bottom tier (e.g., a 12 or 14-inch drum).
Conclusion
Creating your own wedding cake is a labor of love that yields a reward far sweeter than just the dessert itself. This Elegant White Wedding Cake with Gold Leaf Decoration is a testament to the beauty of simplicity and the luxury of fine ingredients. By following this guide, you aren’t just baking a cake; you are crafting a memory. The moment you step back and see the gold leaf catching the light against the pristine white buttercream, you’ll know the effort was worth it. Whether for a grand reception or an intimate gathering, this cake promises to be as unforgettable as the day itself. Happy baking, and congratulations!