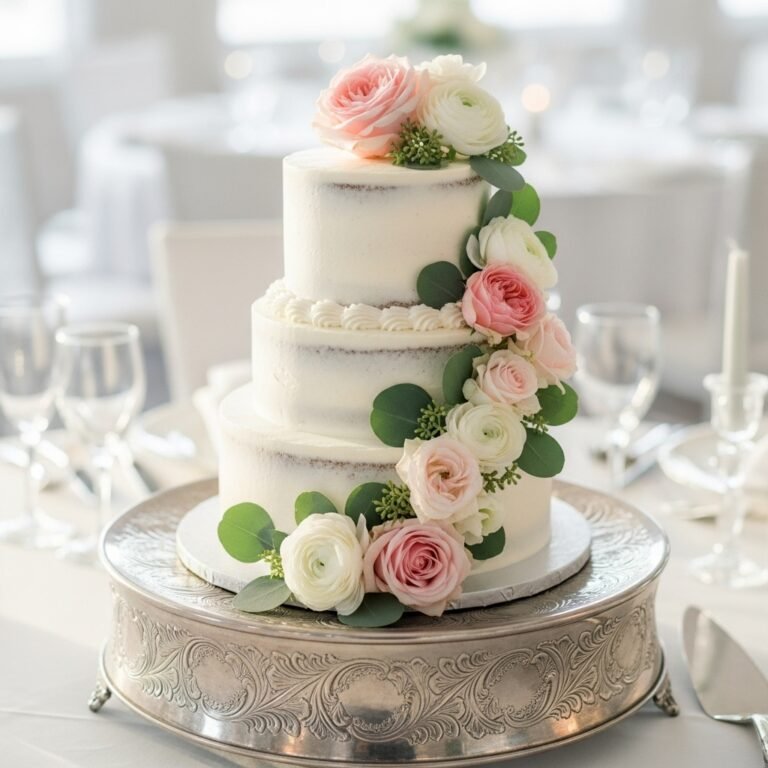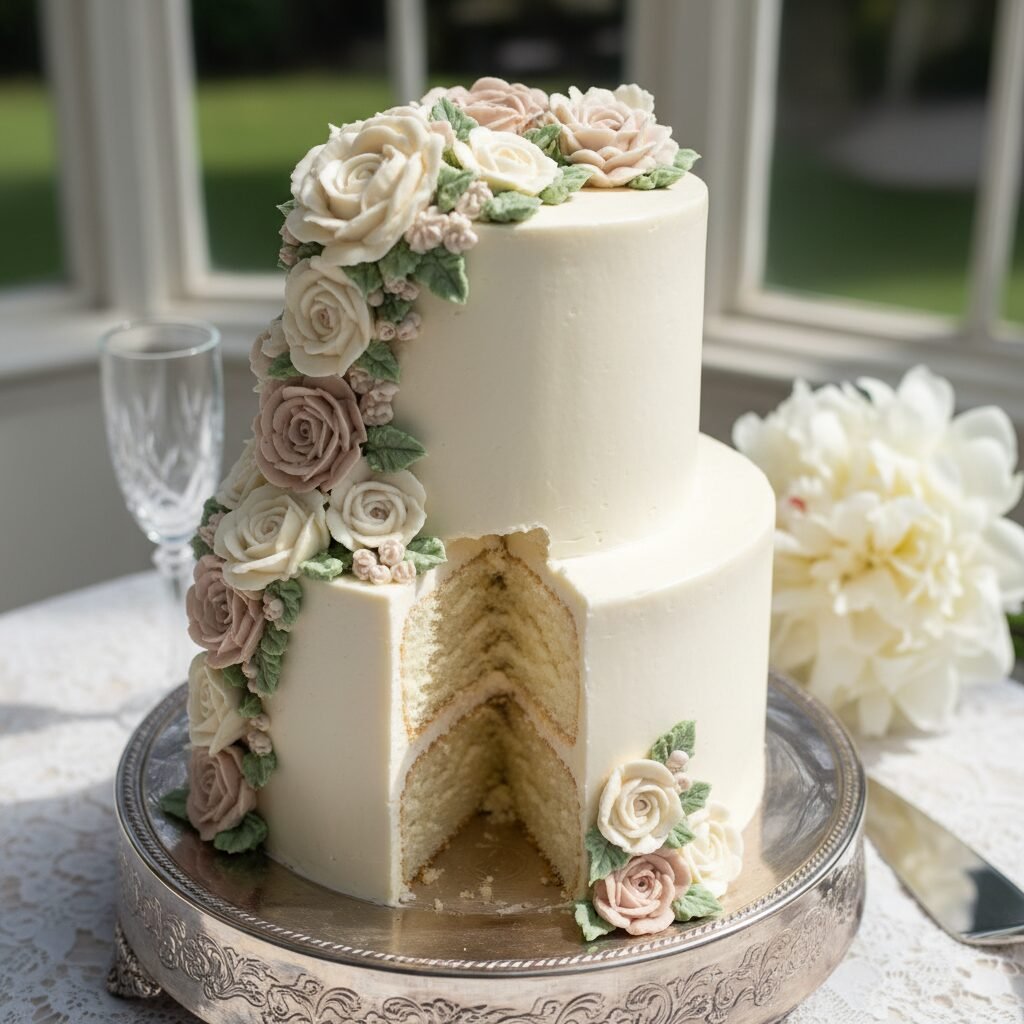
The Ultimate Elegant White Wedding Cake With Hand-Piped Buttercream Flowers
Elegant White Wedding Cake With Buttercream Flowers Recipe
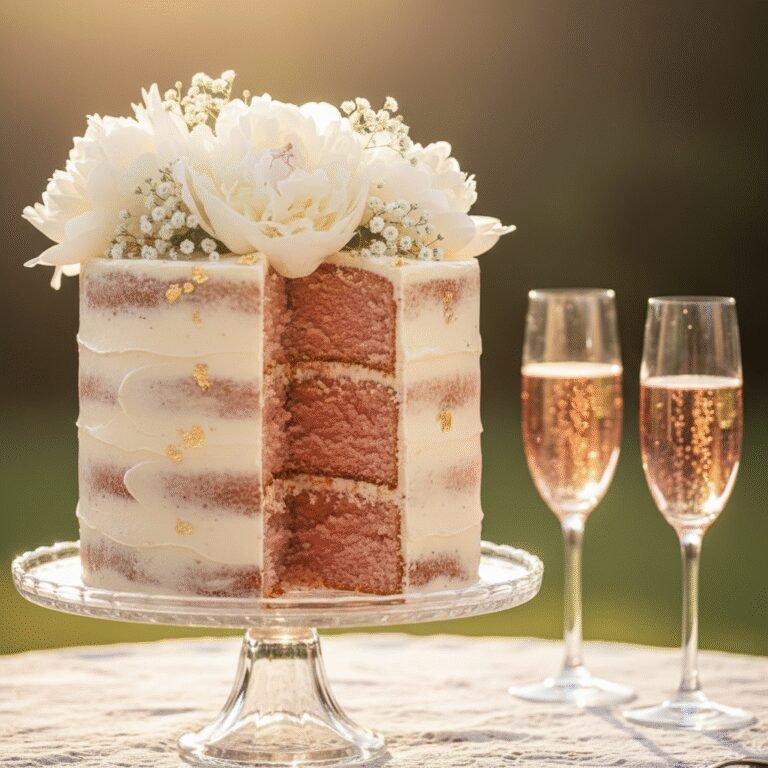
This show-stopping white wedding cake features tender, velvety layers of vanilla bean cake paired with a silky Swiss Meringue Buttercream. Adorned with delicate, hand-piped buttercream flowers, it is the perfect centerpiece for intimate weddings, bridal showers, or sophisticated celebrations.
2 hours
45 minutes
6 hours
30-35 servings (Two-tier cake: 8-inch and 6-inch)
Dessert
Baking
American/European
Vegetarian
There is something undeniably magical about a classic white wedding cake. It stands as a symbol of celebration, new beginnings, and timeless elegance. While the trend of ‘naked’ cakes and rustic designs has had its moment in the spotlight, the return to vintage sophistication is in full swing, and nothing captures that aesthetic quite like a pristine, smooth-coated cake adorned with intricate buttercream flowers. This recipe is not just a dessert; it is a labor of love designed to replicate the high-end bakery experience right in your own kitchen.
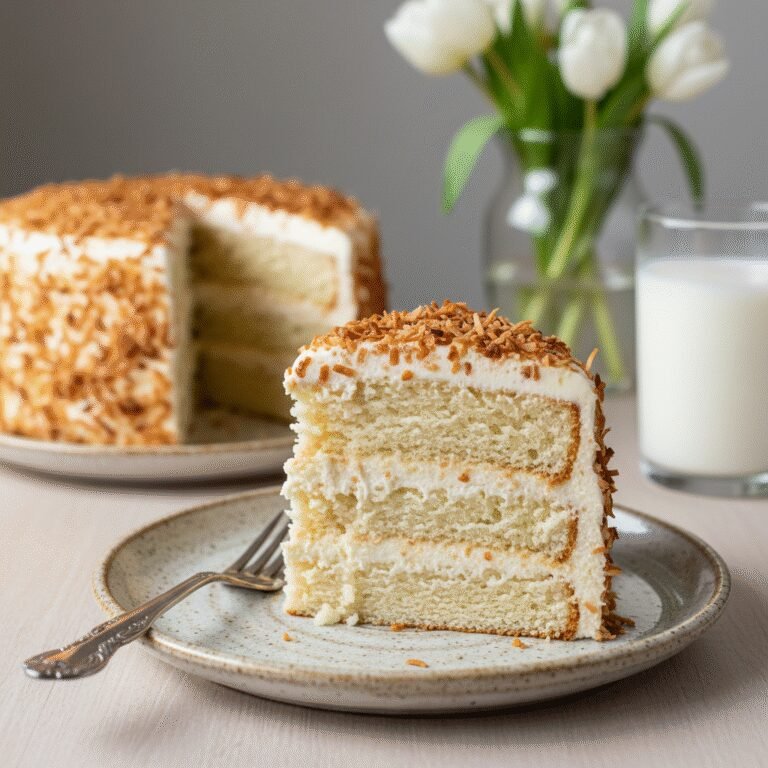
The base of this masterpiece is a ‘White Velvet’ cake. Unlike a standard sponge which can sometimes be dry or airy, this cake possesses a plush, tight crumb that melts in your mouth while remaining sturdy enough to support multiple tiers. The flavor is pure, unadulterated vanilla, achieved by using high-quality vanilla bean paste which flecks the snow-white crumb with inviting black specks. We bypass the cloying sweetness of American buttercream for this recipe, opting instead for a Swiss Meringue Buttercream (SMBC). This European-style frosting is silky, less sweet, and possesses a stability that makes it the superior medium for piping realistic roses, peonies, and ranunculus that won’t wilt under pressure.
Making a wedding cake at home can seem daunting, but this guide breaks down the process into manageable steps. From baking flat, even layers to mastering the art of the crumb coat and finally, piping your floral cascade, we cover every detail. Whether you are a bride baking for your own micro-wedding, a dedicated maid of honor, or a home baker looking to level up your decorating skills, this Elegant White Wedding Cake delivers professional-grade results that taste even better than they look.
History & Origins
The tradition of the wedding cake is steeped in centuries of history, ritual, and evolving symbolism. The origins can be traced back to ancient Rome, where a humble cake of wheat or barley was broken over the bride’s head to bring good fortune and fertility. The guests would then scramble for the crumbs to share in the couple’s luck. By medieval England, this tradition had evolved into a custom where guests brought small buns to the wedding, stacking them in a high pile. If the bride and groom could kiss over the towering stack without knocking it over, a lifetime of prosperity was guaranteed. This practice eventually inspired the French pastry chef who visited London and created the Croquembouche, and later, the tiered cakes we recognize today.
However, the ‘white’ wedding cake as a cultural icon was solidified by Queen Victoria. Before the Victorian era, white sugar was an incredibly expensive luxury, meaning most cakes were fruitcakes covered in darker sugars. When Queen Victoria married Prince Albert in 1840, her cake was covered in a pure white icing—later dubbed ‘Royal Icing’—to reflect her status, wealth, and purity. The whiteness of the cake became a status symbol, indicating that the family could afford the finest refined sugar. Over the decades, as sugar became more accessible, the white cake became a staple for weddings across all social classes. Today, while styles range from geometric modernism to rustic chic, the classic white cake with floral adornments remains the quintessential representation of nuptial elegance, bridging the gap between Victorian grandeur and modern culinary artistry.
Why This Recipe Works
This recipe succeeds where many others fail because it addresses the two biggest complaints about homemade wedding cakes: dryness and structural instability. The cake batter utilizes the ‘reverse creaming’ method, also known as the paste method. Instead of creaming butter and sugar first, we mix the dry ingredients with the butter until it resembles sand, and then add the liquids. This coats the flour proteins in fat, inhibiting gluten formation. The result is a cake with an incredibly tender, velvety crumb that stays flat on top—essential for stacking—rather than doming significantly like a traditional sponge.
Furthermore, the inclusion of sour cream and egg whites is scientifically crucial. The egg whites provide the protein structure needed for the cake to hold its shape without the yellow tint of yolks, maintaining that pristine white color. The sour cream adds acidity, which tenderizes the gluten further, and introduces fat content that keeps the cake moist for days, allowing you to bake the layers in advance without fear of them drying out.
For the decoration, Swiss Meringue Buttercream is the only logical choice for intricate piping. Unlike American buttercream, which is gritty and crusts over, SMBC is an emulsion of meringue and butter. It is smooth, glossy, and holds sharp edges, making your piped petals look realistic. It also withstands room temperature better than cream cheese frosting or whipped cream, ensuring your beautiful flowers don’t slide off the cake during the reception.
Why You’ll Love This Recipe
- ✓Features a ‘reverse creaming’ method for a bakery-style velvety crumb.
- ✓Uses only egg whites to maintain a stunning, pure white color.
- ✓Swiss Meringue Buttercream offers superior stability for piping intricate flowers.
- ✓Sturdy structure allows for easy stacking of tiers.
- ✓Can be made ahead of time, reducing stress on the big day.
- ✓Customizable flavor profile with simple syrup infusions.
Equipment You’ll Need
- ✓Stand mixer with paddle and whisk attachments
- ✓Two 8-inch round cake pans
- ✓Two 6-inch round cake pans
- ✓Digital kitchen scale
- ✓Cake turntable
- ✓Offset spatula
- ✓Bench scraper
- ✓Piping bags and couplers
- ✓Piping tips (Wilton #104, #127 for petals, #352 for leaves)
- ✓Flower nail and parchment squares
- ✓Cake boards and dowels
Ingredients
- ✓3 3/4 cups (450g) Cake flour, sifted
- ✓2 1/4 cups (450g) Granulated sugar
- ✓1 tbsp Baking powder
- ✓1 tsp Salt
- ✓1 1/2 cups (340g) Unsalted butter, room temperature, cut into cubes
- ✓3/4 cup (180g) Egg whites (approx 6 large eggs), room temperature
- ✓1/2 cup (120g) Sour cream, room temperature
- ✓1 1/4 cups (300ml) Whole milk, room temperature
- ✓1 tbsp Vanilla bean paste
- ✓1 tsp Almond extract (optional)
- ✓FOR THE BUTTERCREAM:
- ✓1 1/2 cups (360ml) Egg whites (pasteurized)
- ✓3 cups (600g) Granulated sugar
- ✓3 cups (680g) Unsalted butter, room temperature
- ✓1 tbsp Vanilla extract
- ✓Pinch of salt
- ✓Gel food coloring (White, Soft Pink, Sage Green)
Instructions
- 1. PREHEAT & PREP: Preheat oven to 335°F (170°C). Grease your 8-inch and 6-inch cake pans, line the bottoms with parchment paper, and grease the paper. Dust with flour and tap out excess.
- 2. MIX DRY INGREDIENTS: In the bowl of a stand mixer fitted with the paddle attachment, combine the sifted cake flour, sugar, baking powder, and salt. Mix on low speed for 30 seconds to combine.
- 3. REVERSE CREAMING: Add the cubed, room-temperature butter into the dry ingredients. Mix on low speed until the mixture resembles coarse sand or damp breadcrumbs. There should be no large chunks of butter remaining.
- 4. ADD WET INGREDIENTS: In a separate jug, whisk together the egg whites, sour cream, milk, vanilla bean paste, and almond extract. With the mixer on low, slowly pour in half of the liquid mixture. Increase speed to medium-high and beat for 2 minutes to build structure.
- 5. FINISH BATTER: Scrape down the sides of the bowl. With the mixer on low, add the remaining liquid in two batches, mixing just until combined. Do not overmix.
- 6. BAKE: Distribute batter evenly among the pans (fill about 2/3 full). Bake for 30-40 minutes, or until a toothpick inserted into the center comes out clean. The 6-inch pans may bake faster than the 8-inch pans.
- 7. COOL: Let cakes cool in pans for 10 minutes, then turn out onto a wire rack to cool completely. Wrap in plastic wrap and chill in the fridge or freezer for easier handling.
- 8. MAKE BUTTERCREAM: Combine egg whites and sugar in a heatproof bowl over a pot of simmering water (double boiler). Whisk constantly until sugar is dissolved and mixture reaches 160°F (71°C).
- 9. WHIP MERINGUE: Transfer to stand mixer with whisk attachment. Whip on high speed until stiff peaks form and the bowl is cool to the touch (about 10-15 minutes).
- 10. ADD BUTTER: Switch to paddle attachment. Add butter one cube at a time on low speed. Once all butter is added, increase to high speed and beat until smooth and creamy. Add vanilla and salt. If it looks curdled, keep beating!
- 11. COLOR & PIPE FLOWERS: Separate small portions of buttercream and tint them for your flowers. Using a flower nail and parchment squares, pipe roses and ranunculus using petal tips (#104, #127). Freeze the flowers on a baking sheet until hard (approx 20 mins).
- 12. ASSEMBLE: Level your cake layers. Place the first 8-inch layer on a board. Spread a layer of white buttercream. Repeat for the second 8-inch layer. Crumb coat the tier and chill. Repeat for the 6-inch tier.
- 13. STACK & DECORATE: Insert dowels into the bottom tier for support. Place the 6-inch tier on top (on its own cardboard round). Apply a final smooth coat of white buttercream. Arrange the frozen buttercream flowers on the cake in a cascading design. Pipe leaves directly onto the cake using tip #352 to fill gaps.
Expert Cooking Tips
- ✓Ingredients MUST be at room temperature. Cold ingredients will cause the batter to curdle and the buttercream to separate.
- ✓Weigh your ingredients. Baking is chemistry, and cups can be inaccurate. A digital scale ensures perfection.
- ✓Don’t skip the crumb coat. This thin layer of frosting traps crumbs and ensures your final layer is pristine white.
- ✓Beat the buttercream on the lowest speed for 5 minutes at the very end to push out air bubbles for a super smooth finish.
- ✓Freeze your cake layers before stacking. Cold cake is firmer and much easier to level and frost without breaking.
- ✓If your buttercream looks like cottage cheese (curdled) after adding butter, just keep whipping. It will come together.
- ✓Use ‘White White’ icing coloring to neutralize the natural yellow tint of the butter in the frosting for a pure white look.
Substitutions and Variations
If you cannot find cake flour, you can make a substitute by removing 2 tablespoons of all-purpose flour from every cup and replacing it with 2 tablespoons of cornstarch, sifting heavily. However, true cake flour yields the best results. For the sour cream, full-fat Greek yogurt is an excellent 1:1 substitute that provides similar tang and moisture. If you need a dairy-free cake, you can substitute the butter with high-quality vegan butter blocks (not tub margarine) and the milk with unsweetened almond or soy milk, though the texture may be slightly less velvety. For the buttercream, pasteurized carton egg whites can be used to save time on separating eggs, but ensure they are 100% egg whites without added gums. If you prefer a different flavor, the vanilla bean paste can be swapped for lemon zest, coconut extract, or even a splash of champagne in the batter.
Common Mistakes to Avoid
The most common mistake is rushing the cooling process for the Swiss Meringue Buttercream base. If you add butter to the meringue while it is still warm, the butter will melt, and you will end up with a soupy glaze instead of fluffy frosting. If this happens, refrigerate the bowl for 20 minutes and whip again. Another error is over-mixing the cake batter after adding the liquids; this develops too much gluten and leads to a tough, chewy cake rather than a tender one. Finally, insufficient support is a disaster waiting to happen. Never stack a tier on top of another without using dowels (plastic or wooden) in the bottom tier to bear the weight, otherwise, the bottom cake will collapse.
Serving Suggestions
Serve this elegant cake on a beautiful pedestal stand to heighten the drama. Slice the cake using a sharp knife dipped in hot water and wiped dry between cuts for clean, professional layers. Pair the cake with a glass of dry Champagne or Prosecco to cut through the richness of the buttercream. For a summer wedding, serve alongside a coulis of fresh raspberries or strawberries to add a tart contrast to the sweet vanilla bean flavor. A sprig of fresh mint or edible gold leaf on the plate adds a final touch of luxury.
Storage and Reheating Tips
This cake is best eaten at room temperature, but should be stored in the refrigerator if made in advance. The buttercream acts as a seal, keeping the cake moist. You can assemble and frost the cake up to 2 days before the event; keep it refrigerated, but remove it 2-3 hours before serving to allow the butter in the frosting and cake to soften. Leftovers can be stored in an airtight container in the fridge for up to 5 days. For long-term storage, wrap individual slices tightly in plastic wrap and then foil, and freeze for up to 3 months. Thaw frozen slices in the fridge overnight before bringing to room temperature.
Nutrition Facts (Estimated)
| Serving Size | 1 slice |
| Calories | 580 |
| Fat | 32g |
| Saturated Fat | 19g |
| Unsaturated Fat | 11g |
| Trans Fat | 0g |
| Cholesterol | 85mg |
| Sodium | 210mg |
| Carbohydrates | 68g |
| Fiber | 0.5g |
| Sugar | 38g |
| Protein | 5g |
Frequently Asked Questions
Can I make the cake layers ahead of time?
Absolutely. Wrap the cooled cake layers tightly in two layers of plastic wrap and one layer of aluminum foil. They can be frozen for up to a month. Thaw them in the fridge overnight before decorating.
Why is my Swiss Meringue Buttercream runny?
The meringue was likely too warm when you added the butter. Place the bowl in the fridge for 15-20 minutes to chill, then whip again on high speed. It should come together.
Do I really need dowels for a two-tier cake?
Yes. Even a small top tier is heavy. Without dowels in the bottom tier to support the weight, the bottom cake will slowly compress and bulge, potentially causing the cake to topple.
How do I get the frosting perfectly smooth?
Use a metal bench scraper heated under hot water (and dried). The heat slightly melts the outer layer of fat, smoothing out ridges and air bubbles as you scrape around the cake.
Can I use fresh flowers instead of buttercream?
Yes, you can. Ensure the flowers are non-toxic and organic (pesticide-free). Wrap the stems in floral tape or insert them into a straw before placing them into the cake to protect the food.
What if I don’t have a stand mixer?
While possible with a hand mixer, it will take significantly longer, especially for the Swiss Meringue Buttercream which requires long periods of whipping. Be prepared for an arm workout!
Why did my cake sink in the middle?
This usually happens if the oven door was opened too early, causing a temperature drop, or if the cake was underbaked. Use an oven thermometer to ensure accurate temperature.
Can I use all-purpose flour instead of cake flour?
You can, but the texture will be more like a muffin or bread—heavier and coarser. Cake flour is low-protein and essential for that ‘velvet’ texture.
How do I transport this cake?
Transport the cake in a sturdy box on a flat surface (like the floor of the car or trunk), never on a slanted car seat. Keep the car cool with AC. If it’s very hot, consider transporting tiers separately and stacking at the venue.
Conclusion
Creating an elegant white wedding cake with buttercream flowers is a journey that rewards patience and precision with spectacular beauty. There is a profound satisfaction in slicing into a cake that you constructed from scratch—from the tender, vanilla-speckled crumb to the silky, sweet petals of the buttercream roses. This recipe empowers you to take control of your celebration’s centerpiece, ensuring it tastes as authentic and delightful as the love being celebrated. Whether for a wedding, an anniversary, or a grand birthday, this cake is a testament to the art of baking. Gather your ingredients, trust the process, and prepare to amaze your guests.