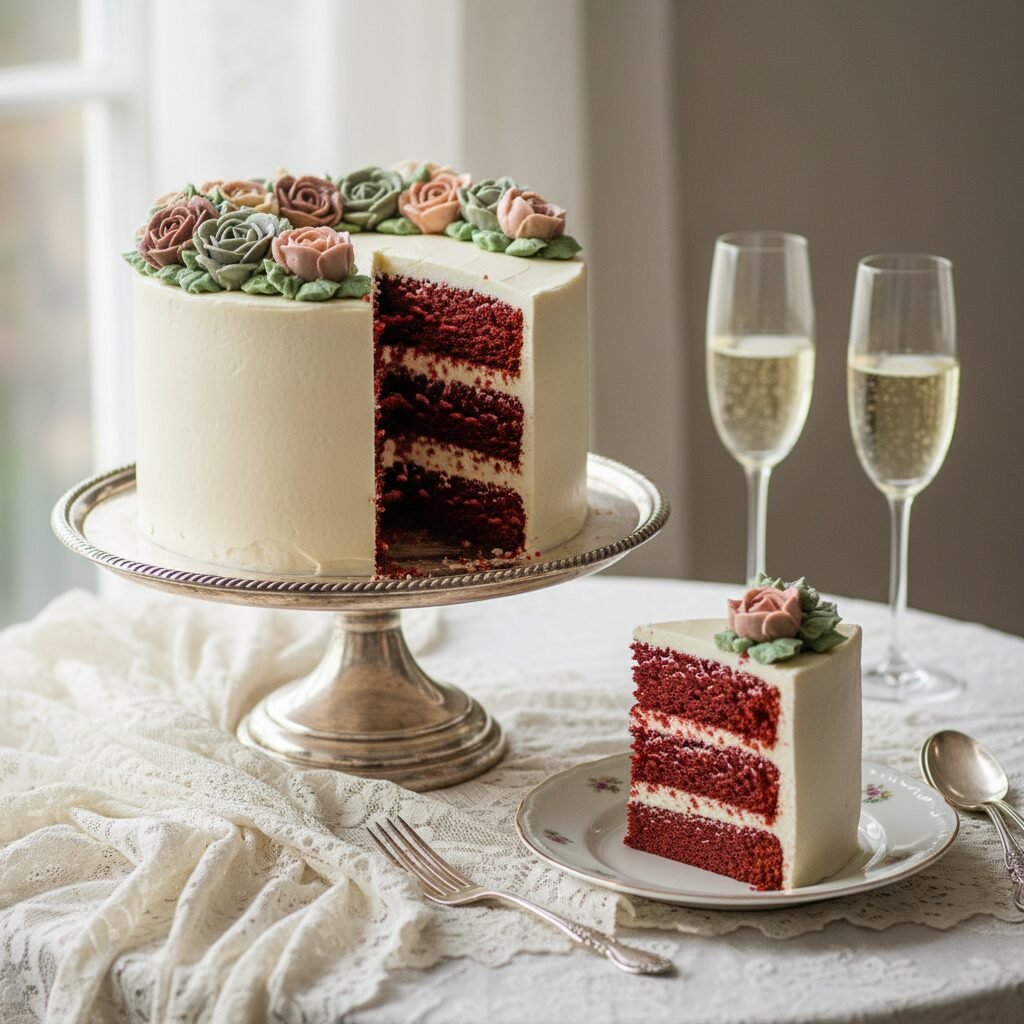
Elegant Red Velvet Anniversary Cake With Buttercream Flowers
Elegant Red Velvet Anniversary Cake With Buttercream Flowers Recipe
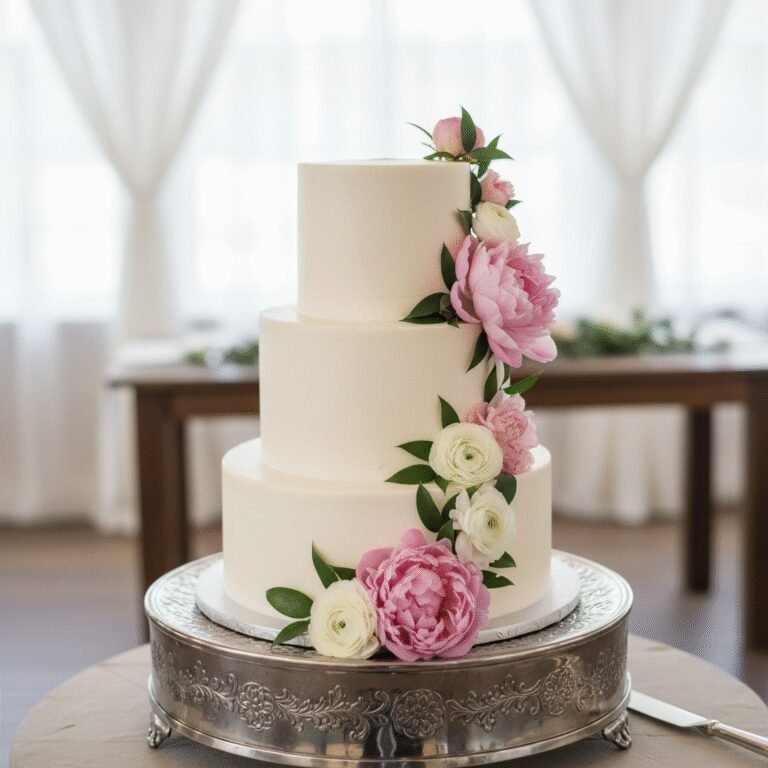
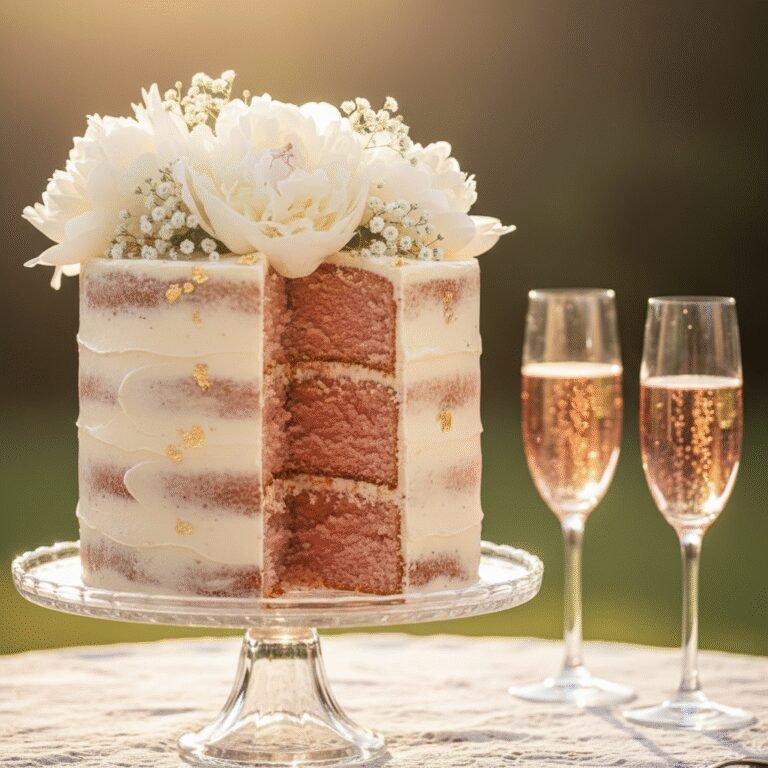
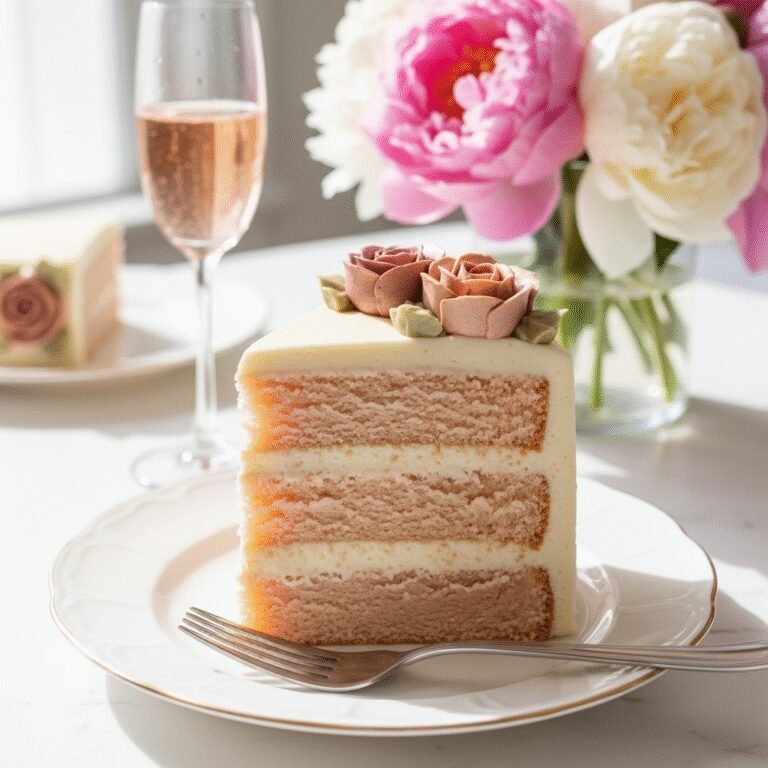
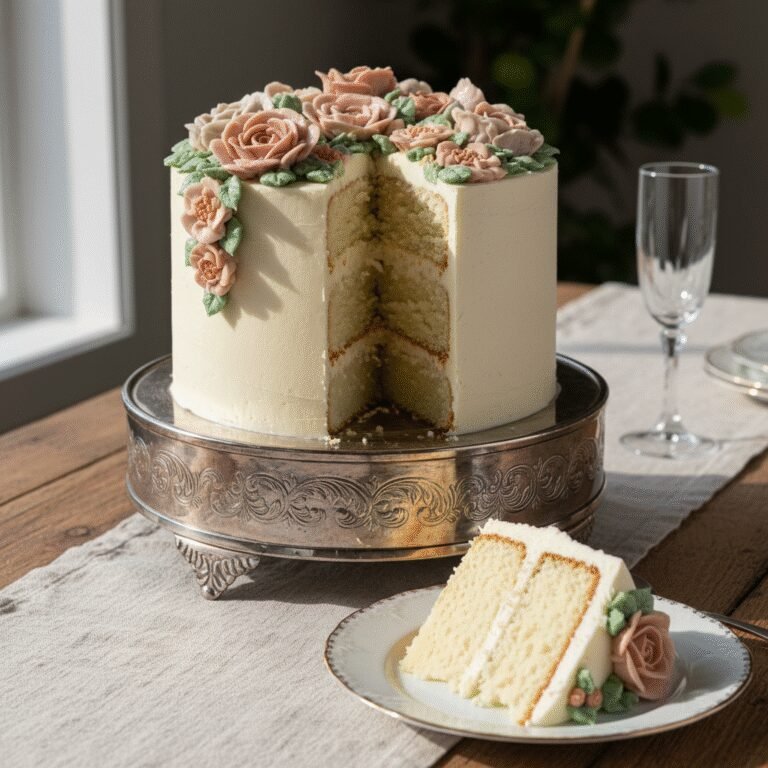
Celebrate love with this breathtaking Red Velvet Anniversary Cake, featuring moist, cocoa-infused layers and a sophisticated Swiss Meringue Buttercream. Adorned with hand-piped edible flowers, this showstopper combines the classic tangy velvet crumb with an artistic floral design perfect for your special milestone.
1 hour 30 minutes
35 minutes
3 hours (includes cooling)
12-16 servings
Dessert
Baking
American
Vegetarian
There is something undeniably romantic about a Red Velvet Cake. Perhaps it is the striking crimson hue that symbolizes passion, or maybe it is the luxuriously soft, velvety crumb that melts in your mouth with every bite. For an anniversary, a simple sheet cake just won’t do. You need a centerpiece that speaks the language of love, and this Elegant Red Velvet Anniversary Cake with Buttercream Flowers is designed to do exactly that.
Unlike the overly dense or dry versions you might find at a grocery store, this recipe focuses on the delicate balance between acidity and chocolate. The ‘velvet’ texture is achieved through a precise chemical reaction between buttermilk, vinegar, and baking soda, which tenderizes the gluten strands and creates a crumb that is both sturdy enough to stack and tender enough to swoon over. We pair this classic base with a silky Swiss Meringue Buttercream rather than the traditional Cream Cheese frosting for the exterior. While cream cheese is delicious, it often lacks the structural integrity needed for intricate floral piping. The Swiss Meringue Buttercream offers a buttery, not-too-sweet canvas that pipes like a dream, allowing you to create a garden of roses, ranunculus, and peonies atop your creation.
This recipe is a labor of love, intended for those moments when you want to pour your heart into your baking. Whether it is your first anniversary or your fiftieth, the time spent crafting these edible blooms and baking these aromatic layers serves as a testament to your devotion. Prepare to impress your partner—and your Pinterest followers—with a cake that tastes as enchanting as it looks.
History & Origins
The history of Red Velvet Cake is as rich and layered as the dessert itself, often shrouded in culinary myth and marketing genius. Its origins can be traced back to the Victorian era, where ‘velvet’ cakes were a distinct category, known for their soft texture achieved by using almond flour, cocoa, or cornstarch to break down protein in the flour. The ‘red’ aspect, however, has a more scientific beginning. Before the advent of Dutch-processed cocoa, cocoa powder was more acidic. When this natural cocoa mixed with buttermilk and baking soda, the anthocyanins revealed a reddish-brown mahogany hue. It wasn’t the vibrant fire-engine red we see today, but it was distinct.
The cake gained massive popularity in the United States during the Great Depression. As ingredients became scarce, a company called Adams Extract, based in Texas, sought to boost sales of their red food coloring and vanilla extract. They printed the recipe for Red Velvet Cake on tear-off cards at grocery stores, marketing it as a flashy, modern dessert. This marketing ploy cemented the cake’s association with heavy red dye.
Another famous, albeit likely apocryphal, story involves the Waldorf-Astoria Hotel in New York City. Legend has it that a patron loved the cake so much she asked for the recipe, only to be billed a whopping $100 (or sometimes cited as $300) for it on her checkout invoice. Out of spite, she allegedly distributed the recipe for free to everyone she knew. While the hotel denies this origin story, the cake was often called the ‘Waldorf-Astoria Cake’ in the mid-20th century. Today, it stands as a staple of American Southern cuisine and a favorite for Valentine’s Day and anniversaries, representing a blend of scientific baking phenomena and mid-century American marketing.
Why This Recipe Works
This recipe succeeds where many others fail because it meticulously balances fat, acidity, and cocoa content. Many red velvet recipes rely solely on butter, which provides flavor but can lead to a dry crumb if overbaked. This recipe utilizes a blend of high-quality unsalted butter and neutral vegetable oil. The butter offers that rich, creamy mouthfeel, while the oil ensures the cake remains moist for days, as oil remains liquid at room temperature.
Furthermore, the ‘tang’ is the hallmark of a true red velvet. We achieve this not just through buttermilk, but by reinforcing it with a teaspoon of white vinegar. This acidity does three things: it activates the baking soda for a fluffy rise, it tenderizes the flour proteins to create that signature velvety texture, and it enhances the subtle chocolate notes without making the cake taste like a standard chocolate cake.
For the decoration, we switch from the traditional cream cheese frosting to Swiss Meringue Buttercream (SMBC). While cream cheese frosting is traditional, it is notoriously unstable for piping intricate flowers. SMBC is stable, holds sharp edges for petals, and takes gel food coloring beautifully without seizing. It has a silky mouthfeel that feels incredibly elegant, elevating the cake from a casual treat to a high-end anniversary celebration.
Why You’ll Love This Recipe
- ✓Hybrid butter-oil base ensures maximum moisture and flavor.
- ✓Authentic ‘tangy’ flavor profile using buttermilk and vinegar.
- ✓Swiss Meringue Buttercream provides a stable medium for professional-looking flowers.
- ✓Vibrant red color stays true after baking.
- ✓Sturdy crumb structure perfect for layering and stacking.
- ✓Elegant presentation suitable for high-end celebrations.
Equipment You’ll Need
- ✓Three 8-inch round cake pans
- ✓Stand mixer with paddle and whisk attachments
- ✓Digital kitchen scale
- ✓Sifter
- ✓Piping bags
- ✓Flower nail and parchment squares
- ✓Piping tips (Wilton 104, 127, 352, and 2D)
- ✓Offset spatula
- ✓Turntable
Ingredients
- ✓2 1/2 cups (300g) Cake flour, sifted
- ✓2 tbsp (15g) Unsweetened cocoa powder (natural, not Dutch-process)
- ✓1 tsp Baking soda
- ✓1/2 tsp Fine sea salt
- ✓1/2 cup (113g) Unsalted butter, room temperature
- ✓1/2 cup (120ml) Vegetable oil or Canola oil
- ✓1 1/2 cups (300g) Granulated sugar
- ✓2 large Eggs, room temperature
- ✓1 tsp Pure vanilla extract
- ✓1 cup (240ml) Buttermilk, room temperature
- ✓1 tsp Distilled white vinegar
- ✓1 tbsp Red gel food coloring (e.g., Americolor Super Red)
- ✓FOR THE SWISS MERINGUE BUTTERCREAM:
- ✓6 large Egg whites (approx 180g)
- ✓2 cups (400g) Granulated sugar
- ✓3 cups (680g) Unsalted butter, cubed and cool room temperature
- ✓1 tbsp Pure vanilla extract
- ✓Pinch of salt
- ✓Gel food coloring (Pink, Peach, Green for flowers)
Instructions
- 1. Preheat oven to 350°F (175°C). Grease three 8-inch cake pans with butter, line the bottoms with parchment paper, and dust the sides with cocoa powder (this prevents white flour streaks on the red cake).
- 2. In a medium bowl, sift together the cake flour, cocoa powder, baking soda, and salt. Whisk to ensure even distribution. Set aside.
- 3. In the bowl of a stand mixer fitted with the paddle attachment, beat the butter, oil, and sugar on medium-high speed for 5-7 minutes until very pale and fluffy. This aeration is crucial.
- 4. Add the eggs one at a time, mixing well after each addition and scraping down the sides of the bowl. Stir in the vanilla extract and the red food coloring.
- 5. In a small measuring cup, mix the buttermilk and vinegar. (It may curdle slightly; this is normal).
- 6. Reduce the mixer speed to low. Add the dry ingredients in three parts, alternating with the buttermilk mixture in two parts, starting and ending with the dry ingredients. Mix only until just combined to avoid overworking the gluten.
- 7. Divide the batter evenly among the three prepared pans. Tap the pans gently on the counter to release large air bubbles.
- 8. Bake for 30-35 minutes, or until a toothpick inserted into the center comes out clean or with a few moist crumbs. Avoid overbaking.
- 9. Cool the cakes in the pans for 10 minutes, then turn them out onto a wire rack to cool completely before frosting.
- 10. TO MAKE THE BUTTERCREAM: Place egg whites and sugar in the heatproof bowl of a stand mixer. Set the bowl over a pot of simmering water (double boiler method), ensuring the water doesn’t touch the bowl. Whisk constantly until the sugar is completely dissolved and the mixture reaches 160°F (71°C).
- 11. Transfer the bowl to the stand mixer fitted with the whisk attachment. Whip on high speed until stiff glossy peaks form and the bowl feels cool to the touch (about 10-15 minutes).
- 12. Switch to the paddle attachment. With the mixer on low, add the cubed butter one piece at a time. Once all butter is added, increase speed to medium and beat until silky and smooth. Add vanilla and salt.
- 13. ASSEMBLY: Level the tops of the cooled cakes if necessary. Place the first layer on a cake board. Spread a layer of white buttercream. Repeat with the second and third layers. Apply a thin crumb coat over the entire cake and chill for 20 minutes.
- 14. Apply a final smooth coat of buttercream. Divide the remaining frosting into small bowls and tint with gel colors for your flowers.
- 15. Using a flower nail and parchment squares, pipe roses (Tip 104) and ranunculus (Tip 127). Freeze the flowers for 10 minutes to harden.
- 16. Arrange the frozen buttercream flowers on the cake in a crescent or wreath shape. Use Tip 352 to pipe green leaves in the gaps. Serve at room temperature.
Expert Cooking Tips
- ✓Room temperature ingredients are non-negotiable. Cold eggs or buttermilk can cause the batter to curdle.
- ✓Do not use Dutch-process cocoa powder; you need natural cocoa to react with the baking soda and vinegar.
- ✓If your Swiss Meringue Buttercream looks curdled or soupy after adding butter, keep mixing! It almost always comes back together.
- ✓Weigh your flour. Using a cup measure can result in too much flour and a dry cake.
- ✓Use gel food coloring rather than liquid drops to avoid altering the liquid ratio of the batter.
- ✓Chill the cake layers before stacking to make them easier to handle and less prone to breaking.
- ✓Make the buttercream flowers in advance and keep them in the freezer until you are ready to decorate.
Substitutions and Variations
If you cannot find cake flour, you can make a substitute by removing 2 tablespoons of all-purpose flour from every cup and replacing it with 2 tablespoons of cornstarch; sift 3-4 times to aerate. For the fat, you can use all butter for a denser cake or all oil for a lighter, more muffin-like texture, though the 50/50 split is recommended. If you prefer not to use red food dye, you can omit it entirely for a ‘Velvet’ chocolate cake, or use beet powder, though be warned beet powder can turn brown during baking due to oxidation. For the frosting, if Swiss Meringue is too intimidating, an Italian Meringue Buttercream is a great alternative, or a crusting American Buttercream if you live in a very humid climate.
Common Mistakes to Avoid
The most common mistake with Red Velvet is overbaking. Because the cake is dark, it is hard to see visual browning cues. Rely on the toothpick test. Another error is overmixing the batter after adding the flour; this develops gluten and makes the cake tough rather than velvety. When making the buttercream, adding the butter while the meringue is still warm will result in a soupy mess. Ensure the meringue is completely cool (room temp) before introducing the butter. Finally, do not skip the crumb coat; red velvet crumbs are dark and will easily ruin the look of a pristine white frosting if not sealed in first.
Serving Suggestions
This cake is best served at room temperature. If it has been refrigerated, allow it to sit out for at least 2-3 hours before serving so the buttercream softens and the cake flavors bloom. Slice with a long, thin knife dipped in hot water and wiped dry between cuts for clean, professional layers. Serve with a glass of cold milk, a dry champagne, or a dark roast coffee to contrast the sweetness.
Storage and Reheating Tips
Store the frosted cake in the refrigerator for up to 4 days. Ideally, use a cake keeper to protect the flowers. Cut slices can be wrapped in plastic wrap and stored in an airtight container. For long-term storage, freeze individual slices wrapped tightly in plastic wrap and foil for up to 3 months. Thaw in the refrigerator overnight before bringing to room temperature. The buttercream flowers can be piped weeks in advance and stored in an airtight container in the freezer.
Nutrition Facts (Estimated)
| Serving Size | 1 slice |
| Calories | 680 |
| Fat | 38g |
| Saturated Fat | 22g |
| Unsaturated Fat | 14g |
| Trans Fat | 0.5g |
| Cholesterol | 110mg |
| Sodium | 320mg |
| Carbohydrates | 72g |
| Fiber | 2g |
| Sugar | 45g |
| Protein | 6g |
Frequently Asked Questions
Can I use cream cheese frosting instead?
Yes, cream cheese frosting is traditional. However, it is much softer than buttercream. If you choose to use it, you may not be able to pipe the intricate flowers shown in the photos. Consider using buttercream for the flowers and cream cheese frosting for the filling.
Why isn’t my cake red enough?
This usually happens if you use too much cocoa powder or a low-quality food coloring. Ensure you are using ‘Super Red’ gel paste rather than liquid drops from the supermarket.
Can I make the cake layers ahead of time?
Absolutely. Wrap the cooled cake layers in double layers of plastic wrap and freeze them for up to a month. Thaw them in the fridge before stacking.
What does the vinegar do in the recipe?
Vinegar provides the acid needed to activate the baking soda for lift and helps tenderize the gluten. It also preserves the red color.
My buttercream looks curdled. Is it ruined?
No! This is a normal stage of emulsion. Keep beating on high speed. If it is too cold, blow a hairdryer against the outside of the bowl for 10 seconds. It will come together.
Can I make this as cupcakes?
Yes, this recipe will make approximately 24-30 standard cupcakes. Bake for 18-22 minutes.
Do I have to use a stand mixer?
For the cake batter, a hand mixer works fine. For the Swiss Meringue Buttercream, a stand mixer is highly recommended because it requires a lot of whipping time that is tiring by hand.
How do I transport this cake?
Because of the delicate flowers, transport the cake in a sturdy cake box on a flat surface (like the floor of the car, not the seat). Keep the car cool.
Conclusion
Creating this Elegant Red Velvet Anniversary Cake is more than just following a recipe; it is an artistic expression of celebration. The deep crimson layers contrasted against the pristine white buttercream and the burst of floral colors creates a visual masterpiece that is sure to be the highlight of your special day. While the process requires patience—specifically with the Swiss Meringue Buttercream and floral piping—the result is a bakery-quality confection right from your own kitchen. We hope this cake brings joy, romance, and a delicious sweetness to your anniversary celebration. Happy baking!