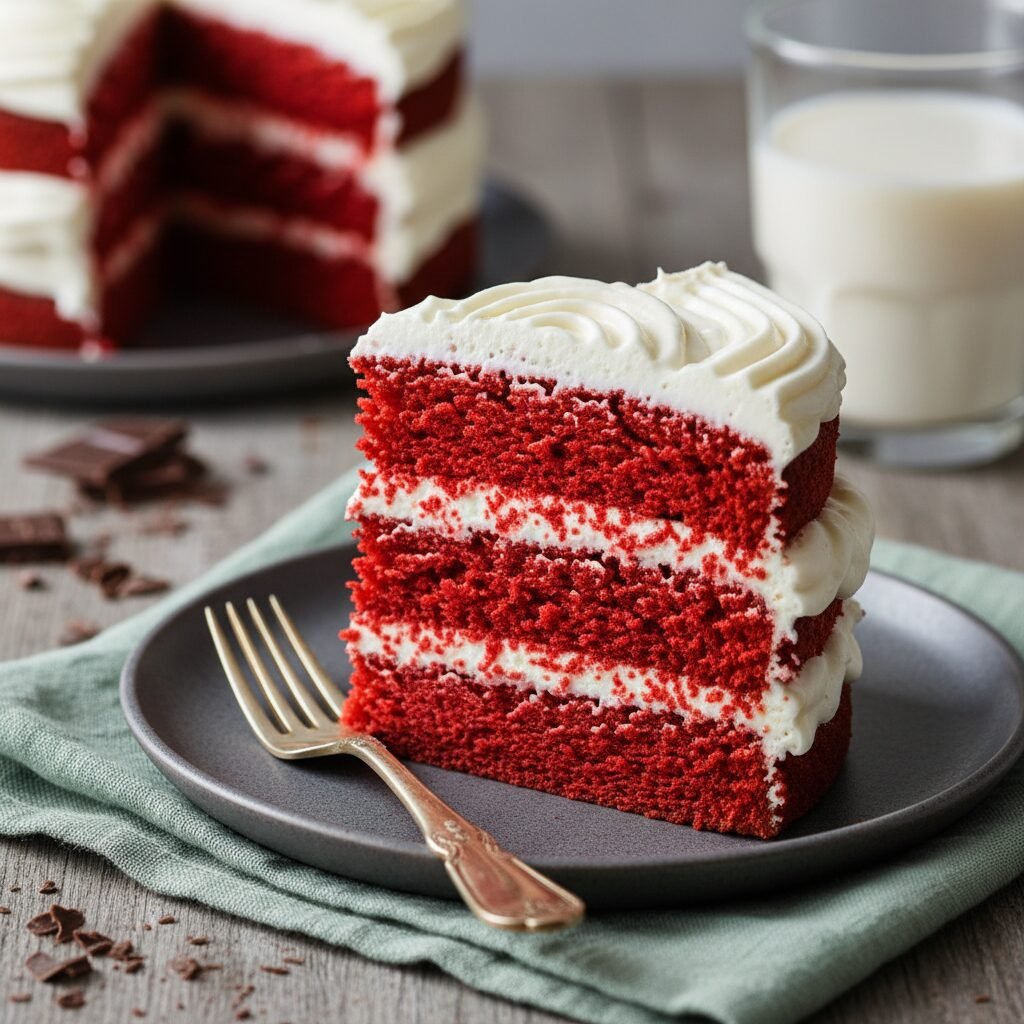
The Ultimate Moist Dairy-Free Red Velvet Cake with Whipped Coconut Cream Frosting
Moist Dairy Free Red Velvet Cake With Coconut Cream Frosting Recipe
This show-stopping dairy-free red velvet cake features a tender, velvety crumb and a subtle chocolate flavor, perfectly balanced by a tangy, luscious whipped coconut cream frosting. It is the ultimate allergy-friendly dessert that tastes just as decadent as the classic version.
30 minutes
30 minutes
1 hour 30 minutes
12-14 servings
Dessert
Baking
American
Dairy-Free
Red velvet cake is an enigma of the baking world; it is not quite a chocolate cake, nor is it simply a vanilla cake dyed red. It occupies a delicious middle ground with a flavor profile that is subtle, tangy, and utterly distinct. For those adhering to a dairy-free or lactose-intolerant lifestyle, finding a red velvet cake that retains that signature ‘velvety’ texture—which traditionally relies heavily on buttermilk and butter—can be a challenge. This recipe changes the narrative completely. We have engineered a cake that is not only free from dairy but is arguably moister and more tender than its conventional counterparts. The secret lies in the reaction between the cocoa powder, the vinegar-based dairy-free buttermilk, and the oil, which creates a crumb that stays soft for days.
But a red velvet cake is nothing without its frosting. Traditional cream cheese icing is heavy and dairy-laden. Our solution is a Whipped Coconut Cream Frosting that mimics the tang and mouthfeel of cream cheese without the heaviness. Using full-fat coconut milk, we create a cloud-like topping that complements the dense, rich crumb of the cake. This dessert is a celebration of texture and flavor, proving that dietary restrictions do not mean sacrificing the joy of a truly indulgent slice of cake. Whether you are baking for a birthday, Valentine’s Day, or just a Tuesday night craving, this cake delivers a visual and gustatory ‘wow’ factor that will leave your guests asking for the recipe, completely unaware it is dairy-free.
History & Origins
The history of red velvet cake is as rich and layered as the cake itself, often debated among food historians. Its origins trace back to the Victorian era, where ‘velvet’ cakes were a category of fancy cakes with a soft, velvety crumb, distinct from the coarser sponge cakes of the time. The ‘red’ hue, however, was originally a result of a chemical reaction rather than food coloring. In the early 20th century, cocoa powder was not Dutch-processed (alkalized) as it is today. When this raw cocoa powder reacted with acidic ingredients like buttermilk and vinegar, the anthocyanins in the cocoa turned a reddish-brown color.
During the Great Depression, the Adams Extract company in Texas is credited with popularizing the modern, vibrant red version we know today. To boost sales during a time when people were buying fewer extracts, they sold red food coloring with tear-off recipe cards for ‘Adams Red Velvet Cake.’ Another famous legend attributes the cake to the Waldorf-Astoria Hotel in New York City, which served a signature red cake in the 1930s. The cake experienced a massive resurgence in pop culture following the 1989 film ‘Steel Magnolias,’ firmly cementing it as a staple of American Southern cuisine.
In recent decades, as plant-based diets have moved from the fringe to the mainstream, the demand for dairy-free adaptations has skyrocketed. Early vegan versions often suffered from dryness or a distinct ‘beany’ flavor from soy substitutes. However, modern food science and the availability of high-quality plant milks and coconut creams have allowed for the evolution of recipes like this one, which honors the historical texture of the Victorian velvet cakes while utilizing modern dairy-free ingredients.
Why This Recipe Works
This recipe succeeds where many dairy-free cakes fail because it prioritizes the chemistry of baking. First, we create a ‘vegan buttermilk’ by curdling almond milk with apple cider vinegar. This acidity is crucial; it not only activates the baking soda for a superior rise but also tenderizes the gluten strands in the flour, ensuring the cake is soft rather than chewy.
Secondly, we use oil instead of a vegan butter substitute for the cake batter. While butter contains water which evaporates during baking, oil is 100% fat and remains liquid at room temperature. This guarantees that the cake remains incredibly moist and sensationally soft even after it has cooled or been refrigerated.
For the frosting, the choice of full-fat coconut cream is scientifically sound. Coconut fat is solid at room temperature (similar to the saturated fat in dairy butter), which allows the frosting to hold its shape when whipped. By chilling the cans, we separate the fat from the liquid water, ensuring a thick, stable frosting that can be piped and spread just like traditional buttercream, providing a luscious, creamy mouthfeel that balances the acidity of the cake.
Why You’ll Love This Recipe
- ✓100% Dairy-Free and Vegan Friendly
- ✓Incredibly moist crumb that stays soft for days
- ✓Luscious, stable whipped coconut cream frosting
- ✓Vibrant red color perfect for holidays and events
- ✓No obscure ingredients—simple pantry staples
- ✓Perfect balance of vanilla and mild cocoa flavors
Equipment You’ll Need
- ✓Two 8-inch or 9-inch round cake pans
- ✓Electric hand mixer or stand mixer
- ✓Large mixing bowls
- ✓Whisk
- ✓Sifter or fine-mesh sieve
- ✓Parchment paper
- ✓Wire cooling rack
- ✓Offset spatula
Ingredients
- ✓2 1/2 cups all-purpose flour (or cake flour for extra lightness)
- ✓1 1/2 cups granulated sugar
- ✓1 teaspoon baking soda
- ✓1 teaspoon fine sea salt
- ✓2 tablespoons unsweetened cocoa powder
- ✓1 1/2 cups unsweetened almond milk (or soy milk)
- ✓1 tablespoon apple cider vinegar
- ✓1 1/2 cups vegetable oil (or melted coconut oil)
- ✓1 teaspoon pure vanilla extract
- ✓1-2 tablespoons red food coloring (gel or liquid)
- ✓2 cans (14 oz each) full-fat coconut milk, chilled in the fridge overnight (for frosting)
- ✓1/2 cup powdered sugar (sifted)
- ✓1/2 teaspoon vanilla extract (for frosting)
Instructions
- Preheat your oven to 350°F (175°C). Grease two 8-inch or 9-inch round cake pans with oil and line the bottoms with parchment paper to ensure easy removal.
- Prepare the dairy-free buttermilk: In a measuring cup, combine the almond milk and apple cider vinegar. Stir gently and let it sit for about 5-10 minutes until it looks slightly curdled and thickened.
- In a large mixing bowl, sift together the flour, sugar, baking soda, salt, and cocoa powder. Whisk firmly to ensure all dry ingredients are evenly distributed and there are no lumps.
- In a separate medium bowl, whisk together the prepared almond milk mixture, vegetable oil, vanilla extract, and red food coloring. Add enough food coloring to reach your desired shade of deep red.
- Pour the wet ingredients into the bowl of dry ingredients. Mix with a hand mixer on low speed or a whisk just until combined. Do not overmix; stop as soon as the flour streaks disappear to prevent a tough cake.
- Divide the batter evenly between the two prepared cake pans. Tap the pans gently on the counter to release any large air bubbles.
- Bake for 28-32 minutes, or until a toothpick inserted into the center comes out clean or with just a few moist crumbs attached.
- Remove cakes from the oven and let them cool in the pans for 10 minutes. Then, carefully invert them onto a wire rack to cool completely before frosting. They must be cool to the touch.
- Make the frosting: Remove the coconut milk cans from the fridge. Be careful not to shake them. Open the cans and scoop out the hardened thick white cream that has separated to the top into a chilled mixing bowl. Discard the liquid water or save it for smoothies.
- Using a hand mixer, whip the coconut cream on high speed for 2-4 minutes until it becomes fluffy and light.
- Add the powdered sugar and vanilla extract to the whipped cream. Continue to whip for another minute until smooth and creamy.
- Assemble the cake: Place one cake layer on a serving plate. Spread a generous layer of coconut cream frosting over the top. Place the second cake layer on top. Use the remaining frosting to cover the top and sides of the cake. Garnish with cake crumbs or berries if desired.
Expert Cooking Tips
- ✓Chill the coconut milk cans for at least 24 hours before making the frosting to ensure the fat separates properly.
- ✓Do not overmix the batter once the wet and dry ingredients are combined, or the gluten will overdevelop and make the cake dense.
- ✓Use ‘gel’ food coloring for a more vibrant red color without adding too much extra liquid to the batter.
- ✓Ensure the cake layers are completely cool before frosting; coconut cream melts faster than butter-based frosting.
- ✓If your kitchen is warm, place the bowl and beaters in the freezer for 10 minutes before whipping the coconut cream.
- ✓Sift your cocoa powder and flour to avoid bitter lumps of dry cocoa in the finished cake.
- ✓Weigh your flour if possible (approx. 120g per cup) to ensure accuracy, as scooping can pack too much flour.
Substitutions and Variations
This recipe is quite flexible. If you need to make it Gluten-Free, replace the all-purpose flour with a high-quality 1:1 Gluten-Free Baking Flour blend that contains xanthan gum. For the sugar, you can substitute cane sugar or coconut sugar, though coconut sugar will darken the batter and make the red color less vibrant. If you are allergic to nuts, soy milk is an excellent protein-rich alternative to almond milk for making the buttermilk. For the oil, melted coconut oil works well, but ensure all other ingredients are room temperature so the oil doesn’t solidify instantly when mixing. For a natural food coloring alternative, you can use beet powder or concentrated beet juice, but be aware this may impart a slight earthy flavor to the cake.
Common Mistakes to Avoid
The most common mistake is using ‘light’ coconut milk for the frosting; it does not have enough fat to whip up and will result in a runny soup. Another error is opening the oven door too early to check the cake, which can cause the center to sink due to the sudden temperature drop. Failing to line the cake pans with parchment paper is also risky, as this moist cake can stick to the bottom of the pan easily. Finally, rushing the cooling process is fatal for this recipe; if the cake is even slightly warm, the coconut frosting will melt and slide right off the cake.
Serving Suggestions
Serve this cake on a white pedestal cake stand to show off the dramatic color contrast between the deep red sponge and the bright white frosting. It pairs beautifully with fresh berries—raspberries or strawberries add a tart freshness that cuts through the richness. For a beverage pairing, a hot cup of coffee or an oat milk latte complements the cocoa notes perfectly. If you want to add a decorative touch, sprinkle some toasted coconut flakes or dark chocolate shavings on top of the frosting.
Storage and Reheating Tips
Because the frosting is based on coconut cream, this cake must be stored in the refrigerator, or the frosting may become too soft. Keep it in an airtight cake carrier or cover the cut sections with plastic wrap to prevent the cake from drying out. It will last in the fridge for up to 5 days. For longer storage, you can freeze individual slices wrapped tightly in plastic wrap and then foil for up to 3 months. Thaw frozen slices in the refrigerator overnight before eating.
Nutrition Facts (Estimated)
| Serving Size | 1 slice |
| Calories | 420 |
| Fat | 22g |
| Saturated Fat | 14g |
| Unsaturated Fat | 7g |
| Trans Fat | 0g |
| Cholesterol | 0mg |
| Sodium | 310mg |
| Carbohydrates | 54g |
| Fiber | 2g |
| Sugar | 28g |
| Protein | 4g |
Frequently Asked Questions
Can I use beet juice instead of food coloring?
Yes, you can use roasted beet puree or concentrated beet juice. However, you may need to adjust the dry ingredients slightly to account for the extra moisture, and the color will be a more muted, rusty red rather than a vibrant crimson.
Why did my coconut cream not whip?
This usually happens if the coconut milk wasn’t chilled long enough or if the can didn’t contain enough fat. Ensure you buy full-fat canned coconut milk (not the carton kind for drinking) and chill it for at least 24 hours. Some brands contain guar gum which helps, while others don’t separate as well.
Can I make this into cupcakes?
Absolutely! This recipe will yield approximately 20-24 cupcakes. Bake them at the same temperature (350°F) but reduce the baking time to 18-22 minutes. Check for doneness with a toothpick.
Is this cake gluten-free?
The recipe as written uses wheat flour, so it is not gluten-free. However, it converts very well to gluten-free by simply swapping the flour for a 1:1 Gluten-Free All-Purpose Flour blend.
Can I use olive oil?
You can, but olive oil has a strong flavor that might clash with the cocoa and vanilla. A neutral oil like canola, vegetable, or grapeseed oil is recommended for the best flavor profile.
Why is there vinegar in the recipe?
Vinegar is essential for two reasons: it reacts with the baking soda to help the cake rise (leavening), and it provides the necessary acidity to curdle the plant milk, mimicking the flavor and texture of traditional buttermilk.
Can I prepare the cake layers in advance?
Yes. You can bake the cake layers, let them cool completely, wrap them tightly in plastic wrap, and freeze them for up to a month. Frost them while they are frozen or thawed; frosting frozen layers is actually easier as fewer crumbs come loose.
Does the frosting taste like coconut?
Yes, the frosting has a distinct coconut flavor. If you dislike coconut, you can use a store-bought vegan butter and powdered sugar to make a standard vegan buttercream instead.
Conclusion
Mastering this Moist Dairy-Free Red Velvet Cake is a game-changer for anyone hosting mixed-diet gatherings or simply looking for a healthier spin on a classic. The combination of the tender, cocoa-infused sponge and the airy, cloud-like coconut cream frosting creates a dessert experience that feels luxurious and special. It proves that you don’t need dairy to achieve baking perfection. We hope this recipe becomes a staple in your kitchen, bringing joy and vibrant color to your table. Happy baking!