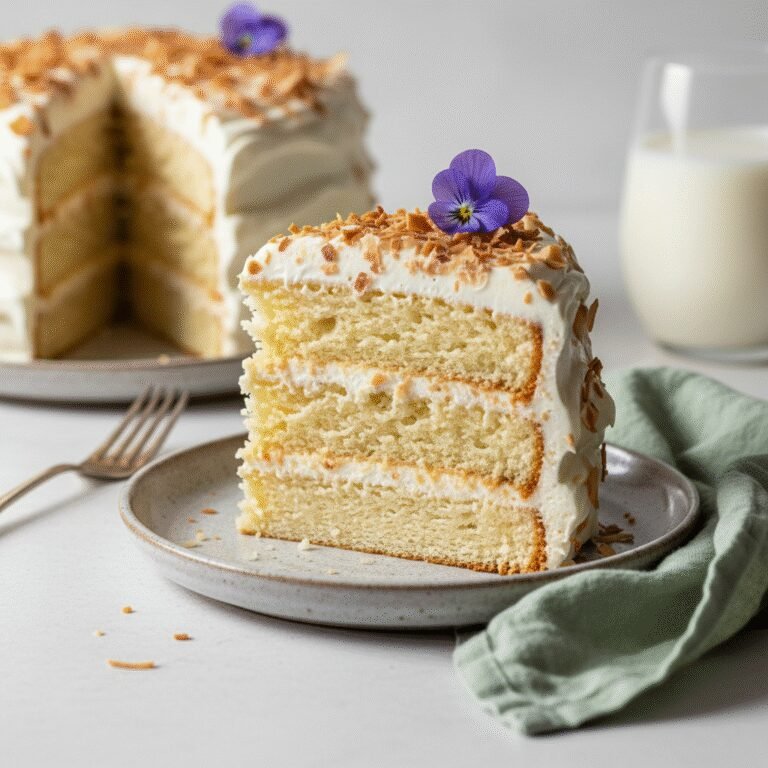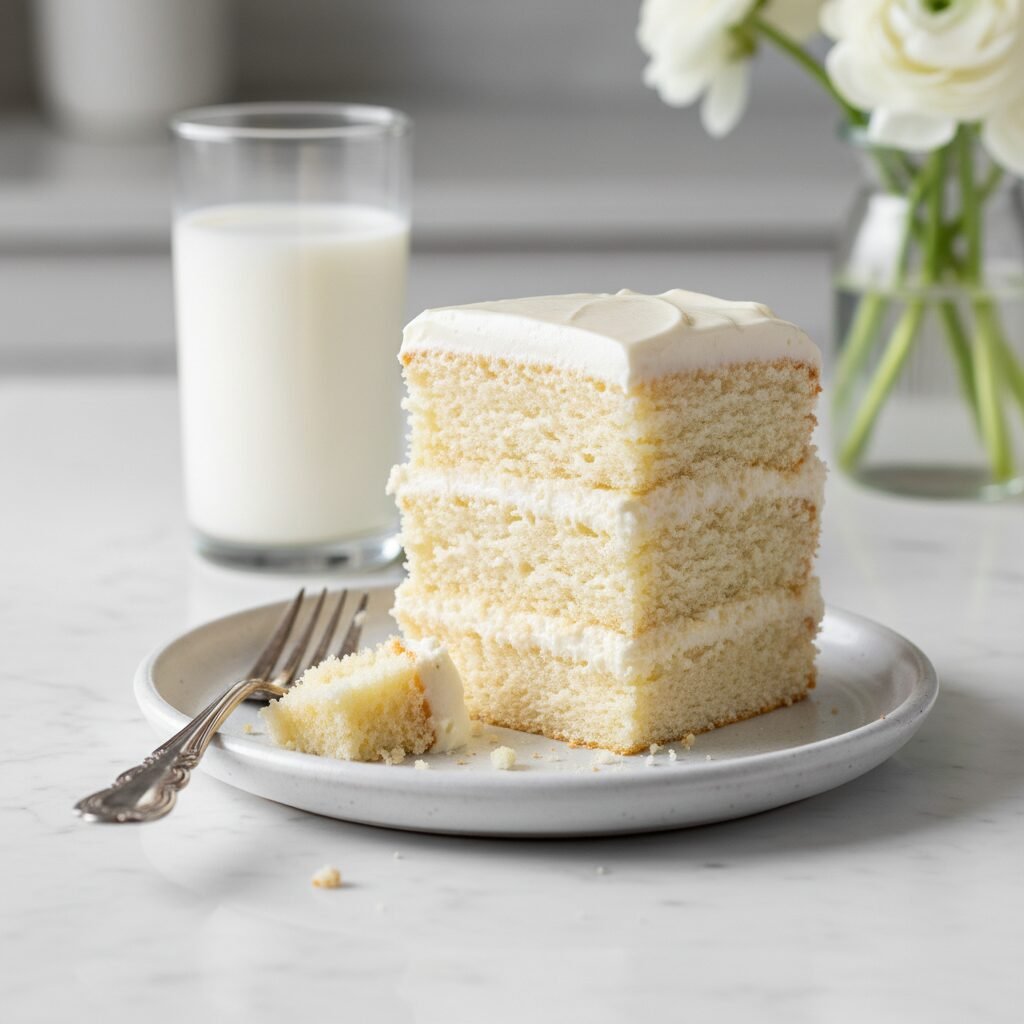
The Ultimate Moist Dairy Free Vanilla Cake (Better Than Bakery!)
Moist Dairy Free Vanilla Cake Recipe
Discover the secret to a perfectly fluffy, tender, and incredibly moist dairy free vanilla cake that rivals any traditional butter-based recipe. This foolproof method uses simple pantry staples to create a velvety crumb that nobody will believe is completely dairy-free.
20 minutes
30 minutes
50 minutes
12-14 servings (Two 8-inch rounds)
Dessert
Baking
American
Dairy-Free
Welcome to what I confidently call the holy grail of allergy-friendly baking. If you have ever experimented with dairy-free baking, you likely know the struggle: cakes that turn out dense, gummy, or disappointingly dry. For years, the standard vanilla cake relied heavily on butter and whole milk for that quintessential tender crumb and rich mouthfeel. Removing those fats and proteins often resulted in a lackluster dessert that felt like a compromise. But not today. This Moist Dairy Free Vanilla Cake recipe is the result of endless testing, tweaking, and tasting to ensure that you never have to apologize for a ‘free-from’ dessert again. We are talking about a cake with a pristine, soft white crumb, a robust vanilla aroma that fills your kitchen, and a texture so moist it stays fresh for days. Whether you are baking for a child with a milk allergy, hosting a vegan friend, or simply ran out of butter, this recipe stands tall on its own merits. It serves as the perfect blank canvas for luscious dairy-free buttercreams, fresh berry fillings, or a simple dusting of powdered sugar. What makes this specific recipe a standout is its ability to mimic the tenderness of a traditional sponge without using specialized, hard-to-find substitutes. We are going back to basics with science-backed ratios that guarantee a light, airy lift every single time. So, preheat your ovens and get your mixers ready, because we are about to bake a cake that will become your new gold standard for celebrations, birthdays, and Tuesday night cravings alike.
History & Origins
The history of the vanilla cake is a journey through the evolution of baking technology and the democratization of ingredients. In the early 19th century, cakes were leavened primarily with yeast or beaten eggs, resulting in denser, bread-like textures. It wasn’t until the mid-1800s, with the invention of baking powder, that the modern ‘butter cake’ with its light, aerated structure became possible. Vanilla, once an exotic and rare orchid pod from Mexico, became more accessible in the late 19th century with the development of vanilla extract, cementing its place as the default flavor profile for American celebrations. However, the concept of ‘dairy-free’ cake has its own fascinating lineage, often born out of necessity rather than choice. During the Great Depression and World War II, rationing of butter, milk, and eggs led to the invention of ‘Wacky Cake’ or ‘Depression Cake,’ which relied on vinegar and baking soda for lift and oil for moisture. These resourceful recipes laid the groundwork for modern dairy-free baking. In recent decades, as awareness of lactose intolerance and milk allergies has grown—along with the rise of veganism—the demand for high-quality dairy-free baked goods has skyrocketed. We have moved far beyond the austere ration cakes of the 1940s. Today’s dairy-free cakes benefit from the availability of high-quality plant-based milks, refined neutral oils, and a better understanding of food chemistry. This recipe honors that history by combining the nostalgic flavor of a classic 1950s birthday cake with modern techniques that render dairy obsolete in the pursuit of the perfect crumb.
Why This Recipe Works
This recipe succeeds where others fail because it fundamentally understands the role of fat and acid in baking. In a traditional cake, butter provides flavor and structure, while milk provides moisture and protein. When we remove dairy, we must replace these functions intelligently. First, we use a high-quality neutral oil instead of a solid fat substitute. Oil is liquid at room temperature, which means the cake remains incredibly moist and soft on the counter, whereas butter-based cakes can firm up and dry out as they cool. To replicate the tenderizing effect of buttermilk, we create a ‘vegan buttermilk’ by curdling soy or almond milk with apple cider vinegar. This acid reacts vigorously with the baking soda, creating carbon dioxide bubbles that expand during baking to provide superior lift and a lighter, airier crumb. Furthermore, we use a specific ratio of granulated sugar to flour. Sugar is hygroscopic, meaning it attracts and holds water; by optimizing this ratio, we ensure the cake retains moisture long after it leaves the oven. Finally, the inclusion of both baking powder and baking soda ensures a dual-action rise—one that starts in the bowl and one that activates in the heat of the oven—preventing the dreaded dense, sunken center often associated with egg-free or dairy-free baking.
Why You’ll Love This Recipe
- ✓Incredibly moist texture that stays soft for days
- ✓Simple pantry ingredients—no weird gums or replacers
- ✓Perfectly flat layers ideal for stacking and decorating
- ✓Versatile base for cupcakes, sheet cakes, or tiered cakes
- ✓Indistinguishable from traditional dairy-full recipes
- ✓Quick and easy one-bowl mixing method
Equipment You’ll Need
- ✓Two 8-inch round cake pans
- ✓Parchment paper
- ✓Large mixing bowl
- ✓Medium mixing bowl
- ✓Whisk
- ✓Electric hand mixer or Stand mixer
- ✓Wire cooling rack
- ✓Kitchen scale (recommended)
Ingredients
- ✓2 and 1/2 cups (300g) All-purpose flour or Cake flour
- ✓1 and 1/2 cups (300g) Granulated white sugar
- ✓1 and 1/2 tsp Baking powder
- ✓1/2 tsp Baking soda
- ✓1/2 tsp Salt
- ✓1 and 1/4 cups (300ml) Unsweetened Soy milk or Almond milk (room temperature)
- ✓1 tbsp Apple cider vinegar or White vinegar
- ✓1/2 cup (112g) Neutral oil (Canola, Vegetable, or Grapeseed)
- ✓1 tbsp Pure Vanilla Extract
- ✓2 large Eggs (room temperature) – *See substitutions for vegan option*
Instructions
- Preheat your oven to 350°F (175°C). Grease two 8-inch round cake pans with oil and line the bottoms with parchment paper rounds. Dust the sides with a little flour and tap out the excess.
- In a measuring cup or small bowl, combine the room temperature dairy-free milk (soy or almond works best) with the vinegar. Stir gently and let it sit for 5-10 minutes to curdle and create your ‘buttermilk’.
- In a large mixing bowl, sift together the flour, baking powder, baking soda, and salt. Whisk in the granulated sugar until well combined.
- In a separate medium bowl, whisk together the prepared milk mixture, oil, eggs, and vanilla extract until the mixture is smooth and emulsified.
- Pour the wet ingredients into the dry ingredients. Using an electric mixer on low speed (or a whisk by hand), mix until just combined and no large lumps of flour remain. Do not overmix; stop as soon as the streaks of flour disappear.
- Divide the batter evenly between the two prepared cake pans. Tap the pans gently on the counter 2-3 times to release any large air bubbles.
- Bake in the center rack of the oven for 28-32 minutes, or until a toothpick inserted into the center comes out clean or with just a few moist crumbs attached. The tops should be pale golden and spring back when lightly touched.
- Remove from the oven and let the cakes cool in the pans for exactly 10 minutes. Then, carefully run a knife around the edges and invert them onto a wire rack to cool completely before frosting.
Expert Cooking Tips
- ✓Measure flour by weight (grams) for the most accurate results; too much flour is the #1 cause of dry cake.
- ✓Ensure all ingredients, especially the milk and eggs, are at room temperature to prevent the batter from breaking.
- ✓Do not skip the parchment paper; dairy-free cakes can be slightly more delicate and prone to sticking.
- ✓Use high-quality vanilla extract or vanilla bean paste for the best flavor profile since vanilla is the star here.
- ✓If using a stand mixer, use the paddle attachment and mix on the lowest speed to avoid developing gluten.
- ✓Let the ‘buttermilk’ sit for the full 5-10 minutes; the curdling action is crucial for the chemical reaction with baking soda.
Substitutions and Variations
This recipe is quite flexible, but substitutions should be made with care to preserve the texture. For the **milk**, unsweetened soy milk is the gold standard because its high protein content curdles best with vinegar, mimicking real buttermilk. Almond milk is a close second. Oat milk can be used, but it may result in a slightly gummier texture due to the starches. Coconut milk (carton, not canned) works but imparts a coconut flavor. For the **oil**, any neutral oil like canola, vegetable, grapeseed, or avocado oil works perfectly. Melted coconut oil can be used, but ensure all other ingredients are warm so the oil doesn’t solidify during mixing. If you need this to be **vegan/egg-free**, you can substitute the 2 eggs with 1/2 cup of unsweetened applesauce or a commercial egg replacer (like Bob’s Red Mill), though the cake will be slightly denser. For **flour**, cake flour yields the softest crumb, but all-purpose flour is perfectly fine. If you need **gluten-free**, use a high-quality 1:1 gluten-free baking flour blend that contains xanthan gum; almond flour alone will not work here.
Common Mistakes to Avoid
The most common mistake baker’s make is **overmixing the batter**. Once the wet and dry ingredients meet, the gluten in the flour begins to develop. If you mix too vigorously or for too long, the cake will become tough, rubbery, and may develop unsightly tunnels inside. Stop mixing the moment the flour streaks disappear. Another frequent error is **incorrect oven temperature**. If your oven runs hot, the cake will dome significantly and crack before the inside is cooked; if it runs cool, the cake may sink in the middle. Use an oven thermometer to be sure. **Opening the oven door too early** is another culprit for sunken cakes; the rush of cold air can collapse the delicate structure before it sets. Wait until at least 25 minutes have passed before checking. Finally, **using old leavening agents** (baking powder/soda) will result in a flat, dense puck. Check the expiration dates before you start.
Serving Suggestions
This cake is a versatile masterpiece that pairs beautifully with almost any topping. For a classic birthday feel, frost it with a **Dairy-Free Vanilla Buttercream** made from vegan butter sticks and powdered sugar. If you prefer something richer, a **Vegan Chocolate Ganache** made with coconut milk and dark chocolate provides a luxurious contrast to the light vanilla sponge. For summer gatherings, serve slices with a dollop of **coconut whipped cream** and a mountain of fresh strawberries, raspberries, or macerated peaches. This cake is also sturdy enough to be used in trifles or layered with lemon curd for a zesty twist. Serve at room temperature for the best texture; cold cake tends to feel drier on the palate.
Storage and Reheating Tips
Proper storage is key to maintaining that incredible moisture. Because this cake uses oil, it stays soft at room temperature longer than butter cakes. Store the frosted cake in an airtight cake carrier or under a glass dome at **room temperature for up to 3 days**. If you live in a very hot or humid climate, you may need to refrigerate it, but be sure to let it come back to room temperature before serving. For **freezing**, wrap individual unfrosted layers tightly in plastic wrap, then a layer of aluminum foil. They can be frozen for up to 3 months. Thaw the layers in the refrigerator overnight or on the counter for an hour before decorating. If you have leftover sliced cake, press a piece of plastic wrap directly against the cut side of the cake to prevent the crumb from drying out.
Nutrition Facts (Estimated)
| Serving Size | 1 slice |
| Calories | 340 |
| Fat | 16g |
| Saturated Fat | 1.5g |
| Unsaturated Fat | 14g |
| Trans Fat | 0g |
| Cholesterol | 0mg |
| Sodium | 210mg |
| Carbohydrates | 48g |
| Fiber | 1g |
| Sugar | 28g |
| Protein | 4g |
Frequently Asked Questions
Can I make this recipe into cupcakes?
Absolutely! This recipe makes approximately 24 standard cupcakes. Bake them at 350°F (175°C) for 18-22 minutes. Check for doneness with a toothpick.
Why did my cake sink in the middle?
Sinking usually happens if the oven door was opened too early, the batter was overmixed, or the leavening agents (baking powder/soda) were expired. It can also happen if the cake is underbaked.
Can I reduce the sugar in this recipe?
I do not recommend reducing the sugar significantly. Sugar provides moisture and tenderness, not just sweetness. Reducing it can lead to a dry, tough cake. You could reduce it by maybe 1/4 cup, but the texture will change.
Is this cake gluten-free?
As written, no. However, you can successfully substitute the all-purpose flour with a high-quality 1:1 Gluten-Free Baking Flour blend (like King Arthur or Bob’s Red Mill) that includes xanthan gum.
Can I use olive oil?
You can, but regular extra virgin olive oil has a strong flavor that will overpower the vanilla. If you want to use olive oil, look for ‘light’ or ‘mild’ olive oil which is more neutral.
My batter looks curdled after mixing the wet ingredients. Is that okay?
Yes, that is totally normal! The vinegar reacting with the milk creates a curdled look, and adding the oil might make it look separated. It will come together perfectly once mixed with the flour.
Can I use a 9×13 inch pan instead?
Yes, this recipe fits perfectly in a 9×13 inch rectangular pan. You will likely need to increase the baking time to 35-40 minutes.
How do I make the cake completely Vegan?
To make this vegan, simply replace the 2 eggs with a suitable substitute. 1/2 cup of unsweetened applesauce, 1/2 cup of silken tofu blended, or a flax egg (2 tbsp flax meal + 6 tbsp water) work well, though the crumb may be slightly heavier.
Conclusion
There you have it—the ultimate guide to baking a Moist Dairy Free Vanilla Cake that requires zero compromises on taste or texture. By understanding the simple science behind acid, oil, and flour ratios, you can produce a dessert that is inclusive without feeling ‘alternative.’ Whether you are stacking it high with frosting for a show-stopping birthday centerpiece or enjoying a simple slice with your afternoon coffee, this recipe is bound to become a heavily rotated favorite in your kitchen recipe box. Don’t forget to tag us on social media when you bake it; we love seeing your beautiful, fluffy creations! Happy baking!