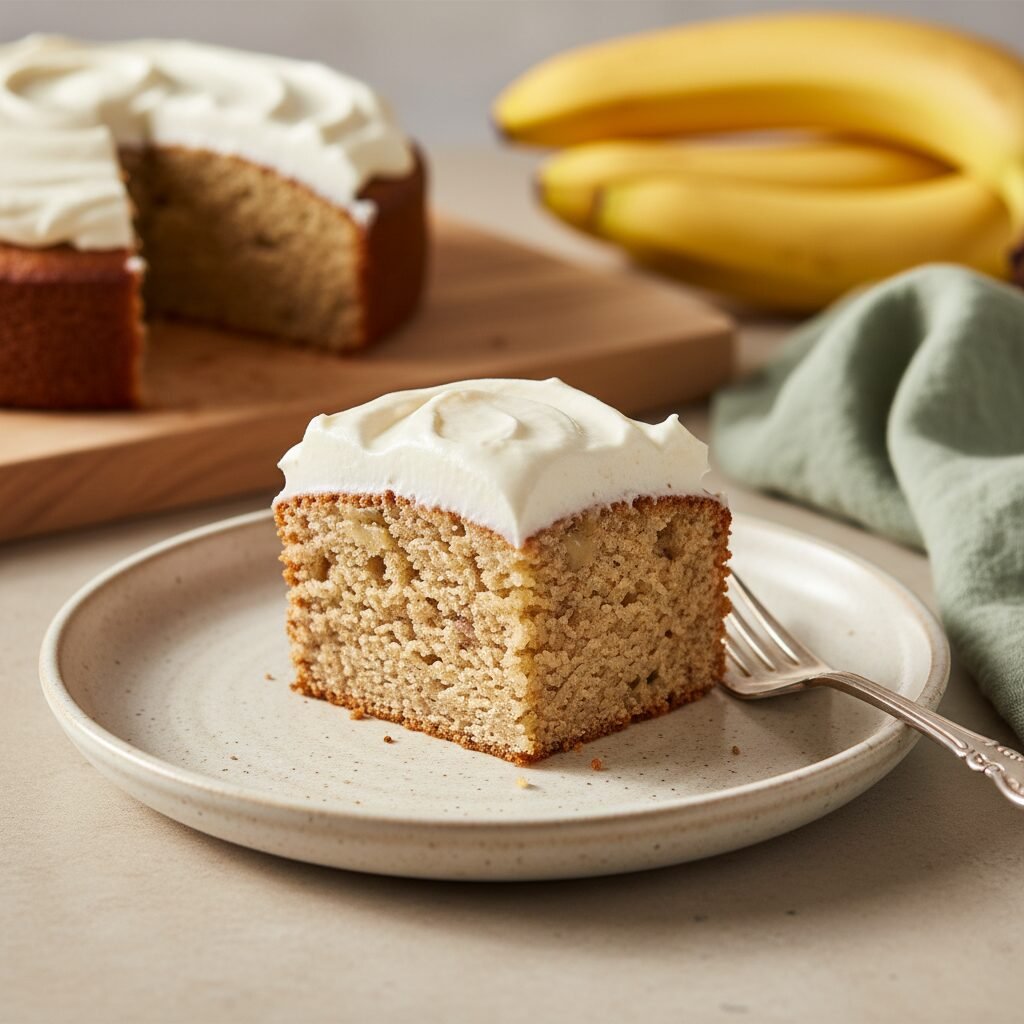
The Ultimate Moist Gluten-Free Banana Cake with Creamy Dairy-Free Frosting
Moist Gluten Free Banana Cake Dairy Free Frosting Recipe
Indulge in the tender crumb of this incredibly moist gluten-free banana cake, topped with a luscious, whipped dairy-free frosting. Perfect for birthdays or a cozy afternoon treat, this recipe proves that allergy-friendly baking can be just as decadent and delicious as traditional desserts.
20 minutes
35 minutes
55 minutes
12 slices
Dessert
Baking
American
Gluten-Free
Welcome to what might just become the most requested dessert in your household. If you have ever navigated the world of gluten-free baking, you know the struggle is real. Far too often, we are met with cakes that are dry, crumbly, or have a gritty texture that just doesn’t sit right. But today, we are shattering those stereotypes with a Gluten-Free Banana Cake that is so incredibly moist, tender, and flavorful, no one will believe it is missing the wheat. This cake celebrates the natural sweetness and density of ripe bananas, transforming them into a sponge that is light yet satisfyingly rich.
But we didn’t stop at just the cake. The crowning jewel is a velvety, dairy-free frosting that rivals any buttercream you have ever tasted. Using high-quality vegan butter and a touch of coconut cream, we achieve a piping consistency that holds its shape beautifully while melting in your mouth. This recipe is a labor of love, designed to bring everyone to the table regardless of dietary restrictions. Whether you are celiac, lactose intolerant, or simply looking for a lighter dessert option that doesn’t compromise on taste, this cake delivers. The aroma of caramelized bananas and vanilla filling your kitchen is just the beginning of this delightful sensory experience. Get ready to bake a masterpiece that looks as stunning as it tastes.
History & Origins
The history of banana cake is deeply intertwined with the history of banana bread, a staple comfort food that gained massive popularity in the United States during the 1930s. As the Great Depression forced households to be resourceful, throwing away overripe fruit became unthinkable. Home bakers discovered that mashed, brown bananas added incredible moisture and sweetness to batters, allowing them to cut back on expensive sugars and fats. The introduction of baking powder and baking soda as reliable chemical leaveners in the 19th century had already paved the way for ‘quick breads,’ and the banana became the star ingredient of this genre.
However, the evolution from a dense bread to a light, fluffy cake is a more recent culinary refinement. As global trade expanded and bananas became a year-round commodity, bakers began experimenting with lighter flours and creaming methods to elevate the humble loaf into a celebration cake. The gluten-free and dairy-free adaptation of this classic is a testament to the modern food revolution. With the rise of Celiac disease awareness and the increasing prevalence of dairy sensitivities in the late 20th and early 21st centuries, the demand for inclusive recipes skyrocketed. Early gluten-free baked goods were often dense and unpalatable, but the development of sophisticated flour blends containing rice flour, tapioca starch, and potato starch has revolutionized the landscape. This recipe stands on the shoulders of decades of culinary innovation, bridging the gap between Depression-era resourcefulness and modern dietary science.
Why This Recipe Works
This recipe succeeds where many gluten-free cakes fail primarily due to the balance of moisture and structure. Gluten is the protein that typically gives cake its structure and elasticity; without it, cakes can easily fall apart. To counteract this, we use a high-quality 1-to-1 gluten-free flour blend that includes xanthan gum, which mimics the binding properties of gluten. However, the real secret weapon here is the bananas themselves. Bananas are hygroscopic, meaning they hold onto water, which ensures the cake stays moist for days.
Furthermore, we utilize oil instead of butter in the cake batter. While butter adds flavor, it contains water which evaporates during baking, sometimes leading to a drier crumb in gluten-free baking. Oil is 100% fat and remains liquid at room temperature, coating the flour proteins and ensuring a sensation of moistness in every bite. For the dairy-free frosting, the combination of room-temperature vegan butter and a splash of full-fat coconut milk or oat milk creates an emulsion that is stable and creamy, avoiding the ‘oily’ mouthfeel that some shortening-based frostings have. The acidity from the brown sugar also reacts with the baking soda to create a superior lift, ensuring the cake is fluffy rather than dense.
Why You’ll Love This Recipe
- ✓Incredibly moist texture that stays fresh for days
- ✓Completely gluten-free and dairy-free safe for allergies
- ✓Rich banana flavor enhanced with hints of vanilla and cinnamon
- ✓Silky smooth frosting that pipes perfectly
- ✓Uses simple pantry staples and ripe bananas
- ✓Kid-friendly and perfect for school celebrations
Equipment You’ll Need
- ✓9×13 inch baking pan or two 9-inch round pans
- ✓Large mixing bowl
- ✓Medium mixing bowl
- ✓Electric hand mixer or stand mixer
- ✓Rubber spatula
- ✓Measuring cups and spoons
- ✓Wire cooling rack
- ✓Potato masher or fork
Ingredients
- ✓2 cups Gluten-Free All-Purpose Flour Blend (ensure it contains xanthan gum)
- ✓1 teaspoon baking powder
- ✓1 teaspoon baking soda
- ✓1/2 teaspoon salt
- ✓1 teaspoon ground cinnamon
- ✓1/2 cup granulated sugar
- ✓1/2 cup light brown sugar, packed
- ✓1/2 cup vegetable oil or melted coconut oil
- ✓2 large eggs, room temperature
- ✓1 teaspoon pure vanilla extract
- ✓3 large ripe bananas, mashed (approx. 1.5 cups)
- ✓1/4 cup dairy-free milk (almond, soy, or oat)
- ✓For the Frosting: 1 cup vegan butter sticks, slightly softened
- ✓3-4 cups powdered sugar, sifted
- ✓2 tablespoons dairy-free milk or coconut cream
- ✓1 teaspoon vanilla extract
- ✓Pinch of salt
Instructions
- Preheat your oven to 350°F (175°C). Grease a 9×13 inch baking pan or two 9-inch round cake pans with oil or cooking spray. Line the bottom with parchment paper for easier removal.
- In a medium bowl, whisk together the gluten-free flour, baking powder, baking soda, salt, and cinnamon until well combined. Set aside.
- In a large mixing bowl, combine the granulated sugar, brown sugar, vegetable oil, eggs, and vanilla extract. Using an electric mixer, beat on medium speed for about 2 minutes until the mixture is smooth and slightly thickened.
- Add the mashed bananas and the 1/4 cup of dairy-free milk to the wet ingredients. Mix on low speed until fully incorporated.
- Gradually add the dry flour mixture to the wet ingredients in two batches. Mix on low speed just until the flour disappears. Do not overmix, or the cake may become dense. Use a spatula to scrape down the sides and bottom of the bowl to ensure everything is combined.
- Pour the batter evenly into the prepared baking pan(s). Smooth the top with a spatula.
- Bake in the preheated oven for 30-35 minutes for a 9×13 pan, or 25-30 minutes for round pans. The cake is done when a toothpick inserted into the center comes out clean or with just a few moist crumbs.
- Remove the cake from the oven and let it cool completely in the pan on a wire rack. If using round pans, let them cool for 10 minutes in the pan before inverting them onto the rack to cool completely.
- While the cake cools, prepare the frosting. In a large bowl, beat the softened vegan butter on medium-high speed for 3-4 minutes until it is very pale and fluffy.
- Gradually add the powdered sugar, one cup at a time, mixing on low speed until incorporated. Add the vanilla extract, pinch of salt, and 1 tablespoon of dairy-free milk.
- Increase the mixer speed to high and whip for another 2-3 minutes. If the frosting is too stiff, add another tablespoon of milk. If it is too soft, add a bit more powdered sugar.
- Once the cake is completely cool, spread the frosting generously over the top using an offset spatula. Slice and serve.
Expert Cooking Tips
- ✓Use bananas that are heavily spotted or even black for the sweetest flavor and best moisture.
- ✓Ensure all ingredients, especially eggs and dairy-free milk, are at room temperature to prevent the batter from curdling.
- ✓Measure your gluten-free flour using the ‘spoon and level’ method to avoid packing too much flour into the cup.
- ✓Do not skip the cooling time; frosting a warm cake will cause the vegan butter to melt and slide off.
- ✓Sifting the powdered sugar is crucial for a lump-free, silky frosting.
- ✓If using round pans, double-check baking time as they may bake faster than a rectangular pan.
Substitutions and Variations
This recipe is quite versatile if you need to make adjustments based on your pantry or other allergies. For the flour, if you don’t have a blend with xanthan gum, you can add 1 teaspoon of xanthan gum separately to your flour mix. If you are not strictly gluten-free, regular all-purpose wheat flour works perfectly in the same 1:1 ratio. For an egg-free version, flax eggs (1 tablespoon ground flaxseed meal mixed with 3 tablespoons warm water per egg) work wonderfully because the bananas already provide structure. You can substitute the vegetable oil with melted coconut oil or avocado oil; olive oil works too but may impart a slight savory flavor. For the sweetener, coconut sugar can replace brown sugar for a lower glycemic index option, though the texture might be slightly coarser. In the frosting, if you cannot find vegan butter sticks, high-quality vegetable shortening can be used, though you may need to increase the vanilla extract to boost the flavor.
Common Mistakes to Avoid
The most common mistake with this recipe is under-baking or over-baking. Gluten-free flours take longer to absorb moisture, so the cake might look done on top but be gummy in the middle. Always use the toothpick test. Another pitfall is using bananas that aren’t ripe enough; yellow or green bananas lack the necessary sugar content and moisture, resulting in a bland, dry cake. Additionally, failing to let the vegan butter soften properly before making the frosting can result in lumps, while letting it get too warm (melting) will result in a greasy soup that won’t hold its shape. Lastly, be careful not to over-measure the flour. Scooping the measuring cup directly into the bag compacts the flour, leading to a dry cake. Always spoon it into the cup and level it off.
Serving Suggestions
This cake is stunning on its own, but you can elevate the presentation for special occasions. Serve each slice with a drizzle of dairy-free caramel sauce and a sprinkle of toasted walnuts or pecans for added crunch. Fresh berries, such as sliced strawberries or raspberries, add a tart contrast to the sweet banana flavor. For a warm, cozy vibe, serve the cake slightly warmed (unfrosted) with a scoop of dairy-free vanilla ice cream. It also pairs beautifully with a hot cup of coffee or an oat milk latte in the morning.
Storage and Reheating Tips
Because this cake is so moist, it stores very well. It can be kept at room temperature in an airtight container for up to 3 days. However, if your kitchen is particularly warm, it is safer to store it in the refrigerator to prevent the frosting from melting; it will last up to 5-6 days in the fridge. Bring it to room temperature before serving for the best texture. For freezing, you can freeze the unfrosted cake layers wrapped tightly in plastic wrap for up to 3 months. You can also freeze individual frosted slices: place them on a baking sheet to freeze solid, then wrap them individually in plastic wrap and foil. Thaw in the refrigerator overnight.
Nutrition Facts (Estimated)
| Serving Size | 1 slice |
| Calories | 340 |
| Fat | 16g |
| Saturated Fat | 4g |
| Unsaturated Fat | 11g |
| Trans Fat | 0g |
| Cholesterol | 35mg |
| Sodium | 210mg |
| Carbohydrates | 48g |
| Fiber | 2g |
| Sugar | 28g |
| Protein | 3g |
Frequently Asked Questions
Can I make this recipe into cupcakes?
Yes, absolutely! This batter makes excellent cupcakes. Line a muffin tin with paper liners and fill them about 2/3 full. Reduce the baking time to 18-22 minutes. Check for doneness with a toothpick.
Why did my cake sink in the middle?
Sinking usually happens if the oven door was opened too early, causing a sudden temperature drop, or if the cake was under-baked. It can also occur if there was too much leavening (baking soda/powder) used.
Can I use almond flour instead of a GF blend?
No, almond flour behaves very differently than a starch-based GF blend. It lacks the starch needed to absorb liquid and provide structure. You would need a recipe specifically designed for almond flour.
Is this cake safe for nut allergies?
Yes, provided your GF flour blend and dairy-free milk are nut-free (e.g., using oat milk or soy milk). Always check the labels of your specific ingredients to ensure they are processed in a nut-free facility.
My frosting is too runny, what do I do?
If the frosting is too runny, add more powdered sugar, 1/4 cup at a time. Also, ensure your kitchen isn’t too hot. You can place the bowl in the fridge for 10 minutes to firm up the butter before whipping again.
Can I reduce the sugar in this recipe?
You can reduce the sugar in the cake by about 1/4 cup without drastically affecting the texture, but reducing it further might make the cake dense and less moist, as sugar contributes to the liquid structure.
What brand of gluten-free flour do you recommend?
We recommend ‘King Arthur Measure for Measure’ or ‘Bob’s Red Mill 1-to-1 Baking Flour’. These blends are formulated to replace wheat flour perfectly without needing extra binders.
Can I use frozen bananas?
Yes! Thaw the frozen bananas completely and drain off any excess clear liquid before mashing them. Frozen bananas often yield an even moister cake.
Conclusion
There is nothing quite as comforting as the smell of banana cake baking in the oven, and this Gluten-Free and Dairy-Free version ensures that everyone can enjoy that comfort without compromise. From the tender, golden crumb to the cloud-like frosting, every bite is a testament to how delicious alternative baking can be. We hope this recipe becomes a staple in your kitchen, proving that dietary restrictions are merely an opportunity to explore new, delicious ingredients. Happy baking!