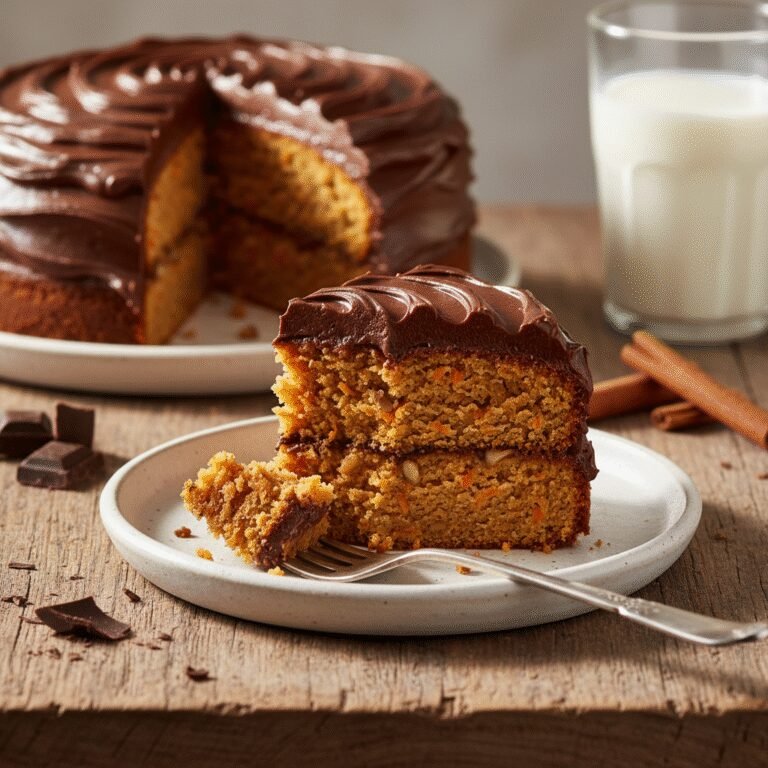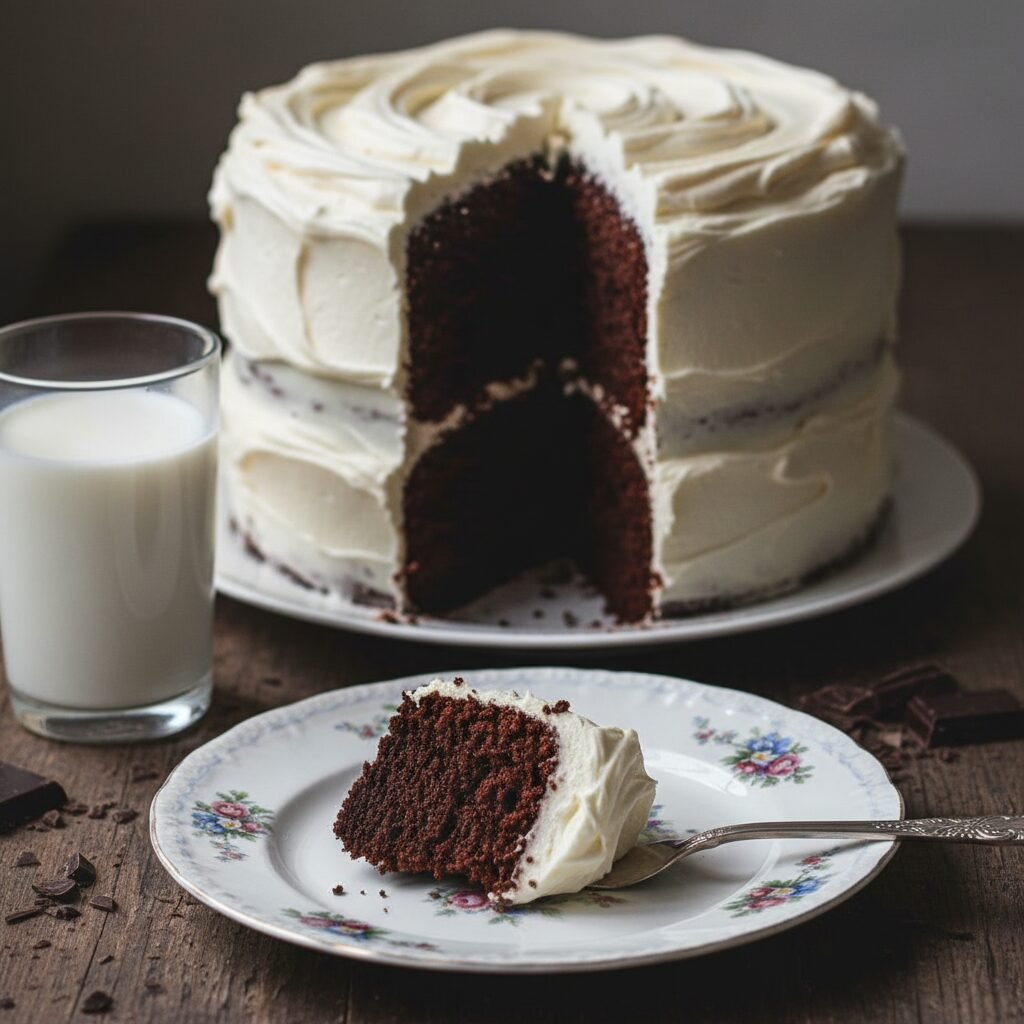
The Ultimate Moist Gluten-Free Chocolate Cake with Creamy Vanilla Buttercream
Moist Gluten Free Chocolate Cake With Vanilla Buttercream Recipe
Finally, a gluten-free chocolate cake that isn’t dry or crumbly! This recipe delivers a rich, fudgy crumb and deep chocolate flavor, perfectly balanced by a fluffy, cloud-like vanilla buttercream. It’s the birthday cake standard you’ve been waiting for.
25 minutes
35 minutes
1 hour 30 minutes (includes cooling)
12-14 slices (Two 8-inch rounds)
Dessert
Baking
American
Gluten-Free
For anyone living a gluten-free lifestyle, the quest for the perfect chocolate cake is often fraught with disappointment. We have all been there: you spend hours measuring expensive flours and starches, only to pull a cake out of the oven that is dense, gummy, or so dry it crumbles into sand the moment a fork touches it. But today, that search ends. This Moist Gluten-Free Chocolate Cake with Vanilla Buttercream is not just ‘good for a gluten-free cake’—it is simply an incredible cake, period. It rivals any wheat-based counterpart in texture and flavor, boasting a tender, velvety crumb that stays moist for days.
The secret lies in the balance of ingredients. We are moving away from the gritty textures of the past and embracing a batter that utilizes the science of hydration and fat ratios to mimic the elasticity of gluten. The chocolate flavor here is profound, achieved by blooming high-quality cocoa powder in boiling water, a technique that awakens the cocoa solids and creates a sophisticated depth of flavor. Paired with a classic, nostalgic American Vanilla Buttercream that is whipped to airy perfection, this cake strikes the ideal balance between dark, decadent chocolate and sweet, creamy vanilla. Whether you are baking for a Celiac family member, a gluten-intolerant friend, or just want a show-stopping dessert that everyone can enjoy without compromise, this recipe is your new gold standard. Prepare to shock your guests when you tell them it is completely gluten-free.
History & Origins
The history of chocolate cake is a fascinating journey that parallels the evolution of baking technology. While chocolate has been consumed as a beverage for millennia, starting with the Mesoamericans, it wasn’t until the mid-19th century that it found its way into cake batter. In 1828, Coenraad van Houten learned how to mechanically extract fat from cacao liquor to produce cocoa butter and cocoa powder, making chocolate more affordable and accessible for baking. However, early ‘chocolate cakes’ were often just yellow cakes served with chocolate frosting or served alongside a cup of chocolate drink. It wasn’t until the late 1800s and early 1900s, with the refinement of baking soda and baking powder, that the dark, velvety Devil’s Food style cakes we recognize today began to appear in American cookbooks.
The history of gluten-free baking is a much more modern chapter. For decades, gluten-free diets were strictly clinical, reserved for those diagnosed with Celiac disease (identified as a distinct condition related to diet by Dr. Willem-Karel Dicke in the 1940s). Early gluten-free baked goods were notoriously heavy, relying on pure rice flour or potato starch without the binding agents necessary to replace the structural integrity of gluten. The ‘Gluten-Free Boom’ of the early 21st century changed everything. As demand skyrocketed, food scientists and home bakers began experimenting with hydrocolloids like xanthan gum and psyllium husk, as well as complex flour blends involving sorghum, tapioca, and almond flour. This recipe stands on the shoulders of that innovation, combining the rich tradition of 19th-century chocolate cake with 21st-century food science to create a masterpiece that honors history while embracing modern dietary needs.
Why This Recipe Works
This recipe succeeds where many others fail due to three specific scientific principles: hydration, acidity, and the blooming technique. First, gluten-free flours are notoriously thirsty; rice flour, in particular, can be gritty if not properly hydrated. This batter is much thinner than a standard wheat cake batter, allowing the starches to fully absorb the liquid during the bake, resulting in a soft, non-gritty crumb. We use a high-quality ‘measure-for-measure’ gluten-free flour blend which already contains xanthan gum, providing the necessary structure to trap air bubbles without the need for gluten strands.
Secondly, the use of buttermilk and brown sugar introduces acid and moisture. The acidity in the buttermilk reacts with the baking soda to create a robust lift—crucial for heavy gluten-free batters—while also tenderizing the protein in the flour. Brown sugar, containing molasses, is hygroscopic, meaning it attracts and holds onto water molecules, ensuring the cake remains moist long after it has cooled.
Finally, the ‘blooming’ step is non-negotiable. By mixing the cocoa powder with boiling hot water (or hot coffee) before adding it to the batter, we dissolve the cocoa butter and release the flavor compounds trapped in the powder. This prevents the cocoa from drying out the batter and ensures a deep, fudge-like intensity that permeates every bite. The result is a cake that is structurally sound, incredibly moist, and deeply flavorful.
Why You’ll Love This Recipe
- ✓Incredibly moist texture that lasts for days.
- ✓Deep, intense chocolate flavor enhanced by coffee.
- ✓No gritty mouthfeel common in GF baking.
- ✓Sturdy enough to layer and frost easily.
- ✓Simple one-bowl batter method.
Equipment You’ll Need
- ✓Two 8-inch round cake pans
- ✓Parchment paper
- ✓Large mixing bowl
- ✓Whisk
- ✓Electric hand mixer or Stand mixer
- ✓Wire cooling rack
- ✓Offset spatula
- ✓Measuring cups and spoons
Ingredients
- ✓2 cups (280g) All-Purpose Gluten-Free Flour Blend (with xanthan gum)
- ✓2 cups (400g) Granulated Sugar
- ✓3/4 cup (75g) Unsweetened Cocoa Powder (Dutch-processed preferred)
- ✓2 teaspoons Baking Powder
- ✓1 1/2 teaspoons Baking Soda
- ✓1 teaspoon Salt
- ✓1 cup (240ml) Buttermilk, room temperature
- ✓1/2 cup (120ml) Vegetable Oil or Melted Coconut Oil
- ✓2 Large Eggs, room temperature
- ✓2 teaspoons Pure Vanilla Extract
- ✓1 cup (240ml) Boiling Water (or strong hot coffee for deeper flavor)
- ✓1 cup (225g) Unsalted Butter, softened (for buttercream)
- ✓4 cups (480g) Powdered Sugar, sifted (for buttercream)
- ✓1/4 cup (60ml) Heavy Cream (for buttercream)
- ✓2 teaspoons Vanilla Bean Paste or Extract (for buttercream)
- ✓Pinch of salt (for buttercream)
Instructions
- Preheat your oven to 350°F (175°C). Grease two 8-inch round cake pans generously with butter or cooking spray. Line the bottoms with parchment paper rounds and grease the paper as well. Dust with a little cocoa powder to prevent sticking.
- In a large mixing bowl, whisk together the gluten-free flour, sugar, cocoa powder, baking powder, baking soda, and salt until fully combined and no lumps remain.
- Add the buttermilk, vegetable oil, eggs, and vanilla extract to the dry ingredients. Beat with an electric mixer on medium speed for about 2 minutes. The batter should look smooth and creamy.
- Reduce the mixer speed to the lowest setting. Carefully pour in the boiling water (or hot coffee) in a steady stream. Mix until just combined. Note: The batter will be very thin and liquidy; this is completely normal for this recipe.
- Divide the batter evenly between the two prepared cake pans. Tap the pans gently on the counter to release any large air bubbles.
- Bake for 30-35 minutes, or until a wooden toothpick inserted into the center comes out clean or with just a few moist crumbs attached. Do not overbake, or the cake will lose its moisture.
- Remove from the oven and let the cakes cool in the pans for about 15 minutes. Run a thin knife around the edges to loosen them, then invert them onto a wire rack to cool completely before frosting.
- To make the buttercream: In a stand mixer fitted with the paddle attachment (or using a hand mixer), beat the softened butter on medium-high speed for 5 minutes until it is pale, light, and airy.
- Gradually add the powdered sugar, one cup at a time, mixing on low speed until incorporated. Scrape down the sides of the bowl as needed.
- Add the vanilla, heavy cream, and a pinch of salt. Increase the speed to high and whip for another 3-4 minutes until the frosting is fluffy and creamy.
- Once the cakes are completely cool, place one layer on a serving plate. Spread a generous layer of buttercream over the top. Place the second cake layer on top and cover the top and sides with the remaining buttercream.
Expert Cooking Tips
- ✓Weigh your flour: For the best accuracy in gluten-free baking, use a kitchen scale. Scooping can compact the flour and lead to a dry cake.
- ✓Room temperature ingredients: Ensure your eggs and buttermilk are at room temperature. This prevents the batter from seizing when the oil is added.
- ✓Don’t skip the parchment: Gluten-free cakes can be more fragile than wheat cakes. Parchment paper guarantees they come out of the pan intact.
- ✓Use hot coffee: Replacing the boiling water with boiling coffee intensifies the chocolate flavor without making the cake taste like coffee.
- ✓Cool completely: Do not attempt to frost a warm gluten-free cake; it will likely slide apart or melt the butter.
- ✓Check your baking powder: Ensure your leavening agents are fresh. Gluten-free flours need all the lift they can get.
- ✓Brand matters: Use a high-quality 1:1 gluten-free flour blend like King Arthur Measure for Measure or Bob’s Red Mill 1-to-1.
Substitutions and Variations
If you need to make this cake dairy-free as well as gluten-free, you can substitute the buttermilk with a mixture of almond milk and 1 tablespoon of lemon juice or white vinegar (let it sit for 5 minutes to curdle). For the buttercream, use a high-quality vegan butter stick and plant-based heavy cream or coconut cream. If you do not have vegetable oil, melted coconut oil or grapeseed oil works perfectly. For a refined sugar-free option, coconut sugar can replace the granulated sugar, though the texture may be slightly denser and the color darker. If you don’t have Dutch-processed cocoa, natural cocoa powder works, but the chocolate flavor will be slightly more acidic and lighter in color.
Common Mistakes to Avoid
The most common mistake with this recipe is over-measuring the flour. Because gluten-free blends often contain starches, packing them into a measuring cup results in too much dry matter, leading to a brick-like cake. Always spoon and level or weigh your flour. Another mistake is over-baking. Gluten-free baked goods often look slightly underdone when they are actually ready; carry-over cooking finishes them as they cool. If you wait until the cake pulls significantly away from the sides of the pan, it is likely already dry. Finally, do not reduce the sugar. Sugar provides moisture and tenderness, not just sweetness. Reducing it will affect the structural integrity of the cake.
Serving Suggestions
This cake is a showstopper on its own, but it pairs beautifully with fresh berries—strawberries or raspberries cut through the richness of the chocolate. For a birthday celebration, top with colorful gluten-free sprinkles. If you want to elevate the dessert for a dinner party, serve a slice with a warm drizzle of salted caramel sauce or a scoop of vanilla bean ice cream. A hot cup of espresso or a cold glass of milk are the perfect beverage companions.
Storage and Reheating Tips
This cake stays incredibly moist at room temperature. Store it in an airtight cake carrier or container on the counter for up to 3 days. If you live in a very hot or humid climate, you may store it in the refrigerator for up to 5 days, but be sure to let it come to room temperature before serving to soften the buttercream and relax the crumb. To freeze, wrap individual unfrosted layers tightly in plastic wrap and then foil; they can be frozen for up to 2 months. Frosted slices can also be frozen in airtight containers.
Nutrition Facts (Estimated)
| Serving Size | 1 slice |
| Calories | 580 |
| Fat | 28g |
| Saturated Fat | 16g |
| Unsaturated Fat | 10g |
| Trans Fat | 0g |
| Cholesterol | 85mg |
| Sodium | 310mg |
| Carbohydrates | 78g |
| Fiber | 3g |
| Sugar | 48g |
| Protein | 5g |
Frequently Asked Questions
Why did my gluten-free cake sink in the middle?
Sinking usually happens because the cake was underbaked or the oven door was opened too early, causing a drop in temperature. It can also happen if there is too much leavening (baking soda/powder) relative to the structure of the flour.
Can I use almond flour instead of a blend?
No, this recipe relies on a specific 1:1 gluten-free flour blend that contains rice flour and starches. Almond flour has a completely different fat and protein structure and will result in a dense, oily puddle if substituted 1:1 here.
Is xanthan gum necessary?
Yes, absolutely. Xanthan gum mimics the elasticity of gluten. Without it, the cake will crumble apart. Make sure your flour blend contains it; if not, add 1 teaspoon to the dry ingredients.
Can I make this into cupcakes?
Yes! This batter makes excellent cupcakes. Line a muffin tin with paper liners and fill them 2/3 full. Bake at 350°F for 18-22 minutes.
Why is the batter so runny?
The batter is supposed to be thin. The high liquid content is necessary to hydrate the rice flours and starches during baking so they soften completely. Do not add more flour to thicken it.
Can I freeze the frosted cake?
Yes, you can. Place the cake in the freezer uncovered for 1 hour to set the frosting, then wrap it tightly in plastic wrap and foil. Thaw in the fridge overnight before serving.
What brand of flour do you recommend?
We highly recommend ‘King Arthur Measure for Measure Gluten-Free Flour’ or ‘Bob’s Red Mill 1-to-1 Baking Flour’. These blends are formulated specifically for cakes and muffins.
Can I use hot water instead of coffee?
Yes, hot water works perfectly fine. The coffee just enhances the chocolate flavor, making it taste ‘more chocolatey’ rather than like coffee.
Conclusion
There is a profound joy in being able to serve a cake that absolutely everyone at the table can eat, regardless of dietary restrictions, without feeling like they are missing out. This Moist Gluten-Free Chocolate Cake with Vanilla Buttercream bridges the gap between dietary necessity and pure culinary indulgence. It is luscious, dark, sweet, and comforting—everything a homemade cake should be. We hope this recipe becomes a staple in your kitchen, proving once and for all that gluten-free baking can be just as delicious, if not more so, than the traditional classics. Happy baking!