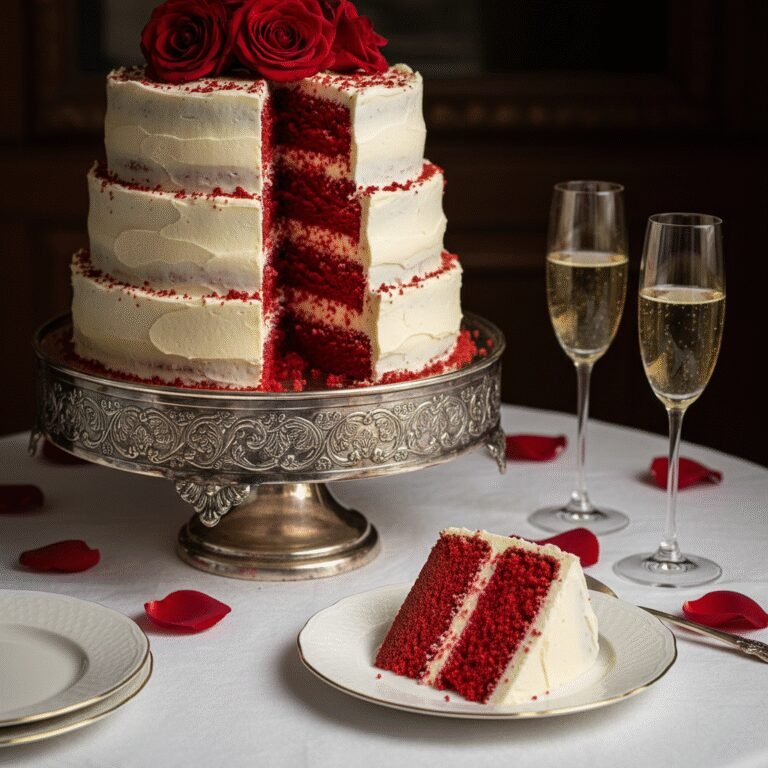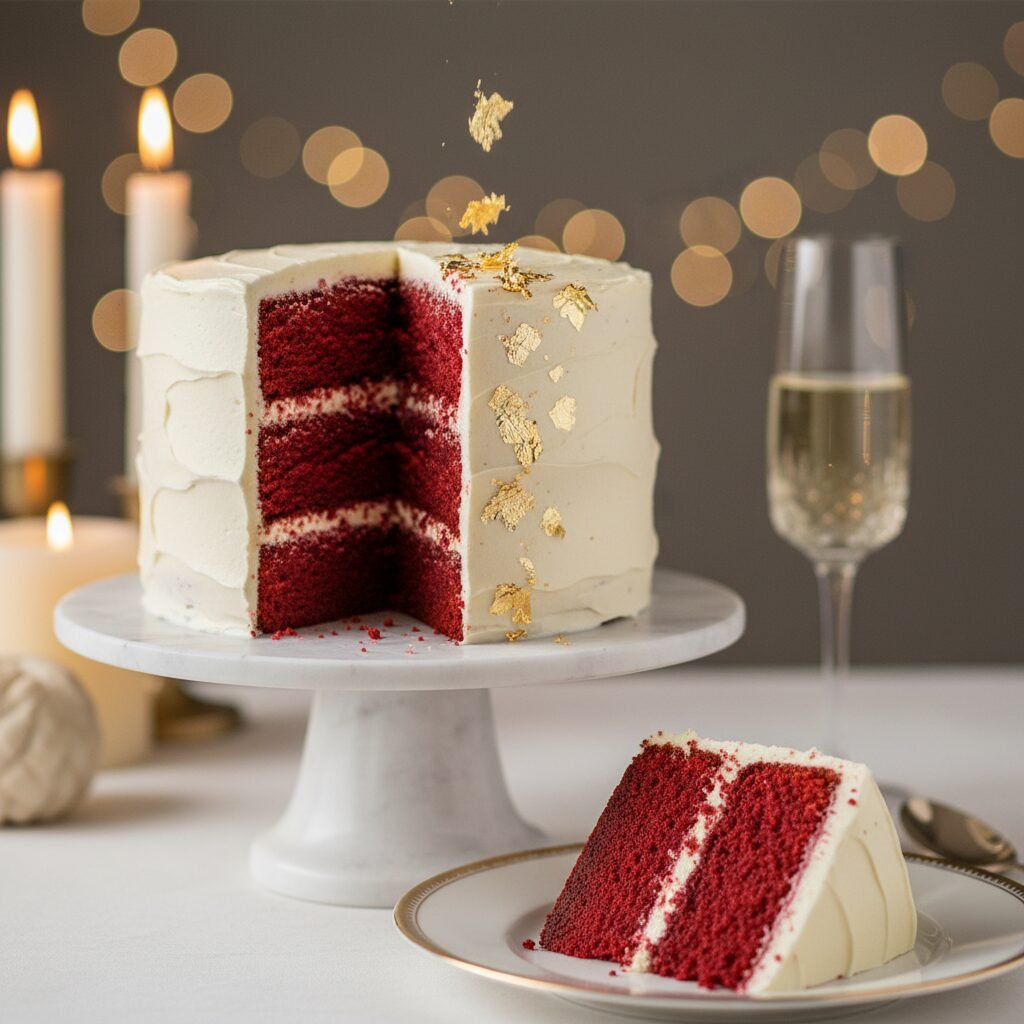
Elegant Red Velvet Anniversary Cake With Gold Leaf Decoration
Elegant Red Velvet Anniversary Cake With Gold Leaf Decoration Recipe
Celebrate love with this breathtaking Red Velvet Anniversary Cake, featuring moist, tender crumb layers and a tangy, silky cream cheese frosting. Adorned with delicate edible gold leaf, this show-stopping dessert is the perfect centerpiece for your special romantic milestone.
45 minutes
35 minutes
2 hours 30 minutes
12-16 servings
Dessert
Baking
American
Vegetarian
There are few desserts that command attention quite like a perfectly executed Red Velvet Cake. When you are celebrating an anniversary, you want a dessert that speaks the language of romance: bold, rich, and undeniably elegant. This Elegant Red Velvet Anniversary Cake is designed to be the crowning jewel of your celebration. It is not just about the striking crimson hue; it is about the texture. We are talking about a crumb so velvety and soft that it practically melts on the tongue, balanced by the slight tang of buttermilk and a hint of cocoa.
What sets this specific recipe apart for an anniversary is the attention to detail in the finish. While the flavor profile remains true to the Southern classic—mild chocolate notes amplified by vanilla and butter—the presentation is elevated with the application of edible gold leaf. The contrast between the stark white cream cheese frosting, the deep red interior, and the shimmering gold accents creates a visual masterpiece. It is a labor of love that yields a sophisticated, bakery-quality result right in your own kitchen. Whether it is your first year or your fiftieth, this cake feels like a gift in itself, promising a moment of shared indulgence that makes the occasion unforgettable.
History & Origins
The history of Red Velvet Cake is a fascinating blend of culinary chemistry and clever marketing. The term ‘velvet’ was actually used in the Victorian era to describe cakes with a specifically soft and fine crumb, distinguishing them from the coarser sponge cakes of the day. The ‘red’ aspect, however, originally came from a chemical reaction rather than food dye. In the early 20th century, raw cocoa powder contained anthocyanins which, when mixed with acidic ingredients like buttermilk and vinegar, would turn the batter a reddish-brown mahogany color.
During the Great Depression and World War II, when foods were rationed, bakers sometimes used boiled beet juices to enhance the moisture and color of their cakes. However, the vibrant, neon-red color we recognize today is largely credited to the Adams Extract company. In an effort to sell more food coloring and vanilla extract during the Depression, John A. Adams created a recipe card for ‘Red Velvet Cake’ that used a significant amount of red dye. This modern version exploded in popularity across the American South and eventually became a staple. A popular urban legend also attributes the cake to the Waldorf Astoria Hotel in New York, claiming a woman was charged a fortune for the recipe and distributed it in revenge, though this is likely a myth. Today, it stands as an icon of American baking.
Why This Recipe Works
This recipe succeeds where many others fail because it meticulously balances moisture, structure, and flavor. Many red velvet cakes can be notoriously dry, but this version uses a combination of unsalted butter and vegetable oil. The butter provides that rich, creamy flavor that oil lacks, while the oil ensures the cake remains incredibly moist and soft, even after being refrigerated (which is necessary due to the cream cheese frosting).
Furthermore, the science of the leavening agents is critical here. We use baking soda combined with both vinegar and buttermilk. This acidic environment not only activates the baking soda for a superior rise and fluffy texture but also tenderizes the gluten in the flour, resulting in that signature ‘velvet’ mouthfeel. We also use cake flour instead of all-purpose flour to lower the protein content, ensuring a finer, lighter crumb. Finally, the frosting is a true cream cheese frosting, not a buttercream hybrid; the tanginess cuts through the sweetness of the cake, providing the perfect palate cleanser between bites.
Why You’ll Love This Recipe
- ✓Incredibly moist texture due to a butter-oil blend
- ✓Authentic tangy cream cheese frosting
- ✓Stunning visual contrast with edible gold leaf
- ✓Perfect balance of vanilla and mild cocoa flavors
- ✓Sturdy enough for layering but soft on the palate
- ✓Ideal for romantic occasions and photography
Equipment You’ll Need
- ✓Three 8-inch round cake pans
- ✓Stand mixer with paddle attachment
- ✓Sifter
- ✓Offset spatula
- ✓Bench scraper
- ✓Tweezers (for gold leaf)
- ✓Wire cooling racks
- ✓Parchment paper
Ingredients
- ✓3 cups cake flour, sifted
- ✓1/4 cup natural unsweetened cocoa powder
- ✓1 tsp baking soda
- ✓1/2 tsp salt
- ✓1/2 cup unsalted butter, room temperature
- ✓2 cups granulated sugar
- ✓1 cup vegetable oil
- ✓4 large eggs, room temperature
- ✓1 tbsp pure vanilla extract
- ✓1 tsp distilled white vinegar
- ✓2 tbsp liquid red food coloring
- ✓1 cup buttermilk, room temperature
- ✓16 oz full-fat brick cream cheese, room temperature (Frosting)
- ✓1 cup unsalted butter, room temperature (Frosting)
- ✓5 cups powdered sugar, sifted (Frosting)
- ✓1 tsp clear vanilla extract (Frosting)
- ✓3-4 sheets edible gold leaf (Decoration)
Instructions
- Preheat your oven to 350°F (175°C). Grease three 8-inch round cake pans with butter, line the bottoms with parchment paper, and dust the sides with cocoa powder or flour.
- In a medium bowl, sift together the cake flour, cocoa powder, baking soda, and salt. Set aside.
- In the bowl of a stand mixer fitted with the paddle attachment, beat the 1/2 cup butter and granulated sugar on medium-high speed until light and fluffy (about 3-4 minutes).
- With the mixer on medium speed, gradually stream in the vegetable oil. Beat for another 2 minutes.
- Add the eggs one at a time, beating well after each addition and scraping down the sides of the bowl.
- Stir in the vanilla extract, vinegar, and red food coloring until the batter is a uniform bright red.
- Reduce the mixer speed to low. Add the dry ingredients in three parts, alternating with the buttermilk in two parts, starting and ending with the dry ingredients. Mix only until just combined to avoid overworking the gluten.
- Divide the batter evenly among the three prepared pans. Tap the pans gently on the counter to release air bubbles.
- Bake for 30-35 minutes, or until a toothpick inserted into the center comes out clean or with just a few moist crumbs.
- Allow the cakes to cool in the pans for 10 minutes, then turn them out onto a wire rack to cool completely before frosting.
- To make the frosting: Beat the cream cheese and butter together on medium-high speed until smooth and creamy (about 3 minutes). Do not overbeat or the cream cheese may become runny.
- Gradually add the powdered sugar, one cup at a time, mixing on low speed. Add the clear vanilla and a pinch of salt. Increase speed to medium-high and whip for 2-3 minutes until fluffy.
- Assemble the cake: Place one layer on a cake stand. Spread a thick layer of frosting on top. Repeat with the second and third layers.
- Apply a thin crumb coat of frosting over the entire cake and refrigerate for 20 minutes. Then, apply the final thick layer of frosting, smoothing the sides with a bench scraper for a clean finish.
- Using tweezers, carefully apply bits of edible gold leaf to the sides or top edge of the cake for an elegant, cascading effect.
- Refrigerate the cake for at least 30 minutes before slicing to set the frosting.
Expert Cooking Tips
- ✓Ensure all ingredients, especially eggs, butter, and buttermilk, are at room temperature to prevent the batter from curdling.
- ✓Do not overmix the batter once the flour is added; this leads to a dense, tough cake.
- ✓Use ‘natural’ cocoa powder rather than Dutch-processed for the best reaction with the vinegar and baking soda.
- ✓Weigh your flour using a kitchen scale for accuracy; too much flour causes dryness.
- ✓If using gel food coloring instead of liquid, use significantly less as it is more concentrated.
- ✓Chill the cake layers before frosting them; this reduces crumbs getting into your white icing.
Substitutions and Variations
If you cannot find cake flour, you can make a substitute by measuring 1 cup of all-purpose flour, removing 2 tablespoons, and adding 2 tablespoons of cornstarch. Sift this mixture twice before using. For the vegetable oil, you can use canola oil or melted coconut oil, though coconut oil may impart a slight flavor. If you don’t have buttermilk, make a ‘sour milk’ substitute by adding 1 tablespoon of lemon juice or white vinegar to a measuring cup and filling it to the 1-cup line with whole milk; let it sit for 5 minutes. For the red food coloring, you can use beet powder for a natural alternative, but be aware the color will be more of a brownish-brick red rather than vibrant scarlet. In the frosting, full-fat brick cream cheese is essential; do not use the spreadable tub variety as it contains too much water.
Common Mistakes to Avoid
The most common mistake with Red Velvet is overbaking. Because the cake is dark, it is hard to see browning. Rely on the toothpick test and start checking 5 minutes before the timer goes off. Another error is overbeating the cream cheese frosting. Unlike buttercream, cream cheese breaks down and becomes soupy if beaten too long or at too high a speed. Stop as soon as it is incorporated and fluffy. Also, failing to grease the pans properly can lead to disaster; parchment paper rounds are non-negotiable for a clean release. Finally, do not skip the vinegar; it is not there for flavor, but for the chemical reaction that creates the texture.
Serving Suggestions
This cake is best served slightly chilled or at cool room temperature. Slice it with a long, sharp knife dipped in hot water and wiped dry between cuts for razor-sharp, professional-looking slices. Serve alongside a glass of chilled champagne or prosecco to complement the anniversary theme. Fresh raspberries or strawberries can be placed on the plate for a pop of fresh tartness that cuts through the rich frosting. For a cozy winter anniversary, a cup of dark roast coffee pairs beautifully with the cocoa notes.
Storage and Reheating Tips
Because of the cream cheese frosting, this cake must be stored in the refrigerator. It can be kept in an airtight cake carrier or covered loosely with plastic wrap for up to 5 days. The cake actually tastes better the next day as the flavors meld. If you want to freeze it, you can freeze individual slices wrapped tightly in plastic wrap and foil for up to 3 months. Thaw overnight in the fridge before eating. Do not freeze the cake with the gold leaf if possible, as condensation upon thawing might affect the metallic luster.
Nutrition Facts (Estimated)
| Serving Size | 1 slice |
| Calories | 680 |
| Fat | 38g |
| Saturated Fat | 18g |
| Unsaturated Fat | 18g |
| Trans Fat | 0.5g |
| Cholesterol | 95mg |
| Sodium | 320mg |
| Carbohydrates | 78g |
| Fiber | 1g |
| Sugar | 45g |
| Protein | 6g |
Frequently Asked Questions
Can I make this cake ahead of time?
Yes, you can bake the cake layers up to 2 days in advance. Wrap them tightly in plastic wrap and store them in the fridge (or freeze for longer). Make the frosting and assemble the day of or the day before serving.
Why did my cake turn out brown instead of red?
This usually happens if you use Dutch-processed cocoa powder instead of natural cocoa, or if you didn’t use enough food coloring. The acidity in natural cocoa helps maintain the reddish hue.
How do I handle the edible gold leaf without ruining it?
Gold leaf is extremely delicate and sticks to skin oils. Always use clean, dry tweezers or a dry paintbrush to lift and apply the sheets. Avoid breathing directly on the leaf as it can crinkle.
Can I use butter instead of oil?
This recipe uses a mix for the best of both worlds. Using only butter makes a delicious cake but it will be drier and harder when chilled. The oil ensures the cake stays soft even straight from the fridge.
Is the vinegar taste noticeable?
Not at all. The small amount of vinegar reacts completely with the baking soda and ingredients. You will not taste pickle flavor; you will just enjoy a tender crumb.
Can I make this as cupcakes?
Yes, this batter works perfectly for cupcakes. It will yield about 24-30 cupcakes. Bake them at 350°F for 18-22 minutes.
My frosting is too runny, how do I fix it?
If the frosting is runny, chill it in the fridge for 20 minutes. If it’s still too soft, add more sifted powdered sugar, 1/4 cup at a time. Ensure your butter and cream cheese weren’t melted or too warm to start with.
What size pans should I use if I don’t have three 8-inch pans?
You can use two 9-inch pans, but the layers will be slightly thicker and may need an extra 5 minutes of baking time. You can also do a 9×13 sheet cake, baking for about 35-40 minutes.
Conclusion
There is something profoundly satisfying about creating a dessert that looks as incredible as it tastes. This Elegant Red Velvet Anniversary Cake is more than just a sweet treat; it is a testament to the care and love you put into your celebration. The contrast of the deep red layers against the pristine white frosting, highlighted by the luxurious shimmer of gold leaf, makes for a memory that will last long after the last crumb is gone. Whether you are an experienced baker or a novice looking to impress, trusting this process will yield a bakery-quality masterpiece. Happy Anniversary, and happy baking!