Elegant White Wedding Cake With Naked Frosting Style Recipe
Elegant White Wedding Cake With Naked Frosting Style Recipe
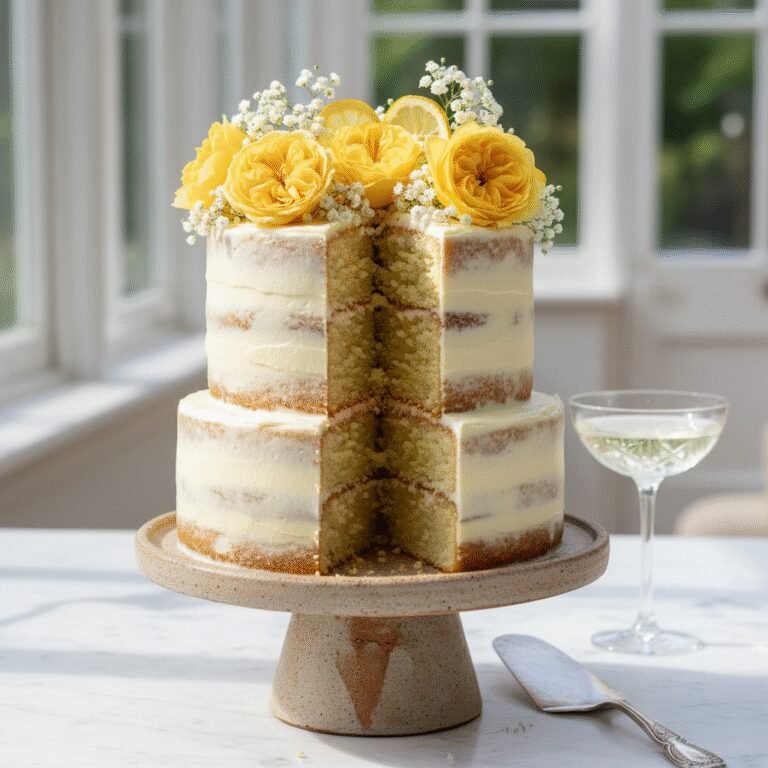
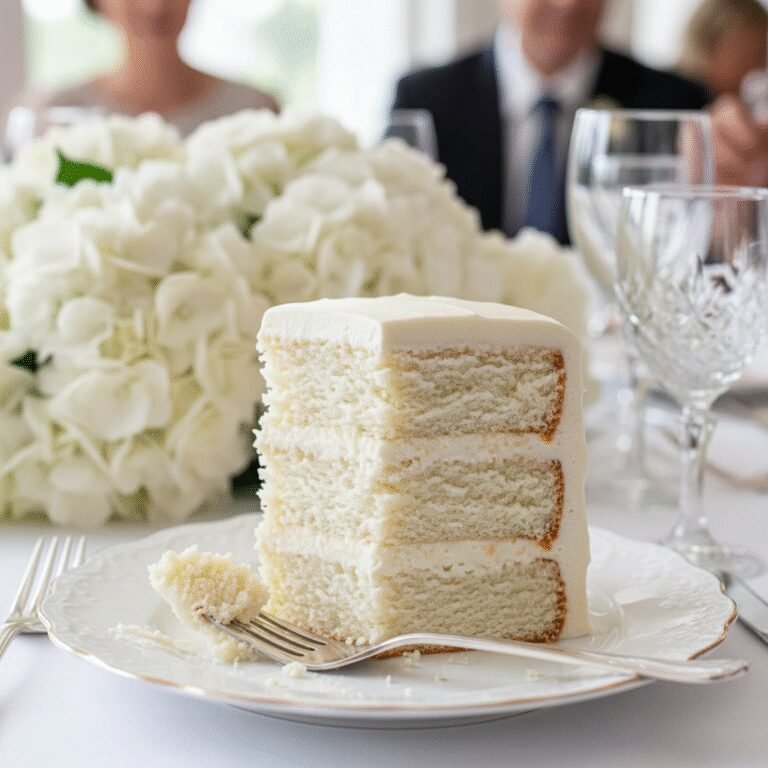
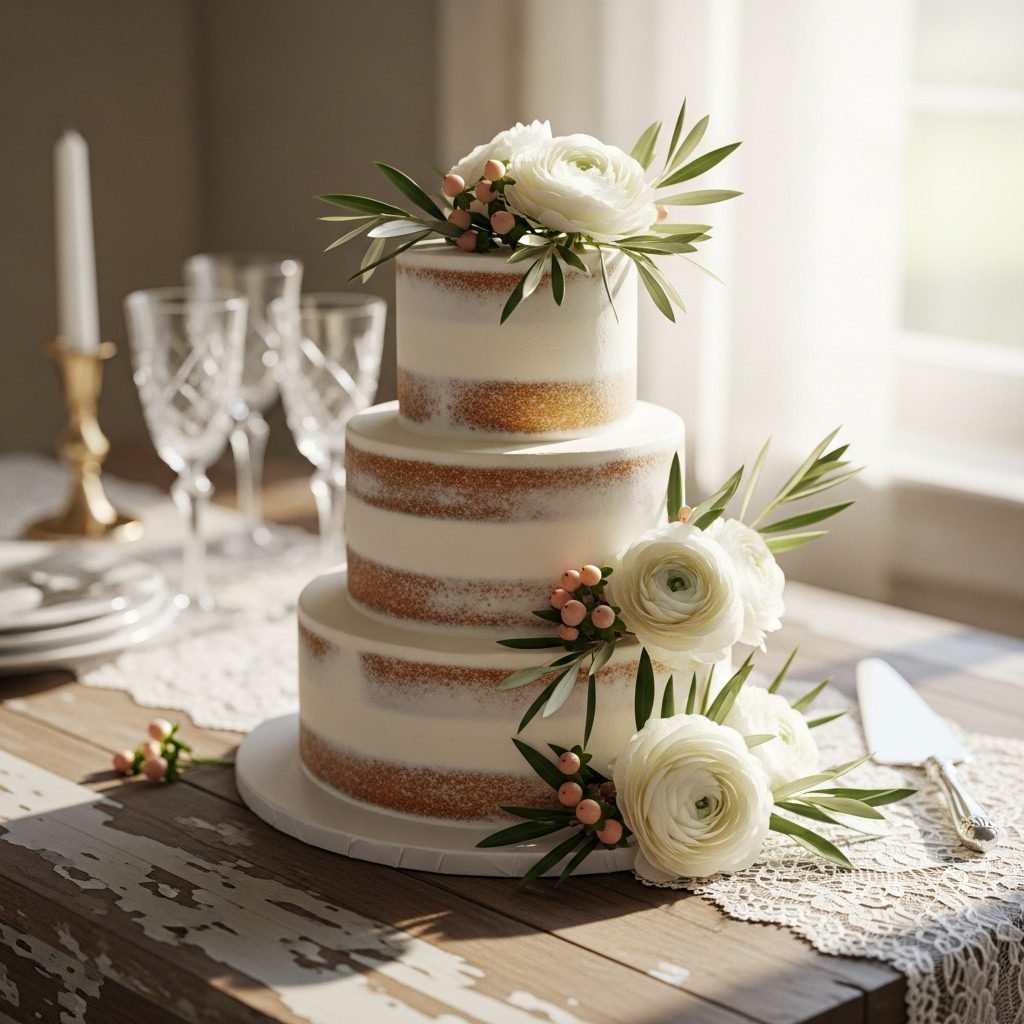
This stunning, rustic-chic wedding cake features tender, velvety white vanilla layers exposed through a delicate ‘naked’ frosting finish. It is the perfect balance of sophisticated elegance and homemade charm, designed to be the centerpiece of your special day or an upscale celebration.
2 hours
45 minutes
4 hours
1 three-tier cake (approx. 30-40 servings)
Dessert
Baking
American
Vegetarian
There is something undeniably magical about a naked cake. In the world of wedding trends, where fondant sculptures and sugar flowers often reign supreme, the naked cake strips away the pretense to reveal the heart of the dessert: the cake itself. This Elegant White Wedding Cake with Naked Frosting Style is a celebration of simplicity, texture, and pure flavor. Unlike traditional wedding cakes that hide dry layers beneath inches of sugary fondant, this recipe relies on the absolute perfection of the sponge. We are talking about a ‘White Velvet’ texture—dense enough to stack three tiers high, yet incredibly moist, tender, and melting on the tongue.
The flavor profile is a nostalgic yet elevated blend of pure vanilla bean and a whisper of almond extract, creating that quintessential ‘wedding cake’ taste that guests crave. The ‘naked’ frosting technique, or semi-naked finish, involves applying a crumb coat that is scraped back to allow the golden-brown edges of the cake layers to peek through a veil of white buttercream. This aesthetic fits perfectly into rustic barn weddings, bohemian garden parties, or minimalist modern receptions. By focusing on high-quality ingredients like European butter, cake flour, and real vanilla, this recipe proves that you don’t need to be a professional pastry chef to create a show-stopping masterpiece. Prepare to impress your guests not just with the visual beauty of this cake, but with a slice that tastes even better than it looks.
History & Origins
The history of the wedding cake is a fascinating journey through centuries of tradition, superstition, and culinary evolution. The custom dates back to Ancient Rome, where a cake made of wheat or barley was broken over the bride’s head to bring good fortune and fertility. In Medieval England, the tradition shifted to stacking small spiced buns as high as possible; if the bride and groom could kiss over the top of the stack without knocking it over, they were guaranteed a prosperous life together. This eventually evolved into the French Croquembouche and the tiered cakes we recognize today.
The specific obsession with ‘white’ wedding cakes began in the Victorian era. Before this, cakes were often fruitcakes, which were dark. When Queen Victoria married Prince Albert in 1840, her cake was covered in pure white icing. At the time, refined white sugar was incredibly expensive, so a white cake was a supreme status symbol indicating wealth and social standing. It also symbolized purity.
Fast forward to the 21st century, and the ‘Naked Cake’ revolution began, largely popularized by Christina Tosi of Momofuku Milk Bar in New York City. Tosi rejected the pristine, often inedible fondant exteriors of traditional wedding cakes, opting instead to expose the fillings and layers. This deconstructed approach resonated with a generation seeking authenticity, rustic charm, and a focus on flavor over rigid aesthetics. The ‘semi-naked’ style used in this recipe is the elegant middle ground—offering the structure and finish of a frosted cake while maintaining the organic, textural appeal of the exposed layers.
Why This Recipe Works
This recipe succeeds where many homemade wedding cakes fail because of its structural integrity combined with a soft crumb. Most light and fluffy cakes cannot support the weight of multiple tiers; they collapse or bulge under the pressure. Conversely, sturdy cakes often taste like dry cornbread. This recipe utilizes the ‘Reverse Creaming Method’ (mixing the butter into the dry ingredients before adding liquids). This coats the flour proteins in fat, inhibiting gluten formation. The result is a plush, velvety crumb that is flat on top (less leveling required!) and sturdy enough to stack.
Furthermore, we use egg whites only, rather than whole eggs. This preserves the pristine white color of the crumb and keeps the flavor delicate. The addition of sour cream is the secret weapon; its acidity tenderizes the gluten strands and adds fat for moisture that keeps the cake fresh for days—a crucial factor when baking for a wedding where prep happens in advance. For the frosting, we use a high-ratio American Buttercream. While Swiss Meringue is smoother, American Buttercream crusts slightly, which makes the ‘scrape and smooth’ technique for the naked look much easier to execute cleanly without smearing crumbs everywhere. The contrast between the sweet, crusting buttercream and the tender, less-sweet cake creates the perfect bite.
Why You’ll Love This Recipe
- ✓Sturdy structure perfect for stacking multiple tiers.
- ✓Velvety, moist crumb using the reverse creaming method.
- ✓Classic vanilla-almond flavor profile.
- ✓Rustic-chic ‘naked’ aesthetic that is forgiving for beginners.
- ✓Stays fresh and moist for up to 3 days.
- ✓customizable with fresh flowers or seasonal fruit.
Equipment You’ll Need
- ✓Stand mixer with paddle attachment
- ✓3 Cake pans (6-inch, 8-inch, and 10-inch)
- ✓Parchment paper
- ✓Cake turntable
- ✓Large offset spatula
- ✓Bench scraper (metal or acrylic)
- ✓Cake boards (6, 8, and 10 inch)
- ✓Bubble tea straws or wooden dowels (for support)
- ✓Wire cooling racks
Ingredients
- ✓4 1/2 cups Cake flour (sifted)
- ✓3 cups Granulated sugar
- ✓2 1/2 tsp Baking powder
- ✓1 tsp Salt
- ✓1 1/2 cups Unsalted butter (room temperature, cut into cubes)
- ✓1 1/4 cups Egg whites (room temperature)
- ✓1 cup Full-fat sour cream (room temperature)
- ✓1 cup Whole milk (room temperature)
- ✓1 tbsp Pure vanilla bean paste
- ✓1 tsp Almond extract
- ✓2 cups Unsalted butter (for frosting, slightly softened)
- ✓7-8 cups Powdered sugar (sifted)
- ✓1/4 cup Heavy cream
- ✓Pinch of salt (for frosting)
Instructions
- Preheat your oven to 335°F (168°C). Grease three cake pans (6-inch, 8-inch, 10-inch) generously and line the bottoms with parchment paper. Dust the sides with flour and tap out excess.
- In the bowl of a stand mixer fitted with the paddle attachment, combine the sifted cake flour, granulated sugar, baking powder, and salt. Mix on low speed for 30 seconds to blend.
- Add the cubed, room-temperature butter to the dry ingredients. Mix on low speed until the mixture resembles coarse sand or damp breadcrumbs. There should be no large chunks of butter remaining.
- In a separate medium bowl, whisk together the egg whites, sour cream, whole milk, vanilla bean paste, and almond extract until smooth.
- With the mixer on low, slowly pour half of the liquid mixture into the crumbly flour mixture. Increase speed to medium-high and beat for exactly 2 minutes to build structure. Scrape down the sides and bottom of the bowl.
- Add the remaining liquid mixture in two batches, beating on medium speed for 30 seconds after each addition. Do not overmix; the batter should be smooth and velvety.
- Distribute the batter into the prepared pans. Fills pans about 2/3 full. (Note: You may need to bake in batches if your oven is small, or double the recipe for taller tiers depending on pan depth).
- Bake for 35-50 minutes. The 6-inch pan will finish first, followed by the 8-inch, then the 10-inch. A toothpick inserted into the center should come out clean or with a few moist crumbs.
- Allow cakes to cool in pans for 15 minutes, then turn out onto wire racks to cool completely.
- While cakes cool, make the frosting. Beat the 2 cups of butter on medium-high speed for 7 minutes until incredibly pale and creamy. Add powdered sugar one cup at a time, mixing on low.
- Add heavy cream, vanilla, and salt. Whip on high for 3-5 minutes until fluffy and white. To remove air bubbles, switch to a paddle attachment and mix on lowest speed for 2 minutes.
- To assemble, level the tops of the cooled cakes with a serrated knife. Place the bottom layer of the 10-inch cake on a cake board. Spread a layer of frosting. Top with the next layer.
- Apply a generous layer of frosting to the top and sides of the tier. Using a bench scraper, scrape the sides firmly to remove most of the frosting, leaving a thin, semi-transparent layer that reveals the cake layers (the ‘naked’ look). Smooth the top.
- Repeat this process for the 8-inch and 6-inch tiers on their respective cardboard rounds. Chill all tiers for at least 30 minutes to set the buttercream.
- Insert dowels or bubble tea straws into the bottom and middle tiers, cut flush to the height of the cake, to support the weight of the tiers above.
- Stack the tiers carefully. Decorate with fresh flowers, berries, or a dusting of powdered sugar.
Expert Cooking Tips
- ✓Room temperature ingredients are non-negotiable. Cold ingredients will cause the batter to curdle and the cake to bake unevenly.
- ✓Weigh your flour. If you scoop with a cup, you might add too much flour, resulting in a dry cake. Use a scale for precision.
- ✓Do not open the oven door before the 30-minute mark. The rush of cold air can cause the cakes to sink in the middle.
- ✓Wrap warm cake layers in plastic wrap and freeze them before assembly. This locks in moisture and makes the cake much easier to handle and frost without crumbling.
- ✓For the whitest buttercream, add a tiny drop of purple food coloring to counteract the yellow hue of the butter.
- ✓When scraping the sides for the naked look, wipe your bench scraper clean after every single pass to ensure a sharp, clean finish.
Substitutions and Variations
This recipe is chemically balanced, so substitutions should be made with caution.
**Flour:** If you cannot find cake flour, you can make a substitute by removing 2 tablespoons of all-purpose flour from every cup and replacing it with 2 tablespoons of cornstarch. Sift 5 times to aerate.
**Sour Cream:** Full-fat Greek yogurt is an excellent 1:1 substitute for sour cream. It provides the same acidity and fat content needed for the tender crumb.
**Egg Whites:** If you don’t mind a yellow cake crumb, you can use whole eggs. Use 3 whole large eggs and 2 egg whites to replace the 1 1/4 cups of whites, but note the texture will be slightly different.
**Milk:** Whole milk is best, but 2% can work. Do not use skim milk. For a dairy-free version, use high-fat oat milk or coconut milk, and substitute the butter with high-quality vegan butter blocks (not tub margarine).
**Extracts:** The almond extract gives the classic wedding cake flavor, but if nut allergies are a concern, simply double the vanilla or use lemon extract for a citrus twist.
Common Mistakes to Avoid
The most common mistake with wedding cakes is **under-baking**. Because these pans are deep and the batter is dense, the center takes a long time to cook. If you pull it out too early, the middle will sink and be raw. Always trust the toothpick test.
Another issue is **frosting a warm cake**. If the cake is even slightly warm, the butter in the frosting will melt, causing the layers to slide off each other. Patience is key; cool completely, preferably in the fridge.
**Over-mixing the batter** after adding the liquid is another pitfall. Once the flour is hydrated, gluten begins to form. If you mix too vigorously at the end, you will end up with a tough, rubbery cake rather than a velvety one.
Finally, **insufficient support**. Never stack tiers without dowels or straws in the layers beneath. Cake is heavy; without support, the bottom tier will be crushed by the weight of the top tiers.
Serving Suggestions
This cake is a canvas for natural beauty. Serve it on a vintage silver cake stand or a rustic wooden slice, depending on your theme. Garnish generously with fresh, organic flowers (ensure they are non-toxic and pesticide-free, or wrap stems in floral tape) such as roses, peonies, or eucalyptus. Fresh berries like blackberries, figs, or raspberries tucked into the crevices add a pop of color and flavor. For a winter wedding, rosemary sprigs and sugared cranberries look stunning. Serve each slice with a dollop of raspberry coulis or slightly sweetened whipped cream to cut through the richness of the buttercream.
Storage and Reheating Tips
Wedding cakes are often made in stages. The baked cake layers can be wrapped tightly in double layers of plastic wrap and aluminum foil and frozen for up to 1 month. Thaw in the fridge overnight before assembling. Once the cake is frosted and assembled, it can stay at cool room temperature (below 70°F) for up to 2 days because the sugar and fat act as preservatives. However, if the filling involves perishable items like curd or mousse (not in this specific recipe, but possible), it must be refrigerated. If refrigerating the finished cake, take it out 2-3 hours before serving to allow the butter to soften; cold cake tastes dry and the frosting will be waxy. Leftovers should be stored in an airtight container in the fridge for up to 5 days.
Nutrition Facts (Estimated)
| Serving Size | 1 slice |
| Calories | 450 |
| Fat | 22g |
| Saturated Fat | 14g |
| Unsaturated Fat | 8g |
| Trans Fat | 0g |
| Cholesterol | 65mg |
| Sodium | 210mg |
| Carbohydrates | 58g |
| Fiber | 1g |
| Sugar | 35g |
| Protein | 4g |
Frequently Asked Questions
Can I make this cake ahead of time?
Yes, absolutely. In fact, professional bakers rarely bake the day of. You can bake the layers up to 3 days in advance and store them in the fridge wrapped in plastic, or freeze them for up to a month. The assembled cake is best frosted the day before the event.
How do I get the frosting to look ‘naked’ without looking messy?
The trick is to apply a thick layer first, ensuring all gaps are filled, and then scrape it away. Use a metal bench scraper and hold it at a 45-degree angle against the cake. Apply firm, even pressure while spinning the turntable. Don’t try to get it perfect in one spin.
Will the exposed cake dry out?
This is a valid concern. Because the sides are exposed, they can dry out faster than a fully frosted cake. However, the thin layer of buttercream acts as a seal, and the high fat content (sour cream/butter) in this specific recipe keeps the crumb moist. It is best to cut the cake within 24 hours of assembly.
Can I use this recipe for cupcakes?
Yes! This batter makes excellent cupcakes. Bake them at 350°F for about 18-22 minutes. The yield will be approximately 24-30 standard cupcakes.
Why did my cake sink in the middle?
Sinking usually happens for two reasons: the cake was under-baked in the center, or the oven door was opened too early, causing a temperature drop that collapsed the rising structure. It can also happen if there was too much leavening (baking powder).
Do I really need to use cake flour?
For a wedding cake, yes. Cake flour has a lower protein content (around 7-8%) compared to all-purpose flour (10-12%). This results in less gluten formation, which creates that super soft, tender, ‘melt-in-your-mouth’ texture.
How do I transport a tiered cake?
Transporting a fully stacked three-tier cake is risky. It is often safer to transport the tiers in separate boxes and stack/decorate them at the venue. If you must transport it stacked, ensure it is well-doweled and drive very carefully with the AC on high.
What size eggs should I use?
Always use Large eggs for baking recipes unless specified otherwise. In the US, a large egg is approx 50g (without shell). For this recipe, since we measure egg whites by volume (cups), the size matters less, but carton egg whites can also be used.
Conclusion
Creating your own wedding cake or a celebration cake for a loved one is an act of love. This Elegant White Wedding Cake with Naked Frosting Style bridges the gap between professional bakery aesthetics and the warmth of a home-baked dessert. While it requires patience, precision, and a bit of time, the result is a breathtaking centerpiece that tastes of vanilla, almond, and joy. Don’t be intimidated by the tiers or the scraping technique; the beauty of the naked cake lies in its imperfections and organic feel. So preheat that oven, separate those eggs, and get ready to create a memory that will last a lifetime—one delicious slice at a time.