The Ultimate Fun Oreo Cookie Birthday Cake Recipe
Fun Oreo Cookie Birthday Cake Recipe
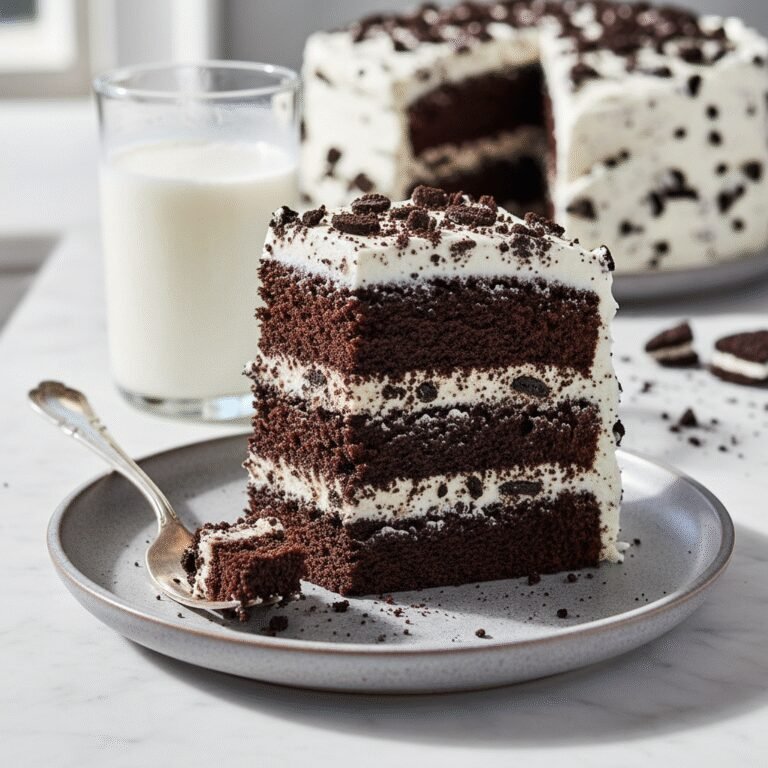
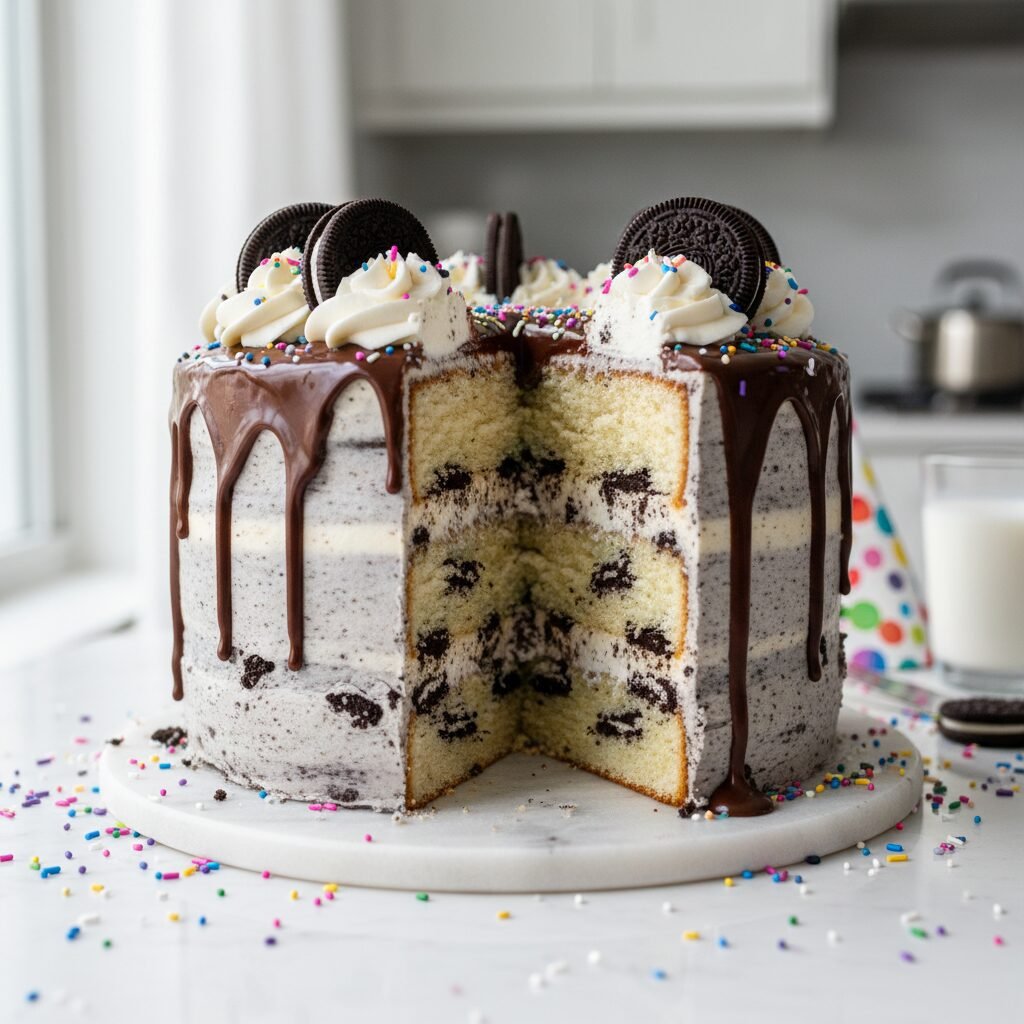
Celebrate in style with this decadent, three-layer Oreo Cookie Birthday Cake. Featuring a moist vanilla bean sponge packed with crushed chocolate cookies and smothered in a velvety cookies-and-cream buttercream, it is the perfect centerpiece for any party.
45 minutes
35 minutes
2 hours 30 minutes
12-16 servings
Dessert
Baking
American
Vegetarian
There is something undeniably magical about the combination of dark chocolate wafers and sweet cream filling. It is a flavor profile that transcends generations, evoking childhood memories of dunking cookies in milk while simultaneously satisfying the sophisticated palate of a dessert connoisseur. This Ultimate Fun Oreo Cookie Birthday Cake is designed to be the showstopper of your celebration. It is not merely a cake; it is an architectural marvel of texture and taste. We start with a base of tender, white vanilla cake—using egg whites to ensure a pristine color that contrasts beautifully with the black cookie crumbs. Unlike standard chocolate cakes that can be heavy, or plain vanilla cakes that might feel too simple for a grand birthday, this recipe strikes the perfect balance. The crumb is soft and airy, yet sturdy enough to hold the suspension of cookie chunks without them sinking to the bottom.
What truly sets this recipe apart, however, is the frosting. We don’t just sprinkle crumbs on top; we infuse the buttercream with finely milled Oreo dust and larger chunks, creating a speckled masterpiece that tastes like the inside of an Oreo, but better. Topped with a luxurious chocolate ganache drip and a crown of whipped cream swirls, this cake screams ‘celebration.’ Whether you are baking for a child’s fifth birthday or a friend’s thirtieth, this cake delivers a nostalgic punch packed with gourmet execution. Get ready to create a dessert that looks like it came straight from a high-end bakery window, but carries the warmth and love of a homemade kitchen.
History & Origins
The Oreo cookie, America’s favorite cookie, has a storied history dating back to 1912. Invented by the National Biscuit Company (Nabisco) in their Chelsea Market factory in New York City, the Oreo was originally sold as part of a trio of ‘high-class biscuits.’ While the other two flavors faded into obscurity, the Oreo—originally mounds of lemon meringue and cream—eventually evolved into the chocolate disk and crème filling we know today. The design of the cookie face has changed over the years, but the signature embossed pattern remains an icon of American snacking.
The concept of ‘Cookies and Cream’ as a distinct dessert flavor, however, is a more recent phenomenon. While people have been crumbling cookies over ice cream for decades, the flavor profile gained massive popularity in the late 1970s and early 1980s. There is some debate over who invented cookies and cream ice cream—South Dakota State University claims to have invented it in 1979, while other ice cream parlors claim earlier dates. Regardless of its origin, the flavor exploded in popularity, eventually making the leap from the freezer aisle to the bakery case. Transforming this flavor into a birthday cake involves a careful adaptation of the classic white cake. Historically, birthday cakes date back to Ancient Rome, but the modern iteration with candles and layers became popular in Western cultures in the mid-19th century. Combining the 20th-century icon of the Oreo with the centuries-old tradition of the birthday cake results in a modern classic that celebrates the best of industrial confectionery and home baking traditions.
Why This Recipe Works
This recipe succeeds where others fail due to a specific focus on moisture retention and structural integrity. Baking with Oreos presents a unique challenge: the cookies are dry and absorbent. If you simply toss them into a standard batter, they can suck the moisture out of the cake, leading to a dry crumb. To combat this, this recipe utilizes a combination of sour cream and whole milk. The acid in the sour cream tenderizes the gluten strands in the flour, resulting in a soft, velvety texture, while the extra fat content compensates for the moisture the cookies might absorb.
Furthermore, we use a ‘reverse creaming’ inspired technique for the dry ingredients and a specific method for the cookies. Instead of pulverizing all the cookies into dust (which would turn the batter an unappetizing grey), we chop them into varying sizes. We fold the larger chunks in at the very last second. This ensures that you get distinct pockets of softened, cake-like cookie throughout the layers, providing a delightful textural contrast. For the frosting, we use a high ratio of heavy cream to butter. This creates a whipped consistency that mimics the filling of the cookie itself, rather than a dense, sugary shell. The addition of a pinch of salt in the frosting cuts through the intense sweetness of the cookies, balancing the flavor profile perfectly.
Why You’ll Love This Recipe
- ✓Moist, tender white cake base that doesn’t dry out.
- ✓Packed with both fine crumbs and large chunks of Oreos for texture.
- ✓Stable whipped buttercream that tastes exactly like Oreo filling.
- ✓Visually stunning high-contrast black and white layers.
- ✓Perfect structural integrity for stacking and decorating.
Equipment You’ll Need
- ✓Three 8-inch round cake pans
- ✓Stand mixer with paddle and whisk attachments
- ✓Large mixing bowls
- ✓Rubber spatula
- ✓Offset spatula
- ✓Piping bag and large star tip (e.g., Wilton 1M)
- ✓Cake turntable (optional but recommended)
- ✓Bench scraper
- ✓Cooling racks
Ingredients
- ✓3 cups Cake flour, sifted
- ✓2 1/2 cups Granulated sugar
- ✓1 tbsp Baking powder
- ✓1/2 tsp Salt
- ✓1 cup Unsalted butter, room temperature, cut into cubes
- ✓1 cup Sour cream, room temperature
- ✓1 cup Whole milk, room temperature
- ✓5 Large egg whites, room temperature
- ✓1 tbsp Pure vanilla extract
- ✓20 Oreos, chopped (for cake batter)
- ✓2 cups Unsalted butter (for frosting), softened
- ✓6-7 cups Powdered sugar
- ✓1/2 cup Heavy cream
- ✓15 Oreos, finely crushed (for frosting)
- ✓1/2 cup Semi-sweet chocolate chips (for drip)
- ✓1/2 cup Heavy cream (for drip)
- ✓Additional Oreos and sprinkles for decoration
Instructions
- 1. Preheat your oven to 350°F (175°C). Grease three 8-inch round cake pans with butter, line the bottoms with parchment paper, and dust the sides with flour. Tap out excess flour.
- 2. In the bowl of a stand mixer fitted with the paddle attachment, combine the sifted cake flour, granulated sugar, baking powder, and salt. Mix on low speed for 30 seconds to combine.
- 3. Add the cubed, room-temperature butter to the dry ingredients. Mix on low speed until the mixture resembles coarse sand. This coating of the flour helps inhibit gluten formation for a tender cake.
- 4. In a separate medium bowl, whisk together the egg whites, whole milk, sour cream, and vanilla extract until smooth.
- 5. With the mixer on low, slowly pour half of the wet ingredients into the dry/butter mixture. Increase speed to medium and beat for 2 minutes to build structure.
- 6. Scrape down the sides of the bowl. Add the remaining wet ingredients in two batches, beating on low for about 30 seconds after each addition. Do not overmix.
- 7. Remove the bowl from the mixer. Gently fold in the 20 chopped Oreos using a rubber spatula. Be careful not to crush them further into the batter to keep the cake white.
- 8. Divide the batter evenly among the three prepared pans (use a kitchen scale for accuracy). Bake for 30-35 minutes, or until a toothpick inserted into the center comes out clean or with just a few moist crumbs.
- 9. Allow cakes to cool in the pans for 10 minutes, then turn them out onto a wire rack to cool completely before frosting. (Freezing the layers for 30 minutes after cooling makes them easier to frost).
- 10. To make the frosting: Beat the 2 cups of butter in a clean mixer bowl on medium-high speed for 5-7 minutes until pale and fluffy. Reduce speed to low and gradually add powdered sugar, one cup at a time.
- 11. Add the heavy cream, vanilla, and a pinch of salt. Whip on high speed for 3 minutes until light and airy. Fold in the finely crushed Oreo crumbs by hand.
- 12. To assemble: Place one cake layer on your serving plate or turntable. Spread a thick layer of frosting on top. Repeat with the second and third layers.
- 13. Apply a thin ‘crumb coat’ of frosting all over the cake to trap any loose crumbs. Chill for 20 minutes. Then, apply the final thick layer of frosting and smooth with a bench scraper.
- 14. Make the ganache drip: Heat 1/2 cup heavy cream until simmering. Pour over chocolate chips in a heat-proof bowl. Let sit for 5 minutes, then whisk until smooth. Let it cool slightly until it thickens to a dripping consistency.
- 15. Using a spoon or squeeze bottle, create drips down the side of the chilled cake. Pour the rest on top and smooth.
- 16. Pipe swirls of leftover frosting around the top edge and place a whole Oreo into each swirl. Add sprinkles if desired for a birthday touch.
Expert Cooking Tips
- ✓Ensure all ingredients, especially eggs, milk, and sour cream, are at room temperature to prevent the batter from curdling.
- ✓When chopping Oreos for the batter, aim for quarter-sized chunks rather than dust to keep the cake batter white.
- ✓Don’t skip the parchment paper; Oreo bits can become sticky and adhere to the pan bottom.
- ✓If your frosting is too stiff, add more heavy cream one teaspoon at a time. If too soft, add more powdered sugar.
- ✓Chill the cake layers before stacking; warm cake is fragile and will melt the buttercream.
- ✓For the cleanest slices, run your knife under hot water and wipe it dry between every cut.
- ✓Use ‘Regular’ Oreos rather than ‘Double Stuf’ for the baking part, as the extra cream can throw off the fat ratio in the cake batter.
Substitutions and Variations
If you do not have cake flour, you can make a substitute by measuring 1 cup of all-purpose flour, removing 2 tablespoons, and replacing them with 2 tablespoons of cornstarch. Sift together twice. For a dairy-free version, substitute the butter with high-quality vegan butter sticks, the milk with almond or soy milk, and the sour cream with a dairy-free yogurt or sour cream alternative. Oreos are accidentally vegan, so the cookies themselves are safe. If you prefer a chocolate base, you can replace 1/2 cup of the flour with unsweetened cocoa powder, though this changes the ‘cookies and cream’ visual contrast. You can also swap the standard Oreos for Golden Oreos for a vanilla-on-vanilla experience, or use Mint Oreos for a fresh twist.
Common Mistakes to Avoid
The most common mistake is overmixing the batter after adding the wet ingredients. This develops the gluten too much and results in a tough, rubbery cake rather than a tender one. Another frequent error is frosting the cake before it is completely cool. Even a slightly warm cake will cause the butter in the frosting to separate and slide off. Regarding the aesthetic, mixing the chopped cookies into the batter with an electric mixer is a mistake; it will pulverize the cookies and turn the entire cake a muddy grey color. Always fold them in gently by hand at the very end. Finally, rushing the ganache drip can lead to a messy pool at the bottom of the cake; ensure the cake is cold and the ganache is room temperature (viscous, not runny) before dripping.
Serving Suggestions
This cake is rich and sweet, so it pairs best with a beverage that can cut through the sugar. A tall glass of cold milk is the classic choice, paying homage to the Oreo tradition. For adults, a hot cup of dark roast coffee or an espresso martini complements the chocolate notes beautifully. Serve the cake slightly chilled or at room temperature. If it has been in the fridge, let the slices sit out for 20 minutes before eating to allow the buttercream to soften to its optimal texture. Serve with a side of vanilla bean ice cream or fresh raspberries to add a tart contrast.
Storage and Reheating Tips
Store the frosted cake in the refrigerator. Due to the dairy in the frosting and the moisture in the cake, it stays fresh for up to 4 days in the fridge. Use a cake keeper or press plastic wrap against the cut sides to prevent them from drying out. For longer storage, you can freeze individual slices wrapped tightly in plastic wrap and then foil for up to 3 months. Thaw frozen slices in the refrigerator overnight or on the counter for an hour. If you are making the cake ahead of time, you can bake the layers, wrap them in plastic, and freeze them for up to a week before frosting and assembling.
Nutrition Facts (Estimated)
| Serving Size | 1 slice |
| Calories | 680 |
| Fat | 38g |
| Saturated Fat | 22g |
| Unsaturated Fat | 14g |
| Trans Fat | 0.5g |
| Cholesterol | 95mg |
| Sodium | 340mg |
| Carbohydrates | 82g |
| Fiber | 2g |
| Sugar | 55g |
| Protein | 6g |
Frequently Asked Questions
Can I use Double Stuf Oreos for this recipe?
It is best to use regular Oreos for the cake batter. The extra cream in Double Stuf can make the batter greasy and affect the rise. However, you can use Double Stuf for the decoration on top!
Why did my cake batter turn grey?
This happens if the Oreos were crushed too finely or if they were mixed into the batter with an electric mixer. To keep the batter white, chop the cookies into chunks and fold them in gently by hand.
Can I make this recipe as cupcakes?
Yes! This batter yields approximately 24-30 cupcakes. Bake them at 350°F for 18-22 minutes. Check for doneness with a toothpick.
Do I have to use a stand mixer?
While a stand mixer makes the process easier, specifically for the buttercream, you can use a hand mixer. Just be prepared to mix for a bit longer to get the frosting truly fluffy.
Can I use gluten-free flour?
Yes, a high-quality 1:1 gluten-free baking flour blend (like King Arthur or Bob’s Red Mill) works well. Ensure you also use Gluten-Free Oreos, which are now widely available.
How do I get the perfect drip?
Temperature is key. The cake must be cold (chilled for at least 30 minutes), and the ganache should be cool to the touch but still fluid. Test a single drip on the back of the cake first.
Can I leave this cake out on the counter?
It can sit out for the duration of a party (3-4 hours) without issue, but for overnight storage, it should be refrigerated due to the cream cheese or heavy cream often used in variations of this frosting.
Can I use store-bought frosting?
You can, but homemade buttercream provides the stability needed for a layer cake and allows you to control the sweetness. Store-bought frosting is often too thin to hold the layers effectively.
Conclusion
This Fun Oreo Cookie Birthday Cake is more than just a dessert; it is a celebration of texture, flavor, and nostalgia wrapped in a stunning visual package. By following the steps to keep your batter white and your frosting fluffy, you will create a bakery-quality cake right in your own kitchen. It’s the perfect way to say ‘Happy Birthday’ to the cookie lover in your life. The crunch of the cookies against the soft crumb of the cake and the creamy richness of the frosting creates a bite that is truly unforgettable. So grab your mixer, pick up a pack of Oreos (or two), and get ready to bake a masterpiece that will have your guests asking for seconds—and the recipe!