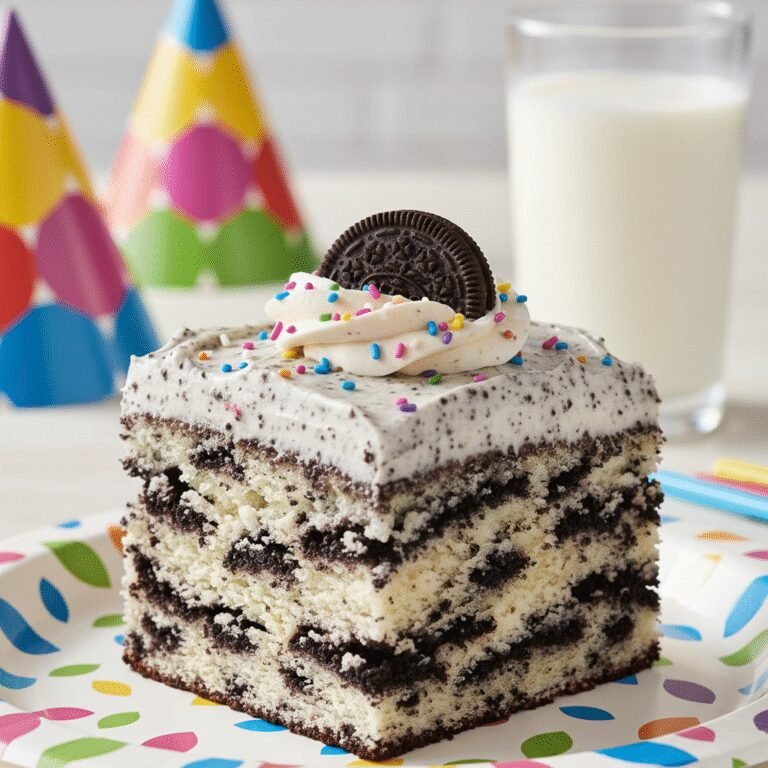
The Ultimate Classroom-Friendly Rainbow Sprinkle Birthday Sheet Cake
Fun Rainbow Sprinkle Birthday Cake For Class Party Recipe
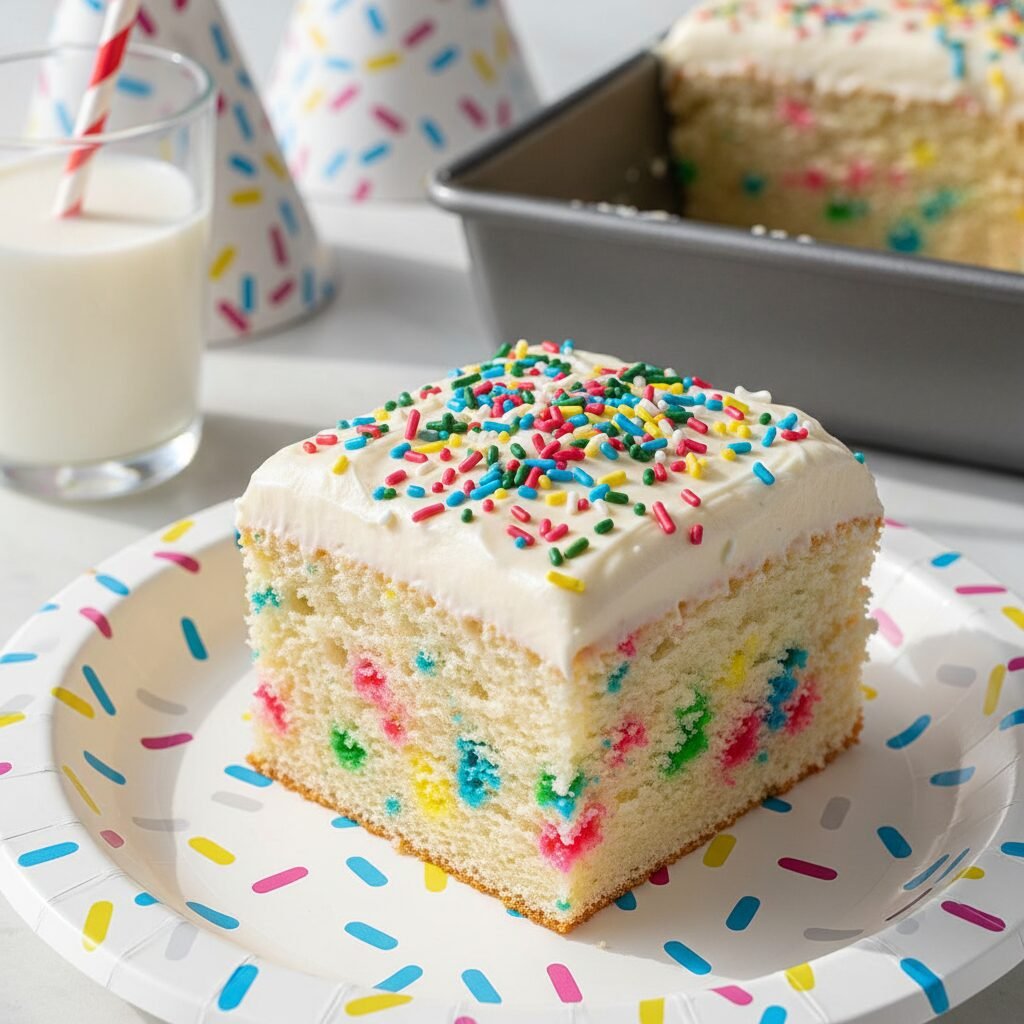
This moist, fluffy vanilla sheet cake is packed with vibrant rainbow sprinkles and topped with a creamy, cloud-like vanilla buttercream. Designed specifically for easy transport and serving, it is the ultimate stress-free treat for your child’s next school birthday party.
20 minutes
30 minutes
1 hour 15 minutes
24 servings
Dessert
Baking
American
Vegetarian
There is something undeniably magical about a cake speckled with bright, cheerful dots of color. For decades, the ‘funfetti’ style cake has been the reigning champion of childhood nostalgia, evoking memories of sticky fingers, paper party hats, and the pure, unadulterated joy of a classroom birthday celebration. But let’s be honest: as a parent, the logistics of a class party can be daunting. You need a dessert that is sturdy enough to survive a car ride, easy to slice into twenty-plus portions without crumbling, and universally appealing to picky eaters. Enter this Ultimate Rainbow Sprinkle Birthday Sheet Cake.
Unlike delicate layer cakes that require precarious balancing acts or cupcakes that often result in a frosting-to-nose ratio that teachers dread, this sheet cake is the pragmatic yet festive solution. It features a tender, close-crumbed vanilla base that derives its moisture from a blend of butter and sour cream, ensuring it stays fresh even if you bake it the night before. The flavor is a distinct, high-quality vanilla—reminiscent of the best bakery style cakes—enhanced by the sugary crunch of rainbow sprinkles baked right into the batter. Topped with a swooping layer of whipped vanilla buttercream and even more sprinkles, it is a visual delight that screams ‘celebration.’
This recipe isn’t just about convenience; it’s about upgrading a classic. We skip the box mix preservatives in favor of simple pantry staples that yield a far superior texture and taste. The result is a cake that feels homemade and special, yet remains robust enough to be cut into neat squares on a desk. Whether you are a baking novice or a seasoned pro, this recipe is designed to be foolproof, ensuring you earn that ‘Coolest Parent’ title with minimal stress.
History & Origins
The concept of the ‘confetti’ or ‘funfetti’ cake is a relatively modern invention in the grand timeline of baking history, yet it has firmly cemented itself as an American cultural icon. While adding nuts, dried fruits, and spices to cakes has been common for centuries, the addition of pure sugar sprinkles for purely aesthetic purposes is a late 20th-century phenomenon. The specific style gained massive popularity in 1989 when Pillsbury introduced their ‘Funfetti’ cake mix. It was a marketing masterstroke, capitalizing on the vibrant, neon aesthetics of the late 80s and early 90s. The idea was simple: take a standard white cake mix and suspend colorful sprinkles within it to create a surprise burst of color in every bite.
However, the roots of the birthday cake itself go back much further. The tradition of celebrating birthdays with cake is often attributed to the Kinderfest celebrations in 18th-century Germany, though those cakes were more bread-like and far less sweet than our modern confections. The Industrial Revolution brought affordable ingredients like refined sugar and baking powder to the masses, allowing home bakers to create the lighter, sweeter cakes we recognize today.
By the mid-20th century, the ‘sheet cake’ emerged as a staple of American suburban life. As post-war families grew and community gatherings became central to social life, the need for a cake that could be baked in a single pan and feed a crowd became apparent. The 9×13 inch pan became a fixture in every kitchen. Combining the efficiency of the sheet cake with the whimsical joy of the 1989 sprinkle innovation created the perfect storm for the classroom birthday party staple we know and love today. It represents a shift in baking from purely functional or highly formal to something inherently playful and child-centric.
Why This Recipe Works
This recipe succeeds where many others fail because it specifically addresses the physics of suspending sprinkles and the chemistry of moisture retention. A common pitfall with homemade sprinkle cakes is that the sprinkles either sink to the bottom or bleed their color into the batter, turning a beautiful white cake into a muddy gray mess. This recipe solves that by using a slightly denser, higher-viscosity batter. By using a combination of softened butter and room-temperature sour cream, we create a thick emulsion that holds the sprinkles in suspension while the cake rises, ensuring an even distribution of color throughout the crumb.
Furthermore, the choice of sprinkles matters immensely. We strictly use ‘jimmies’ (the rod-shaped sprinkles) rather than ‘nonpareils’ (the tiny balls). Jimmies are coated in a way that makes them more heat-stable and less likely to bleed instantly upon contact with wet batter.
Texture-wise, this cake uses a ‘reverse creaming’ inspired technique or a high-ratio liquid balance. The addition of sour cream introduces acidity, which tenderizes the gluten strands in the flour, resulting in a soft, velvety crumb that doesn’t dry out. Many box mixes rely on oil for moisture, which is great, but lacks flavor. We use a mix of butter for that rich, dairy flavor and whole milk plus sour cream for fat content. This ensures the cake remains moist for days, making it perfect for baking ahead of a busy school day. Finally, the clear vanilla extract in the frosting mimics that nostalgic ‘box mix’ flavor profile that kids love, while the cake itself uses pure vanilla extract for a more sophisticated depth.
Why You’ll Love This Recipe
- ✓Feeds a Crowd: Easily yields 24 generous squares, perfect for a full classroom.
- ✓Travel-Friendly: The single-layer sheet format is stable and easy to transport.
- ✓No-Bleed Batter: formulated to keep the cake crumb white and the sprinkles bright.
- ✓Stay-Moist Crumb: Sour cream ensures the cake stays soft for days.
- ✓Nostalgic Flavor: Captures the essence of childhood birthdays with upgraded ingredients.
Equipment You’ll Need
- ✓9×13 inch baking pan
- ✓Stand mixer or electric hand mixer
- ✓Large mixing bowl
- ✓Medium mixing bowl
- ✓Rubber spatula
- ✓Offset spatula
- ✓Measuring cups and spoons
- ✓Sifter
Ingredients
- ✓2 1/2 cups Cake Flour (spooned and leveled)
- ✓2 cups Granulated Sugar
- ✓1 tbsp Baking Powder
- ✓1 tsp Fine Sea Salt
- ✓1 cup Unsalted Butter, softened to room temperature
- ✓3 large Eggs, room temperature
- ✓1 cup Whole Milk, room temperature
- ✓1/2 cup Full-Fat Sour Cream, room temperature
- ✓1 tbsp Pure Vanilla Extract
- ✓3/4 cup Rainbow Sprinkles (Jimmies only, not nonpareils)
- ✓FOR THE FROSTING:
- ✓1 1/2 cups Unsalted Butter, slightly softened
- ✓5-6 cups Powdered Sugar, sifted
- ✓1/4 cup Heavy Cream
- ✓2 tsp Clear Vanilla Extract (for white color) or Pure Vanilla
- ✓Pinch of Salt
- ✓Additional Sprinkles for decoration
Instructions
- Preheat your oven to 350°F (175°C). Grease a 9×13 inch baking pan generously with butter or non-stick spray, and line the bottom with parchment paper for easy removal.
- In a medium bowl, whisk together the cake flour, baking powder, and salt. Set aside.
- In the bowl of a stand mixer fitted with the paddle attachment (or a large bowl with a hand mixer), cream the softened butter and granulated sugar together on medium-high speed for about 3-4 minutes until the mixture is pale, fluffy, and aerated.
- Add the eggs one at a time, mixing well after each addition and scraping down the sides of the bowl to ensure everything is incorporated.
- In a small bowl or measuring cup, whisk together the milk, sour cream, and vanilla extract.
- Reduce the mixer speed to low. Add one-third of the dry flour mixture to the butter mixture. Mix just until combined.
- Pour in half of the liquid milk mixture. Mix until combined. Repeat with half of the remaining flour, the rest of the liquids, and finish with the final portion of flour. Do not overmix; stop when streaks of flour disappear.
- Remove the bowl from the mixer. Gently fold in the 3/4 cup of rainbow sprinkles by hand using a rubber spatula. Be gentle to avoid breaking the sprinkles.
- Pour the batter into the prepared baking pan and smooth the top with an offset spatula.
- Bake for 28-32 minutes, or until a toothpick inserted into the center comes out clean or with just a few moist crumbs. The top should be a light golden brown.
- Remove the cake from the oven and allow it to cool completely in the pan placed on a wire rack. This usually takes about 1-2 hours.
- While the cake cools, make the frosting. Beat the butter on medium-high speed for 5 minutes until it is almost white in color.
- Gradually add the powdered sugar, one cup at a time, mixing on low speed. Once incorporated, increase to high speed for a minute.
- Add the heavy cream, vanilla, and salt. Whip on high speed for another 3-4 minutes until the frosting is light, airy, and creamy.
- Once the cake is completely cool, spread the frosting generously over the top. Garnish immediately with extra rainbow sprinkles.
- Slice into squares and serve.
Expert Cooking Tips
- ✓Room Temperature Ingredients: Ensure your butter, eggs, milk, and sour cream are all at room temperature. This prevents the batter from curdling and ensures a smooth emulsion.
- ✓Use Jimmies: Only use the rod-shaped sprinkles (‘jimmies’). The small round balls (‘nonpareils’) will bleed instantly and turn your batter gray.
- ✓Don’t Overmix: Once you add the flour, mix gently. Overmixing develops gluten which leads to a tough, dense cake rather than a fluffy one.
- ✓Cool Completely: Do not attempt to frost the cake if it is even slightly warm, or the buttercream will melt and slide off.
- ✓Clear Vanilla: For the frosting, using clear imitation vanilla keeps the frosting bright white and gives it that nostalgic birthday cake flavor.
- ✓Sift Your Sugar: Always sift powdered sugar before making frosting to avoid gritty lumps.
Substitutions and Variations
If you do not have cake flour, you can make a substitute by measuring 1 cup of all-purpose flour, removing 2 tablespoons, and replacing them with 2 tablespoons of cornstarch. Sift this mixture twice before using. For a dairy-free version, substitute the butter with a high-quality plant-based butter stick, the milk with almond or oat milk, and the sour cream with a dairy-free yogurt or sour cream alternative. Note that the texture may vary slightly. If you don’t have sour cream, full-fat plain Greek yogurt is an excellent 1:1 substitute that provides similar moisture and tang. For the frosting, you can use half shortening and half butter if you need it to be more stable in hot weather, though an all-butter buttercream tastes superior.
Common Mistakes to Avoid
The most common mistake with this cake is using the wrong type of sprinkles. Nonpareils (the tiny round balls) are notorious for bleeding dye into the batter during the mixing process, resulting in a muddy, unappealing cake color. Another frequent error is overbaking. Because this is a sheet cake, it has a large surface area and bakes relatively quickly. Start checking it at the 28-minute mark. If you bake it until it is dark brown, it will be dry. Finally, failing to scrape down the bowl during mixing often leaves clumps of butter at the bottom, which can create greasy pockets in the finished cake.
Serving Suggestions
This cake is best served simply, straight from the pan or plated on colorful paper plates for a party atmosphere. For a class party, pre-cutting the cake into squares at home makes distribution significantly faster and less messy for the teacher. If serving at a home party, a scoop of vanilla bean ice cream or a glass of cold milk is the perfect accompaniment. You can also add a personalized touch by piping a ‘Happy Birthday’ message on top in a contrasting color gel icing before adding the final sprinkle garnish.
Storage and Reheating Tips
This cake can be stored at room temperature in an airtight container (or covered tightly with plastic wrap/foil) for up to 3 days. The sugar and fat content act as preservatives, keeping it moist. If you are in a very hot or humid climate, you may want to refrigerate it to keep the buttercream from melting, but allow it to come to room temperature before serving for the best texture. The unfrosted baked cake can be frozen for up to 3 months; wrap it tightly in plastic wrap and then aluminum foil. Thaw overnight in the refrigerator before frosting.
Nutrition Facts (Estimated)
| Serving Size | 1 square |
| Calories | 320 |
| Fat | 14g |
| Saturated Fat | 8g |
| Unsaturated Fat | 5g |
| Trans Fat | 0g |
| Cholesterol | 45mg |
| Sodium | 180mg |
| Carbohydrates | 45g |
| Fiber | 0.5g |
| Sugar | 28g |
| Protein | 3g |
Frequently Asked Questions
Can I make this cake ahead of time?
Yes! In fact, this cake is often better the next day as the flavors have time to meld. You can bake and frost it the day before the party and keep it covered at room temperature.
Why did my sprinkles sink to the bottom?
This usually happens if the batter is too thin or if the cake was overmixed. Our recipe uses sour cream to create a thick batter that supports the weight of the sprinkles.
Can I use all-purpose flour instead of cake flour?
Yes, but the crumb will be slightly denser. Cake flour has less protein, which ensures a tender, feathery texture. See the substitutions section for a DIY cake flour hack.
How do I transport this to school safely?
If you have a baking pan with a snap-on lid, that is ideal. If not, stick toothpicks into the top of the cake (mostly the corners and center) and tent aluminum foil over it so the foil doesn’t touch the frosting.
Can I turn this recipe into cupcakes?
Absolutely. This batter will make approximately 24 standard cupcakes. Bake them at 350°F for 18-22 minutes.
Why is my frosting yellow instead of white?
Butter is naturally yellow. To get white frosting, beat the butter for a full 5 minutes until it lightens, and consider using clear vanilla extract. You can also add a tiny, tiny dot of purple food coloring to neutralize the yellow tones.
Can I reduce the sugar in this recipe?
Sugar provides moisture and structure, not just sweetness. Reducing it significantly will alter the texture, making the cake tougher and drier. We recommend sticking to the measurements.
What if I only have salted butter?
You can use salted butter, but you should reduce the added salt in the recipe to 1/4 teaspoon to prevent the cake from tasting savory.
Conclusion
In a world of complex desserts and intricate pastries, the Rainbow Sprinkle Birthday Sheet Cake stands as a testament to the power of simple, joyful baking. It is a recipe that prioritizes happiness, ease, and reliability—three things every parent needs when planning a celebration. Whether you are baking for a classroom of twenty energetic kids or just looking for a nostalgic treat to share with friends, this cake delivers on every front. So grab your most colorful sprinkles, preheat your oven, and get ready to bake some memories that are just as sweet as the frosting on top.