Ultimate Chocolate Dinosaur Sheet Cake: The Perfect Easy Birthday Treat for Class Parties
Fun Chocolate Dinosaur Birthday Cake For Class Party Recipe
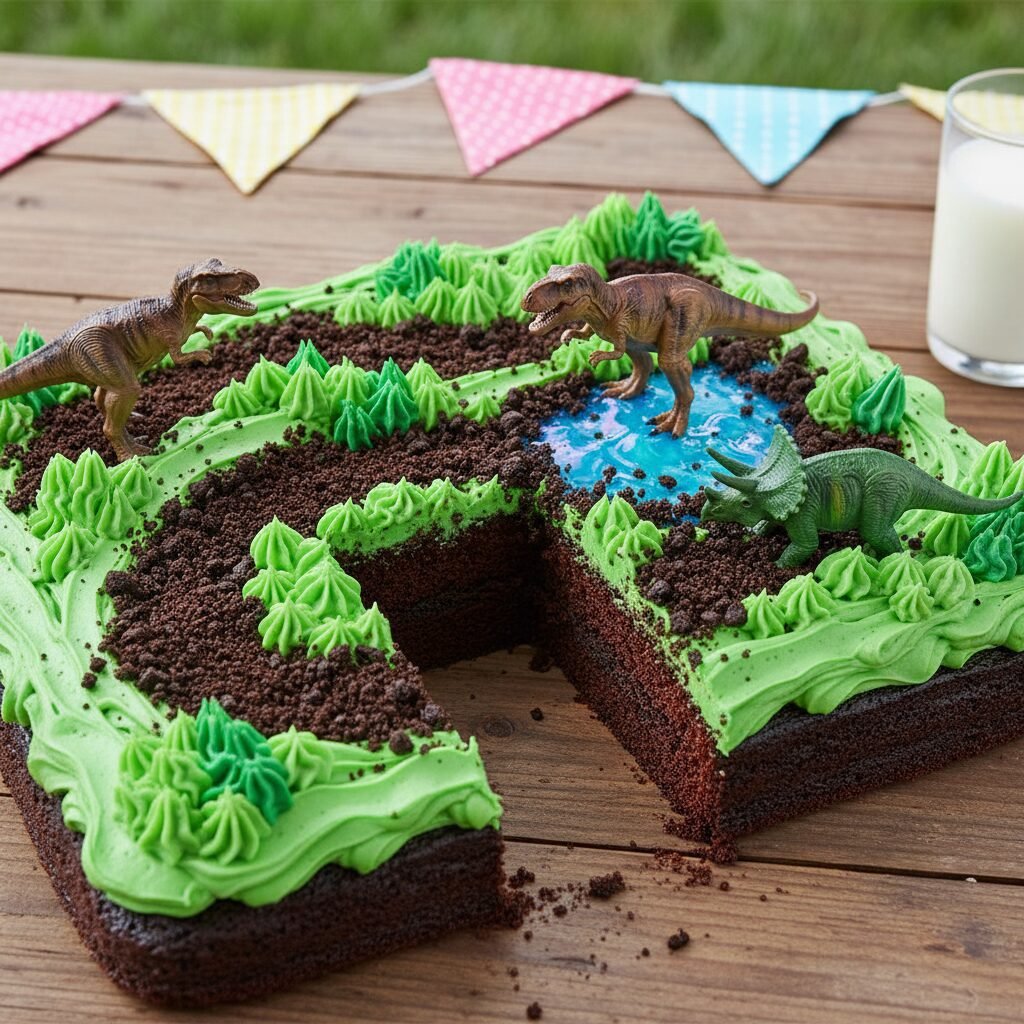
Roar into your little one’s birthday with this incredibly moist chocolate sheet cake transformed into a prehistoric landscape! Designed specifically for class parties, this recipe is easy to slice, simple to transport, and features a fun, messy decoration style that requires zero professional piping skills.
30 minutes
35 minutes
2 hours (includes cooling)
24 servings
Dessert
Baking
American
Vegetarian
Planning a birthday party for a classroom full of energetic kids can be a logistical challenge, but the cake shouldn’t be the source of your stress. Enter the Ultimate Chocolate Dinosaur Sheet Cake—a dessert that strikes the perfect balance between a show-stopping visual presentation and practical, parent-friendly execution. Unlike towering layer cakes that are precarious to transport in a minivan or elaborate fondant creations that often taste like sugary cardboard, this sheet cake is built for flavor and convenience. We start with a classic, deep-dish chocolate cake base that uses the ‘boiling water method’ to ensure a crumb so moist it stays fresh for days.
The real magic, however, happens on top. We utilize a lush vanilla buttercream dyed in vibrant prehistoric greens and blues to create a swampy terrain. Crushed chocolate sandwich cookies mimic nutrient-rich soil, while chocolate rock candies add texture. The best part? The decoration relies on plastic dinosaur toys, meaning you don’t need to be a sculptor to pull this off. It creates an interactive 3D scene that sparks the imagination of every child in the room. This cake is specifically engineered for the chaos of a school party: it yields exactly 24 generous squares, holds up at room temperature, and avoids common allergens like nuts (depending on your ingredient choices). Whether you are a seasoned baker or a novice looking to impress, this dinosaur habitat cake is your ticket to being the coolest parent in the class.
History & Origins
The concept of the birthday cake dates back to the ancient Greeks, who made round cakes to honor Artemis, the goddess of the moon, lighting candles to make them glow like her celestial symbol. However, the modern children’s birthday party, complete with a sugary cake, finds its stronger roots in the German ‘Kinderfest’ of the 18th century. Originally, these celebrations were fairly modest, but the Industrial Revolution brought ingredients like sugar and baking vessels to the masses, allowing cakes to become the centerpiece of the celebration we know today.
The ‘Sheet Cake,’ specifically, is a distinctly American evolution of cake baking, rising to prominence in the mid-20th century alongside the suburban boom. As families grew and community potlucks and school functions became standard social fixtures, the need for a cake that could feed a crowd, bake quickly, and travel easily became paramount. The Texas Sheet Cake is perhaps the most famous iteration, known for its large surface area and poured icing.
The dinosaur motif taps into a separate but equally powerful cultural phenomenon. Since the ‘Bone Wars’ of the late 19th century and the subsequent display of massive skeletons in museums, children have held a deep fascination with these prehistoric giants. This obsession was cemented in pop culture through the late 20th century with movies and cartoons. Combining the practicality of the American sheet cake with the timeless wonder of dinosaurs creates a dessert that bridges generations. The ‘dirt cake’ trend of the 1980s—pudding cups topped with crushed Oreos and gummy worms—also heavily influences this recipe, borrowing the idea of edible landscapes to create a sense of playfulness.
Why This Recipe Works
This recipe succeeds where many birthday cakes fail because it prioritizes moisture retention and structural integrity, two things essential for a cake that might sit out on a teacher’s desk for an hour before serving. The cake batter utilizes oil instead of butter. While butter offers flavor, oil remains liquid at room temperature, coating the flour proteins and preventing the cake from drying out. This ensures that even if you bake the cake the night before, it will be just as tender the next day.
Furthermore, the addition of boiling water to the batter serves a dual purpose. First, the heat blooms the cocoa powder, releasing its full, complex flavor profile that can sometimes remain dormant in cold batters. Second, the hot liquid helps dissolve the sugar completely before baking begins, resulting in a finer, more velvety crumb.
From a decoration standpoint, this recipe works because it is ‘perfectly imperfect.’ Traditional smooth-iced cakes highlight every flaw and smudge. By intentionally creating a textured surface with swirled ‘grass’ frosting and crushed cookie ‘dirt,’ any accidental knicks or uneven spreading become part of the rugged terrain. The use of American Buttercream is also strategic; it forms a slight crust on the outside, making the cake much more durable for the car ride to school than a soft Swiss meringue or whipped cream frosting.
Why You’ll Love This Recipe
- ✓Feeds a full classroom (24 servings) easily.
- ✓Oil-based batter ensures the cake stays moist for days.
- ✓Decoration requires no advanced piping skills—messy is better!
- ✓Sturdy structure makes it safe and easy to transport.
- ✓Highly customizable with different dinosaur toys and candy rocks.
- ✓Rich, deep chocolate flavor that appeals to both kids and adults.
Equipment You’ll Need
- ✓9×13 inch baking pan (metal preferred)
- ✓Large mixing bowl
- ✓Medium mixing bowl
- ✓Whisk
- ✓Electric hand mixer or stand mixer
- ✓Rubber spatula
- ✓Offset spatula
- ✓Small bowls for coloring frosting
Ingredients
- ✓2 cups granulated sugar
- ✓1 3/4 cups all-purpose flour
- ✓3/4 cup unsweetened cocoa powder (Dutch-processed preferred)
- ✓1 1/2 teaspoons baking powder
- ✓1 1/2 teaspoons baking soda
- ✓1 teaspoon salt
- ✓2 large eggs, room temperature
- ✓1 cup whole milk
- ✓1/2 cup vegetable oil
- ✓2 teaspoons pure vanilla extract
- ✓1 cup boiling water
- ✓1 cup unsalted butter, softened (for frosting)
- ✓4 cups powdered sugar
- ✓2-3 tablespoons heavy cream or milk
- ✓Green and Blue gel food coloring
- ✓1 cup crushed chocolate sandwich cookies (e.g., Oreos)
- ✓1/2 cup chocolate rock candies
- ✓Clean, new plastic dinosaur toys
Instructions
- Preheat your oven to 350°F (175°C). Grease and flour a 9×13 inch baking pan, or line it with parchment paper for easy removal.
- In a large mixing bowl, whisk together the sugar, flour, cocoa, baking powder, baking soda, and salt until well combined and no lumps remain.
- Add the eggs, milk, oil, and vanilla extract to the dry ingredients. Beat on medium speed with an electric mixer for about 2 minutes. The batter will look thick and glossy.
- Carefully stir in the boiling water by hand. The batter will become very thin and watery—this is completely normal and essential for the moist texture.
- Pour the batter into the prepared pan. Bake for 30 to 35 minutes, or until a wooden toothpick inserted into the center comes out clean or with just a few moist crumbs.
- Remove the cake from the oven and allow it to cool completely in the pan on a wire rack. Do not attempt to frost until the cake is cool to the touch.
- While the cake cools, prepare the buttercream. In a large bowl, beat the softened butter until creamy and pale (about 3-4 minutes).
- Gradually add the powdered sugar, one cup at a time, beating well after each addition. Add the vanilla and 2 tablespoons of cream/milk. Beat on high for 3 minutes until fluffy. Add more liquid if needed for spreadable consistency.
- Divide the frosting. Keep about 1/3 white (or dye blue for water) and dye the remaining 2/3 green for grass.
- Spread the green frosting over the majority of the cake using an offset spatula. You can use the back of a spoon to create swirls and peaks to mimic rough terrain.
- If using blue frosting, create a small ‘lake’ or ‘river’ section on the cake.
- Sprinkle the crushed cookies in a winding path across the cake to create a ‘dirt road’ or ‘mud pit’.
- Place the chocolate rocks strategically around the dirt and grass.
- Just before serving or transporting, arrange the clean plastic dinosaurs on the cake to create a scene (e.g., drinking from the river, walking on the path).
Expert Cooking Tips
- ✓Ensure your boiling water is actually boiling; hot tap water isn’t hot enough to bloom the cocoa properly.
- ✓Do not overbake. Check the cake 5 minutes before the timer goes off. Overbaking is the main cause of dry cake.
- ✓If using plastic toys, wash them thoroughly with soap and water and dry them completely before placing them on the cake.
- ✓Gel food coloring is superior to liquid drops as it provides vibrant color without watering down your frosting.
- ✓For an extra flat cake surface (easier for decorating), gently tap the pan on the counter before baking to release air bubbles.
- ✓If transporting to school, leave the dinosaurs off and place them on the cake upon arrival to prevent them from toppling over during the drive.
- ✓Room temperature eggs and milk incorporate much better into the batter, creating a more uniform structure.
Substitutions and Variations
This recipe is highly adaptable to various dietary needs. For a gluten-free version, substitute the all-purpose flour with a high-quality 1:1 gluten-free baking flour blend (one that contains xanthan gum). To make this cake dairy-free, use almond milk or oat milk in the batter, and swap the butter in the frosting for a vegan butter stick or high-ratio vegetable shortening. For the ‘buttermilk’ tang without dairy, add a teaspoon of vinegar to your plant-based milk. If you want to avoid food dyes, you can use matcha powder to tint the frosting green naturally, though the flavor will change slightly. Instead of chocolate rocks, you can use chocolate chips or raisins. If crushed Oreos aren’t an option due to allergies, crushed gluten-free chocolate cookies or even cocoa nibs make excellent ‘dirt’.
Common Mistakes to Avoid
The most common mistake with this cake is frosting it before it is 100% cool. Even a slightly warm cake will melt the butter in the frosting, causing your dinosaur landscape to slide off into a greasy puddle. Another mistake is over-mixing the batter after adding the flour but before adding the water; this develops gluten and makes the cake tough. Stick to the 2-minute beat time. Lastly, don’t skimp on the cocoa powder quality. Using a cheap, generic cocoa can result in a lackluster flavor. Opt for a Dutch-processed cocoa for that deep, fudgy color and taste.
Serving Suggestions
Since this is designed for a class party, pre-cutting is often a lifesaver for teachers. You can cut the cake into squares at home and leave them in the pan, arranging the dinosaurs on top of the cut lines so they don’t have to be removed to serve. Serve with cold milk or water bottles. If you are serving this at a home party, a scoop of vanilla bean ice cream pairs perfectly with the rich chocolate. Don’t forget to provide plenty of napkins, as the ‘dirt’ and blue frosting can be delightfully messy for little hands.
Storage and Reheating Tips
This cake stores beautifully at room temperature for up to 3 days, provided it is covered. The sugar and fat content act as preservatives. If you live in a very hot or humid climate, you may want to store it in the refrigerator to keep the buttercream from melting, but let it come to room temperature before serving for the best texture. You can also freeze the baked, unfrosted cake layer for up to 3 months wrapped tightly in plastic wrap. The frosting can also be made ahead and refrigerated for a week; just rewhip it before using.
Nutrition Facts (Estimated)
| Serving Size | 1 slice |
| Calories | 380 |
| Fat | 18g |
| Saturated Fat | 6g |
| Unsaturated Fat | 11g |
| Trans Fat | 0g |
| Cholesterol | 45mg |
| Sodium | 210mg |
| Carbohydrates | 52g |
| Fiber | 2g |
| Sugar | 32g |
| Protein | 4g |
Frequently Asked Questions
Can I make this cake the day before?
Absolutely. In fact, this cake often tastes better the next day as the flavors meld and the moisture distributes evenly. Just cover it tightly.
How do I transport this without ruining the decoration?
If you have a cake carrier with a high lid, that works best. If not, use a deep roasting pan to bake the cake, or place the 9×13 pan inside a cardboard box with the lid propped up. Add the tall dinosaurs after you arrive.
Is this recipe nut-free?
The base ingredients are nut-free, but always check the labels on your chocolate rocks, sprinkles, and cookies, as these are often processed in facilities that handle peanuts or tree nuts.
Can I use a box mix instead?
Yes, you can. To doctor a box mix to taste like homemade, replace the water with milk, use melted butter instead of oil, and add an extra egg.
What if I don’t have buttermilk?
You can make a substitute by adding 1 tablespoon of lemon juice or white vinegar to a cup of regular milk and letting it sit for 5 minutes until it curdles slightly.
How do I get the frosting a deep jungle green?
Start with a yellow base if possible, then add green gel coloring. Let the colored frosting sit for an hour; the color deepens as it develops.
Can I turn this into cupcakes?
Yes! This batter will make approximately 24-30 standard cupcakes. Bake at 350°F for 18-22 minutes.
Are the plastic dinosaurs safe to put on food?
Most new plastic toys are safe for brief contact with food. However, always wash them with warm soapy water first. If you are concerned, you can place a small piece of fondant or parchment paper under the feet of the dinosaurs.
Conclusion
Creating a memorable birthday treat doesn’t require a culinary degree or days of stress. This Chocolate Dinosaur Sheet Cake proves that with a reliable recipe and a little creativity, you can create a magical world that tastes as good as it looks. The joy on the kids’ faces when they see a T-Rex stomping through crushed cookie mud is worth every minute of preparation. So, grab your mixer, unleash your inner artist, and get ready to bake a cake that will go down in history—or at least be the talk of the playground!