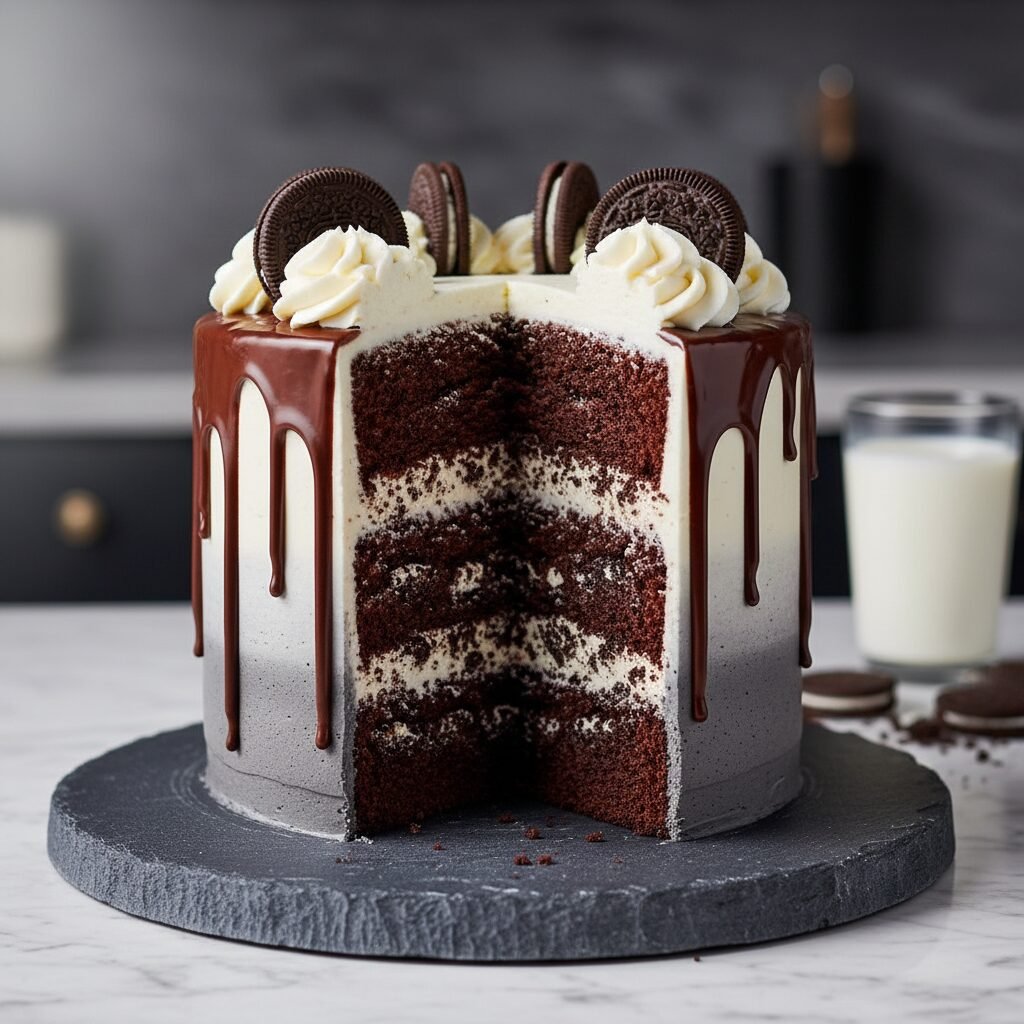
Ultimate Tall Oreo Drip Cake With Ombre Frosting Recipe
Tall Oreo Drip Cake With Ombre Frosting Recipe
This show-stopping dessert features towering layers of moist, dark chocolate sponge packed with crunchy Oreo chunks, enveloped in a sophisticated grey ombre buttercream. Finished with a glossy chocolate ganache drip and crowned with cookies, it is the ultimate celebration cake for cookies and cream lovers.
1 hour 30 minutes
35 minutes
4 hours 30 minutes
12-14 servings
Dessert
Baking
American
Vegetarian
There are few flavor combinations as universally beloved as cookies and cream, but when transformed into a towering, architectural masterpiece, it becomes something truly magical. This Tall Oreo Drip Cake is not just a dessert; it is a statement piece designed to elicit gasps of delight at birthday parties, showers, and celebrations. At its heart lies a deeply rich, oil-based chocolate sponge that stays incredibly moist for days. We don’t just stop at chocolate cake; we fold in generous amounts of crushed Oreo cookies into the batter, creating unexpected pockets of texture that contrast beautifully with the tender crumb. The height of this cake—achieved by using smaller 6-inch pans stacked four layers high—gives it that modern, professional bakery aesthetic that has taken Pinterest and Instagram by storm. But the real showstopper is the exterior. We use a vanilla bean buttercream, speckled with fine cookie crumbs, and tint it into a seamless monochrome ombre gradient, fading from a deep charcoal at the base to a pristine white at the crown. To finish, a luxurious semi-sweet chocolate ganache is dripped over the chilled edges, frozen in time as it cascades down the sides. This recipe is designed for the ambitious home baker who wants to create a professional-level cake. While it requires patience and precision, particularly with the ombre frosting technique and the temperature of the drip, the result is a stunning visual and culinary experience that tastes even better than it looks. The balance of the slightly salty dark chocolate sponge with the sweet, creamy frosting ensures that every bite is rich without being cloyingly sweet.
History & Origins
The concept of ‘Cookies and Cream’ as a flavor profile traces its roots back to the invention of the Oreo cookie by the National Biscuit Company (Nabisco) in 1912 at their Chelsea factory in New York City. Originally sold as part of a trio, the Oreo quickly outpaced its competitors to become the best-selling cookie in the United States. However, the specific application of cookies and cream in ice cream and cakes gained massive popularity in the late 1970s and early 1980s, often attributed to South Dakota State University’s dairy plant. The modern ‘Drip Cake’ phenomenon, which this recipe emulates, is a much more recent culinary trend. It was largely popularized around 2015 by Australian bakers like Katherine Sabbath, who moved away from the rigid, fondant-covered wedding cakes of the 90s and 2000s toward buttercream-finished cakes featuring playful, messy-yet-controlled ganache drips. This style revolutionized home baking, making high-end decoration more accessible because it celebrated texture and color over smooth perfection. The ‘Tall Cake’ trend also emerged from this movement, utilizing 6-inch pans to create height and drama rather than width. This recipe marries the century-old love for America’s favorite cookie with the contemporary aesthetics of the modern craft baking revolution, creating a dessert that honors history while looking thoroughly modern.
Why This Recipe Works
This recipe succeeds where others fail due to three critical structural and chemical factors. First, the cake base uses oil rather than butter. While butter provides flavor, oil remains liquid at room temperature (and in the fridge), ensuring that even when this tall cake is chilled to set the buttercream, the sponge remains soft and moist rather than drying out or becoming hard. This is crucial for tall cakes which require refrigeration for structural stability. Second, the buttercream consistency is tailored specifically for the ombre technique. We use a high ratio of heavy cream to butter, allowing the frosting to be smooth enough to blend easily with a bench scraper without dragging or creating air pockets, yet stiff enough to hold the weight of the layers. Third, the ‘Drip’ element is scientifically calculated. Many recipes result in drips that run all the way to the bottom plate because the ganache is too thin or the cake is too warm. This recipe utilizes a specific chocolate-to-cream ratio and emphasizes chilling the cake significantly before applying the drip. The cold surface of the cake shocks the warm ganache, causing it to set midway down the side, creating those perfect, photogenic droplets. Additionally, the inclusion of boiling water in the batter blooms the cocoa powder, releasing more intense chocolate flavor and creating a darker, richer crumb that contrasts visually with the white frosting.
Why You’ll Love This Recipe
- ✓Achieves a professional bakery-style height using 6-inch pans.
- ✓Features a stunning monochrome grey-to-white ombre effect.
- ✓The oil-based cake recipe guarantees a moist crumb that stays fresh for days.
- ✓Packed with real Oreo chunks in both the batter and the filling.
- ✓Includes a foolproof ganache ratio for the perfect controlled drip.
- ✓Highly photogenic and perfect for Pinterest-worthy celebration photos.
Equipment You’ll Need
- ✓Three or Four 6-inch round cake pans
- ✓Stand mixer with paddle attachment
- ✓Turntable (lazy Susan)
- ✓Metal bench scraper (icing smoother)
- ✓Offset spatula
- ✓Piping bags
- ✓Squeeze bottle (for the drip)
- ✓Wire cooling racks
- ✓Parchment paper
Ingredients
- ✓2 cups granulated sugar
- ✓1 3/4 cups all-purpose flour
- ✓3/4 cup dark unsweetened cocoa powder
- ✓1 1/2 tsp baking powder
- ✓1 1/2 tsp baking soda
- ✓1 tsp salt
- ✓2 large eggs, room temperature
- ✓1 cup whole milk
- ✓1/2 cup vegetable oil
- ✓2 tsp pure vanilla extract
- ✓1 cup boiling water
- ✓12 Oreos, roughly chopped (for batter)
- ✓1 1/2 cups unsalted butter, softened (for frosting)
- ✓5 cups powdered sugar
- ✓1/4 cup heavy cream
- ✓1 tsp vanilla extract (for frosting)
- ✓6 Oreos, pulverized to fine dust (for frosting flavor)
- ✓Black gel food coloring
- ✓1/2 cup semi-sweet chocolate chips (for drip)
- ✓1/3 cup heavy cream (for drip)
- ✓Additional Oreos for decoration
Instructions
- Preheat your oven to 350°F (175°C). Grease three or four 6-inch cake pans (depending on how thick you want layers) and line the bottoms with parchment paper.
- In the bowl of a stand mixer, whisk together the sugar, flour, cocoa, baking powder, baking soda, and salt.
- Add the eggs, milk, oil, and vanilla. Beat on medium speed for 2 minutes to develop structure.
- Stir in the boiling water by hand. The batter will be very thin and liquid; this is normal.
- Gently fold in the roughly chopped Oreos.
- Pour the batter evenly into the prepared pans. Bake for 30-35 minutes, or until a wooden toothpick inserted into the center comes out clean.
- Cool in the pans for 10 minutes, then turn out onto a wire rack to cool completely.
- To make the frosting: Beat the softened butter on high speed for 5 minutes until pale and fluffy. Gradually add powdered sugar, one cup at a time. Add the heavy cream and vanilla, beating on high for another 3 minutes. Stir in the fine Oreo dust.
- Divide the frosting. Keep 50% white. Tint 25% light grey with a tiny drop of black gel color. Tint the remaining 25% dark grey.
- Level the cake layers if they are domed. Place the first layer on a cake board. Spread a layer of white frosting and sprinkle with extra crushed Oreos. Repeat stacking all layers.
- Apply a thin ‘crumb coat’ of white frosting all over the cake to lock in crumbs. Chill in the fridge for 20 minutes.
- To create the ombre: Pipe the dark grey frosting in a ring around the bottom third of the cake. Pipe the light grey frosting around the middle third. Pipe the white frosting around the top third and the top surface.
- Use a bench scraper to smooth the sides while rotating the turntable. The colors will blend together creating a gradient. Clean the scraper often. Chill the cake for at least 30 minutes until the frosting is cold and firm.
- Make the drip: Heat 1/3 cup heavy cream until simmering. Pour over chocolate chips. Let sit for 5 minutes, then stir until smooth. Let it cool until it is slightly thick but pourable (approx 90°F).
- Using a spoon or squeeze bottle, drip the ganache down the cold edges of the cake. Fill in the top center with remaining ganache.
- Decorate the top with swirls of leftover buttercream and whole Oreos. Serve at room temperature.
Expert Cooking Tips
- ✓Ensure all cold ingredients (eggs, milk, butter) are at room temperature before starting to prevent curdling.
- ✓Do not overmix the batter once the flour is added, or the cake will be tough. The boiling water step is the exception as it ensures a smooth batter.
- ✓Chill the cake thoroughly before applying the drip. The contrast between the cold cake and warm ganache stops the drip from running too far.
- ✓Use gel food coloring instead of liquid to avoid changing the consistency of your buttercream.
- ✓A metal bench scraper heated under hot water and dried can help achieve a super smooth finish on the buttercream.
- ✓If your drip is too thick, microwave it for 5 seconds. If too thin, let it cool longer.
- ✓Weigh your flour using a kitchen scale for the most accurate results; too much flour makes a dry cake.
Substitutions and Variations
For a gluten-free version, substitute the all-purpose flour with a high-quality 1:1 gluten-free flour blend that contains xanthan gum. To make this dairy-free, use plant-based milk mixed with a teaspoon of vinegar (to mimic buttermilk) for the cake, and swap the butter for high-quality vegan butter sticks and coconut cream for the ganache. If you cannot find black gel food coloring, you can use activated charcoal powder, though this may slightly alter the texture. You can substitute the coffee/boiling water with hot milk if you wish to avoid caffeine, though the coffee enhances the chocolate flavor without making it taste like coffee. For the cookies, any sandwich cookie works—Golden Oreos, mint, or peanut butter variations can be used to change the flavor profile completely.
Common Mistakes to Avoid
The most common mistake is rushing the cooling process. If the cake layers are even slightly warm when you frost them, the butter will melt, and the cake will slide apart. Another frequent error is making the ganache too hot; it will melt the buttercream and pool at the bottom of the plate. Always test one drip on the back of the cake to check the consistency before doing the whole cake. Over-whipping the buttercream at the very end can create air bubbles; to fix this, use a paddle attachment on the lowest speed for 5 minutes to knock the air out before frosting. Finally, failing to level the cake tops results in a leaning tower; always trim the domes off your cake layers.
Serving Suggestions
Because this is a tall cake (often 6-8 inches high), standard triangular slices can be too large. The best way to serve a tall drip cake is to cut it ‘catering style.’ Make a long cut across the cake about 1 inch from the edge, then slice that slab into rectangular portions. Repeat until you reach the center. This ensures everyone gets a stable piece of cake with an equal ratio of frosting to sponge. Serve with a cold glass of milk or a hot espresso to cut through the sweetness. A side of fresh raspberries or strawberries also pairs beautifully with the rich chocolate and cream flavors.
Storage and Reheating Tips
This cake is best stored in the refrigerator due to the buttercream and height, but it should be eaten at room temperature. Remove slices from the fridge 30 minutes before serving to allow the buttercream to soften and the sponge to relax. The cake can be stored in an airtight cake carrier in the fridge for up to 4 days. For longer storage, you can freeze individual slices wrapped tightly in plastic wrap and foil for up to 2 months. If freezing the whole cake, place it in the freezer unwrapped for an hour to harden the decoration, then wrap tightly in plastic wrap.
Nutrition Facts (Estimated)
| Serving Size | 1 slice |
| Calories | 680 |
| Fat | 34g |
| Saturated Fat | 14g |
| Unsaturated Fat | 18g |
| Trans Fat | 0g |
| Cholesterol | 65mg |
| Sodium | 320mg |
| Carbohydrates | 88g |
| Fiber | 4g |
| Sugar | 55g |
| Protein | 6g |
Frequently Asked Questions
Can I make the cake layers ahead of time?
Yes, absolutely. In fact, chilled or semi-frozen cake layers are easier to stack and frost. Wrap the baked, cooled layers in plastic wrap and store them in the fridge for up to 2 days or freeze for up to a month.
Why did my drip run all the way to the bottom?
This happens if the ganache was too hot or the cake wasn’t cold enough. The cake must be chilled for at least 30 minutes, and the ganache should be slightly warm to the touch (around 90°F) but not hot.
How do I get the black frosting to be truly black and not grey?
Start with a chocolate buttercream base (add cocoa powder) so you aren’t fighting against white. Then add black gel color. The color will deepen significantly as it sits, so make the frosting a few hours ahead or overnight.
Can I use 8-inch pans instead of 6-inch?
Yes, but the cake will be shorter and wider. You will likely only get 2 or 3 layers, and the baking time may need to be adjusted (check around 25 minutes).
Do I have to use a turntable?
While not strictly ‘mandatory’, achieving a smooth ombre gradient is extremely difficult without one. The turntable allows you to keep your scraper stationary while the cake moves, creating a seamless finish.
Can I use Swiss Meringue Buttercream instead?
Yes, Swiss Meringue Buttercream is less sweet and very silky. It works great for ombre cakes. Just ensure you add the crushed Oreos only to the filling, not the outside frosting, as chunks will snag your scraper.
Why is my cake leaning?
This usually happens if the layers weren’t leveled properly or if the filling is too soft and squishing out. Always create a ‘dam’ of stiffer frosting around the edge of the layer before adding soft fillings.
How do I transport a tall cake?
Tall cakes are top-heavy. It is highly recommended to drive a long wooden dowel through the center of the entire cake into the bottom board for stability. Keep the cake in a very cold car on a flat surface (the floor, not the seat).
Conclusion
Creating this Tall Oreo Drip Cake is a rewarding project that yields a bakery-quality result right in your own kitchen. The combination of the deep, dark chocolate sponge, the creamy, cookie-speckled frosting, and the dramatic ombre design makes it a true centerpiece for any special occasion. While the steps may seem numerous, taking them one at a time—baking, stacking, frosting, and dripping—makes the process manageable and fun. Don’t be afraid to get creative with the toppings or the ombre colors. Once you slice into that tower of chocolate and cream, the effort will be entirely worth it. Happy baking!