The Ultimate Tall Chocolate Drip Cake Three Layer Recipe
Tall Chocolate Drip Cake Three Layer Cake Recipe
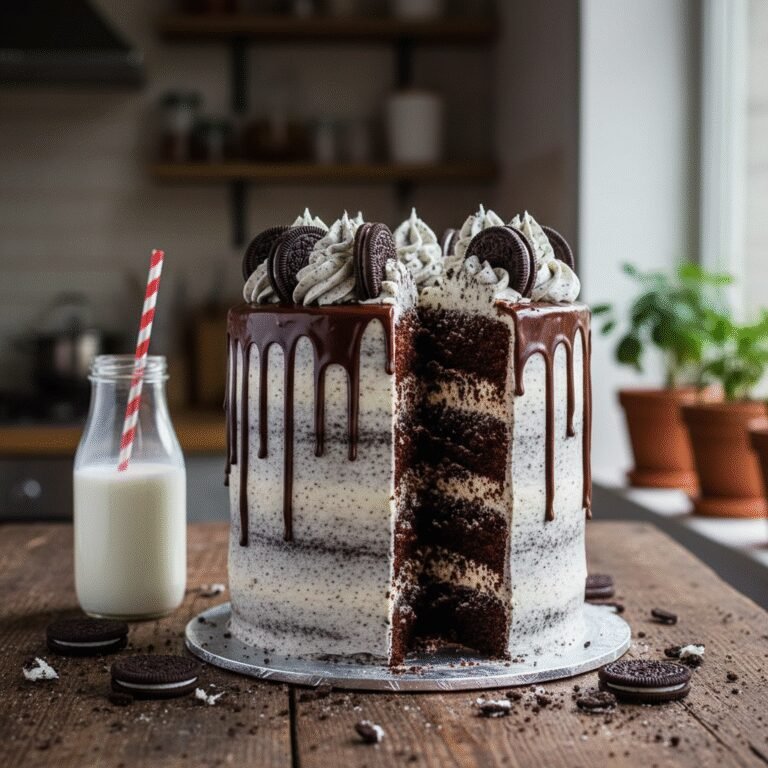
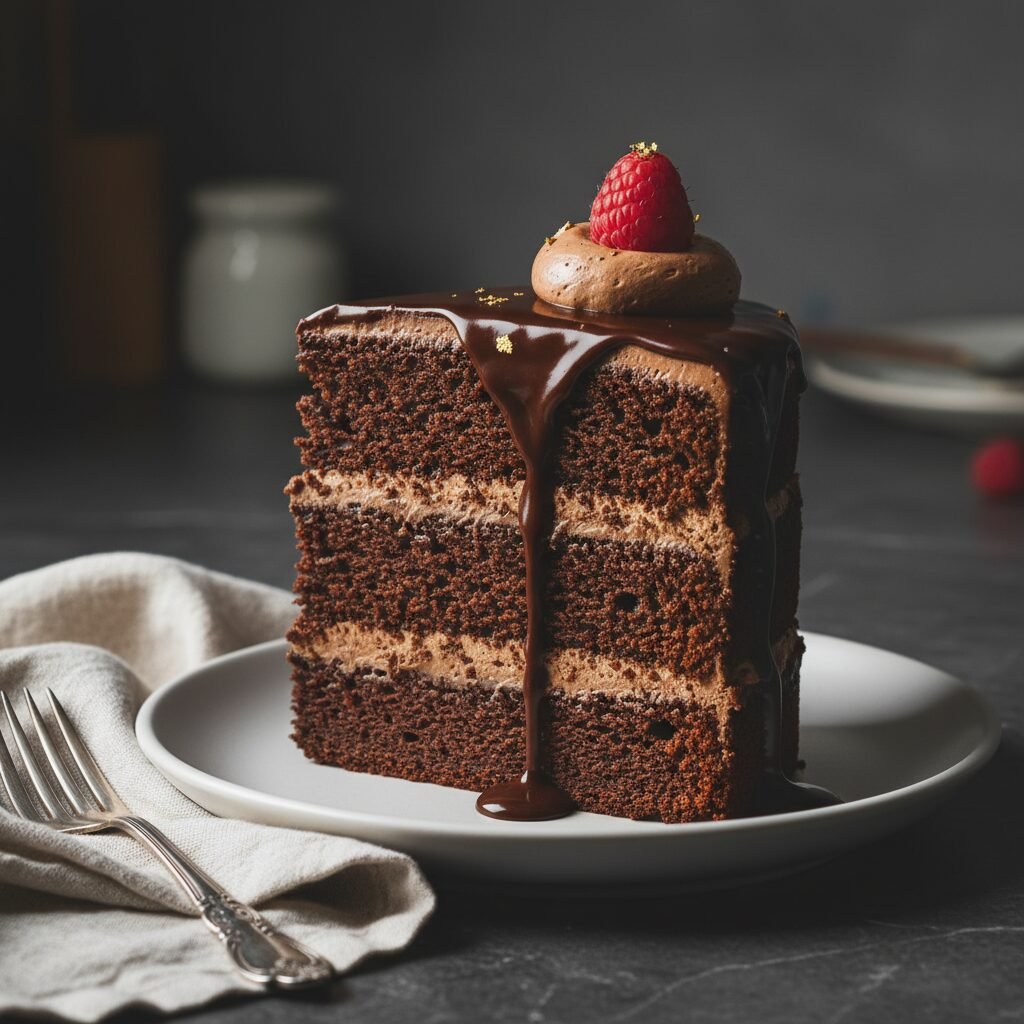
This show-stopping tall chocolate drip cake features three decadent layers of moist, dark chocolate sponge, silky chocolate buttercream, and a glossy ganache drip. Perfect for birthdays and celebrations, this recipe brings bakery-quality elegance right to your kitchen with a foolproof method for that signature drip.
45 minutes
35 minutes
2 hours 30 minutes
12-16 servings
Dessert
Baking
American
Vegetarian
There is something undeniably magical about a tall, architectural cake that commands attention the moment it enters a room. This Tall Chocolate Drip Cake is not just a dessert; it is a centerpiece, a conversation starter, and a slice of pure chocolate heaven. We are talking about three towering layers of incredibly moist, dark chocolate cake that stays tender for days, thanks to a secret weapon in the batter. Sandwiched between these rich layers is a cloud-like chocolate buttercream that strikes the perfect balance between sweet and buttery. But the real star of the show is the dramatic chocolate ganache drip that cascades down the sides, creating that trendy, professional finish that has taken the baking world by storm. Whether you are an experienced baker looking to refine your stacking skills or a novice ready to tackle your first layer cake, this recipe is designed to guide you through every step of the engineering process. From achieving flat cake tops to mastering the temperature of your ganache for the perfect drip, we cover it all. The flavor profile is deep and sophisticated, utilizing Dutch-process cocoa and hot coffee to bloom the chocolate notes, ensuring it is never overly sweet but always intensely chocolatey. Get ready to impress your guests with a cake that looks as magnificent as it tastes.
History & Origins
The history of the chocolate cake is a journey from a beverage to the fluffy confection we know today. Until the mid-19th century, chocolate was primarily consumed as a drink. It wasn’t until 1828, when Coenraad van Houten discovered how to treat cocoa beans with alkaline salts (Dutching) and press out the cocoa butter, that cocoa powder became accessible. The first ‘chocolate cakes’ were actually yellow cakes served with chocolate frosting. The true Devil’s Food Cake, distinct for its reddish tint caused by the reaction of baking soda and non-alkalized cocoa, emerged in the United States in the early 20th century, standing in stark contrast to the snowy white Angel Food Cake. Fast forward to the 21st century, and the ‘Drip Cake’ phenomenon exploded onto the scene around 2015, largely popularized by Australian baker Katherine Sabbath. Her neon-colored, candy-laden creations featuring the signature ganache drip revolutionized modern cake decorating. It moved the aesthetic away from rigid fondant and towards a more playful, appetizing look where the deliciousness of the ingredients—like melting chocolate—was celebrated visually. This recipe marries the traditional, nostalgic comfort of a classic American high-ratio chocolate cake with the modern, architectural aesthetic of the Australian-style drip cake, creating a dessert that honors history while embracing contemporary design.
Why This Recipe Works
This recipe succeeds where others fail due to the precise balance of fat, liquid, and acidity. First, we use oil instead of butter in the cake batter. While butter provides flavor, oil remains liquid at room temperature, ensuring the cake stays moist and sensationally tender even after refrigeration. Second, the addition of hot coffee is crucial; it doesn’t make the cake taste like java, but rather ‘blooms’ the cocoa powder, releasing its full depth of flavor and dissolving the sugar completely for a uniform crumb. Structurally, this cake is designed to be tall. Many recipes yield soft cakes that collapse under the weight of three layers. This formula includes enough flour and eggs to provide a sturdy crumb structure that supports stacking without becoming dense or dry. For the drip, the ratio of heavy cream to chocolate is scientifically adjusted to creating a ganache that flows smoothly but sets firm halfway down the cake, avoiding the messy puddle at the bottom. Finally, the ‘crumb coat’ technique detailed in the instructions locks in stray crumbs, ensuring your final layer of frosting is pristine and professional.
Why You’ll Love This Recipe
- ✓Uses hot coffee to intensify chocolate flavor without adding coffee taste.
- ✓Oil-based batter ensures the cake stays moist for days.
- ✓Sturdy crumb structure perfect for tall, three-layer stacking.
- ✓Detailed ganache ratio guarantees the perfect drip consistency.
- ✓Rich, silky buttercream that is easy to spread and smooth.
- ✓Bakery-style presentation that is achievable for home bakers.
Equipment You’ll Need
- ✓Three 6-inch or 8-inch round cake pans
- ✓Stand mixer or electric hand mixer
- ✓Large mixing bowls
- ✓Wire cooling rack
- ✓Offset spatula
- ✓Bench scraper (for smoothing sides)
- ✓Turntable (lazy Susan)
- ✓Squeeze bottle or spoon (for the drip)
- ✓Parchment paper
Ingredients
- ✓2 cups granulated sugar
- ✓1 3/4 cups all-purpose flour
- ✓3/4 cup Dutch-process cocoa powder
- ✓1 1/2 teaspoons baking powder
- ✓1 1/2 teaspoons baking soda
- ✓1 teaspoon salt
- ✓2 large eggs, room temperature
- ✓1 cup whole milk
- ✓1/2 cup vegetable oil
- ✓2 teaspoons vanilla extract
- ✓1 cup boiling hot coffee
- ✓1.5 cups unsalted butter, softened (for frosting)
- ✓5 cups powdered sugar (for frosting)
- ✓1/2 cup cocoa powder (for frosting)
- ✓1/4 cup heavy cream (for frosting)
- ✓1/2 cup semi-sweet chocolate chips (for drip)
- ✓1/3 cup heavy cream (for drip)
Instructions
- Preheat your oven to 350°F (175°C). Grease three 6-inch or 8-inch cake pans with butter and dust with cocoa powder, or line the bottoms with parchment paper.
- In a large bowl, whisk together the sugar, flour, cocoa, baking powder, baking soda, and salt until well combined and free of lumps.
- Add the eggs, milk, oil, and vanilla extract to the dry ingredients. Beat on medium speed for about 2 minutes using a mixer.
- Stir in the boiling hot coffee by hand. The batter will be very thin and liquid; this is normal and essential for moisture.
- Divide the batter evenly among the three prepared pans.
- Bake for 30-35 minutes, or until a wooden toothpick inserted into the center comes out clean or with just a few moist crumbs.
- Cool the cakes in the pans for 10 minutes, then turn them out onto a wire rack to cool completely before frosting.
- To make the frosting: Beat the softened butter until creamy. Gradually add powdered sugar and cocoa powder alternately with the heavy cream and vanilla. Whip on high for 3 minutes until fluffy.
- To assemble: Level the tops of the cooled cakes if they are domed. Place the first layer on a cake board. Spread a layer of frosting on top. Repeat with the second and third layers.
- Apply a thin layer of frosting all over the cake (crumb coat) and refrigerate for 20 minutes. Then, apply a thick, final layer of frosting and smooth the sides with a bench scraper.
- Make the drip: Heat 1/3 cup heavy cream until simmering. Pour over chocolate chips in a bowl. Let sit for 5 minutes, then stir gently until smooth. Let it cool slightly until it thickens to a pourable consistency.
- Using a squeeze bottle or spoon, carefully drip the ganache over the edges of the chilled cake, allowing it to run down the sides. Fill in the top center with the remaining ganache.
- Garnish with chocolate shavings, sprinkles, or piped frosting swirls if desired.
Expert Cooking Tips
- ✓Do not overmix the batter once the flour is added to avoid a tough cake, but ensure the liquid is fully incorporated.
- ✓Use room temperature eggs and milk to ensure the batter emulsifies properly.
- ✓Chill the cake thoroughly before applying the drip; a cold cake helps the ganache set quickly and prevents it from running all the way to the bottom.
- ✓Weigh your ingredients using a kitchen scale for the most accurate results, especially the flour.
- ✓If your ganache is too thick, add a teaspoon of warm cream; if too thin, let it cool longer.
Substitutions and Variations
If you do not have Dutch-process cocoa, regular unsweetened cocoa powder works, though the color will be lighter. You can substitute the hot coffee with hot water if you want to avoid caffeine entirely, though the chocolate flavor will be slightly less intense. For a dairy-free version, use almond milk mixed with a teaspoon of vinegar (to mimic buttermilk) in the cake, and use plant-based butter and full-fat coconut milk for the frosting and ganache. Gluten-free all-purpose flour blends that include xanthan gum can be swapped 1:1 for the wheat flour. If you prefer a lighter frosting, a Swiss Meringue Buttercream can be used instead of the American buttercream listed here.
Common Mistakes to Avoid
The most common mistake is applying the drip when the ganache is too hot. This melts the buttercream and causes the chocolate to pool at the base of the cake. Always test a single drip on the back of the cake first. Another error is rushing the cooling process; frosting a warm cake will cause the layers to slide and the frosting to melt. Over-baking is also a risk; check the cakes at the 30-minute mark. Finally, failing to level the cakes results in a leaning tower; always cut off the domes to ensure a flat, stable stacking surface.
Serving Suggestions
This cake is rich, so thin slices are often sufficient. Serve it at room temperature; if it has been in the fridge, let it sit out for an hour before serving to allow the buttercream to soften and the cake to regain its full flavor. It pairs beautifully with a glass of cold milk, a tart raspberry coulis to cut through the richness, or a scoop of vanilla bean ice cream. For an adult twist, serve with a glass of Cabernet Sauvignon or a coffee-based liqueur.
Storage and Reheating Tips
Store the frosted cake in a cake keeper at room temperature for up to 3 days. If the weather is hot or humid, store it in the refrigerator, but bring to room temperature before eating. Cut slices can be wrapped tightly in plastic wrap and stored in the fridge for 5 days. For long-term storage, freeze individual slices wrapped in plastic and foil for up to 3 months. Thaw in the refrigerator overnight.
Nutrition Facts (Estimated)
| Serving Size | 1 slice |
| Calories | 750 |
| Fat | 45g |
| Saturated Fat | 18g |
| Unsaturated Fat | 25g |
| Trans Fat | 0g |
| Cholesterol | 85mg |
| Sodium | 320mg |
| Carbohydrates | 90g |
| Fiber | 4g |
| Sugar | 60g |
| Protein | 8g |
Frequently Asked Questions
Can I make the cake layers ahead of time?
Yes, you can bake the layers up to 2 days in advance. Wrap them tightly in plastic wrap and store them at room temperature, or freeze them for up to a month for easier handling.
Why is my batter so runny?
The batter is supposed to be very thin due to the milk and hot coffee. Do not add more flour; this liquid evaporates during baking to create a moist crumb.
How do I get smooth sides on the frosting?
A metal bench scraper and a turntable are essential. Hold the scraper stationary while you spin the cake. Dipping the scraper in hot water and drying it before the final pass also helps smooth out bubbles.
Can I use melted chocolate instead of cocoa powder for the cake?
No, this recipe relies on cocoa powder for its specific structure and fat content. Melted chocolate would weigh down the batter and change the texture.
Why did my drip run all the way to the bottom?
Either the cake wasn’t cold enough, or the ganache was too warm/thin. Let the ganache cool until it is the consistency of heavy syrup before using.
What size pans should I use?
This recipe works for three 6-inch pans (for a very tall look) or three 8-inch pans (for a standard look). Adjust bake time slightly for 8-inch pans as they may bake faster.
Can I use this recipe for cupcakes?
Yes, this batter makes excellent cupcakes. Fill liners 2/3 full and bake for 18-22 minutes at 350°F.
My cake sank in the middle, what happened?
This usually happens if the oven door was opened too early, or if there was too much leavening (baking powder/soda). Ensure your oven temperature is accurate.
Is the coffee flavor strong?
No, the coffee enhances the chocolate flavor but does not make the cake taste like coffee.
How do I transport this tall cake?
Use a tall cake box and ensure the cake is well-chilled before moving. Driving with the AC on helps keep the buttercream stable.
Conclusion
Mastering the Tall Chocolate Drip Cake is a milestone for any home baker. It combines the technical skill of structural baking with the artistic flair of modern decorating. While it may seem intimidating at first, breaking it down into manageable steps—baking, stacking, frosting, and dripping—makes it entirely achievable. The result is a dessert that is not only visually stunning but also incredibly delicious, with a moisture and depth of flavor that box mixes simply cannot replicate. Whether for a birthday, anniversary, or just a Tuesday that needs some chocolate therapy, this cake delivers joy in every tall, dark, and handsome slice.