Tall Unicorn Birthday Cake With Ombre Frosting Recipe
Tall Unicorn Birthday Cake With Ombre Frosting Recipe
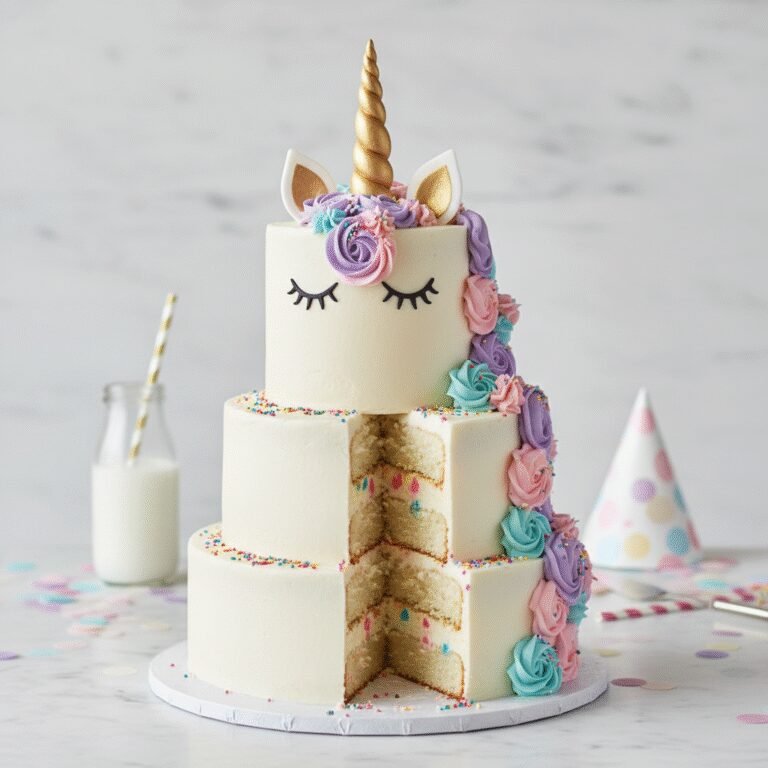
Make magical memories with this stunning Tall Unicorn Birthday Cake! Featuring four towering layers of tender vanilla bean sponge, a silky pastel ombre buttercream finish, and a glittering gold horn, this masterpiece is the ultimate centerpiece for any whimsical celebration.
1 hour 30 minutes
35 minutes
4 hours (includes cooling)
12-15 generous servings
Dessert
Baking
American
Vegetarian
There is something undeniably magical about slicing into a cake that looks too good to eat, only to find that it tastes even better than it looks. This Tall Unicorn Birthday Cake with Ombre Frosting is the epitome of edible art, designed to bring gasps of delight to children and adults alike. As a food blogger who lives for that ‘wow’ moment at parties, I can tell you that the unicorn trend is not just a fleeting fad—it is a celebration of color, joy, and creativity in baking. This recipe takes the standard birthday cake and elevates it—literally—with four high-rise layers of moist, dense vanilla cake that provide the perfect structural foundation for decorating.
What sets this cake apart is the balance of flavors and textures. We aren’t just relying on sugar to do the heavy lifting; we use high-quality vanilla bean paste and real sweet cream butter to create a depth of flavor that mimics a high-end bakery confection. The frosting is a classic American buttercream, whipped to a cloud-like consistency, which crusts perfectly to hold the intricate piped rosettes of the unicorn’s mane. The ombre effect, transitioning from deep violet to soft teal and baby pink, creates a visual journey that mimics the ethereal nature of mythical creatures. Whether you are a seasoned baker looking for your next challenge or a dedicated parent wanting to create a core memory for your child, this guide covers every single detail to ensure your unicorn stands tall and proud.
History & Origins
The phenomenon of ‘unicorn food’ exploded onto the culinary scene around the mid-2010s, turning social media feeds into a kaleidoscope of pastels, sparkles, and rainbows. While the concept of decorating cakes with animal motifs has existed for decades, the specific ‘Unicorn Cake’ design—characterized by a tall, round cylinder, sleepy closed eyes (often drawn with black fondant or edible marker), a spiraled gold horn, and a flowing buttercream mane—is largely credited to cake designers and bloggers who began sharing these stylized creations on Instagram and Pinterest around 2016. It marked a shift away from the rigid, fondant-heavy novelty cakes of the early 2000s toward a more buttercream-centric aesthetic that felt softer and more approachable.
Historically, the unicorn has been a symbol of purity and grace since antiquity, appearing in the natural history accounts of Pliny the Elder and medieval tapestries. Bringing this mythical creature into the realm of pastry was a natural evolution of the ‘rainbow’ food trend. The ombre technique used on the sides of this cake traces its roots to French textile dyeing (meaning ‘shaded’), which transitioned into hair and fashion trends before finding a permanent home in cake decorating. Combining the height of modern ‘barrel’ cakes with the whimsy of unicorn mythology creates a dessert that feels both contemporary and timelessly enchanting. This specific recipe honors that history by maintaining the classic iconography—the gold horn and rosette mane—while using modern baking science to ensure the tall stack remains stable and moist.
Why This Recipe Works
Constructing a tall, four-layer cake requires a recipe that balances tenderness with structural integrity, and that is exactly why this specific formula works so well. Standard sponge cakes can be too airy to support the weight of a tall stack and heavy buttercream mane, leading to bulging sides or, in worst-case scenarios, a collapse. This recipe utilizes the ‘reverse creaming’ method (or a modified high-ratio method) where butter is worked into the dry ingredients before adding liquids. This coats the flour proteins in fat, inhibiting gluten formation just enough to keep the crumb tender, while providing a sturdy, velvety texture that stacks beautifully without compressing the bottom layers.
Furthermore, the buttercream ratio in this recipe is calculated precisely to ensure you have enough frosting for the crumb coat, the final smoothing, and the lavish piping required for the mane. Many recipes underestimate the volume of frosting needed for multi-colored piping, leaving bakers scrambling halfway through. By using a high-fat, low-moisture American buttercream, we ensure the decorations hold their sharp edges at room temperature. The addition of a touch of heavy cream and a pinch of salt cuts through the sweetness, ensuring that despite the generous amount of frosting, the palate isn’t overwhelmed by sugar alone.
Why You’ll Love This Recipe
- ✓Four towering layers create a dramatic, professional bakery look.
- ✓Sturdy vanilla bean crumb that is easy to stack and carve.
- ✓Detailed instructions for achieving a seamless pastel ombre effect.
- ✓Step-by-step guide to sculpting a food-safe fondant unicorn horn.
- ✓Perfect crusting buttercream that holds intricate piping shapes.
- ✓Customizable color palette to match any party theme.
Equipment You’ll Need
- ✓Three 6-inch round cake pans
- ✓Stand mixer with paddle attachment
- ✓Turntable (lazy Susan)
- ✓Offset spatula
- ✓Bench scraper (icing smoother)
- ✓Piping bags and couplers
- ✓Piping tips (1M, 2D, and 4B)
- ✓Wooden skewer or dowel
- ✓Small paintbrush for gold dust
Ingredients
- ✓3 cups Cake flour, sifted
- ✓2 1/2 tsp Baking powder
- ✓1/2 tsp Baking soda
- ✓1 tsp Fine sea salt
- ✓1 cup Unsalted butter, room temperature
- ✓1 3/4 cups Granulated sugar
- ✓4 large Eggs, room temperature
- ✓1 tbsp Vanilla bean paste
- ✓1 cup Buttermilk, room temperature
- ✓2 cups Unsalted butter (for frosting), softened
- ✓7-8 cups Powdered sugar, sifted
- ✓1/4 cup Heavy cream
- ✓Gel food coloring (Pink, Purple, Teal)
- ✓White fondant (approx. 4 oz)
- ✓Gold luster dust
- ✓Vodka or lemon extract (for painting gold)
Instructions
- Preheat your oven to 350°F (175°C). Grease three 6-inch round cake pans, line the bottoms with parchment paper, and flour the sides.
- In a medium bowl, whisk together the cake flour, baking powder, baking soda, and salt. Set aside.
- In the bowl of a stand mixer fitted with the paddle attachment, beat the 1 cup of butter and granulated sugar on medium-high speed for 5 minutes until pale and fluffy.
- Add the eggs one at a time, beating well after each addition and scraping down the bowl. Mix in the vanilla bean paste.
- Reduce mixer speed to low. Add the flour mixture in three parts, alternating with the buttermilk, beginning and ending with the flour. Mix only until just combined to avoid tough cakes.
- Divide batter evenly among the three pans. Bake for 30-35 minutes, or until a toothpick inserted into the center comes out clean.
- Cool cakes in pans for 10 minutes, then turn out onto a wire rack to cool completely. Once cool, level the tops with a serrated knife.
- To make the frosting: Beat the 2 cups of butter on medium-high speed for 7 minutes until incredibly pale and creamy. Gradually add powdered sugar, one cup at a time, mixing on low. Add heavy cream, vanilla, and a pinch of salt. Whip on high for 3 minutes.
- Divide the frosting. Keep about 40% white for filling and crumb coating. Divide the remaining frosting into three bowls and tint them pink, purple, and teal.
- Stack the cake layers with a generous layer of white buttercream between each. Apply a thin crumb coat over the entire cake and chill for 20 minutes.
- For the ombre effect: Pipe rings of purple frosting around the bottom third, teal around the middle, and pink around the top. Use a bench scraper to smooth the sides while rotating the turntable, blending the colors slightly.
- Insert a wooden skewer into the fondant horn (shaped previously) and place it on top. Use the remaining colored frosting in piping bags with various tips to pipe rosettes and stars creating a ‘mane’ cascading down the side.
- Paint the horn and fondant ears with gold luster dust mixed with a drop of vodka. Add sprinkles to the mane for extra magic.
Expert Cooking Tips
- ✓Ensure all ingredients, especially eggs and buttermilk, are at room temperature to prevent the batter from curdling.
- ✓Weigh your flour using a kitchen scale (approx. 120g per cup) for the most accurate texture; scooping can pack too much flour.
- ✓When smoothing the ombre frosting, clean your bench scraper after every single pass to keep the colors distinct and not muddy.
- ✓Make the fondant horn and ears at least 24 hours in advance so they have time to dry and harden before being placed on the cake.
- ✓If the buttercream gets too soft while piping the mane, pop the piping bags in the fridge for 5-10 minutes to firm up.
- ✓Use a turntable; it is nearly impossible to get smooth sides on a tall cake without being able to rotate it continuously.
Substitutions and Variations
Baking is a science, but there is room for adjustments. If you cannot find cake flour, you can make a substitute by removing 2 tablespoons of all-purpose flour from 1 cup and replacing it with 2 tablespoons of cornstarch; sift together twice. For the buttermilk, a mixture of whole milk with a tablespoon of white vinegar or lemon juice works well if let sit for 5 minutes. If you prefer a less sweet frosting, you can swap the American buttercream for Swiss Meringue Buttercream, though you will need to ensure your gel colors are highly concentrated as SMBC takes color differently. For the egg-free version, use a commercial egg replacer or aquafaba for the cake, though the rise may be slightly less dramatic. Vegetarian concerns regarding fondant usually involve gelatin; look for vegan fondant brands if serving strict vegetarians.
Common Mistakes to Avoid
The most common mistake with tall cakes is rushing the cooling process. If the cake layers are even slightly warm when you begin to stack and frost, the butter in the frosting will melt, causing the layers to slide off one another—a disaster known as ‘cake slide.’ Another frequent error is not leveling the cakes properly. Dome-shaped tops create an unstable tower that leans; always cut the tops completely flat. Regarding the aesthetics, avoid over-mixing the colors on the side of the cake. If you scrape the sides too many times, the purple, teal, and pink will blend into a muddy grey-brown. Stop as soon as the sides are smooth. Finally, do not forget to insert a central dowel if you plan to transport the cake; a tall 6-inch cake has a high center of gravity and can easily tip over in a moving car.
Serving Suggestions
This cake is a showstopper, so serve it on a pedestal stand to give it the height it deserves. Since the cake is quite tall (likely 6-7 inches), slice it using the ‘grid method’ or cut a rectangular slab across the diameter and then divide that into strips, rather than cutting traditional wedges, to get more servings and manageable portions. Flavor-wise, this sweet vanilla cake pairs beautifully with tart accompaniments to cut the sugar. Serve with a side of fresh berries, a raspberry coulis, or a scoop of lemon sorbet. For a party, serve alongside ‘unicorn water’ (sparkling water with fruit and edible glitter) to continue the theme.
Storage and Reheating Tips
Because of the butter content in the frosting, this cake is best stored in the refrigerator but served at room temperature. If you have leftovers, press a piece of plastic wrap directly against the cut side of the cake to keep the crumb moist, then cover the whole thing or place it in a cake keeper. It will last in the fridge for up to 4 days. For longer storage, you can freeze individual slices wrapped tightly in plastic wrap and foil for up to 2 months. When ready to eat, thaw the cake on the counter for at least 2-3 hours; cold buttercream has a waxy texture and dulls the flavor, so patience is key to enjoying the creamy texture.
Nutrition Facts (Estimated)
| Serving Size | 1 slice |
| Calories | 650 |
| Fat | 34g |
| Saturated Fat | 21g |
| Unsaturated Fat | 11g |
| Trans Fat | 1g |
| Cholesterol | 110mg |
| Sodium | 320mg |
| Carbohydrates | 82g |
| Fiber | 1g |
| Sugar | 45g |
| Protein | 6g |
Frequently Asked Questions
Can I make the cake layers ahead of time?
Absolutely. You can bake the layers up to 2 days in advance. Wrap them tightly in plastic wrap once completely cool and store them at room temperature or in the fridge. You can also freeze the layers for up to a month.
How do I get the gold color on the horn?
Mix edible gold luster dust with a tiny amount of clear alcohol (like vodka) or lemon extract to create a thick paint. Paint this onto the white fondant horn. The alcohol evaporates, leaving just the shine.
Do I need 6-inch pans, or can I use 8-inch?
This recipe is designed for three 6-inch pans to get that trendy ‘tall’ look. If you use 8-inch pans, you will likely only get two layers, and the cake will look wider and shorter, changing the unicorn aesthetic.
My frosting is full of air bubbles, how do I fix it?
Run your mixer on the lowest speed for 2-3 minutes at the very end of the process to knock out large air bubbles. You can also use a spatula to smash the frosting against the side of the bowl by hand.
Can I use liquid food coloring instead of gel?
It is not recommended. Liquid coloring adds water to your frosting, which can break the emulsion and make it runny. Gel paste provides intense color without altering the consistency.
How do I transport this tall cake safely?
Chill the cake thoroughly before moving it so the frosting is hard. Place the cake box on a flat surface in the car (like the floor mat), not on a slanted seat. Drive like you have a wedding dress in the back!
What if I don’t like fondant?
You can make the horn out of an ice cream cone covered in buttercream and sprayed with edible gold spray, or use a large lollipop or twisted hard candy.
Why is my cake dry?
Over-baking is the usual culprit. Check the cake 5 minutes before the recipe says. Also, ensure you measured flour correctly; too much flour absorbs all the moisture.
Conclusion
Creating this Tall Unicorn Birthday Cake is more than just following a recipe; it is an exercise in imagination and joy. While the steps might seem numerous, breaking them down into baking, frosting, and decorating makes the process manageable and incredibly rewarding. The look on the birthday girl or boy’s face when you unveil this towering, glittering creation is worth every minute of prep time. So, grab your piping bags, unleash your inner artist, and get ready to bake a little bit of magic right in your own kitchen. Happy baking!