Classic Japanese Strawberry Shortcake: The Ultimate Fluffy Sponge Cake
Classic Japanese Strawberry Shortcake Recipe
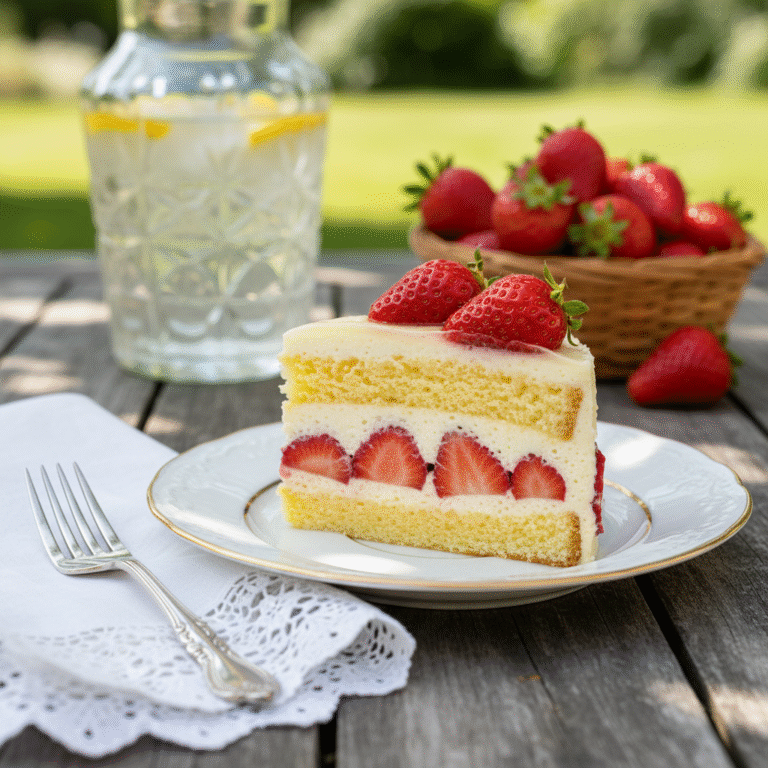
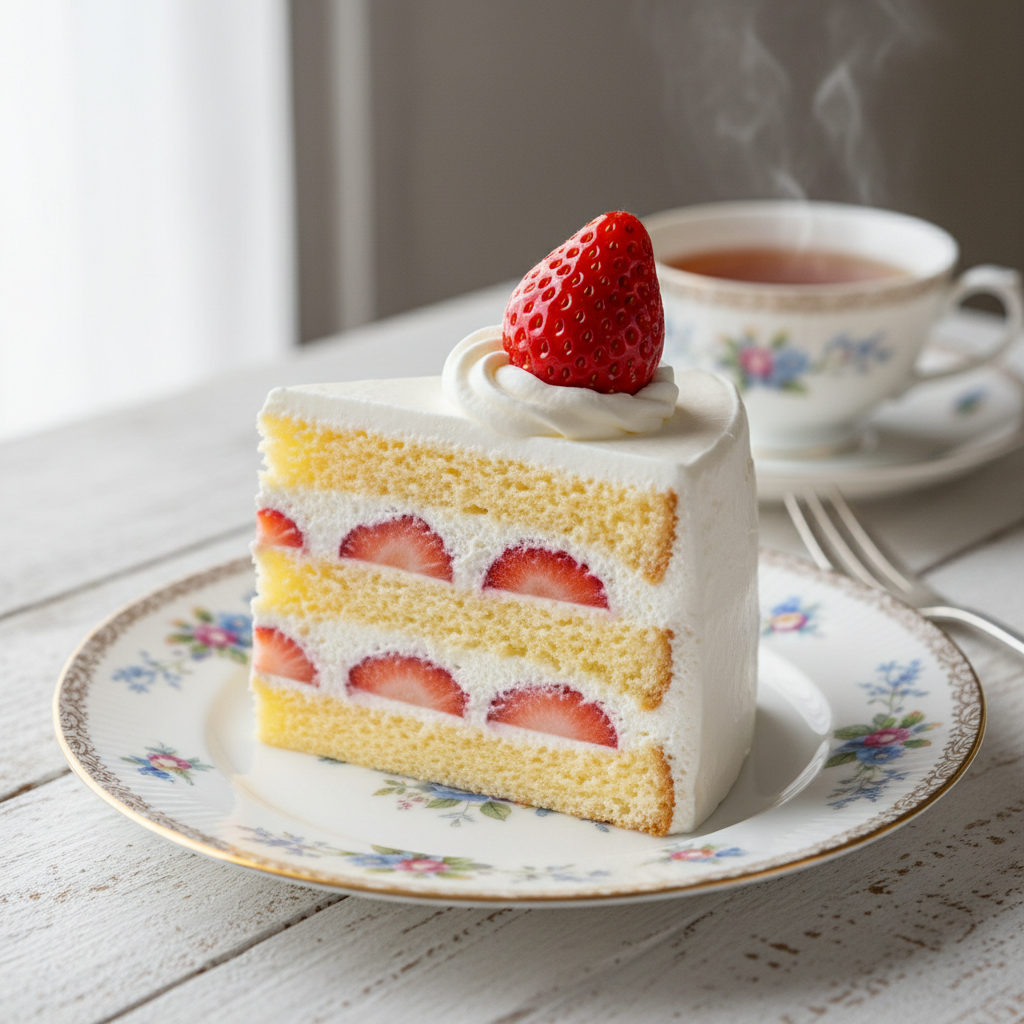
Experience the ethereal lightness of authentic Japanese Strawberry Shortcake, or ‘Kurisumasu Keiki.’ This iconic dessert features an incredibly airy sponge cake, lightly sweetened fresh whipped cream, and juicy, ruby-red strawberries, creating a perfect balance of textures and flavors that is far lighter than its Western counterparts.
45 minutes
25 minutes
2 hours (includes cooling)
8 servings (one 8-inch cake)
Dessert
Baking
Japanese
Vegetarian
If you have ever walked past a bakery window in Tokyo, you have undoubtedly seen the pristine, snow-white elegance of the Japanese Strawberry Shortcake. Known locally as ‘Shortcake’ or the quintessential Christmas Cake, this dessert is a far cry from the biscuit-based strawberry shortcakes familiar to many Americans. Instead, it is a masterpiece of ‘Yogashi’ (Western-style Japanese sweets), characterized by its signature ‘fuwa fuwa’ (fluffy) texture that practically melts in your mouth. The magic lies in the sponge—a Genoise that is meticulously whipped to trap air, resulting in a crumb that is delicate yet resilient enough to hold layers of rich, dairy cream and fresh fruit. Unlike heavy buttercreams or dense pound cakes, this recipe relies on the quality of fresh heavy cream and the natural sweetness of strawberries. It is a celebration of simplicity executed with precision. The balance is key: the sponge is not overly sweet, allowing the milky richness of the cream and the tart-sweet brightness of the berries to shine through. While it is the standard birthday cake in Japan, it is most famous as the Christmas cake, consumed by millions every December 25th. Whether you are celebrating a special occasion or simply craving a dessert that feels like eating a cloud, this recipe will guide you through every step to achieve that professional bakery look and taste right in your own kitchen.
History & Origins
The history of the Japanese Strawberry Shortcake is a fascinating journey of cultural adaptation and post-war symbolism. While ‘shortcake’ in the UK or US typically refers to a crumbly biscuit or scone topped with fruit and cream, the Japanese version is derived from the French Genoise sponge and crème chantilly. The concept was popularized in Japan by Fujiya, a historic confectionery chain. In 1922, Fujiya’s founder, Rinemon Fujii, visited the United States and was inspired by the rich cakes he saw there. However, realizing that the heavy, sweet American cakes might not suit the Japanese palate, he adapted the recipe using a lighter sponge and fresh cream. The cake truly rose to prominence after World War II. In a recovering nation, ingredients like sugar, milk, and butter were luxuries. The snow-white cream and bright red strawberries mirrored the colors of the Japanese flag, symbolizing prosperity and national pride. By the 1970s, thanks to the widespread availability of refrigeration and the marketing genius of Fujiya, eating this cake became the standard way to celebrate Christmas in Japan—a secular, commercial holiday focused on romance and family. Today, it remains the undisputed queen of Japanese cakes, representing the perfect marriage of Western baking techniques and Japanese sensibility for texture and restraint.
Why This Recipe Works
This recipe works because it addresses the three most common pitfalls of sponge cake making: dryness, deflation, and lack of flavor. First, we use the ‘warm egg’ method for the Genoise. By heating the eggs and sugar over a bain-marie before whipping, we dissolve the sugar completely and relax the egg proteins, allowing them to whip up to a greater volume and stability. This creates the microscopic air bubbles necessary for that signature lift. Second, the inclusion of butter and milk adds richness that a plain fatless sponge lacks, but we add it at a specific temperature to ensure it emulsifies without weighing down the batter. Third, and perhaps most importantly, this recipe utilizes a simple syrup brush. Japanese bakeries always brush their sponge layers with a syrup (often flavored with Kirsch or Grand Marnier). This not only adds a layer of aroma but ensures the cake stays moist for days, preventing the sponge from drawing moisture out of the whipped cream. Finally, the ratio of heavy cream to sugar in the frosting is kept low (about 8-10%), which prevents the filling from becoming cloying, making it easy to eat a whole slice without feeling heavy.
Why You’ll Love This Recipe
- ✓Achieves the authentic ‘fuwa fuwa’ (fluffy) texture found in Tokyo bakeries.
- ✓Uses a stabilized whipped cream that holds its shape beautifully.
- ✓Perfect balance of sweetness; not cloying like American buttercream cakes.
- ✓Includes a secret syrup step to keep the cake moist for days.
- ✓Step-by-step guidance on the critical ‘folding’ technique.
Equipment You’ll Need
- ✓8-inch round cake pan
- ✓Electric hand mixer or stand mixer
- ✓Kitchen scale (highly recommended)
- ✓Rubber spatula
- ✓Parchment paper
- ✓Wire cooling rack
- ✓Cake turntable (optional but helpful)
- ✓Offset spatula
- ✓Pastry brush
- ✓Sieve/Sifter
Ingredients
- ✓3 large Eggs (room temperature)
- ✓90g Granulated sugar (for sponge)
- ✓90g Cake flour (sifted)
- ✓30g Unsalted butter
- ✓1 tbsp Whole milk
- ✓1/2 tsp Vanilla extract
- ✓400ml Heavy cream (cold, min 35% fat)
- ✓3 tbsp Granulated sugar (for cream)
- ✓1 pack Fresh strawberries (approx 15-20 berries)
- ✓40g Granulated sugar (for syrup)
- ✓40ml Water (for syrup)
- ✓1 tsp Kirsch or Grand Marnier (optional, for syrup)
Instructions
- Preheat your oven to 340°F (170°C). Line the bottom and sides of an 8-inch cake pan with parchment paper. Do not grease the sides if you want the cake to climb higher, but lining is safer for beginners.
- Prepare the syrup: Combine 40g sugar and 40ml water in a small bowl. Microwave for 30 seconds until sugar dissolves. Stir in the liqueur if using. Set aside to cool.
- Melt butter and milk: In a small bowl, combine butter and milk. Microwave or use a hot water bath to melt them completely. Keep this mixture warm (approx 104°F/40°C) – this is crucial for emulsification.
- Whip the eggs: In a large heatproof bowl, combine eggs and 90g sugar. Place the bowl over a pot of simmering water (bain-marie). Whisk constantly until the mixture is warm to the touch (approx 104°F/40°C) and sugar is dissolved.
- Remove from heat and beat with an electric mixer on high speed. Beat until the mixture becomes pale, thick, and triples in volume. When you lift the beaters, the batter should fall in a ribbon that sits on the surface for a few seconds before sinking (Ribbon Stage). Reduce speed to low for 1 minute to eliminate large air bubbles.
- Add flour: Sift the cake flour into the egg mixture in two batches. After each addition, fold gently but thoroughly with a rubber spatula using a ‘cut and fold’ motion. Scrape the bottom to ensure no flour pockets remain. Do not overmix, or the cake will be dense.
- Add liquids: Take a scoop of the batter and add it to the warm butter/milk mixture. Mix well. Then, pour this back into the main batter. Add vanilla. Fold gently until combined and glossy.
- Bake: Pour batter into the prepared pan. Drop the pan on the counter once from a height of 3 inches to break large air bubbles. Bake for 23-25 minutes, or until a toothpick comes out clean and the top is golden.
- Cool: Remove from oven and immediately drop the pan on the counter once to prevent shrinking. Remove cake from pan and cool upside down on a wire rack to maintain height. Peel off parchment paper once cooled.
- Prep Strawberries: Wash, hull, and dry strawberries. Select 6-8 pretty ones for decoration. Slice the rest into 5mm thick slices for the filling.
- Whip Cream: In a cold bowl over an ice bath, whip the heavy cream and 3 tbsp sugar until stiff peaks form. Be careful not to over-whip into butter.
- Assembly: Slice the sponge cake horizontally into two even layers. Brush the cut side of the bottom layer generously with syrup. Spread a layer of whipped cream, arrange sliced strawberries evenly, and cover with more cream to fill gaps.
- Top layer: Brush the cut side of the second sponge layer with syrup and place it syrup-side down onto the strawberries. Brush the top of the cake with remaining syrup.
- Frost: Cover the entire cake with the remaining whipped cream. Smooth the top and sides with an offset spatula. Pipe rosettes on top and garnish with the reserved whole strawberries.
- Chill: Refrigerate for at least 2 hours before slicing. This allows the cream to set and the sponge to absorb moisture.
Expert Cooking Tips
- ✓Use a kitchen scale: Baking is chemistry. Measuring flour by volume is often inaccurate; weighing ensures the perfect sponge texture.
- ✓Temperature matters: Ensure your eggs are warm when whipping and your heavy cream is ice-cold when whipping. This maximizes volume and stability.
- ✓Do not over-fold: When adding flour, stop as soon as you no longer see white powder. Over-mixing develops gluten and makes the cake rubbery.
- ✓The Drop: Dropping the pan before and after baking is a professional trick to release large air bubbles and prevent the cake from collapsing.
- ✓Syrup is essential: Don’t skip the syrup step. It differentiates a dry cake from a moist, bakery-quality one.
Substitutions and Variations
If you cannot find cake flour, you can make a substitute by removing 2 tablespoons of all-purpose flour from one cup and replacing it with 2 tablespoons of cornstarch; sift together 3-4 times. However, real cake flour yields the best result. For the cream, use heavy whipping cream with a fat content between 35% and 40%. Avoid ultra-pasteurized cream if possible, as it doesn’t whip as firmly. If you want a non-alcoholic version, simply omit the Kirsch in the syrup; you can add a drop of vanilla extract or lemon juice instead. For the fruit, while strawberry is classic, you can substitute with sliced peaches, kiwi, or mangoes during the summer months for a refreshing variation.
Common Mistakes to Avoid
The most common mistake is under-whipping or over-whipping the eggs. If under-whipped, the cake will be flat and dense. If over-whipped without the ‘low speed’ finishing step, the texture will be coarse. Another frequent issue is deflating the batter when adding the butter. To prevent this, always mix a small amount of batter into the fat first (tempering) before adding it to the main bowl. Finally, avoid frosting the cake while it is even slightly warm, as this will melt the fresh cream immediately, causing the cake to slide apart. Ensure the sponge is completely cool.
Serving Suggestions
This cake is best served chilled. Slice it using a sharp knife dipped in hot water and wiped dry between each cut for clean, professional-looking layers. Serve with a cup of hot Darjeeling tea or a light coffee. In Japan, it is traditionally served on a small plate with a dessert fork. It is the perfect centerpiece for Christmas dinner, birthdays, or romantic anniversaries.
Storage and Reheating Tips
Japanese Strawberry Shortcake is best eaten on the day it is assembled, as fresh cream absorbs fridge odors and can deflate over time. However, it can be stored in an airtight cake carrier in the refrigerator for up to 2 days. If you have leftover slices, press plastic wrap directly against the cut sides to prevent the sponge from drying out. Freezing is not recommended for the assembled cake because fresh strawberries release water when thawed, making the sponge soggy and the cream watery.
Nutrition Facts (Estimated)
| Serving Size | 1 slice |
| Calories | 340 |
| Fat | 24g |
| Saturated Fat | 14g |
| Unsaturated Fat | 8g |
| Trans Fat | 0g |
| Cholesterol | 110mg |
| Sodium | 65mg |
| Carbohydrates | 28g |
| Fiber | 1g |
| Sugar | 22g |
| Protein | 5g |
Frequently Asked Questions
Why did my sponge cake collapse?
Collapsing usually happens if the cake wasn’t baked long enough (the structure wasn’t set) or if it wasn’t cooled upside down. It can also happen if the egg foam was unstable due to over-mixing the flour.
Can I use store-bought whipped topping?
It is highly recommended to use real heavy cream. Whipped toppings (like Cool Whip) are oil-based and lack the delicate mouthfeel and structural integrity needed for this specific cake.
Why is my cream grainy?
Grainy cream is a sign of over-whipping. Stop whipping as soon as you see stiff peaks. If it’s slightly grainy, you can try adding a teaspoon of liquid cream and folding it in gently to smooth it out.
Can I make the sponge ahead of time?
Yes, the sponge cake can be made a day in advance. Wrap it tightly in plastic wrap once completely cooled and store it at room temperature. This actually makes it easier to slice.
Do I have to use alcohol in the syrup?
No, the alcohol is for aroma. You can use plain sugar water or infuse the syrup with a strawberry slice or vanilla bean for a non-alcoholic alternative.
Why do we use a water bath for the eggs?
Warming the eggs helps the sugar dissolve and relaxes the proteins, allowing them to expand more easily. This creates a significantly fluffier and more stable foam than whipping cold eggs.
My cake came out rubbery, why?
This is likely due to over-mixing the flour. When gluten develops too much, the texture becomes chewy rather than soft. Fold gently and stop as soon as the flour is incorporated.
Can I use frozen strawberries?
No. Frozen strawberries release too much liquid when thawed, which will bleed into the cream and turn the cake into a soggy mess. Always use fresh fruit.
Conclusion
Mastering the Japanese Strawberry Shortcake is a rewarding experience that elevates your home baking to a professional level. The combination of the feather-light Genoise, the rich yet subtle cream, and the burst of fresh strawberries creates a harmony of flavors that is impossible to resist. It captures the essence of Japanese culinary philosophy: attention to detail, quality ingredients, and refined presentation. Whether for a holiday celebration or a weekend treat, this cake is sure to impress and bring a smile to anyone who takes a bite.