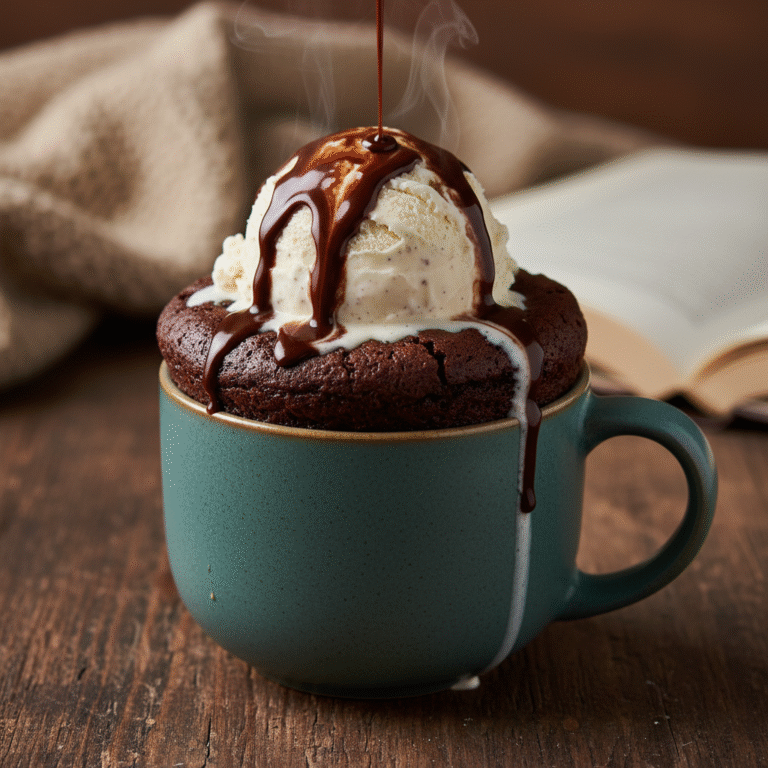
Decadent 5-Minute Fudgy Microwave Brownie Mug Cake for Two
Quick Microwave Brownie Mug Cake For Two People Recipe
Craving chocolate but short on time? This rich, gooey microwave brownie mug cake recipe is designed perfectly for two people. Ready in under 10 minutes, it uses simple pantry staples to create a warm, fudgy dessert that rivals any bakery treat without the hassle of a full batch.
5 minutes
2 minutes
7 minutes
2 servings
Dessert
Microwave
American
Vegetarian
There is a universal truth known to anyone with a sweet tooth: the craving for chocolate often strikes at the most inconvenient times. Usually, it is late at night, long after the local bakery has closed, and the prospect of preheating the oven to bake an entire tray of brownies feels like an insurmountable task. Enter the microwave brownie mug cake—a revolutionary concept in the world of home baking that bridges the gap between instant gratification and gourmet dessert. This specific recipe for a Quick Microwave Brownie Mug Cake For Two People is not just a hasty alternative to the real thing; it is a meticulously tested formula designed to deliver a texture that is impossibly fudgy, dense, and rich, avoiding the rubbery pitfalls that often plague microwave desserts.
What sets this recipe apart is its focus on the ‘shareable’ aspect. Most mug cake recipes are designed for a solitary indulgence, but food is often best enjoyed with company. Whether you are looking for a quick date-night dessert, a treat for a sleepover, or simply a way to manage portion control while satisfying a intense chocolate longing, this recipe is your answer. We have dialed in the ratios of fat to flour to ensure that the result is closer to a molten lava cake than a dry sponge. The addition of chocolate chips is non-negotiable here; as they melt during the short cooking burst, they create pockets of liquid gold that make every bite luxurious. Prepare to have your expectations of microwave cooking completely shattered as you dive into a warm, comforting mug of chocolate perfection that tastes like it took hours to prepare, yet was whipped up during a commercial break.
History & Origins
The history of this dessert is a fascinating convergence of two distinct timelines: the invention of the brownie and the rise of microwave technology. The brownie itself traces its roots back to 1893 in Chicago. Legend has it that Bertha Palmer, a prominent socialite and wife of the owner of the Palmer House Hotel, requested a dessert for the World’s Columbian Exposition. She wanted a confection smaller than a cake but more substantial than a cookie, something that could be easily eaten from a boxed lunch. The result was a dense, fudgy square made with walnuts and an apricot glaze—the ancestor of the modern brownie. The term ‘brownie’ eventually appeared in the 1896 Boston Cooking-School Cook Book, though that recipe was molasses-based.
Fast forward to 1945, when Percy Spencer, an engineer at Raytheon, accidentally melted a candy bar in his pocket while working on active radar sets, leading to the invention of the microwave oven. However, it wasn’t until the late 20th and early 21st centuries that these two histories truly intersected in the culinary world. As microwaves became a standard kitchen appliance, adventurous home cooks began experimenting with ‘single-serving’ baking. The ‘mug cake’ trend exploded with the advent of the internet and social media platforms like Pinterest in the late 2000s. Bloggers and food enthusiasts sought to crack the code of baking without an oven, creating a viral phenomenon. This recipe honors that modern tradition, refining the rough experiments of the early internet age into a sophisticated, reliable dessert that pays homage to Bertha Palmer’s original desire for a convenient, decadent treat.
Why This Recipe Works
Microwave baking is fundamentally different from oven baking, and understanding this science is why this specific recipe succeeds where others fail. In an oven, heat surrounds the food and cooks from the outside in, allowing for caramelization and a slow rise. A microwave, however, uses electromagnetic radiation to excite water molecules within the food, generating heat internally and cooking the item very rapidly via steam. Because of this, traditional cake batters often turn rubbery or tough in the microwave due to the rapid coagulation of egg proteins and gluten development.
This recipe eliminates the egg entirely. By doing so, we remove the risk of that rubbery, omelet-like texture. Instead, we rely on a higher ratio of fat (butter) and sugar to flour. The melted butter coats the flour particles, inhibiting gluten formation and ensuring the result is tender and fudgy rather than chewy. Furthermore, we use a specific amount of liquid to ensure the batter remains loose enough to steam properly without drying out. The cooking time is also critical; we utilize the ‘carryover cooking’ principle. By stopping the microwave while the center still looks slightly underdone, the residual heat finishes the cooking process as you let it cool for a minute, resulting in that perfect, gooey, brownie-batter consistency that makes this dessert so addictive.
Why You’ll Love This Recipe
- ✓Ready in under 10 minutes from start to finish
- ✓No eggs required, ensuring a fudgy rather than rubbery texture
- ✓Perfectly portioned for two people to prevent food waste
- ✓Uses standard pantry staples you likely already have
- ✓Highly customizable with nuts, swirls, or different chocolate chips
- ✓Minimal cleanup required—mix and bake in the same vessel
Equipment You’ll Need
- ✓2 Microwave-safe mugs (approx 10-12 oz capacity)
- ✓Measuring spoons
- ✓Small mixing bowl (optional, if mixing before dividing)
- ✓Spoon or small whisk
Ingredients
- ✓4 tablespoons All-purpose flour
- ✓4 tablespoons Granulated sugar
- ✓2 tablespoons Unsweetened cocoa powder (Dutch-process preferred)
- ✓1/8 teaspoon Salt
- ✓2 tablespoons Unsalted butter, melted
- ✓4 tablespoons Milk (Whole milk works best)
- ✓1/4 teaspoon Vanilla extract
- ✓2 tablespoons Semi-sweet chocolate chips (plus extra for topping)
Instructions
- Gather your ingredients and two microwave-safe mugs. Ensure the mugs are large enough to prevent overflow; standard 10-12 ounce coffee mugs work best.
- In a small mixing bowl, whisk together the dry ingredients: 4 tablespoons flour, 4 tablespoons sugar, 2 tablespoons cocoa powder, and 1/8 teaspoon salt. Whisking ensures there are no clumps of cocoa powder.
- Pour in the wet ingredients: 2 tablespoons melted butter, 4 tablespoons milk, and 1/4 teaspoon vanilla extract.
- Stir the mixture vigorously until the batter is smooth and glossy. Ensure you scrape the bottom of the bowl to incorporate all the flour.
- Fold in 2 tablespoons of chocolate chips. Do not overmix at this stage.
- Divide the batter evenly between the two mugs. If you prefer, you can mix the ingredients directly inside each mug (halving the measurements for each) to save on cleanup, but mixing in a bowl first ensures consistent flavor.
- Place both mugs in the microwave on opposite sides of the turntable. This helps them cook evenly.
- Microwave on high for 60 seconds. Check the texture. The top should look set but slightly moist. If it looks too wet, continue microwaving in 15-second intervals. Total time usually ranges between 60 to 90 seconds depending on microwave wattage (based on 1000W).
- Remove carefully from the microwave—the mugs will be hot! Let them stand for 1-2 minutes to cool slightly and finish setting.
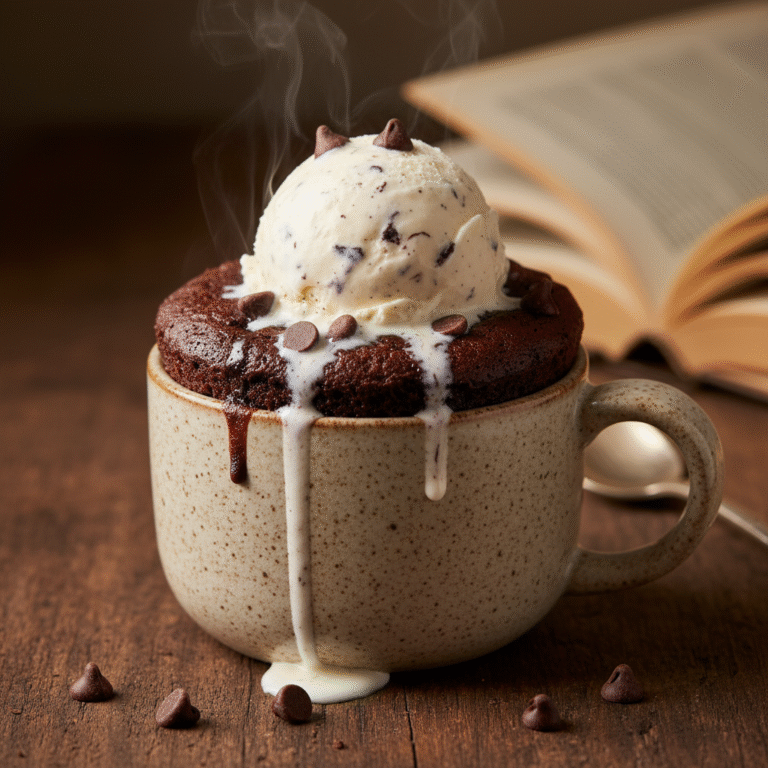
- Top with extra chocolate chips, whipped cream, or ice cream and serve warm.
Expert Cooking Tips
- ✓Do not overcook! The brownie will continue to firm up as it cools. It is better to undercook slightly for a fudgy texture than to overcook and get a dry puck.
- ✓Use Dutch-process cocoa powder for a deeper, darker chocolate flavor and a less acidic taste.
- ✓If your microwave has hot spots, cook one mug at a time to ensure perfect doneness.
- ✓Grease the inside of the mugs with a tiny bit of butter or cooking spray for easier cleanup.
- ✓Make sure your baking powder (if you choose to add a pinch for cakey texture) is fresh, though this recipe relies on density so leavening is optional.
- ✓Use a wide mug rather than a tall, narrow one to allow for more even cooking.
Substitutions and Variations
This recipe is incredibly versatile and can be adapted to suit various dietary needs and pantry limitations. For a gluten-free version, simply swap the all-purpose flour for a high-quality 1:1 gluten-free baking flour blend; the texture remains surprisingly similar. If you are dairy-free or vegan, substitute the butter for melted coconut oil or a neutral vegetable oil, and use almond milk, soy milk, or oat milk instead of cow’s milk. You can also use dairy-free chocolate chips. For the sweetener, brown sugar can be used instead of granulated sugar to add a deeper molasses flavor and extra moisture. If you want to reduce the refined sugar, coconut sugar is a viable alternative, though it may slightly alter the flavor profile. You can also swap the semi-sweet chocolate chips for white chocolate, peanut butter chips, or even chopped nuts like walnuts or pecans for added crunch.
Common Mistakes to Avoid
The most common mistake with mug cakes is overcooking. Because microwaves vary wildly in power, following the time exactly can sometimes lead to disaster. Always start with the minimum time and check; the difference between a gooey brownie and a dry brick is often just 15 seconds. Another mistake is using a mug that is too small. The batter rises rapidly as it steams, and a small mug will result in a messy overflow on your microwave turntable. Using a narrow, tall mug can also lead to the bottom being uncooked while the top is rubbery. Finally, failing to mix the dry ingredients thoroughly before adding the wet ones can result in pockets of dry flour or bitter cocoa powder in your final bite. Take the extra 30 seconds to whisk the dry goods properly.
Serving Suggestions
While delicious on its own, this mug brownie shines when dressed up. The classic pairing is a scoop of vanilla bean ice cream placed right on top of the hot brownie, allowing it to melt into a crème anglaise-like sauce. Alternatively, a dollop of sweetened whipped cream and a dusting of cocoa powder adds a touch of elegance. For fruit lovers, fresh raspberries or sliced strawberries cut through the richness of the chocolate perfectly. If you are feeling particularly indulgent, drizzle salted caramel sauce or warm peanut butter over the top before serving. A glass of cold milk or a hot espresso is the perfect beverage accompaniment.
Storage and Reheating Tips
Mug cakes are best enjoyed immediately while they are still warm. The texture tends to degrade as they cool completely, becoming tougher. However, if you cannot finish it, you can cover the mug tightly with plastic wrap and store it in the refrigerator for up to 24 hours. To eat, reheat it in the microwave for 15-20 seconds to restore some of the softness and melt the chocolate chips again. Freezing is not recommended for this recipe as the texture does not hold up well upon thawing and reheating.
Nutrition Facts (Estimated)
| Serving Size | 1 mug cake |
| Calories | 380 |
| Fat | 18g |
| Saturated Fat | 11g |
| Unsaturated Fat | 6g |
| Trans Fat | 0g |
| Cholesterol | 30mg |
| Sodium | 150mg |
| Carbohydrates | 48g |
| Fiber | 3g |
| Sugar | 28g |
| Protein | 5g |
Frequently Asked Questions
Can I make this in a bowl instead of a mug?
Absolutely. A small microwave-safe bowl or ramekin works perfectly and often cooks more evenly due to the wider surface area.
Why is my mug cake rubbery?
A rubbery texture usually comes from overcooking or overmixing the batter which develops the gluten. It can also happen if you add an egg to a small batch recipe like this.
Can I double this recipe?
Yes, you can double the ingredients to make four servings, but you should still cook them in separate mugs or in batches to ensure even cooking.
Can I use water instead of milk?
You can, but the result will be less rich and flavorful. Milk adds fat and sugar which contribute to the tenderness.
Do I need to add baking powder?
This recipe is designed to be a dense, fudgy brownie, so baking powder is not included. If you prefer a cake-like texture, add 1/4 teaspoon of baking powder.
Is it safe to eat if it looks undercooked?
Since this recipe contains no eggs, it is safe to eat slightly undercooked, provided your flour hasn’t been recalled for raw consumption issues (you can heat treat flour if worried).
What wattage microwave is this for?
This is based on a standard 1000-watt microwave. If yours is 700W, add 15-30 seconds. If 1200W, reduce time by 10-15 seconds.
Can I use self-rising flour?
If you use self-rising flour, omit the salt. The result will be more cake-like and airy rather than fudgy.
Why did my brownie explode over the mug?
The mug was likely too small or the batter was filled too high. The batter should only fill the mug about halfway to allow for rising.
Can I mix the batter ahead of time?
It is best to mix and cook immediately. The baking powder (if used) or the chemical reaction of the ingredients works best when fresh.
Conclusion
There you have it—the ultimate solution to your chocolate emergencies. This Quick Microwave Brownie Mug Cake For Two proves that you don’t need hours of time or a sink full of dirty dishes to create a high-quality, homemade dessert. It strikes the perfect balance between convenience and indulgence, making it a staple recipe for busy couples, roommates, or anyone who believes that chocolate is a necessary food group. Next time the craving hits, resist the urge to buy a stale candy bar and instead spend five minutes whipping up this warm, gooey delight. Your taste buds will thank you.